2016 MERCEDES-BENZ G-Class ESP
[x] Cancel search: ESPPage 243 of 302

Ruseinmountainous terrain or on poor road
surfaces
Rif the engine isoften left idling for long periods
Under these or similar conditions, have, for
example, the air filter, engine oil and oil filter
replaced or changed more frequently. Under
arduous operating conditions, the tires must be
checked more often. Further information can be
obtained at a qualified specialist workshop,e.g.
an authorized Mercedes-Benz Center.
Fuel/water separator
HEnvironmental note
Dispose of service products inan environ-
mentally responsible manner.
!Ifyou continue drivingwithout having the
fuel/water separator serviced, th iscould
cause damage to the engine. Any resulting
damage isnot covered bythe warranty.
If the fuel/water separator needs servicing, the
fol lowin g message appears inthe multifunction
displ ay:
Youwillalso hear a brief warning tone.
XVisit a qualified specialist workshop as soon
as possible.
Care
General notes
GWAR NING
Many cleaning products can behazardous.
So me are poisonous, others are flammable.
Alwa ys follow the instructions on the particu-
lar container. Always open your veh icle's
doors or windows when cleaning the ins ide.
Never use fluids or solvents that are not
designed for cleaning your veh icle.
Always lock away cleaning products and keep
them out of reach of children.
!For cleaning your vehicle, donot use any of
the following:
Rdry, rough or hard cloths
Rabrasive cleaning agents
Rsolvents
Rcleaning agents containing solvents
Do not scrub.
Do not touch the surfaces or protective films
wit h hard objects, e.g. a ring or ice scraper.
You could otherwise scratch or damage the
surfaces and protective film.
!Do not park the vehicle for an extended
period straight after cleaning it, particularly
after having cleaned the wheels with wheel
cleaner. Wheel cleaners could cause
increased corrosion of the brake discs and
brake pads/linings. For this reason, you
should drive for a few minutes after cleaning.
Braking heats the brake discs and the brake
pads/linings, thus drying them. The vehicle
can then beparked.
HEnvironmental note
Dispose of empty packaging and cleaning
cloths in an environmentally responsible man-
ner.
Regular care of your vehicle isa condition for
retaining the quality in the long term.
Use care products and cleaning agents recom-
mended and approved by Mercedes-Benz.
Exterior care
Automatic car wash
GWARNING
Braking efficiency is reduced after washing
the vehicle. There is a risk of an accident.
After the vehicle has been washed, brake
carefully while paying attention to the traffic
conditions until full braking power is restored.
!Never clean your vehicle ina Touchless
Automat icCar Wash as these use special
Care241
Maintenance and care
Z
Page 247 of 302

Impurities combined with the effects of road grit
and corrosive environmental factors may causeflash rust to form on the surface. You can
restore the original shine of the chrome parts by
cleaning them regularly, especially in winter and
after washing.
XClean the chrome parts with a chrome care
product tested and approved by Mercedes-
Benz.
Cleaning the trailer coupling
HEnvironmental note
Dispose of rags soaked in oil and grease in an
environmentally responsible manner.
!Do not clean the ball coupling with a power
washer. Do not use solvents.
!Please note the care instructions in the
trailer coupling manufacturer's operating
instructions.
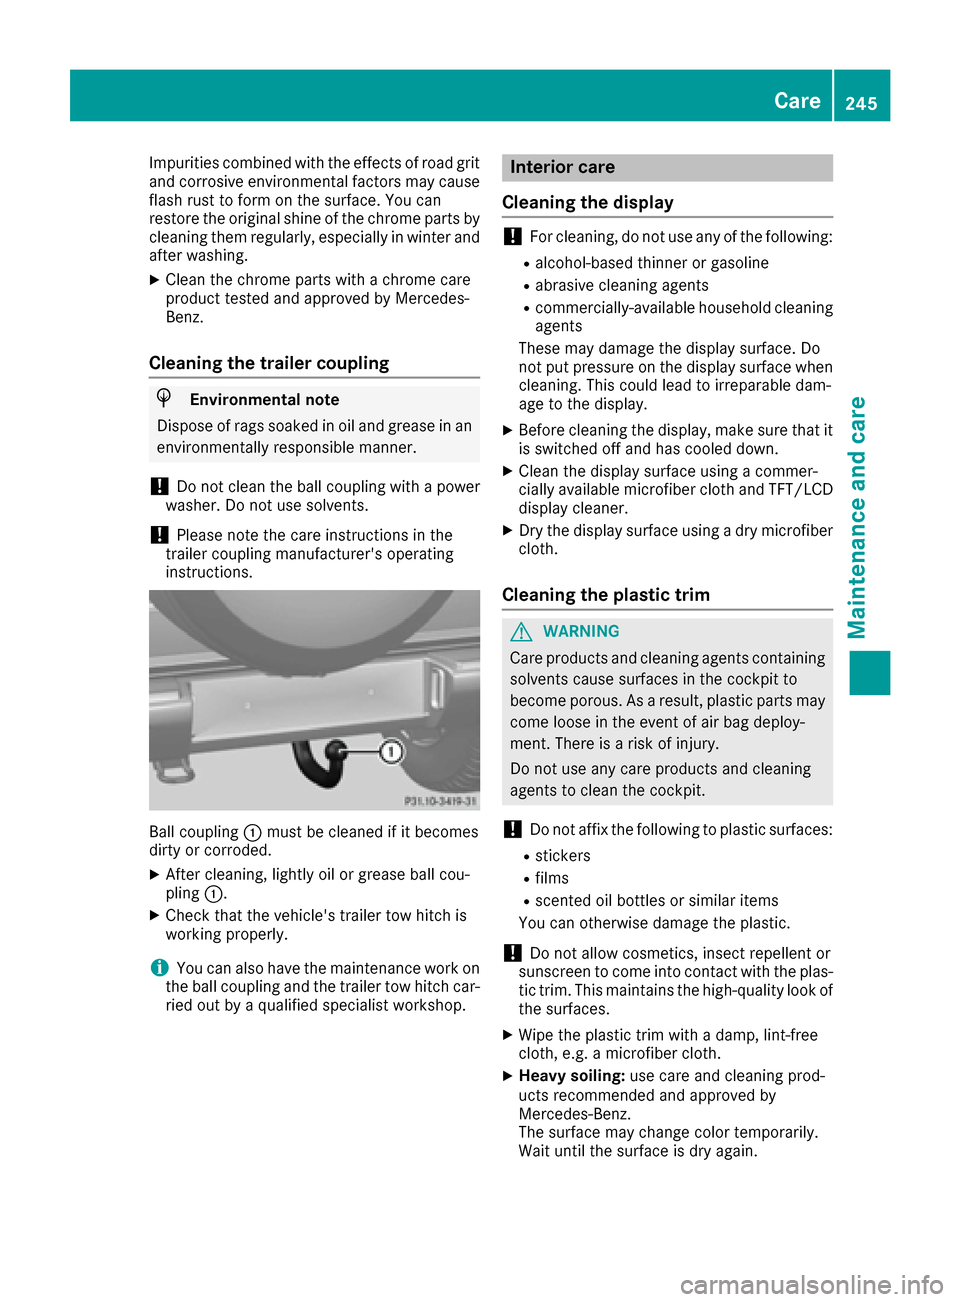
Ball coupling :must be cleaned if it becomes
dirty or corroded.
XAfter cleaning, lightly oil or grease ball cou-
pling :.
XCheck that the vehicle's trailer tow hitch is
working properly.
iYou can also have the maintenance work on
the ball coupling and the trailer tow hitch car-
ried out by a qualified specialist workshop.
Interior care
Cleaning the display
!For cleaning, do not use any of the following:
Ralcohol-based thinner or gasoline
Rabrasive cleaning agents
Rcommercially-available household cleaning
agents
These may damage the display surface. Do
not put pressure on the display surface when cleaning. This could lead to irreparable dam-
age to the display.
XBefore cleaning the display, make sure that it
is switched off and has cooled down.
XClean the display surface using a commer-
cially available microfiber cloth and TFT/LCD
display cleaner.
XDry the display surface using a dry microfiber
cloth.
Cleaning the plastic trim
GWARNING
Care products and cleaning agents containing solvents cause surfaces in the cockpit to
become porous. As a result, plastic parts may
come loose in the event of air bag deploy-
ment. There is a risk of injury.
Do not use any care products and cleaning
agents to clean the cockpit.
!Do not affix the following to plastic surfaces:
Rstickers
Rfilms
Rscented oil bottles or similar items
You can otherwise damage the plastic.
!Do not allow cosmetics, insect repellent or
sunscreen to come into contact with the plas-
tic trim. This maintains the high-quality look of
the surfaces.
XWipe the plastic trim with a damp, lint-free
cloth, e.g. a microfiber cloth.
XHeavy soiling: use care and cleaning prod-
ucts recommended and approved by
Mercedes-Benz.
The surface may change color temporarily.
Wait until the surface is dry again.
Care245
Maintenance and care
Z
Page 251 of 302

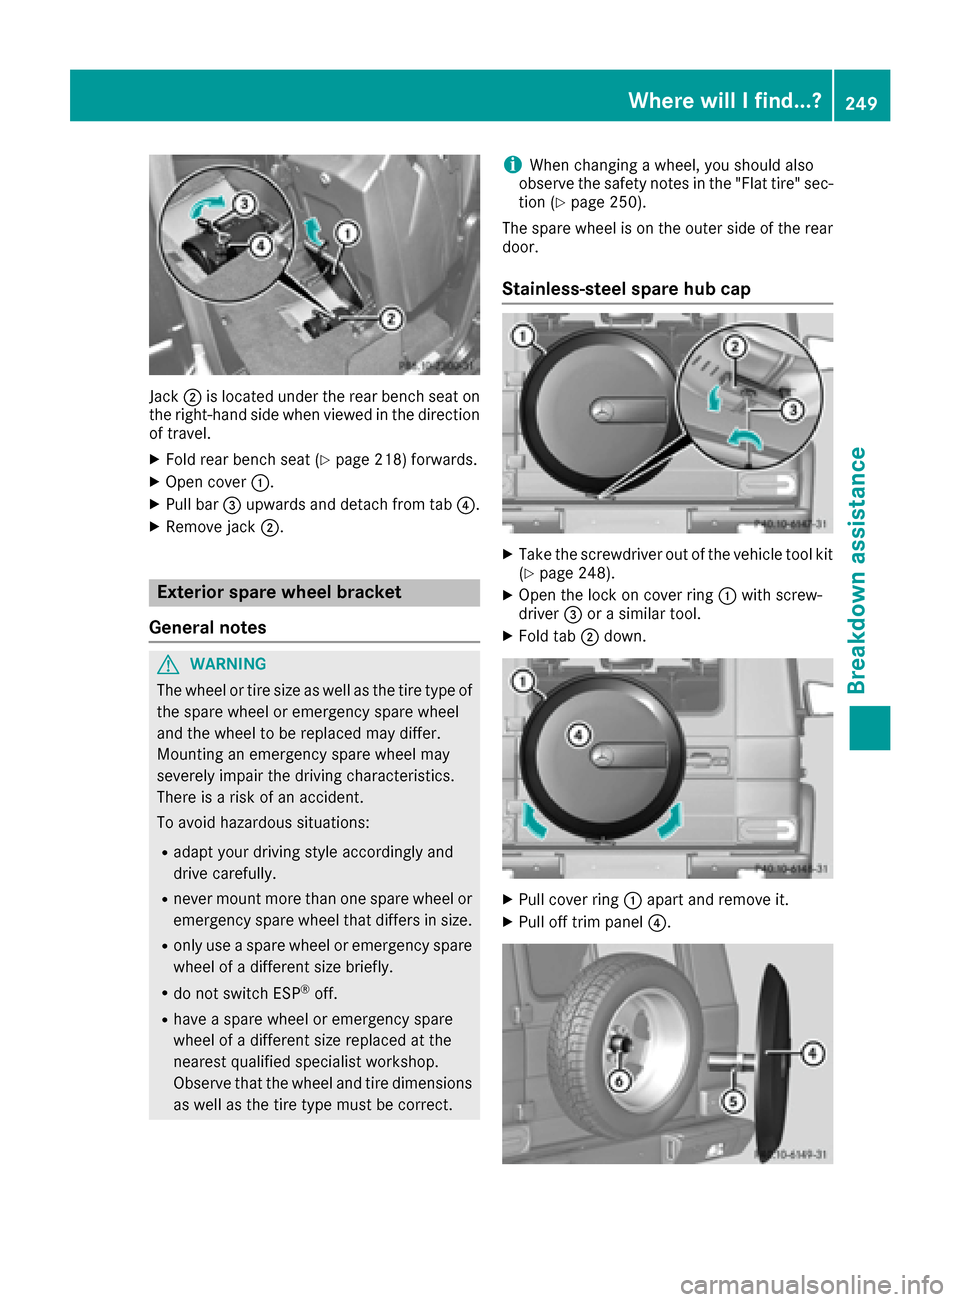
Jack;is located under the rear bench seat on
the right-hand side when viewed in the direction
of travel.
XFold rear bench seat (Ypage 218) forwards.
XOpen cover :.
XPull bar=upwards and detach from tab ?.
XRemove jack;.
Exterior spare wheel bracket
General notes
GWARNING
The wheel or tire size as well as the tire type of the spare wheel or emergency spare wheel
and the wheel to be replaced may differ.
Mounting an emergency spare wheel may
severely impair the driving characteristics.
There is a risk of an accident.
To avoid hazardous situations:
Radapt your driving style accordingly and
drive carefully.
Rnever mount more than one spare wheel or
emergency spare wheel that differs in size.
Ronly use a spare wheel or emergency spare
wheel of a different size briefly.
Rdo not switch ESP®off.
Rhave a spare wheel or emergency spare
wheel of a different size replaced at the
nearest qualified specialist workshop.
Observe that the wheel and tire dimensions
as well as the tire type must be correct.
iWhen changing a wheel, you should also
observe the safety notes in the "Flat tire" sec-
tion (
Ypage 250).
The spare wheel is on the outer side of the rear
door.
Stainless-steel spare hub cap
XTake the screwdriver out of the vehicle tool kit
(Ypage 248).
XOpen the lock on cover ring :with screw-
driver =or a similar tool.
XFold tab ;down.
XPull cover ring :apart and remove it.
XPull off trim panel ?.
Where will I find...?249
Breakdown assistance
Z
Page 252 of 302

iWhen re-installing trim panel?, make sure
that retainer Aengages in recess B.
Removing the spare wheel
The spare wheel is heavy. Take particular note of
this when removing the spare wheel.
XRemove wheel nuts :.
XRemove the spare wheel.
Mounting the wheel
After changing a wheel:
XRepair or replace the damaged wheel as soon
as possible and secure the spare wheel in
place again.
XSecure the damaged wheel on the spare
wheel bracket with wheel nuts :. When
doing so, make sure that the wheel cannot
come loose.
XWhen re-installing trim panel ?, make sure
that retainer Bengages in recess A
(
Ypage 249).
XMake sure that tab ;is below when re-
installing cover ring :(Ypage 249).
XFor safety reasons, regularly check to ensure
that the wheel is securely fastened.
Flat tire
Preparing the vehicle
XStop the vehicle on solid, non-slippery and
level ground, as far away as possible from
traffic.
XSwitch on the hazard warning lamps
(Ypage 89).
XApply the parking brake.
XBring the front wheels into the straight-ahead
position.
XMove the selector lever to position P.
XSwitch off the engine.
XRemove the SmartKey from the ignition lock.
The steering wheel lock stays active for as
long as the SmartKey is removed.
XAll occupants must get out of the vehicle.
Make sure that they are not endangered as
they do so.
XMake sure that no one is near the danger area
while a wheel is being changed. Anyone who
is not directly assisting in the wheel change
should, for example, stand behind the barrier.
XGet out of the vehicle. Pay attention to traffic
conditions when doing so.
XClose the driver's door.
Battery (vehicle)
Important safety notes
Special tools and expert knowledge are required
when working on the battery, e.g. removal and
installation. You should therefore have all work
involving the battery carried out at a qualified
specialist workshop.
GWARNING
Work carried out incorrectly on the battery
can lead, for example, to a short circuit and
thus damage the vehicle electronics. This can
lead to function restrictions applying to
safety-relevant systems, e.g the lighting sys-
tem, the ABS (anti-lock braking system) or the
ESP
®(Electronic Stability Program). The oper-
ating safety of your vehicle may be restricted.
You could lose control of the vehicle, for
example:
Rwhen braking
Rin the event of abrupt steering maneuvers
and/or when the vehicle's speed is not
adapted to the road conditions
There is a risk of an accident.
In the event of a short circuit or a similar inci-
dent, contact a qualified specialist workshop
immediately. Do not drive any further. You
250Battery (vehicle)
Breakdown assistance
Page 253 of 302

should have all work involving the battery car-ried out at a qualified specialist workshop.
If ABS malfunctions, the wheels can lock during braking. This limits the steerability of the vehicle
when braking and may increase the braking dis-
tance.
If ESP
®malfunctions, the vehicle will not be sta-
bilized if it starts to skid or a wheel starts to spin.
iFor further information about ABS and
ESP®, see (Ypage 55) and (Ypage 57).
GWARNING
During the charging process, a battery produ-
ces hydrogen gas. If a short circuit occurs or
sparks are created, the hydrogen gas can
ignite. There is a risk of an explosion.
RMake sure that the positive terminal of a
connected battery does not come into con- tact with vehicle parts.
RNever place metal objects or tools on a bat-
tery.
RIt is important that you observe the descri-
bed order of the battery terminals when
connecting and disconnecting a battery.
RWhen jump-starting, make sure that the
battery poles with identical polarity are
connected.
RIt is particularly important to observe the
described order when connecting and dis-
connecting the jumper cables.
RNever connect or disconnect the battery
terminals while the engine is running.
GWARNING
Electrostatic build-up can lead to the creation of sparks, which could ignite the highly explo-
sive gases of a battery. There is a risk of an
explosion.
Before handling the battery, touch the vehicle
body to remove any existing electrostatic
build-up.
The highly flammable gas mixture forms when
charging the battery as well as when jump-start-
ing. Always make sure that neither you nor the bat-
tery is electrostatically charged. A build-up of
electrostatic charge can be caused, for exam-
ple:
Rby wearing clothing made from synthetic
fibers
Rdue to friction between clothing and seats
Rif you push or pull the battery across the car-
pet or other synthetic materials
Rif you wipe the battery with a cloth
GWARNING
Battery acid is caustic. There is a risk of injury.
Avoid contact with skin, eyes or clothing. Do
not inhale any battery gases. Do not lean over
the battery. Keep children away from batter-
ies. Wash away battery acid immediately with
plenty of clean water and seek medical atten-
tion.
!Have the battery checked regularly at a
qualified specialist workshop.
Observe the service intervals in the Mainte-
nance Booklet or contact a qualified specialist
workshop for more information.
!You should have all work involving the bat-
tery carried out at a qualified specialist work-
shop. In the exceptional case that it is neces-
sary for you to disconnect the battery your-
self, make sure that:
Ryou switch off the engine and remove the
SmartKey. Check that all the indicator
lamps in the instrument cluster are off.
Otherwise, electronic components, such as
the alternator, may be damaged.
Ryou first remove the negative terminal
clamp and then the positive terminal
clamp. Never swap the terminal clamps.
Otherwise, the vehicle's electronic system
may be damaged.
Ron vehicles with automatic transmission,
the transmission is locked in position P
after disconnecting the battery. The vehicle
is secured against rolling away. You can
then no longer move the vehicle.
The battery and the cover of the positive ter-
minal clamp must be installed securely during
operation.
Battery (vehicle)251
Breakdown assistance
Z
Page 260 of 302

Transporting the vehicle
4MATIC vehicles/vehicles with auto-
matic transmission
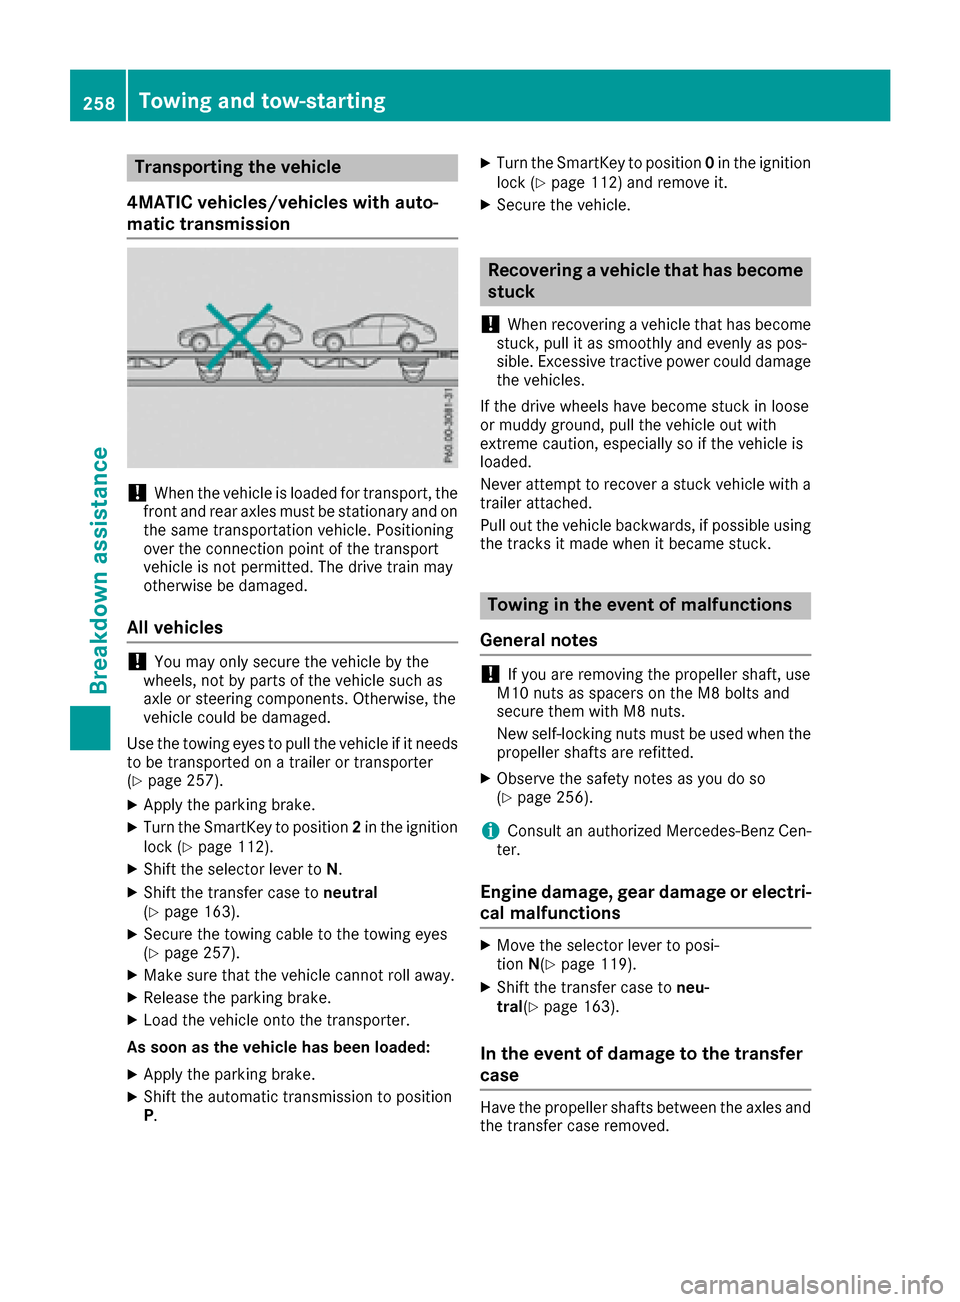
!When the vehicle is loaded for transport, the
front and rear axles must be stationary and on the same transportation vehicle. Positioning
over the connection point of the transport
vehicle is not permitted. The drive train may
otherwise be damaged.
All vehicles
!You may only secure the vehicle by the
wheels, not by parts of the vehicle such as
axle or steering components. Otherwise, the
vehicle could be damaged.
Use the towing eyes to pull the vehicle if it needs
to be transported on a trailer or transporter
(
Ypage 257).
XApply the parking brake.
XTurn the SmartKey to position 2in the ignition
lock (Ypage 112).
XShift the selector lever to N.
XShift the transfer case toneutral
(Ypage 163).
XSecure the towing cable to the towing eyes
(Ypage 257).
XMake sure that the vehicle cannot roll away.
XRelease the parking brake.
XLoad the vehicle onto the transporter.
As soon as the vehicle has been loaded:
XApply the parking brake.
XShift the automatic transmission to position
P .
XTurn the SmartKey to position 0in the ignition
lock (Ypage 112) and remove it.
XSecure the vehicle.
Recovering a vehicle that has become
stuck
!
When recovering a vehicle that has become
stuck, pull it as smoothly and evenly as pos-
sible. Excessive tractive power could damage
the vehicles.
If the drive wheels have become stuck in loose
or muddy ground, pull the vehicle out with
extreme caution, especially so if the vehicle is
loaded.
Never attempt to recover a stuck vehicle with a
trailer attached.
Pull out the vehicle backwards, if possible using the tracks it made when it became stuck.
Towing in the event of malfunctions
General notes
!If you are removing the propeller shaft, use
M10 nuts as spacers on the M8 bolts and
secure them with M8 nuts.
New self-locking nuts must be used when the
propeller shafts are refitted.
XObserve the safety notes as you do so
(Ypage 256).
iConsult an authorized Mercedes-Benz Cen-
ter.
Engine damage, gear damage or electri-
cal malfunctions
XMove the selector lever to posi-
tion N(Ypage 119).
XShift the transfer case to neu-
tral (Ypage 163).
In the event of damage to the transfer
case
Have the propeller shafts between the axles and
the transfer case removed.
258Towing and tow-starting
Breakdown assistance
Page 261 of 302

In the event of damage to the front axle
Haveth epropelle rshaf tbetween th erear axl e
and th etransfer cas eremoved.
Hav eth evehicl etowed wit hth efron taxl e
raised.
In the event of damage to the rear axle
Hav eth epropelle rshaf tbetween th efron taxl e
and th etransfer cas eremoved.
Hav eth evehicl etowed wit hth erear axl eraised
and wit hwhee lroller sunder th efron taxle.
Tow-starting (emergency engine
starting)
!
Vehicles wit hautomatic transmission must
no tbe tow-started. You could otherwise dam-
age th eautomatic transmission .
You can fin dinformation on "Jump-starting "
under (
Ypage 254).
Fuses
Important safety notes
GWARNIN G
If you manipulat eor bridge afault yfus eor if
you replace it wit h afusewit h a higher amper-
age, th eelectric cables could be overloaded.
This could result in afire. Ther eis aris kof an
acciden tand injury.
Always replace fault yfuses wit hth especifie d
ne wfuses having th ecorrec tamperage .
!Only use fuses that hav ebeen approve dfor
Mercedes-Ben zvehicles and whic hhave th e
correc tfus erating for th esystem concerned.
Otherwise, component sor systems could be
damaged.
The fuses in your vehicl eserve to close down
fault ycircuits. If afus eblows ,all th ecompo -
nent son th ecircuit and their function sstop
operating .
Blown fuses must be replace dwit hfuses of th e
sam erating ,whic hyou can recognize by th e
color and value .The fus erating sare listed in th e
fus eallocation chart .
iIfafus ehas blown ,contact abreakdown
servic eor an authorize dMercedes-Ben zCen -
ter.
If anewly inserted fus ealso blows ,hav eth e
caus etrace dand rectifie dat aqualified special-
ist workshop, e.g. an authorize dMercedes-Ben z
Center.
Before changing a fuse
XPark th evehicl eand apply th eparking brake.
XSwitc hoff all electrical consumers.
XRemove th eSmartKey from th eignition lock.
All indicator lamp sin th einstrumen tcluste r
must be off .
The fuses are locate din various fus eboxes:
RMain fus ebox on th edriver' sside of th edash -
boar d
RFusebox in th efront-passenger footwell
RFus ebox in th etransmission tunne l
RFusebox in th ebattery cas e
RFusebox in th ecargo compartmen t
The fus eallocation chart and th espar efuses are
in th emain fus ebox on th edashboar d
(
Ypage 259).
You will fin dth efus eremoval device in th evehi-
cle tool kit (
Ypage 248).
Dashboard fuse box
!
Do no tuse apointe dobjec tsuc has ascrew-
driver to open th ecover in th edashboard. You
could damag eth edashboar dor th ecover .
!Makesur ethat no moisture can ente rth e
fus ebox when th ecover is open .
!When closingth ecover ,mak esur ethat it is
lyin gcorrectl yon th efus ebox .Moistur eseep -
ing in or dirt could otherwise impair th eoper -
ation of th efuses.
Fuses259
Breakdown assistance
Z
Page 266 of 302

Winter operation
General notes
Have your vehicle winterproofed at a qualified
specialist workshop at the onset of winter.
Observe the notes in the "Changing a wheel"
section (
Ypage 281).
Driving with summer tires
At temperatures below 45 ‡ (+7 †), summer
tires lose elasticity and therefore traction and
braking power. Change the tires on your vehicle
to M+S tires. Using summer tires at very cold
temperatures could cause cracks to form,
thereby damaging the tires permanently.
Mercedes-Benz cannot accept responsibility for
this type of damage.
M+S tires
GWARNING
M+S tires with a tire tread depth of less than
ã in (4 mm) are not suitable for use in winter
and do not provide sufficient traction. There is
a risk of an accident.
M+S tires with a tread depth of less than ãin
(4 mm) must be replaced immediately.
GWARNING
Wheel and tire dimensions as well as the type of tire can vary between the spare wheel and
the wheel to be replaced. When the spare
wheel is mounted, driving characteristics may be severely affected. There is a risk of an acci-
dent.
In order to reduce risks:
Ryou should therefore adapt your driving
style and drive carefully.
Rnever mount more than one spare wheel
that differs from the wheel to be replaced.
Ronly use a spare wheel that differs from the
wheel to be replaced for a short time.
Rdo not deactivate ESP®.
Rhave a spare wheel that differs from the
wheel that has been changed replaced at
the nearest qualified specialist workshop.
You must observe the correct wheel and
tire dimensions as well as the wheel type.
Do not exceed a maximum speed of 50 mph
(80 km/h) if a spare wheel of a different size is
installed.
At temperatures below 45 ‡ (+7 †), use all-
season tires or winter tires. Both types of tire are
identified by the M+S marking.
Not all tires with the M+S marking provide the
driving characteristics of winter tires. In addition
to the M+S marking, winter tires also have the
i snowflake symbol on the tire wall. Tires
with this marking fulfill the requirements of the
Rubber Manufacturers Association (RMA) and
the Rubber Association of Canada (RAC) regard-
ing snow traction, and were specially developed
for driving on snow. Only these tires will allow
driving safety systems such as ABS and ESP
®to
function optimally in winter, since these tires
have been designed specifically for driving on
snow.
Use M+S tires of the same make and tread on all
wheels to maintain safe handling characteris-
tics.
Always observe the maximum permissible
speed specified for the M+S tires you have
mounted.
When you have mounted the M+S tires:
XCheck the tire pressures (Ypage 265).
XRestart the tire pressure monitor
(Ypage 270).
iYou can obtain information about winter
tires that have been approved by Mercedes-
Benz especially for your vehicle at any
Mercedes-Benz Service center.
iFor further information about tires, see
(Ypage 286).
Snow chains
GWARNING
If you drive too fast with snow chains moun-
ted, they may snap. As a result, you could
injure others and damage the vehicle. There is
a risk of an accident.
264Winter operation
Wheels and tires