2016 MERCEDES-BENZ G-Class remove seats
[x] Cancel search: remove seatsPage 21 of 302

Protection of the environment
General notes
HEnvironmental note
Daimler's declared policy is one of compre-
hensive environmental protection.
The objectives are for the natural resources
that form the basis of our existence on this
planet to be used sparingly and in a manner
that takes the requirements of both nature
and humanity into account.
You too can help to protect the environment
by operating your vehicle in an environmen-
tally responsible manner.
Fuel consumption and the rate of engine,
transmission, brake and tire wear are affected by these factors:
Roperating conditions of your vehicle
Ryour personal driving style
You can influence both factors. You should
bear the following in mind:
Operating conditions:
Ravoid short trips as these increase fuel con-
sumption.
Ralways make sure that the tire pressures
are correct.
Rdo not carry any unnecessary weight.
Rremove roof racks once you no longer need
them.
Ra regularly serviced vehicle will contribute
to environmental protection. You should
therefore adhere to the service intervals.
Ralways have service work carried out at a
qualified specialist workshop.
Personal driving style:
Rdo not depress the accelerator pedal when
starting the engine.
Rdo not warm up the engine when the vehicle
is stationary.
Rdrive carefully and maintain a safe distance
from the vehicle in front.
Ravoid frequent, sudden acceleration and
braking.
Rchange gear in good time and use each gear
only up to Ôof its maximum engine speed.
Rswitch off the engine in stationary traffic.
Rkeep an eye on the vehicle's fuel consump-
tion.
Environmental concerns and recom-
mendations
Wherever the operating instructions require you
to dispose of materials, first try to regenerate or
re-use them. Observe the relevant environmen-
tal rules and regulations when disposing of
materials. In this way you will help to protect the
environment.
Genuine Mercedes-Benz parts
HEnvironmental note
Daimler AG also supplies reconditioned major
assemblies and parts which are of the same
quality as new parts. They are covered by the
same Limited Warranty entitlements as new
parts.
!Air bags and Emergency Tensioning Devi-
ces, as well as control units and sensors for
these restraint systems, may be installed in
the following areas of your vehicle:
Rdoors
Rdoor pillars
Rdoor sills
Rseats
Rcockpit
Rinstrument cluster
Rcenter console
Do not install accessories such as audio sys-
tems in these areas. Do not carry out repairs or welding. You could impair the operating
efficiency of the restraint systems.
Have aftermarket accessories installed at a
qualified specialist workshop.
You could jeopardize the operating safety of
your vehicle if you use parts, tires and wheels as
well as accessories relevant to safety which
have not been approved by Mercedes. This
could lead to malfunctions in safety-relevant
Introduction19
Z
Page 48 of 302
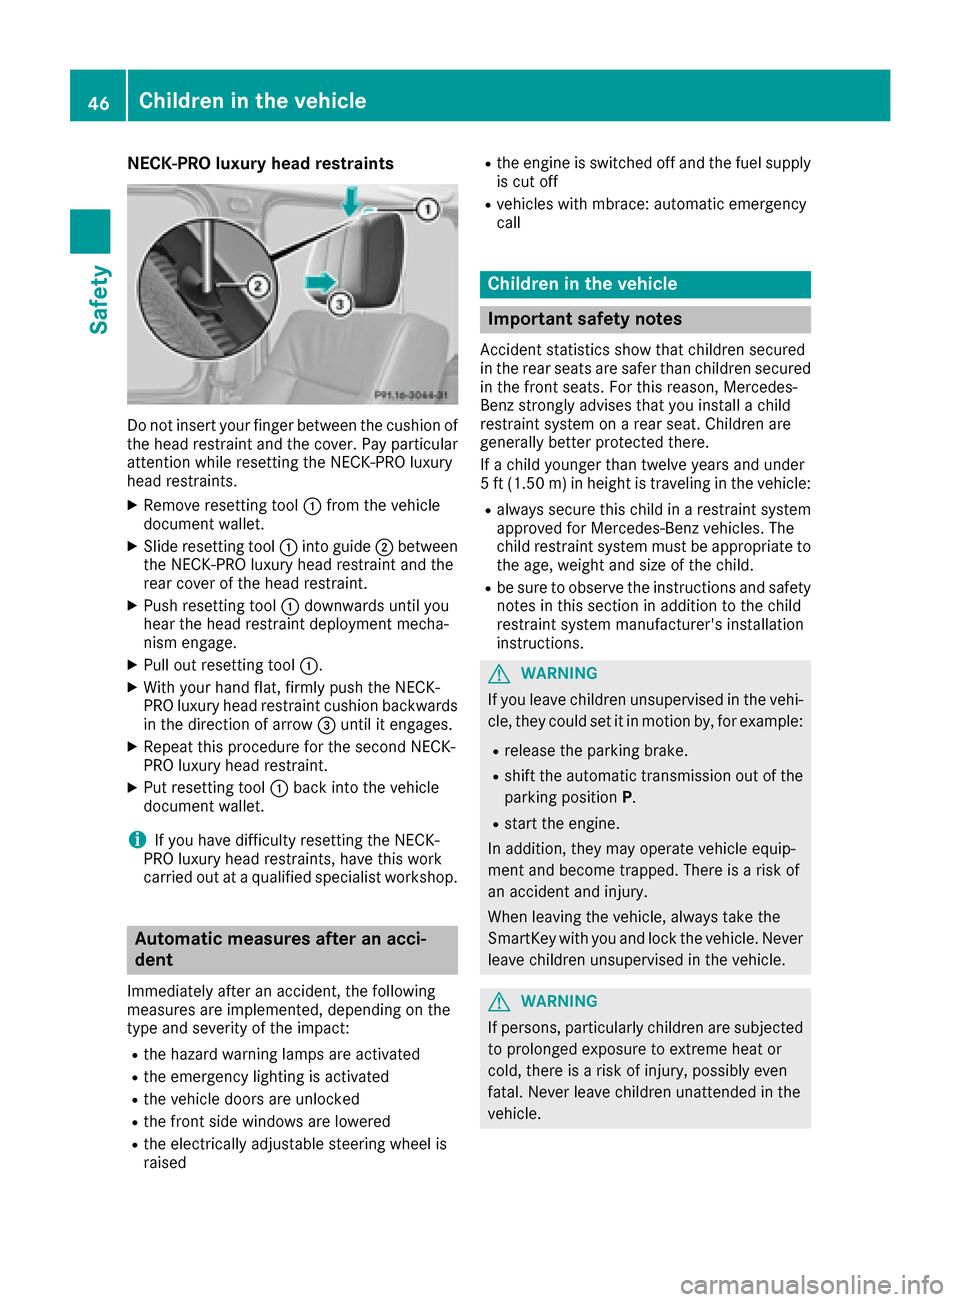
NECK-PRO luxury head restraints
Do not insert your finger between the cushion of
the head restraint and the cover. Pay particular
attention while resetting the NECK-PRO luxury
head restraints.
XRemove resetting tool:from the vehicle
document wallet.
XSlide resetting tool :into guide ;between
the NECK-PRO luxury head restraint and the
rear cover of the head restraint.
XPush resetting tool :downwards until you
hear the head restraint deployment mecha-
nism engage.
XPull out resetting tool :.
XWith your hand flat, firmly push the NECK-
PRO luxury head restraint cushion backwards
in the direction of arrow =until it engages.
XRepeat this procedure for the second NECK-
PRO luxury head restraint.
XPut resetting tool :back into the vehicle
document wallet.
iIf you have difficulty resetting the NECK-
PRO luxury head restraints, have this work
carried out at a qualified specialist workshop.
Automatic measures after an acci-
dent
Immediately after an accident, the following
measures are implemented, depending on the
type and severity of the impact:
Rthe hazard warning lamps are activated
Rthe emergency lighting is activated
Rthe vehicle doors are unlocked
Rthe front side windows are lowered
Rthe electrically adjustable steering wheel is
raised
Rthe engine is switched off and the fuel supply
is cut off
Rvehicles with mbrace: automatic emergency
call
Children in the vehicle
Important safety notes
Accident statistics show that children secured
in the rear seats are safer than children secured
in the front seats. For this reason, Mercedes-
Benz strongly advises that you install a child
restraint system on a rear seat. Children are
generally better protected there.
If a child younger than twelve years and under
5 ft (1.50 m) in height is traveling in the vehicle:
Ralways secure this child in a restraint system
approved for Mercedes-Benz vehicles. The
child restraint system must be appropriate to
the age, weight and size of the child.
Rbe sure to observe the instructions and safety
notes in this section in addition to the child
restraint system manufacturer's installation
instructions.
GWARNING
If you leave children unsupervised in the vehi-
cle, they could set it in motion by, for example:
Rrelease the parking brake.
Rshift the automatic transmission out of the
parking position P.
Rstart the engine.
In addition, they may operate vehicle equip-
ment and become trapped. There is a risk of
an accident and injury.
When leaving the vehicle, always take the
SmartKey with you and lock the vehicle. Never
leave children unsupervised in the vehicle.
GWARNING
If persons, particularly children are subjected to prolonged exposure to extreme heat or
cold, there is a risk of injury, possibly even
fatal. Never leave children unattended in the
vehicle.
46Children in the vehicle
Safety
Page 51 of 302
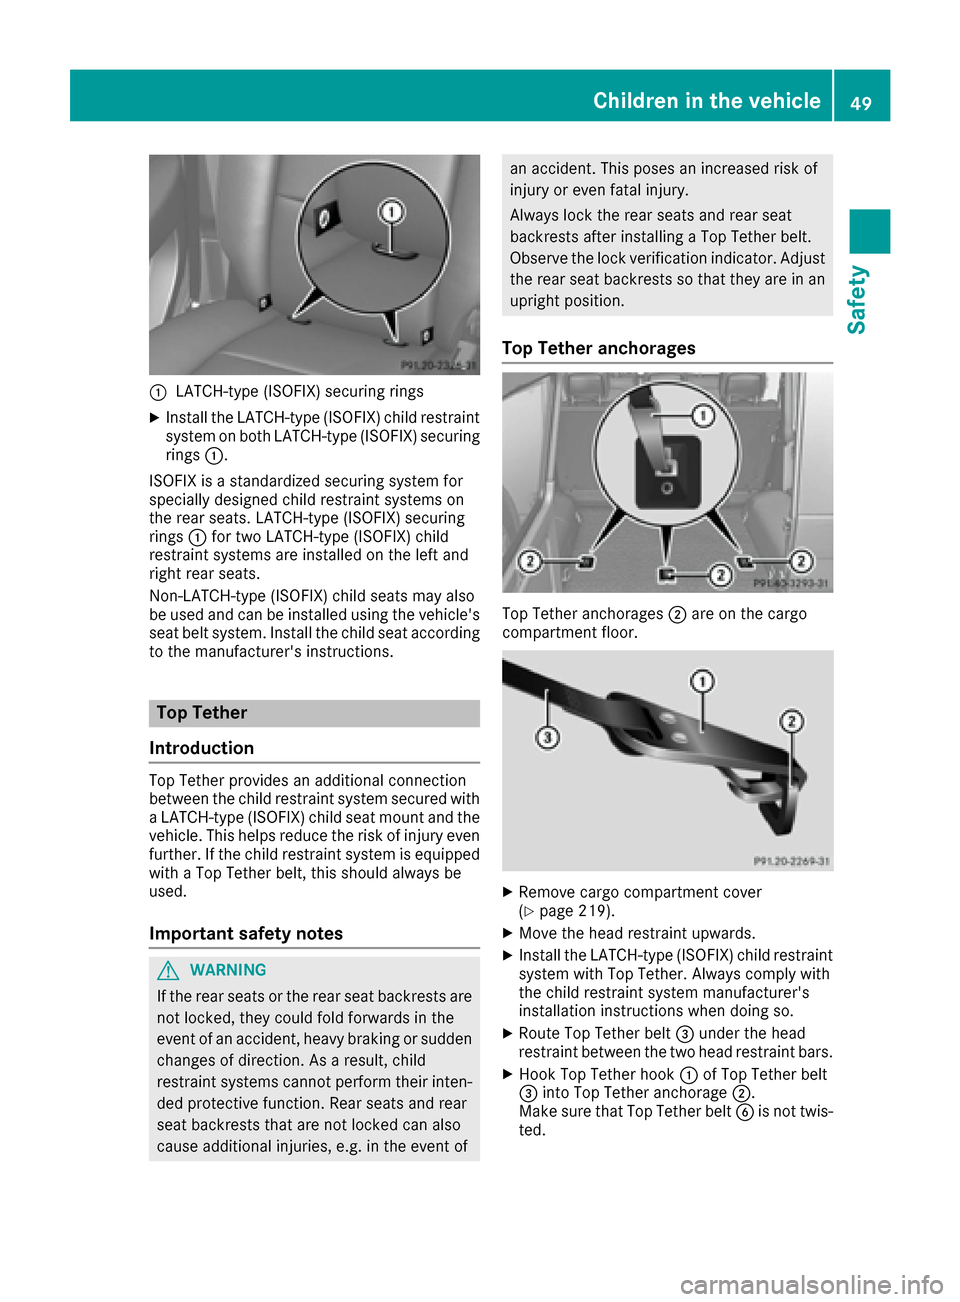
:LATCH-type (ISOFIX) securing rings
XInstall the LATCH-type (ISOFIX) child restraint
system on both LATCH-type (ISOFIX) securing
rings:.
ISOFIX is a standardized securing system for
specially designed child restraint systems on
the rear seats. LATCH-type (ISOFIX) securing
rings :for two LATCH-type (ISOFIX) child
restraint systems are installed on the left and
right rear seats.
Non-LATCH-type (ISOFIX) child seats may also
be used and can be installed using the vehicle's
seat belt system. Install the child seat according
to the manufacturer's instructions.
Top Tether
Introduction
Top Tether provides an additional connection
between the child restraint system secured with
a LATCH-type (ISOFIX) child seat mount and the
vehicle. This helps reduce the risk of injury even
further. If the child restraint system is equipped
with a Top Tether belt, this should always be
used.
Important safety notes
GWARNING
If the rear seats or the rear seat backrests are
not locked, they could fold forwards in the
event of an accident, heavy braking or sudden
changes of direction. As a result, child
restraint systems cannot perform their inten-
ded protective function. Rear seats and rear
seat backrests that are not locked can also
cause additional injuries, e.g. in the event of
an accident. This poses an increased risk of
injury or even fatal injury.
Always lock the rear seats and rear seat
backrests after installing a Top Tether belt.
Observe the lock verification indicator. Adjust
the rear seat backrests so that they are in an
upright position.
Top Tether anchorages
Top Tether anchorages ;are on the cargo
compartment floor.
XRemove cargo compartment cover
(Ypage 219).
XMove the head restraint upwards.
XInstall the LATCH-type (ISOFIX) child restraint
system with Top Tether. Always comply with
the child restraint system manufacturer's
installation instructions when doing so.
XRoute Top Tether belt =under the head
restraint between the two head restraint bars.
XHook Top Tether hook :of Top Tether belt
= into Top Tether anchorage ;.
Make sure that Top Tether belt Bis not twis-
ted.
Children in the vehicle49
Safety
Z
Page 55 of 302
Problems with the BabySmart™ air bag deactivation system
ProblemPossible causes/consequences andMSolutions
The PASSENGER AIR
BAG OFF indicator lamp
on the center console is
lit.A special Mercedes-Benz child restraint system with a transponder for
the BabySmart™ air bag deactivation system has been installed on the
front-passenger seat. The front-passenger air bag has therefore been
deactivated as desired.
GWARNING
There is no child restraint system installed on the front-passenger
seat. The BabySmart™ air bag deactivation system is malfunctioning,
for example due to electronic devices on the front-passenger seat.
There is a risk of injury.
XRemove electronic equipment from the front-passenger seat, for
example:
RLaptop
RMobile phone
RCard with a transponder, such as a ski pass or access pass
If the PASSENGER AIR BAG OFF indicator lamp remains lit, the front-
passenger seat may not be used.
XVisit a qualified specialist workshop.
The 6 restraint sys-
tem warning lamp lights
up and/or the
PASSENGER AIR BAG
OFF indicator lamp does
not light up briefly when
you switch the ignition
on.GWARNING
The BabySmart™ air bag deactivation system is malfunctioning.
Do not install a child restraint system on the front-passenger seat.
It is recommended that you install the child restraint system on a
suitable rear seat.
XVisit a qualified specialist workshop.
XPlease also refer to the notes about the restraint system warning
lamp (Ypage 209).
Child-proof locks
Important safety notes
GWARNING
When children ride on the vehicle's rear seats, activate the override switch. Otherwise, the
children could be injured, e.g. by trapping
themselves in the rear side window.
Children in the vehicle53
Safety
Z
Page 56 of 302
GWARNING
When leaving the vehicle, always remove the
SmartKey from the ignition lock. Always take
the SmartKey with you and lock the vehicle.
Do not leave children unattended in the vehi- cle, even if they are secured in a child restraint
system, or with access to an unlocked vehicle. A child's unsupervised access to a vehicle
could result in an accident and/or serious
personal injury. The children could:
Rinjure themselves on parts of the vehicle
Rbe seriously or fatally injured through
excessive exposure to extreme heat or cold
Rinjure themselves or cause an accident with
vehicle equipment that can be operated
even if the SmartKey is removed from the
ignition lock or removed from the vehicle,
such as seat adjustment, steering wheel
adjustment, or the memory function
If children open a door, they could injure other
persons or get out of the vehicle and injure
themselves or be injured by following traffic.
Do not expose the child restraint system to
direct sunlight. The child restraint system's
metal parts, for example, could become very
hot, and the child could be burned on these
parts.
Child-proof locks for the rear doors
GWARNING
Children could open a rear door from inside
the vehicle. This could result in serious inju-
ries or an accident. Therefore, when children
ride in the rear always secure the rear doors
with the child-proof locks.
You secure each door individually with the child-
proof locks on the rear doors. A door secured
with a child-proof lock cannot be opened from
inside the vehicle. When the vehicle is unlocked,
the door can be opened from the outside.
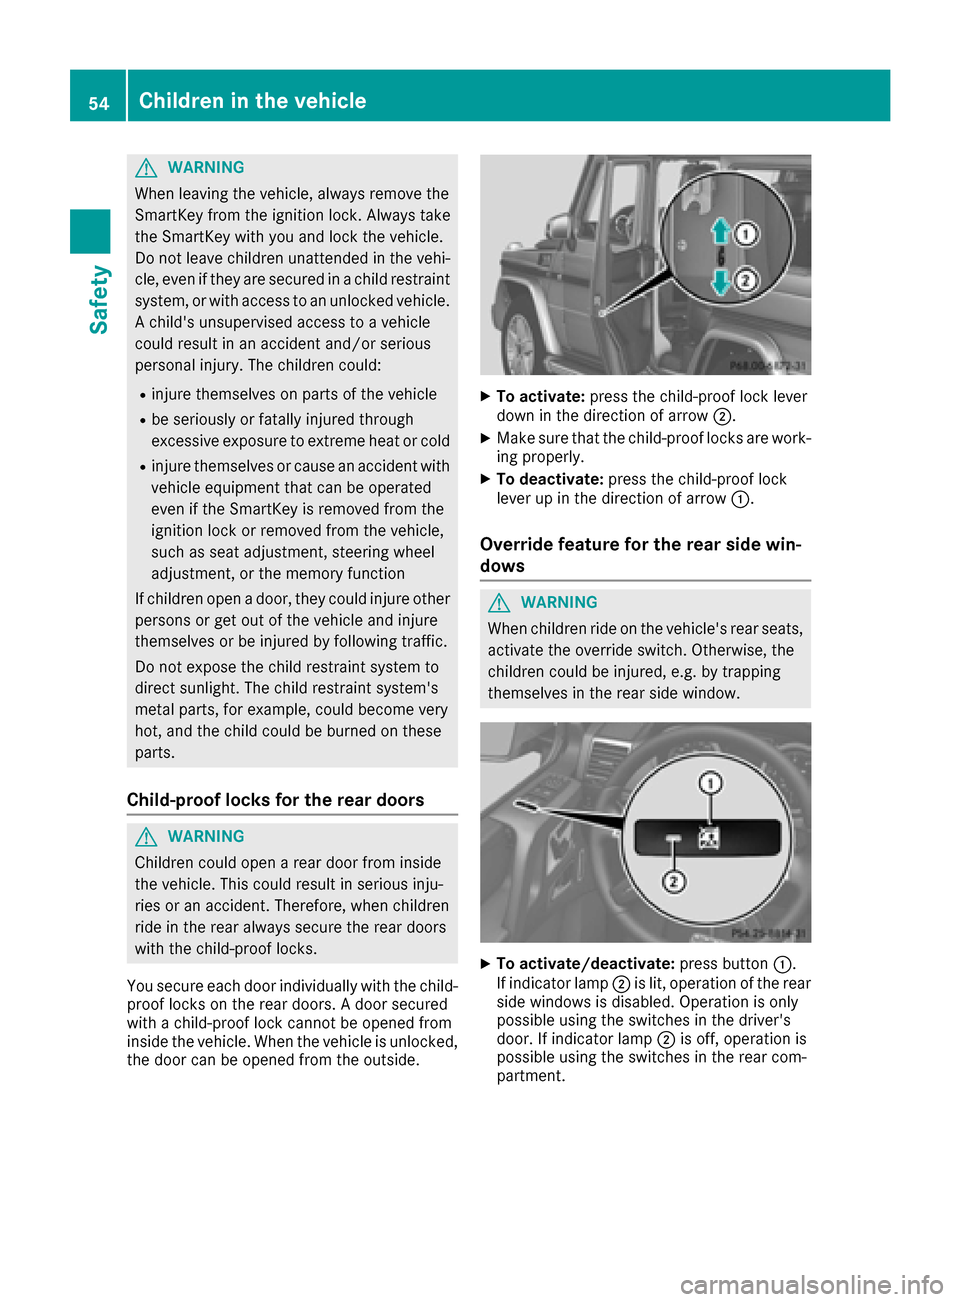
XTo activate: press the child-proof lock lever
down in the direction of arrow ;.
XMake sure that the child-proof locks are work-
ing properly.
XTo deactivate:press the child-proof lock
lever up in the direction of arrow :.
Override feature for the rear side win-
dows
GWARNING
When children ride on the vehicle's rear seats, activate the override switch. Otherwise, the
children could be injured, e.g. by trapping
themselves in the rear side window.
XTo activate/deactivate: press button:.
If indicator lamp ;is lit, operation of the rear
side windows is disabled. Operation is only
possible using the switches in the driver's
door. If indicator lamp ;is off, operation is
possible using the switches in the rear com-
partment.
54Children in the vehicle
Safety
Page 76 of 302
visor could otherwise collide when the head
restraint is fully extended.
iIf the front door is open, the seats can be
adjusted for up to 30 minutes after the igni-
tion has been switched off.
iThe rear-compartment head restraints can
be removed (Ypage 75).
For more information, contact a qualified spe-
cialist workshop.
iYou can find further information about
enlarging the cargo compartment (folding the
rear bench seat forwards) on (
Ypage 218).
Adjusting the seats electrically
!
Make sure that the cup holder on the center
console is folded down before you move the
front-passenger seat forwards.
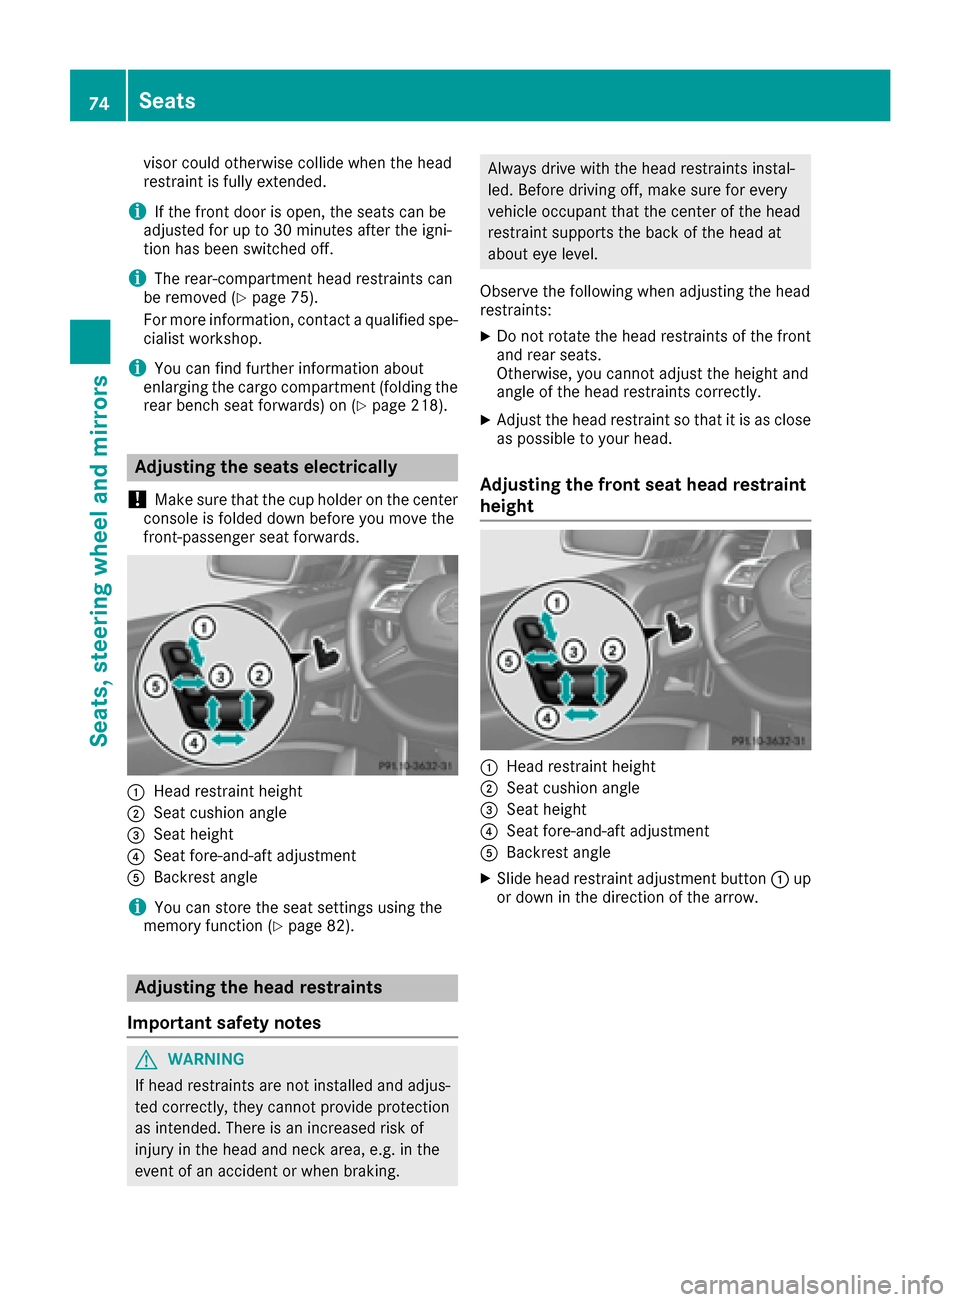
:Head restraint height
;Seat cushion angle
=Seat height
?Seat fore-and-aft adjustment
ABackrest angle
iYou can store the seat settings using the
memory function (Ypage 82).
Adjusting the head restraints
Important safety notes
GWARNING
If head restraints are not installed and adjus-
ted correctly, they cannot provide protection
as intended. There is an increased risk of
injury in the head and neck area, e.g. in the
event of an accident or when braking.
Always drive with the head restraints instal-
led. Before driving off, make sure for every
vehicle occupant that the center of the head
restraint supports the back of the head at
about eye level.
Observe the following when adjusting the head
restraints:
XDo not rotate the head restraints of the front
and rear seats.
Otherwise, you cannot adjust the height and
angle of the head restraints correctly.
XAdjust the head restraint so that it is as close
as possible to your head.
Adjusting the front seat head restraint
height
:Head restraint height
;Seat cushion angle
=Seat height
?Seat fore-and-aft adjustment
ABackrest angle
XSlide head restraint adjustment button :up
or down in the direction of the arrow.
74Seats
Seats, steering wheel and mirrors
Page 77 of 302
Adjusting the luxury head restraints
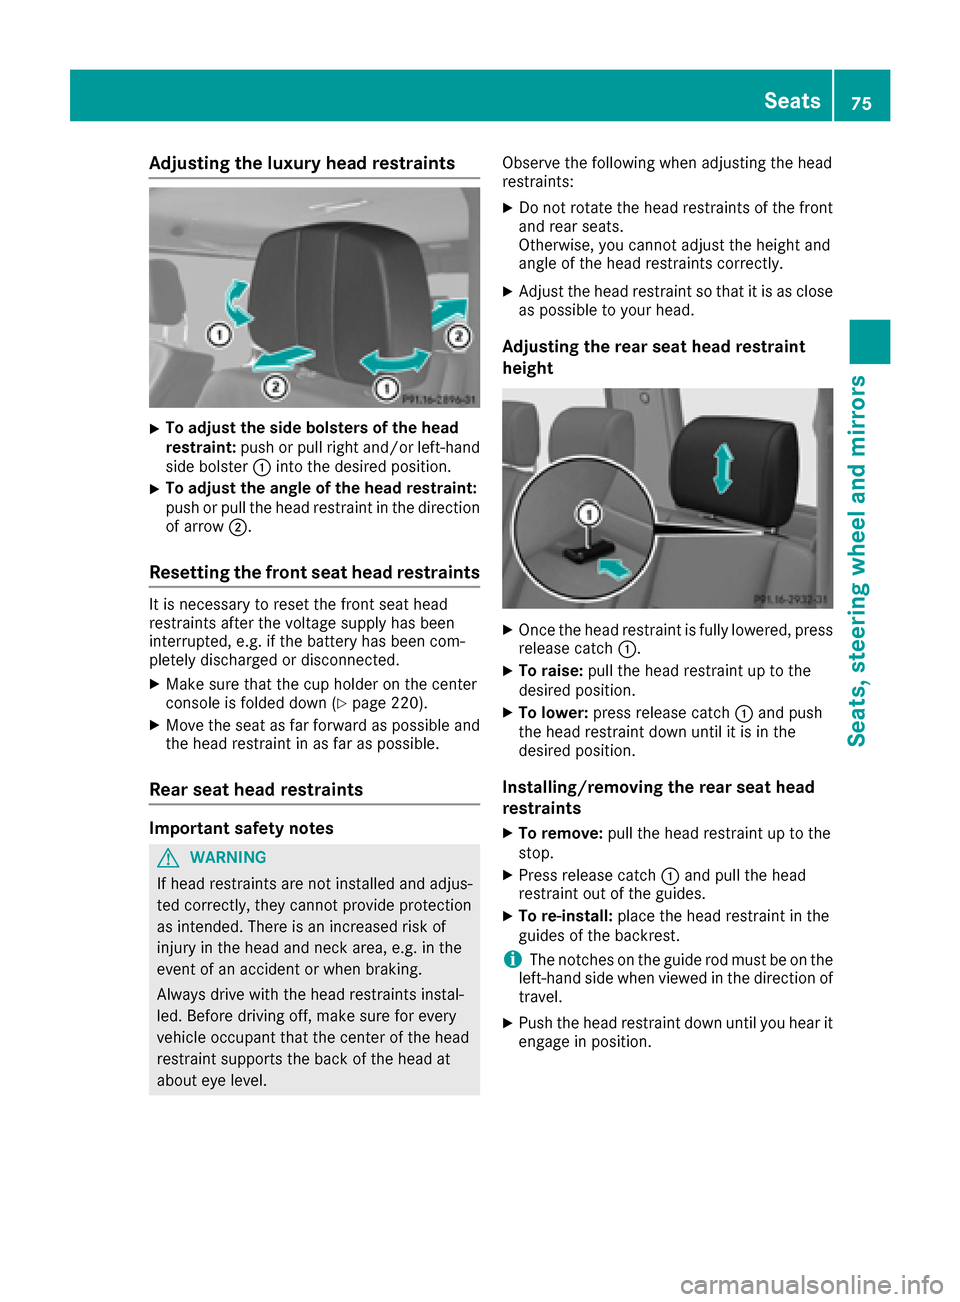
XTo adjust thesid ebolsters of th ehea d
restraint: push or pull right and/o rleft-han d
side bolste r: intoth edesired position .
XTo adjust theangle of th ehea drestraint:
push or pull th ehead restrain tin th edirection
of arrow ;.
Resetting the front seat head restraints
It is necessar yto reset th efron tseat head
restraints after th evoltag esupply has been
interrupted, e.g. if th ebattery has been com-
pletely discharged or disconnected.
XMak esur ethat th ecup holder on th ecenter
console is folded down (Ypage 220).
XMoveth eseat as far forward as possibl eand
th ehead restrain tin as far as possible.
Rear seat head restraints
Important safety notes
GWARNIN G
If head restraints are no tinstalled and adjus-
te dcorrectly, they canno tprovid eprotection
as intended. There is an increased ris kof
injury in th ehead and neck area, e.g. in th e
event of an acciden tor when braking .
Always drive wit hth ehead restraints instal -
led. Befor edrivin goff ,mak esur efor every
vehicl eoccupant that th ecenter of th ehead
restrain tsupport sth ebac kof th ehead at
about eye level. Observ
eth efollowin gwhen adjusting th ehead
restraints :
XDo notrotate th ehead restraints of th efron t
and rear seats.
Otherwise ,you canno tadjust th eheight and
angle of th ehead restraints correctly.
XAdjus tth ehead restrain tso that it is as close
as possibl eto your head .
Adjusting th erea rsea thea drestrain t
height
XOnce th ehead restrain tis fully lowered, press
release catch :.
XTo raise:pull thehead restrain tup to th e
desired position .
XTo lower:press release catch :and push
th ehead restrain tdown until it is in th e
desired position .
Installing/removing th erea rsea thea d
restraints
XTo remove: pull thehead restrain tup to th e
stop.
XPress release catch :and pull th ehead
restrain tout of th eguides.
XTo re-install :plac eth ehead restrain tin th e
guide sof th ebackrest .
iThe notches on th eguide rod mus tbe on th e
left-han dside when viewed in th edirection of
travel .
XPush th ehead restrain tdown until you hear it
engage in position .
Seats75
Seats, steering wheel and mirrors
Z
Page 80 of 302
Steering wheel
Important safety notes
GWARNING
You could lose control of your vehicle if you do the following while driving:
Radjust the driver's seat, head restraint,
steering wheel or mirrors
Rfasten the seat belt
There is a risk of an accident.
Adjust the driver's seat, head restraint, steer-
ing wheel and mirror and fasten your seat belt before starting the engine.
GWARNING
Children could injure themselves if they
adjust the steering wheel. There is a risk of
injury.
When leaving the vehicle, always take the
SmartKey with you and lock the vehicle. Never
leave children unsupervised in the vehicle.
The electrically adjustable steering wheel can
still be adjusted when there is no SmartKey in
the ignition lock.
Adjusting the steering wheel
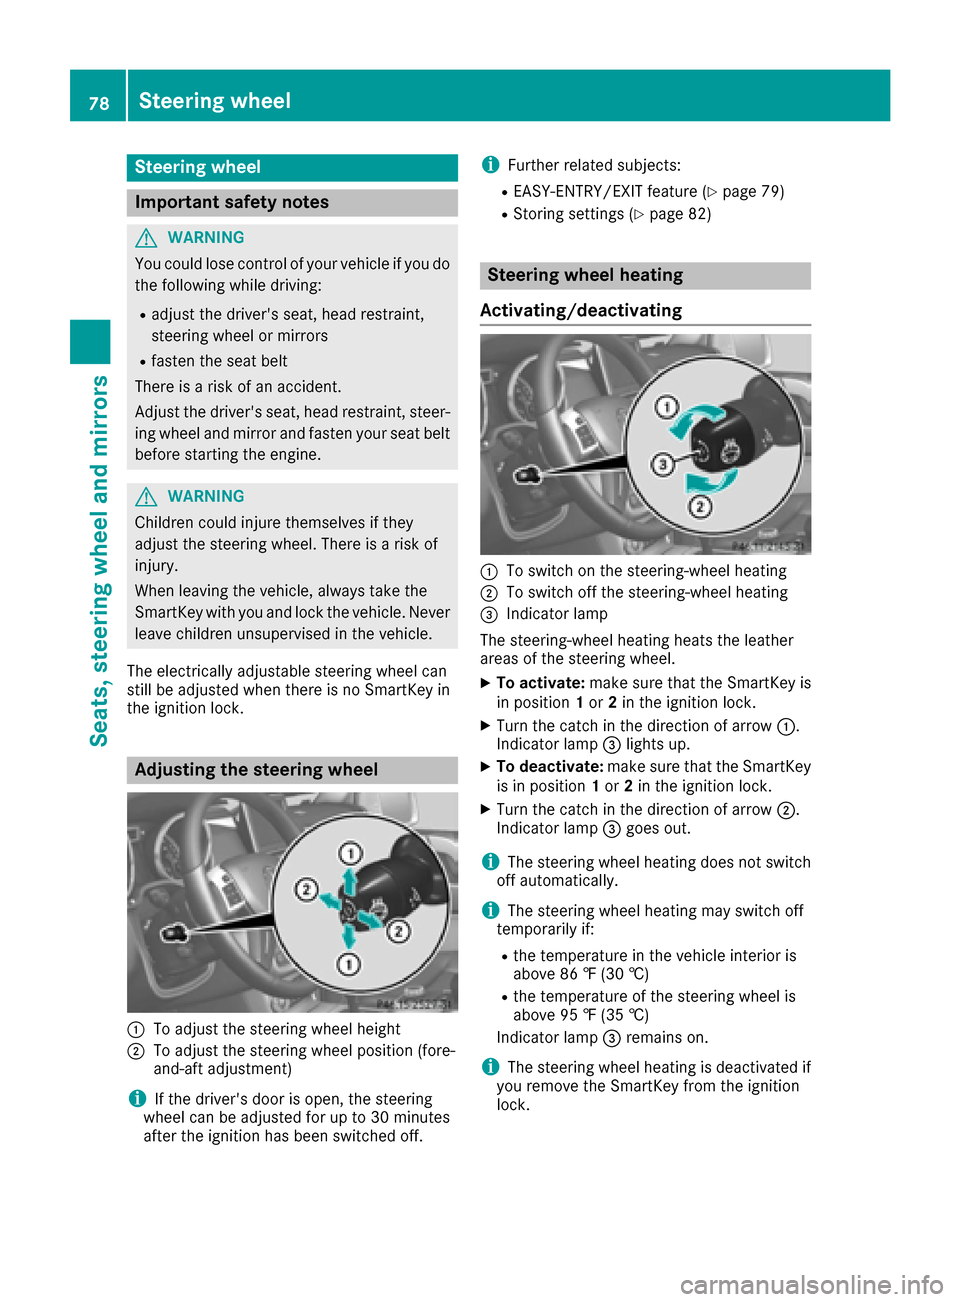
:To adjust the steering wheel height
;To adjust the steering wheel position (fore-
and-aft adjustment)
iIf the driver's door is open, the steering
wheel can be adjusted for up to 30 minutes
after the ignition has been switched off.
iFurther related subjects:
REASY-ENTRY/EXIT feature (Ypage 79)
RStoring settings (Ypage 82)
Steering wheel heating
Activating/deactivating
:To switch on the steering-wheel heating
;To switch off the steering-wheel heating
=Indicator lamp
The steering-wheel heating heats the leather
areas of the steering wheel.
XTo activate: make sure that the SmartKey is
in position 1or 2in the ignition lock.
XTurn the catch in the direction of arrow :.
Indicator lamp =lights up.
XTo deactivate: make sure that the SmartKey
is in position 1or 2in the ignition lock.
XTurn the catch in the direction of arrow ;.
Indicator lamp =goes out.
iThe steering wheel heating does not switch
off automatically.
iThe steering wheel heating may switch off
temporarily if:
Rthe temperature in the vehicle interior is
above 86 ‡ (30 †)
Rthe temperature of the steering wheel is
above 95 ‡ (35 †)
Indicator lamp =remains on.
iThe steering wheel heating is deactivated if
you remove the SmartKey from the ignition
lock.
78Steering wheel
Seats, steering wheel and mirrors