2016 MERCEDES-BENZ E-CLASS SALOON boot
[x] Cancel search: bootPage 418 of 557

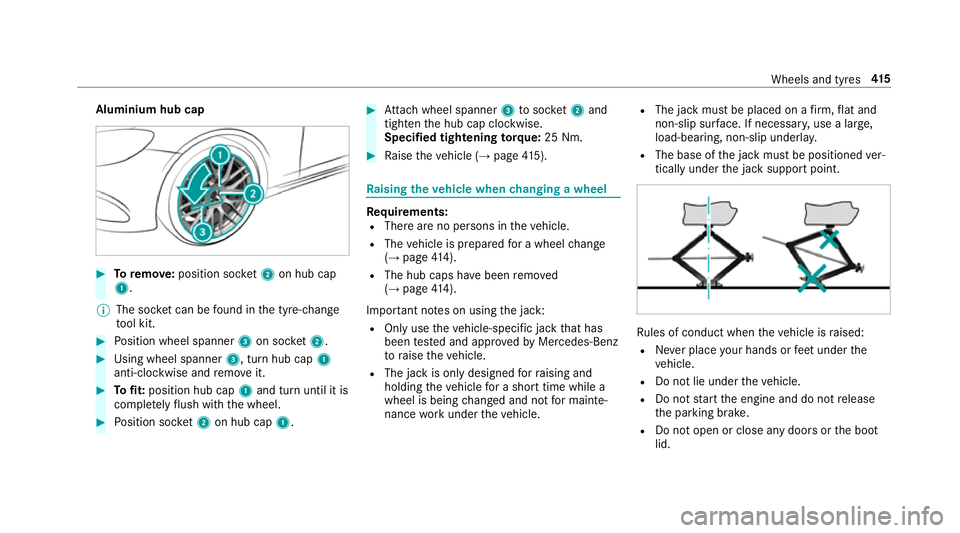
Aluminium hub cap
#
Toremo ve:position soc ket2 on hub cap
1.
% The soc ket can be found in the tyre-change
to ol kit. #
Position wheel spanner 3on soc ket2. #
Using wheel spanner 3, turn hub cap1
anti-clo ckwise and remo veit. #
Tofit: position hub cap 1and turn until it is
comple tely flush with the wheel. #
Position soc ket2 on hub cap 1. #
Attach wheel spanner 3tosoc ket2 and
tighten the hub cap clockwise.
Specified tightening torq ue: 25 Nm. #
Raise theve hicle (→ page415). Ra
ising theve hicle when changing a wheel Re
quirements:
R There are no persons in theve hicle.
R The vehicle is prepared for a wheel change
(→ page 414).
R The hub caps havebeen remo ved
( → page 414).
Impor tant no tes on using the jack:
R Only use theve hicle-specific jack that has
been tested and appr ovedby Mercedes-Benz
to raise theve hicle.
R The jack is only designed forra ising and
holding theve hicle for a short time while a
wheel is being changed and not for mainte‐
nance workunder theve hicle. R
The jack must be placed on a firm ,fl at and
non-slip sur face. If necessar y,use a lar ge,
load-bearing, non-slip underla y.
R The base of the jack must be positioned ver‐
tically under the jack support point. Ru
les of conduct when theve hicle is raised:
R Never place your hands or feet under the
ve hicle.
R Do not lie under theve hicle.
R Do not start the engine and do not release
th e parking brake.
R Do not open or close any doors or the boot
lid. Wheels and tyres
415
Page 423 of 557

Ve
hicles with a tyre pressure monitoring
sy stem: If an emer gency spa rewheel is fit‐
te dth e tyre pressure monitoring sy stem can‐
not function reliabl y.Only restart the sy stem
again when the emer gency spa rewheel has
been replaced with a new wheel.
Ve hicles with a tyre pressure monitoring
sy stem: For a few minutes af ter an emer‐
ge ncy spa rewheel is fitted, the sy stem may
st ill display the tyre pressure of there mo ved
wheel.
Be sure toalso obse rveth efo llowing fur ther
re lated subjects:
R Notes on tyre pressure (→ page 402)
R Tyre pressure table (→ page 403) Re
moving the eme rgency spa rewheel The eme
rgency spare wheel is secured in the
emer gency spa rewheel bag in the boot. #
Obser vethe information on mounting tyres
(→ page 409). #
Open the boot. #
Detach thefast ening stra ps. #
Unhook there taining spring hooks of thefa s‐
te ning stra ps from the brac kets. #
Remo vethe emer gency spa rewheel bag with
th e emer gency spa rewheel. #
Open the emer gency spa rewheel bag and
re mo vethe emer gency spa rewheel. 420
Wheels and tyres
Page 425 of 557

*
NO
TEInva lidation of the operating per‐
mit due tofailure tocomply wi th the
instructions for ins tallation and use The operating permit may be in
validated if
th e instructions for ins tallation and use of RF
transmitters are not obser ved. #
Only use appr oved frequency bands. #
Obser vethe maximum permissible out‐
put po wer in these frequency bands. #
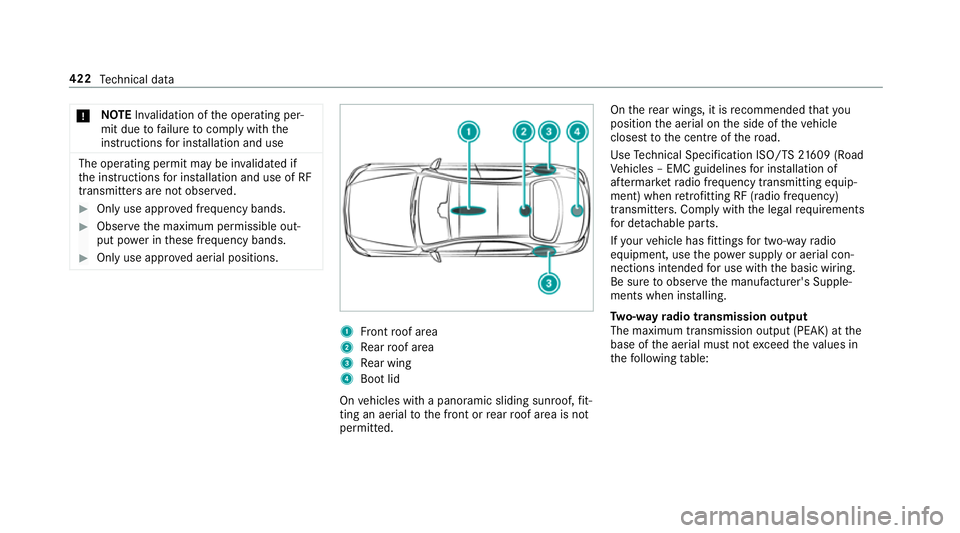
Only use appr oved aerial positions. 1
Front roof area
2 Rear roof area
3 Rear wing
4 Boot lid
On vehicles with a panoramic sliding sunroof, fit‐
ting an ae rial to the front or rear roof area is not
permitted. On
there ar wings, it is recommended that you
position the aerial on the side of theve hicle
closest tothe cent reofthero ad.
Use Tech nical Specification ISO/TS 21609 (Road
Ve hicles – EMC guidelines for ins tallation of
af te rm arke tra dio frequency transmitting equip‐
ment) when retrofitting RF (radio frequency)
transmitters. Co mply wi th th e legal requirements
fo r de tach able parts.
If yo ur vehicle has fittings for two-w ayradio
equipment, use the po wer supp lyor aerial con‐
nections intended for use with the basic wiring.
Be sure toobser vethe manufacturer's Supple‐
ments when ins talling.
Tw o-w ayradio transmission output
The maximum transmission output (PEAK) at the
base of the aerial must not exceed theva lues in
th efo llowing table: 422
Tech nical da ta
Page 438 of 557

Ro
of load and boot load All models
Maximum
roof load 100kg
Maximum boot load 100kg Tr
ailer hitch Gene
ral no tes on the trailer hit ch Not all models can be used
to tow a trailer
(→ page 237).
Modifications tothe engine cooling sy stem may
be necessar y,depending on theve hicle model.
The retrofitting of a trailer hitch is only pe rmissi‐
ble if a towing capacity is specified in your vehi‐
cle documents.
Fu rther information on the trailer hitch can be
obtained at a qualified specialist workshop. Pe
rm issible towing capacity The
tongue weight is not included in theto wing
capacity. Pe
rm issible towing capacit y,braked (at a
minimum start-off gradeability of 8% from a
st andstill) Model
Manual
trans‐
mission Au
to‐
matic
trans‐
mission
E 18 0— 1900 kg
E 200 1500 kg 1900 kg
E 250
E 200 4MATIC —2
000kg
All other models —2100kg Pe
rm issible towing capacit y,braked (at a
minimum start-off gradeability of 12%) from
a st andstill) Model
Manual
trans‐
mission Au
to‐
matic
trans‐
mission
E 18 0— 1900 kg
E 200 1500 kg 1900 kg
E 250
E 200 4MATIC —2
000kg
All other models —2100kg Pe
rm issible towing capacit y,unbraked Model
Perm issible towing
capacit y,unbraked
All model s7 50kg Te
ch nical da ta435
Page 493 of 557

Display messages
Possible causes/consequences and M
MSolutions
N *T
he boot lid is open. &
WARNING Risk ofexhaust gas poisoning
Combustion engines emit poisonous exhaust gases such as carbon monoxide. Exhaust gases can enter the
ve hicle interior if the boot lid is open when the engine is running, especially if theve hicle is in motion. #
Alw ays switch off the engine before opening the boot lid. #
Never drive with the boot lid open. #
Close the boot lid.
_ Example:Rear left seat
backrest not locked *T
he cor responding seat backrest of there ar ben chseat is not engaged. #
Foldthe cor responding seat backrest back until it engages.
¥
Top up washer fluid *T
hewasher fluid le vel in thewa sher fluid reser voir has dropped below the minimum. #
Top up thewa sher fluid . 490
Display messages and warning/indicator lamps
Page 516 of 557

Au
tomatic mir rorfo lding function
Ac tivating/deactivating ...................... .139
Au tomatic transmission
DIRECT SELECT le ver ........................... 16 2
Drive program display .......................... 161
Drive programs .................................... 16 0
DY NA MIC SELECT switch .................... 16 0
Engaging drive position ....................... 16 4
Engaging reve rsege ar ........................ .164
Kickdown ............................................. 16 5
Manual gearshifting ............................ .165
Selecting park position ........................ 16 4
Shifting toneutral ................................ 16 4
St eering wheel gearshift paddles ........ .165
Tr ansmission position display .............. 16 2
Tr ansmission positions ........................ 16 2
Au tomatic transmission
see Selector le ver
Axle load Perm issible .......................................... 423
Tr ailer operation .................................. 436 B
Ball neck Extending/r etra cting ........................... 238
BA S (Brake Assist Sy stem) .................... .181
Battery Key ........................................................ 66
Re mo tecontrol (s tationary heater) ...... 14 9
Battery (vehicle) Charging .............................................. 389
Notes ................................................... 387
St arting assis tance .............................. 389
Battery (vehicle) see Vehicle battery
Belt .............................................................32
Belt airbag Activation .............................................. 31
Fu nction/no tes .....................................35
Bic ycle rack
Tr ailer operation .................................. .241
Blind Spot Assi st..................................... 232
Ac tivating/deactivating ...................... .234
Fu nction/no tes ................................... 232
Sy stem limits ....................................... 232 Blind Spot Assist
see Active Blind Spot Assi st
Blo wer
see Climate control
BlueTEC see AdBlue ®
Blue tooth ®
Ac tivating/deactivating ...................... .278
Setting up an Internet connection ....... 330
Settings ............................................... 277
Switching profile (DUN/PAN) .............. 332
Blue tooth ®
Au dio
Ac tivating ............................................ 349
De-authorising (de-regis tering) the
device .................................................. 349
Information .......................................... 346
Overview .............................................3 47
Sea rching for and auth orisingthe
device .................................................. 348
Switching device via NFC .................... 349
Boot box see EASY -PAC K boot box Index
513
Page 517 of 557

Boot lid
....................................................... 73
Ac tivating/deactivating the boot lid
opening limiter ...................................... 78
Closing .................................................. .74
HANDS-FREE ACCESS .......................... .76
Loc ked separately .................................77
Opening .................................................73
Opening dimensions ............................4 33
Boot lid see Boot lid
see Locking/unlocking
Boot load ................................................. .434
Brake Assist Sy stem
see BAS (Brake Assi stSystem)
Brake fluid
No tes ................................................... 431
Brake forc e distribution
EBD (Elect ronic Brake forc e Distribu‐
tion) ..................................................... 184
Brakes ABS (Anti-lock Braking Sy stem) ........... 180
Ad aptive brake lights .......................... .190
BA S (Brake Assi stSystem) ...................1 81
Driving tips .......................................... 15 6EBD (Electronic Brake
forc e Distribu‐
tion) ..................................................... 184
HOLD function .................................... .203
Limi ted braking ef fect (salt-trea ted
ro ads) .................................................. 15 6
New/replaced brake linings/brake
discs .................................................... 15 6
Ru nning-in no tes ..................................1 56
Brakes see Active Brake Assi st
Braking assistance see BAS (Brake Assi stSystem)
Breakdown ............................................... 381
Assis tance overview .............................. 18
To w- starting ........................................ 397
To wing away ........................................ 393
Tr ansporting theve hicle ......................3 95
Wheel change ...................................... 414
Breakdown assistance call see Service call
Breakdown management see Service call Burmes
ter®
high-end 3D sur round
sound sy stem
Ad justing the balance/fader ................3 61
Ad justing the sound optimisation ........ 362
Ad justing treble, mid and bass ............ 361
Calling up the sound menu .................. 361
Information .......................................... 361
Setting the sound profile ..................... 362
Burmes ter®
sur round sound sy stem .....3 60
Ad justing the balance/fader ................3 61
Ad justing the sound focus ................... 361
Ad justing treble, mid and bass ............ 361
Calling up the sound menu .................. 360
Information .......................................... 360
Switching the sur round sound on/off
............................................................ .361
Buttons Steering wheel .....................................2 45 C
CA module (TV) ........................................ 360
Calling up a menu ................................ 360
Inse rting .............................................. 359 514
Index
Page 518 of 557

Call list
Making a call ........................................ 314
Options in the call list .......................... 314
Overview ..............................................3 14
Calling up the sound menu
Burmes ter®
high-end 3D sur round
sound sy stem ...................................... 361
Burmes ter®
sur round sound sy stem ... 360
Calls ..........................................................3 11
Ac cepting ............................................. 311
Ac tivating functions du ring a call ......... 311
Calls with se veral participants ............ .311
Declining .............................................. 311
Ending a call ......................................... 311
Incoming call during an existing call .... 312
Making .................................................3 11
Vi ath eove rhead control panel
(Mercedes me connect) ....................... 317
Camera see 360° Camera
see Reversing camera
Car wash
see Care
Car wash (care) ........................................3 71Care
.......................................................... .376
AIR PANEL ............................................ 374
Car wash ..............................................3 71
Carpet .................................................. 376
Displ ay................................................. 376
EAS Y-PA CK boot box ............................ 376
Exterior lighting ................................... 374
Genuine wood/trim elements .............. 376
High-pressu recleaner .......................... 371
Matt finish ........................................... 373
Pa int .................................................... 373
Plastic trim .......................................... 376
Re versing camera/360° Camera ........ 374
Ro of lining ............................................ 376
Seat belt .............................................. 376
Seat co ver ........................................... 376
Senso rs............................................... 374
Ta ilpipes .............................................. .374
Tr ailer hit ch.......................................... 374
Wa shing byhand ................................. 372
Wheels/rims ........................................3 74
Wi ndo ws .............................................. 374
Wi per blades ........................................ 374
Carpet (Care) ............................................ 376Changing bulbs
........................................ 131
Dipped beam ....................................... 13 2
Fitting/removing co ver (front wheel
ar ch ) .................................................... 13 2
Main beam ...........................................1 32
No tes ................................................... 131
Opening/closing the side trim pan‐
els .......................................................1 33
Overview .............................................. 131
Re versing light .................................... .133
Tu rn signal light (front) ........................ 13 2
Tu rn signal light (rear) .......................... 13 3
Changing hub caps .................................. 414
Channel tracking Setting ................................................ .352
Charging Battery (vehicle) .................................. 389
Child saf ety lock
Re ar door .............................................. .61
Re ar side wind ows ................................. 63
Child seat ................................................... 45
At tach ing (no tes) ................................... 52
Fr ont passenger seat (no tes) ................. 50 Index
515