2016 MERCEDES-BENZ E-CLASS SALOON jump start
[x] Cancel search: jump startPage 392 of 557

We
ar saf etygl asses. Ke
ep children away. Obser
vethis Owner's Manual.
If yo u do not intend touse theve hicle over an
ex tended pe riod of time:
R Activate standby mode, or
R Connect the battery toa bat tery charger
appr ovedby Mercedes-Benz, or
R Consult a qualified specialist workshop to
disconnect the batter y. St
arting assi stance and charging the12 V
battery Ve
hicles with a lithium-ion battery #
When charging the battery and during start‐
ing assis tance, al ways use the jump-s tart
connection point in the engine compartment.
* NO
TEDama getothe battery from over‐
vo ltage When
charging using a bat tery charge r with‐
out a maximum charging voltage, the battery
or the on-board electronics may be damaged. #
Only use battery charge rs with a maxi‐
mum charging voltage of 14.4 V. All
other vehicles #
When charging the battery and during start‐
ing assis tance, al ways use the jump-s tart
connection point in the engine compartment. *
NO
TEDamaging the battery thro ugh
ove rvoltage When using a battery
charge r without a maxi‐
mum charging voltage, the battery or the
ve hicle electronics may be damaged. #
Only use battery charge rs with a maxi‐
mum charging voltage of 14.8 V. &
WARNING Risk ofexplosion from hydro‐
ge nga s igniting
A battery generates hydrogen gas during the
ch arging process. If there is a short circuit or
spar ksstart toform ,th ere is a danger of the
hy drogen gas igniting. #
Make sure that the positive term inal of
th e connected battery does not come
into conta ct withvehicle parts. #
Never place me tal objects or tools on a
batter y. #
When connecting and disconnecting the
batter y,yo u must obse rveth e descri‐
bed order forth e battery clamps. Breakdown assis
tance 389
Page 393 of 557

#
When giving starting assis tance, al ways
make sure that you on lyconnect bat‐
te ry term inals with identical polarity. #
During starting assis tance, you must
obse rveth e described order for con‐
necting and disconnecting the jump
lead. #
Do not connect or disconnect the bat‐
te ry cla mp s while the engine is running. &
WARNING Risk ofexplosion during
ch arging process and starting assis tance
During thech arging process and starting
assis tance, the battery may release an explo‐
sive gas mixture. #
Avoid fire , naked flames, creating
spar ksand smoking. #
Make sure that there is suf ficient venti‐
lation du ring thech arging process and
during starting assis tance. #
Do not lean over a batter y. If
th e indicator/warning lamps in the instrument
clus ter do not light up at low temp eratures, it is
ve ry likely that the dischar ged battery has fro‐
zen. &
WARNING Risk ofexplosion from a fro‐
zen battery
A dischar ged battery may freeze at temp era‐
tures slightly abo veor below freezing point.
During starting assis tance or battery charg‐
ing, bat tery gas may be released. #
Alw aysth aw a frozen bat tery out first
before charging it or per form ing start‐
ing assis tance. *
NO
TEShor tening the service life of the
battery bycharging the battery at low
te mp eratures Charging
the battery at very low temp era‐
tures may shor tenth e service life of the bat‐
te ry and ha vea negative ef fect on starting. #
Do not charge the battery at very low
te mp eratures. The service life of a battery
that has been
th awe d may be dramatically shor tened.
It is recommended that you ha veathaw ed bat‐
te ry checked at a qualified specialist workshop.
Plug-in hybrid: make sure that youre ad the
separate operating instructions. You could other‐
wise failto recognise dangers, e.g. due tohigh
vo ltage.
All vehicles
* NO
TEDama gecaused bynumerous or
ex tended attem ptsto start the engine Nume
rous or extended attem ptsto start the
engine may damage the catalytic con verter
due tonon-combu sted fuel. #
Avoid numerous and extended attem pts
to start the engine. Obser
vethefo llowing points during starting
assis tance and when charging the battery:
R Only use undamaged jump leads/charging
cables with a suf ficient cross-section and
insula tedte rm inal clamps. 390
Breakdown assis tance
Page 394 of 557

R
Non- insulated parts of thete rm inal clamps
must not come into con tact wi thother me tal
parts while the jump lead/charging cable is
connected tothe battery/jump-s tart connec‐
tion point.
R The jump lead/charging cable must not
come into contact wi thany parts which may
mo vewhen the engine is running.
R Alw ays make sure that nei ther you nor the
battery is elect rostatically charge d.
R Keep away from fire and naked flames.
R Do not lean overth e batter y.
R When charging: only use battery charge rs
te sted and appr ovedby Mercedes-Benz and
re ad the battery charge r's operating instruc‐
tions before charging the batter y.
Obser vethe additional following points during
st arting assis tance:
R Starting assis tance may only be pr ovided
using batteries with a nominal voltage of 12
V.
R The vehicles must not touch. R
Petrol engine: Only acce ptstarting assis‐
ta nce if the engine and exhaust sy stem are
cold. #
Secure theve hicle byapplying the electric
parking brake. #
Automatic transmission: Shiftthe trans‐
mission toposition j. #
Manual transmission: Shift into neutral. #
Make sure that the ignition and all electrical
consumers are switched off. #
Open the engine bonn et. #
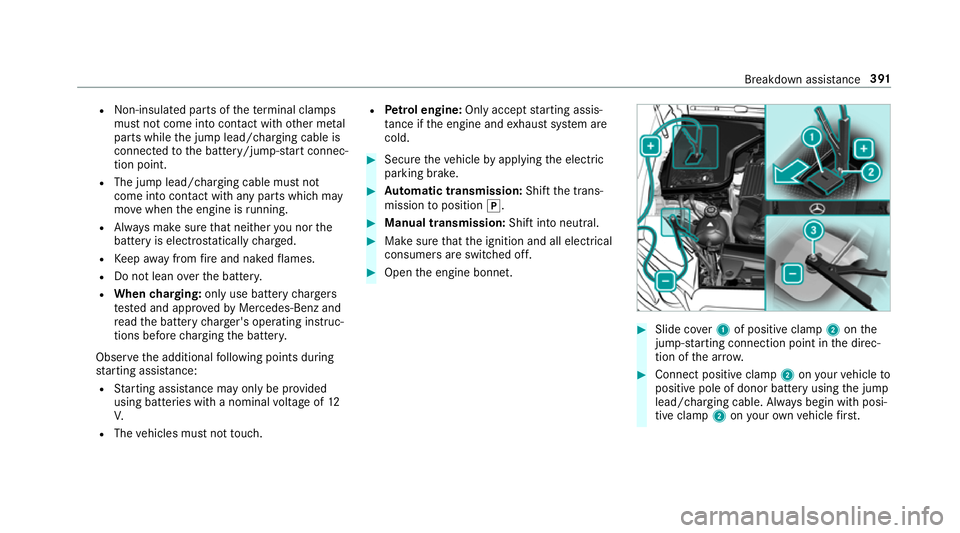
Slide co ver1 of positive clamp 2onthe
jump-s tarting connection point in the direc‐
tion of the ar row. #
Connect positive clamp 2onyour vehicle to
positive pole of donor battery using the jump
lead/charging cable. Alw ays begin with posi‐
tive clamp 2onyour ow nve hicle firs t. Breakdown assi
stance 391
Page 395 of 557

#
During thest arting assi stance proce‐
dure: start the engine of the donor vehicle
and run at idle speed. #
Connect the negative pole of the donor vehi‐
cle and ear thpoint 3ofyour ow nve hicle by
using the jump lead/charging cable. Begin
with the donor battery firs t. #
During starting assi stance: start the
engine of your ow nve hicle. #
During thech arging process: start the
ch arging process. #
During starting assi stance: letthe engines
ru nfo r se veral minutes. #
During starting assi stance: before discon‐
necting the jump lead, switch on an electrical consumer on
your ow nve hicle, e.g. there ar
wind owheater or lighting.
When thest arting assis tance/charging process
is compl ete: #
First,re mo vethe jump lead/charging cable
from ear thpoint 3and negative pole of the
donor vehicle, then from positive clamp 2
and positive pole of the donor vehicle. Begin
each time with the conta cts onyour own
ve hicle firs t. #
Afterre moving the jump lead/charging
cable, close co ver1 of positive clamp 2.
Yo u can obtain fur ther information on starting
assis tance at any qualified specialist workshop. To
w starting or towing away Pe
rm itted towing me thods Plug-in
hybrid: obser vethe no tes on the permit‐
te dto wing me thods in the separate Owner's
Manual.
Mercedes-Benz recommends transporting your
ve hicle in the case of a breakdown, rath er than
to wing it away.
* NO
TEDama getotheve hicle due to tow‐
ing away incor rectly #
Obser vethe instructions and no tes on
to wing away. 392
Breakdown assis tance
Page 532 of 557

J
Jack Declaration of Conformity ..................... 24
St orage location ................................... 413
Jump-start connection ............................389K
Ke y.............................................................. 64
Battery .................................................. 66
Emer gency key element ........................ 66
Energy consum ption .............................. 65
Ke yring attachment .............................. 66
Overview ............................................... 64
Pa nic alarm ........................................... 65
Problem ................................................. 67
Un locking setting .................................. 65
Key see Ignition key
see Locking
see Vehicle key
KEYLESS-GO Locking theve hicle ................................ 70
Problem .................................................71
Un locking setting .................................. 65 Un
locking theve hicle ............................70
Kickd own.................................................1 65
Using ................................................... 16 5
Knee airbag ................................................ 37 L
Laden ........................................................ 11 0
Ro ofrack ............................................. 11 4
St ow age space under the boot floor ....1 13
Ti e-down eyes ...................................... 11 0
Lamp see In terior lighting
Lamp (instrument display) see Warning/indicator lamps
Lane Keeping Assist
see Active Lane Keeping Assist
Language Notes ................................................... 281
Setting .................................................2 81
Last destinations Selecting ............................................ .288
LED light see Intelligent Light Sy stem Le
vel control sy stem
see AIR BODY CONTROL
Light switch Overview .............................................1 23
Lighting .................................................... 13 0
Lighting see Lights
Lights ................................................ 123, 13 0
Ac tive light function ............................. 12 6
Ad aptive Highbeam Assist Plus .......... .128
Ad justing the instrument lighting ......... 24 8
Ad versewe ather light .......................... 12 8
Au tomatic driving lights ....................... 124
Changing bulbs .................................... 131
City lighting ........................................ .128
Combination switch ............................ .125
Cornering light function ....................... 127
Dipped beam ....................................... 12 3
Driving ab road .................................... .123
Fo g light (extended range) ................... 127
Haza rdwa rning lights .......................... 12 6
Headla mpflashing .............................. .125
Headlamp range .................................. 124
Intellige nt Light Sy stem ....................... 12 6 Index
529
Page 543 of 557

Closing with
theke y .............................. .81
Opening .................................................83
Opening with theke y ............................ .80
Problem .................................................86
Ra in-closing feature .............................. .85
Smartphone see Android Auto
see Apple CarPlay™
see Telephone
Snow chains ............................................. 401
Snow chains
see Skid chains
Soc ket (12 V) ............................................ 11 8
Boot ..................................................... 12 0
Fr ont centre console ............................ 11 8
Re ar passenger compartment .............. 11 8
Soc ket (230 V)
Re ar .................................................... .119
Software update Information .......................................... 283
Pe rforming .......................................... 283
Sound PRE-SAFE ®
Sound ................................. 44Sound
see Burmes ter®
sur round sound sy stem
see Tone settings
Spare wheel .............................................. 419
Spectacles compartment .......................107
Speech dialogue sy stem
see LINGU ATRO NIC
Speed limit for winter tyres
Setting ................................................. 19 3
Speed Limit Pilot ............................. 193, 231
Displ ay................................................. 19 3
Setting ................................................. 231
Speedome ter
Digital .................................................. 24 9
St andby mode
Ac tivating/deactivating ...................... .179
Fu nction .............................................. 17 9
St anding lights ........................................ 12 3
St art/S top button
St arting vehicle ................................... 154
Switching off theve hicle ......................1 72
Switching on the po wer supply or
ignition ................................................ 15 3St
art/s top function
see ECO start/ stop function
St arting assi stance ................................. 389
St arting assi stance
see Jump -sta rt connection
St arting the engine
see Vehicle
St arting-o ffaid
see Hill start assist
St ation
Deleting ............................................... 351
Direct frequency entry ......................... 351
Fr equency fix ....................................... 352
Moving ................................................. 351
Sea rching ............................................ 351
Setting .................................................3 51
St oring .................................................3 51
St ation list
Calling up ............................................. 351
St ation presets
Editing ................................................. 351
St ationary heater/ventilation
Displ ays (remo tecontrol) .................... 14 9540
Index