2016 MERCEDES-BENZ E-CLASS ESTATE tow
[x] Cancel search: towPage 131 of 565
#
Insert the plug of the device into 230 V
soc ket1.
When the on-board electrical sy stem voltage
is suf ficient, indicator la mp2lights up. Using
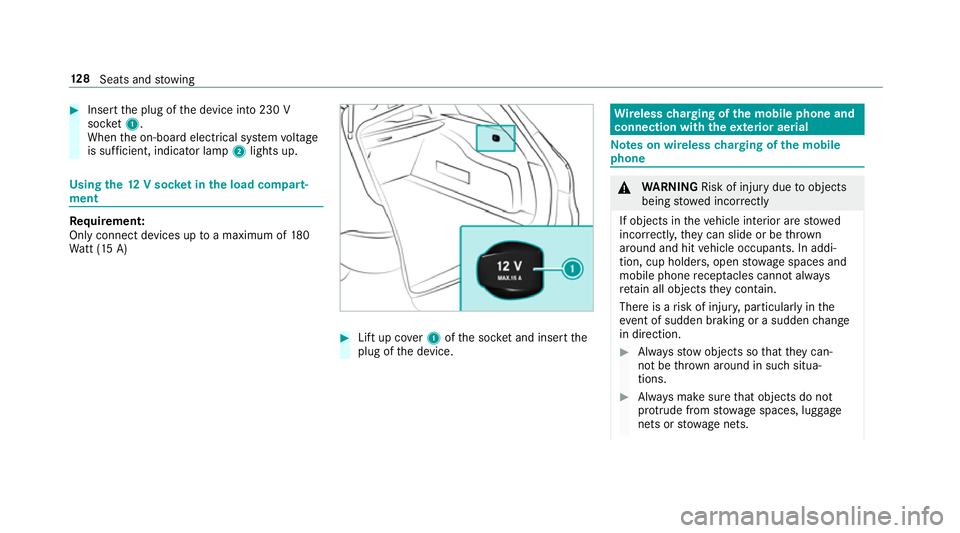
the12 V so cket inthe load compa rt‐
ment Re
quirement:
Only connect devices up toa maximum of 180
Wa tt (15 A) #
Lift up co ver1 ofthe soc ket and insert the
plug of the device. Wire
lesscharging of the mobile phone and
connection with theex terior aerial Note
s on wireless charging of the mobile
phone &
WARNING Risk of inju rydue toobjects
being stowed inco rrectly
If objects in theve hicle interior are stowed
incor rectly, they can slide or be thrown
around and hit vehicle occupants. In addi‐
tion, cup holders, open stowage spaces and
mobile phone recep tacles cannot al ways
re tain all objects they contain.
The reis a risk of injur y,particularly in the
ev ent of sudden braking or a sudden change
in direction. #
Alw aysstow objects so that they can‐
not be throw n around in su chsitua‐
tions. #
Alw ays make sure that objects do not
pr otru de from stowage spaces, luggage
nets or stowage nets. 12 8
Seats and stowing
Page 132 of 565
#
Close the loc kable stow age spaces
before starting a journe y. #
Alw aysstow and secure heavy, hard,
poin ted, sharp-edged, fragile or bulky
objects in the boot/load compartment. Obser
vethe no tes on loading theve hicle. &
WARNING Risk offire from placing
objects in the mobile phone stowage
compartment
If yo u place objects in the mobile phone
stow age compartment, they may heat up
exc essively and even catch fire. #
Do not place additional objects, espe‐
cially those mode of me tal, in the
mobile phone stowage compartment. *
NO
TEDama getoobjects caused by
placing them in the mobile phone stow‐
age compartment If
yo u place objects in the mobile phone
stow age compartment, these may be dam‐
aged byelectromagnetic fields. #
Do not place credit cards, storage
media or other objects sensitive to
electromagnetic fields in the mobile
phone stowage compartment. *
NO
TEDama getothe mobile phone
stow age compartment caused byliquids If liquid is spilled in
the mobile phone stow‐
age compartment, the mobile phone stowage
compartment may be damaged. #
Do not spill liquids into the mobile
phone stowage compartment. R
Depending on theve hicle equipment, the
mobile phone is connected totheve hicle's
ex terior aerial via thech arging module. R
The charging function and wireless connec‐
tion of the mobile phone totheve hicle's
ex terior aerial are only available if the ignition
is switched on.
R Small mobile phones may not be able tobe
ch arge d in everyposition of the mobile
phone stowage compartment.
R Largemobile phones which do not rest flat in
th e mobile phone stowage compartment may
not be able tobe charge d or connec ted with
th eve hicle's exterior aerial.
R The mobile phone may heat up during the
ch arging process. The mobile phone can be
cooled in the mobile phone stowage com‐
partment when the air conditioning sy stem is
switched on. The cooling output in the
mobile phone stowage compartment is high‐
est when the controller in theglove box is
closed. Wire
lesscharging of the mobile phone Re
quirements:
R Your mobile phone must be suitable for wire‐
less charging (Qi-compatible mobile phone). Seats and
stowing 12 9
Page 133 of 565
Yo
u can find a li stof Qi-compatible mobile
phones online at:
http://www.mercedes-benz.com/connect
R Toensure more ef ficient charging and con‐
nection with theve hicle's exterior aerial,
re mo vethe pr otective co ver from the mobile
phone.
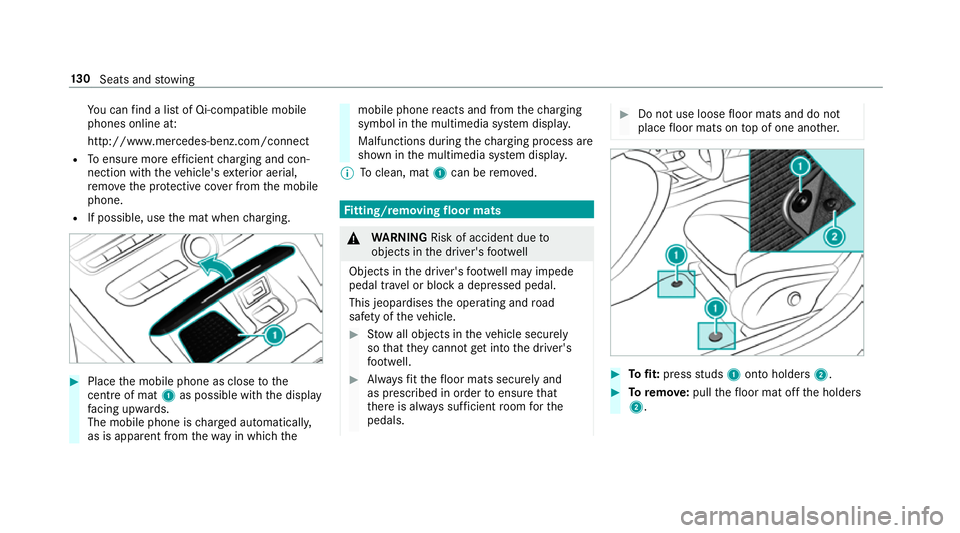
R If possible, use the mat when charging. #
Place the mobile phone as close tothe
centre of mat 1as possible wi th the display
fa cing up wards.
The mobile phone is charge d automatically,
as is apparent from thewa y in which the mobile phone
reacts and from thech arging
symbol in the multimedia sy stem displa y.
Malfunctions during thech arging process are
shown in the multimedia sy stem displa y.
% Toclean, mat 1can be remo ved. Fi
tting/ removing floormats &
WARNING Risk of accident due to
objects in the driver's foot we ll
Objects in the driver's foot we ll may impede
pedal tr avel or block a depressed pedal.
This jeopardises the operating and road
saf ety of theve hicle. #
Stow all objects in theve hicle securely
so that they cannot getinto the driver's
fo ot we ll. #
Alw aysfit th efloor mats securely and
as prescribed in order toensure that
th ere is alw ays suf ficient room forthe
pedals. #
Do not use loose floor mats and do not
place floor mats on top of one ano ther. #
Tofit: press studs 1onto holders 2. #
Toremo ve:pull thefloor mat off the holders
2. 13 0
Seats and stowing
Page 166 of 565
%
You can check the suitability of your mobile
phone byentering the phone number at
http://www.mercedes.me.
Information about suitable mobile phones
can be obtained from your Mercedes-Benz
service centre or at http://www.mercedes-
benz.com/connect.
% The function is on lyavailable in combination
with Mercedes me connect and on lyin cer‐
ta in countries.
% Protective cases around the mobile phone
can impair the functionality.
St arting theve hicle for the firs t time af ter
activating the function #
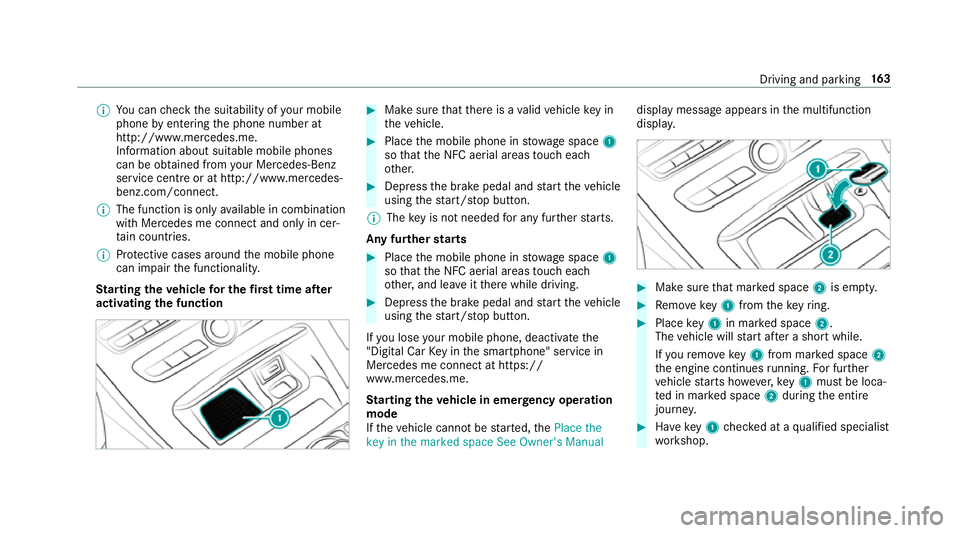
Make sure that there is a valid vehicle key in
th eve hicle. #
Place the mobile phone in stowage space 1
so that the NFC aerial areas touch each
ot her. #
Depress the brake pedal and start theve hicle
using thest art/ stop button.
% The key is not needed for any fur ther starts.
Any fu rther starts #
Place the mobile phone in stowage space 1
so that the NFC aerial areas touch each
ot her, and lea veitth ere while driving. #
Depress the brake pedal and start theve hicle
using thest art/ stop button.
If yo u lose your mobile phone, deactivate the
"Digital Car Key in the smartphone" service in
Mercedes me connect at https://
www.mercedes.me.
St arting theve hicle in emer gency operation
mode
If th eve hicle cannot be star ted, thePlace the
key in the marked space See Owner's Manual display message appears in
the multifunction
displa y. #
Make sure that mar ked space 2is em pty. #
Remo vekey1 from theke yring. #
Place key1 in mar ked space 2.
The vehicle will start af ter a short while.
If yo ure mo vekey1 from mar ked space 2
th e engine continues running. For fur ther
ve hicle starts ho wever,ke y1 must be loca‐
te d in mar ked space 2during the entire
journe y. #
Have key1 checked at a qualified specialist
wo rkshop. Driving and parking
16 3
Page 167 of 565
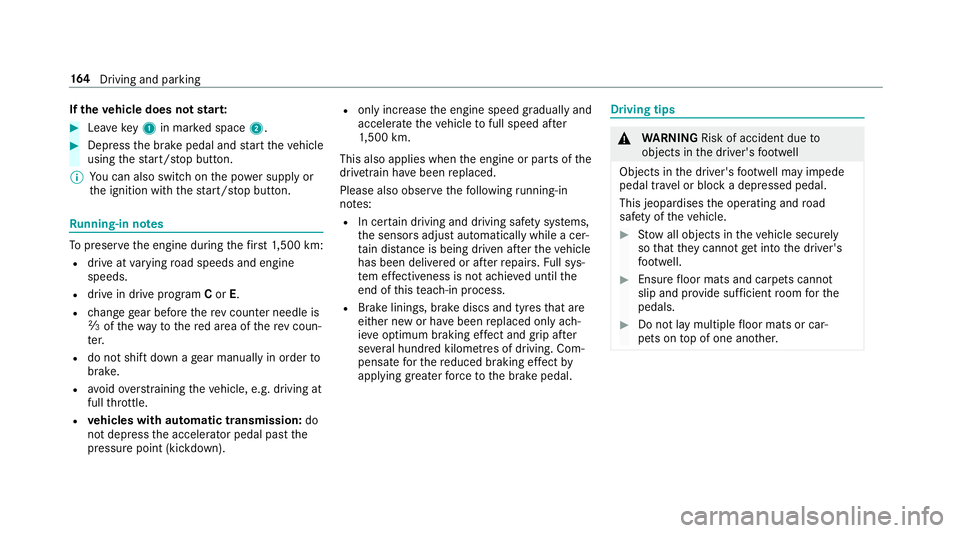
If
th eve hicle does not star t: #
Lea vekey1 in mar ked space 2. #
Depress the brake pedal and start theve hicle
using thest art/ stop button.
% You can also swit chon the po wer supp lyor
th e ignition with thest art/ stop button. Ru
nning-in no tes To
preser vethe engine during thefirs t1, 500 km:
R drive at varying road speeds and engine
speeds.
R drive in drive program Cor E.
R change gear before there v counter needle is
Ô ofthewa yto there d area of there v coun‐
te r.
R do not shift down a gear manually in order to
brake.
R avoidoverstra ining theve hicle, e.g. driving at
full thro ttle.
R vehicles with automatic transmission: do
not depress the accelera tor pedal past the
pressure point (kickdown). R
only increase the engine speed gradually and
accelera tetheve hicle tofull speed af ter
1, 500 km.
This also applies when the engine or parts of the
driv etra in ha vebeen replaced.
Please also obser vethefo llowing running-in
no tes:
R In cer tain driving and driving saf ety sy stems,
th e sensors adjust automatically while a cer‐
ta in dis tance is being driven af terth eve hicle
has been delivered or af terre pairs. Full sys‐
te m ef fectiveness is not achie ved until the
end of this teach-in process.
R Brake linings, brake discs and tyres that are
either new or ha vebeen replaced only ach‐
ie ve optimum braking ef fect and grip af ter
se veral hundred kilom etre s of driving. Com‐
pensate forth ere duced braking ef fect by
applying greaterfo rc eto the brake pedal. Driving tips
&
WARNING Risk of accident due to
objects in the driver's foot we ll
Objects in the driver's foot we ll may impede
pedal tr avel or block a depressed pedal.
This jeopardises the operating and road
saf ety of theve hicle. #
Stow all objects in theve hicle securely
so that they cannot getinto the driver's
fo ot we ll. #
Ensure floor mats and carpets cannot
slip and pr ovide suf ficient room forthe
pedals. #
Do not lay multiple floor mats or car‐
pets on top of one ano ther. 16 4
Driving and pa rking
Page 175 of 565
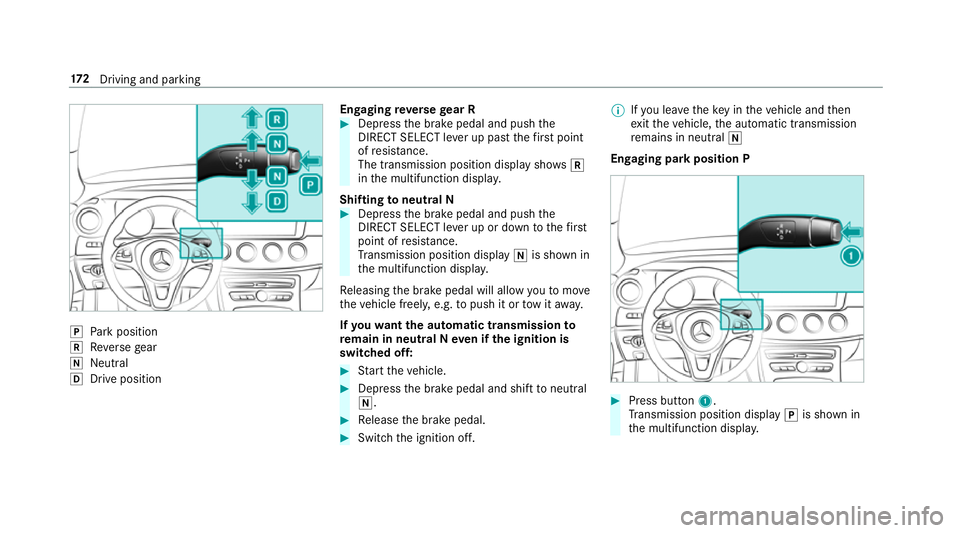
j
Park position
k Reversege ar
i Neut ral
h Drive position En
gaging reve rsege ar R #
Depress the brake pedal and push the
DIRECT SELECT le ver up past thefirs t point
of resis tance.
The transmission position displ aysho wsk
in the multifunction displa y.
Shifting toneutral N #
Depress the brake pedal and push the
DIRECT SELECT le ver up or down tothefirst
point of resis tance.
Tr ansmission position display iis shown in
th e multifunction displa y.
Re leasing the brake pedal will allow youto mo ve
th eve hicle freely, e.g. topush it or tow it away.
If yo uwa ntthe automatic transmission to
re main in neutral N even if the ignition is
switched off: #
Start theve hicle. #
Depress the brake pedal and shift toneutral
i. #
Release the brake pedal. #
Switch the ignition off. %
Ifyo u lea vetheke y in theve hicle and then
ex itth eve hicle, the automatic transmission
re mains in neutral i
Engaging park position P #
Press button 1.
Tr ansmission position display jis shown in
th e multifunction displa y.17 2
Driving and pa rking
Page 184 of 565
*
NO
TEDama getotheve hicle or the driv‐
et ra in caused bytheve hicle rolling away #
Alw ays proper lysecure theve hicle
against rolling away. #
On uphill or downhill inclines, turn the front
wheels towa rdsth eke rb. #
Vehicles with manual transmission:
Engage firs t1 orreve rsege ar k. #
App lythe electric parking brake. #
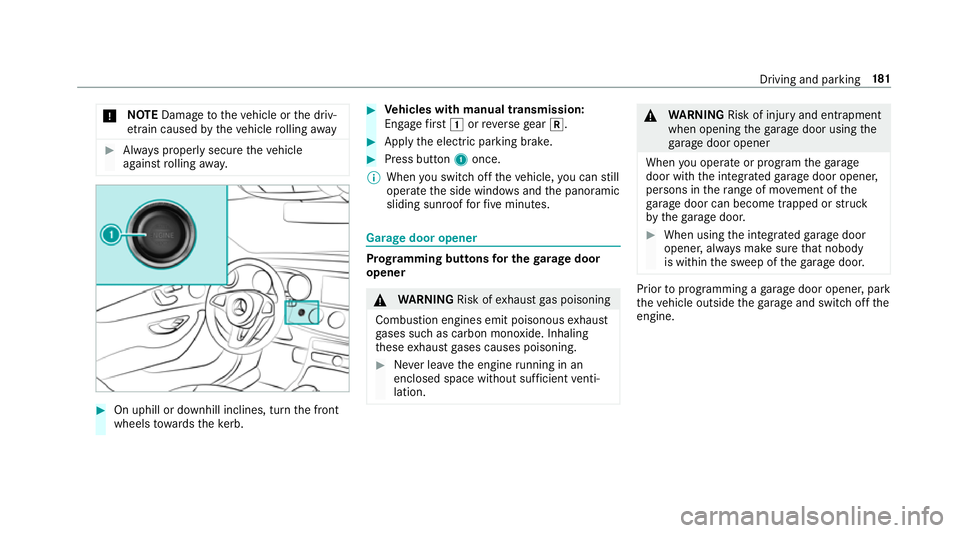
Press button 1once.
% When you swit choff theve hicle, you can still
opera tethe side windo wsand the panoramic
sliding sunroof forfive minutes. Garage door opener
Prog
ramming buttons for the garage door
opener &
WARNING Risk ofexhaust gas poisoning
Combustion engines emit poisonous exhaust
ga ses such as carbon monoxide. Inhaling
th ese exhaust gases causes poisoning. #
Never lea vethe engine running in an
enclosed space wi thout suf ficient venti‐
lation. &
WARNING Risk of inju ryand ent rapment
when opening thega rage door using the
ga rage door opener
When you operate or program thega rage
door with the integrated garage door opener,
persons in thera nge of mo vement of the
ga rage door can become trapped or stru ck
by thega rage door. #
When using the integrated garage door
opener, alw ays make sure that nobody
is within the sweep of thega rage door. Prior
toprog ramming a garage door opener, park
th eve hicle outside thega rage and swit choff the
engine. Driving and parking
181
Page 185 of 565
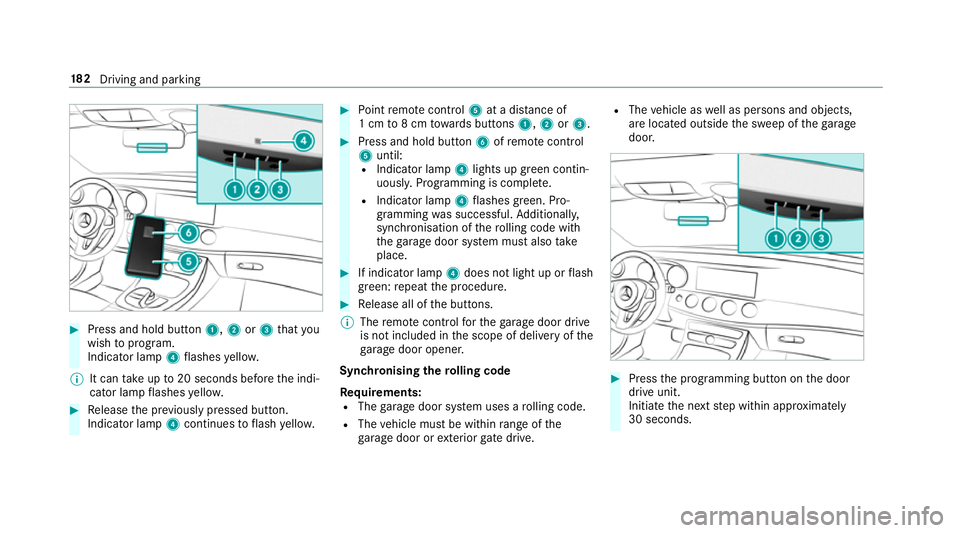
#
Press and hold button 1,2or3 that you
wish toprog ram.
Indicator lamp 4flashes yello w.
% It can take up to20 seconds before the indi‐
cator lamp flashes yello w. #
Release the pr eviously pressed button.
Indicator lamp 4continues toflash yello w. #
Point remo tecontrol 5at a di stance of
1 cm to8 cm towa rds buttons 1,2or3. #
Press and hold button 6ofremo tecontrol
5 until:
R Indicator la mp4lights up green contin‐
uousl y.Programming is comple te.
R Indicator lamp 4flashes green. Pro‐
gr amming was successful. Additionally,
synchronisation of thero lling code with
th ega rage door sy stem must also take
place. #
If indicator lamp 4does not light up or flash
green: repeat the procedure. #
Release all of the buttons.
% The remo tecontrol forth ega rage door drive
is not included in the scope of delivery of the
ga rage door opener.
Synchronising thero lling code
Re quirements:
R The garage door sy stem uses a rolling code.
R The vehicle must be within range of the
ga rage door or exterior gate drive. R
The vehicle as well as persons and objects,
are located outside the sweep of thega rage
door. #
Press the programming button on the door
drive unit.
Initiate the next step within appr oximately
30 seconds. 18 2
Driving and pa rking