Page 115 of 565
#
Left and right and seat backrests: press
ri ght or left button 1.
The cor responding seat backrest folds for‐
wa rds. #
Centre seat backres t:pull seat backrest 2
re lease 3forw ards. #
Fold seat backrest 2forw ards. Fo
lding there ar seat backrest back
* NO
TEDama getothe seat belt The seat belt could become trapped and
thus
damaged when folding back the seat back‐
re st. #
Make sure that the seat belt is not trap‐
ped when folding back the seat back‐
re st. If
th e seat backrest is not engaged and loc ked,
th is will be shown in the multifunction display in
th e instrument clus ter. #
Movethe driver's or front passenger seat for‐
wa rds, if necessar y. 11 2
Seats and stowing
Page 116 of 565
#
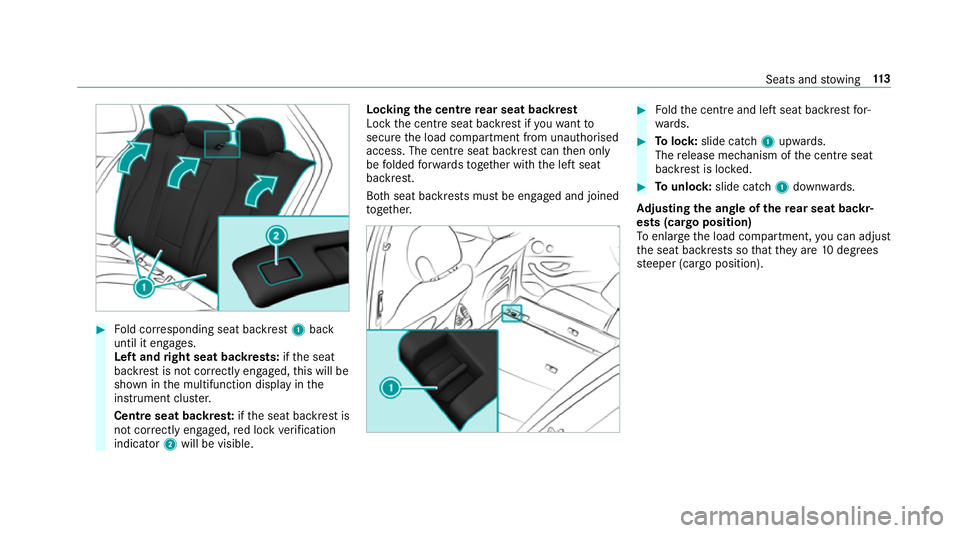
Fold cor responding seat backrest 1back
until it engages.
Left and right seat backrests: ifth e seat
backrest is not cor rectly engaged, this will be
shown in the multifunction display in the
instrument clus ter.
Centre seat backres t:ifth e seat backrest is
not cor rectly engaged, red lock verification
indicator 2will be visible. Lo
cking the centre rear seat backrest
Lock the cent reseat backrest if youwa ntto
secure the load compartment from unauthorised
access. The cent reseat backrest can then only
be folded forw ards toge ther with the left seat
backrest.
Bo th seat backrests must be engaged and joined
to ge ther. #
Foldthe cent reand left seat backrest for‐
wa rds. #
Tolock: slide cat ch1 upwards.
The release mechanism of the cent reseat
backrest is loc ked. #
Tounlo ck:slide catch 1down wards.
Ad justing the angle of the rear seat backr‐
ests (cargo position)
To enlar gethe load compartment, you can adjust
th e seat backrests so that they are 10degrees
st eeper (cargo position). Seats and
stowing 11 3
Page 117 of 565
#
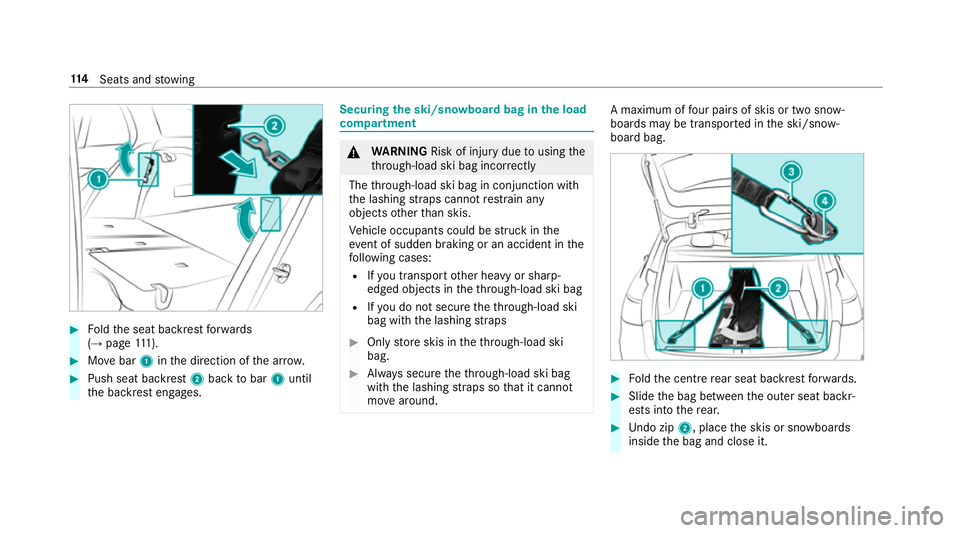
Foldthe seat backrest forw ards
(→ page 111). #
Movebar 1inthe direction of the ar row. #
Push seat backrest 2back tobar 1until
th e backrest engages. Securing
the ski/sn owboard bag in the load
compa rtment &
WARNING Risk of inju rydue tousing the
th ro ugh-load ski bag incor rectly
The thro ugh-load ski bag in conjunction with
th e lashing stra ps cann otrestra in any
objects other than skis.
Ve hicle occupants could be stru ck inthe
ev ent of sudden braking or an accident in the
fo llowing cases:
R Ifyo u transpo rtother heavy or sharp-
edged objects in theth ro ugh-load ski bag
R Ifyo u do not secure theth ro ugh-load ski
bag with the lashing stra ps #
Only store skis in theth ro ugh-load ski
bag. #
Alw ays secure theth ro ugh-load ski bag
with the lashing stra ps so that it cannot
mo vearound. A maximum of
four pairs of skis or two sn ow‐
boards may be transpor ted in the ski/snow‐
board bag. #
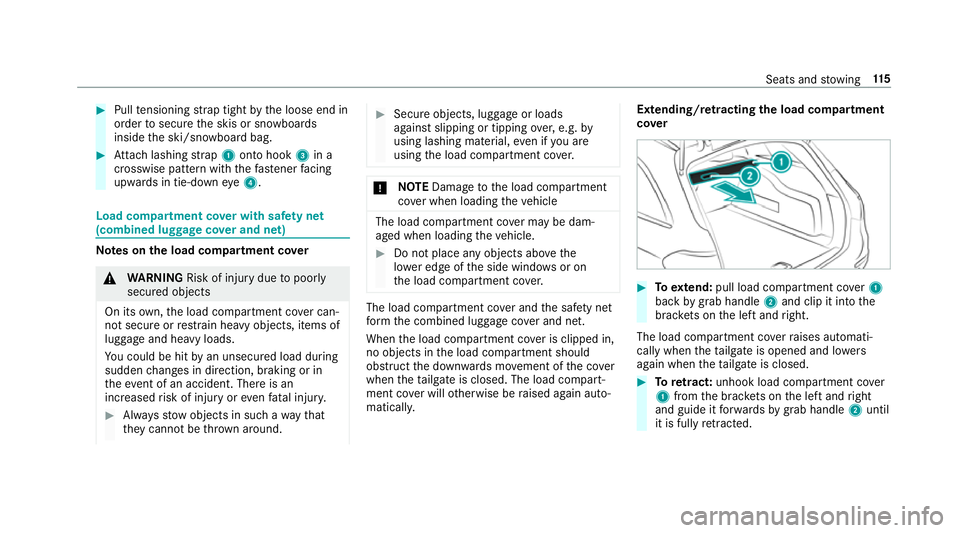
Foldthe cent re rear seat backrest forw ards. #
Slide the bag between the outer seat backr‐
ests into there ar. #
Undo zip 2, place the skis or snowboards
inside the bag and close it. 11 4
Seats and stowing
Page 118 of 565
#
Pull tensioning stra p tight bythe loose end in
order tosecure the skis or snowboards
inside the ski/snowboard bag. #
Attach lashing stra p1 onto hook 3in a
crosswise pattern with thefast ener facing
up wa rds in tie-down eye4. Load compartment co
ver with saf ety net
(combined luggage co ver and net) Note
s onthe load compa rtment co ver &
WARNING Risk of inju rydue topoorly
secured objects
On its own,the load compartment co ver can‐
not secure or restra in heavy objects, items of
luggage and heavy loads.
Yo u could be hit byan unsecured load during
sudden changes in direction, braking or in
th eev ent of an accident. There is an
increased risk of injury or even fata l injur y. #
Alw aysstow objects in such a wayth at
th ey cannot be thro wn around. #
Secure objects, luggage or loads
against slipping or tipping over,e.g. by
using lashing material, even if you are
using the load compartment co ver. *
NO
TEDama getothe load compartment
co ver when loading theve hicle The load compartment co
ver may be dam‐
aged when loading theve hicle. #
Do not place any objects abo vethe
lo we r edge of the side windo wsor on
th e load compartment co ver. The load compartment co
ver and the saf ety net
fo rm the combined luggage co ver and net.
When the load compartment co ver is clipped in,
no objects in the load compartment should
obstruct the down wards mo vement of the co ver
when theta ilgate is closed. The load compart‐
ment co ver will otherwise be raised again auto‐
matically. Extending/r
etra cting the load compa rtment
co ver #
Toextend: pull load compartment co ver1
back bygrab handle 2and clip it into the
brac kets on the left and right.
The load compartment co verra ises automati‐
cally when theta ilgate is opened and lo wers
again when theta ilgate is closed. #
Toretract: unhook load compa rtment co ver
1 from the brac kets on the left and right
and guide it forw ards bygrab handle 2until
it is fully retracted. Seats and
stowing 11 5
Page 119 of 565
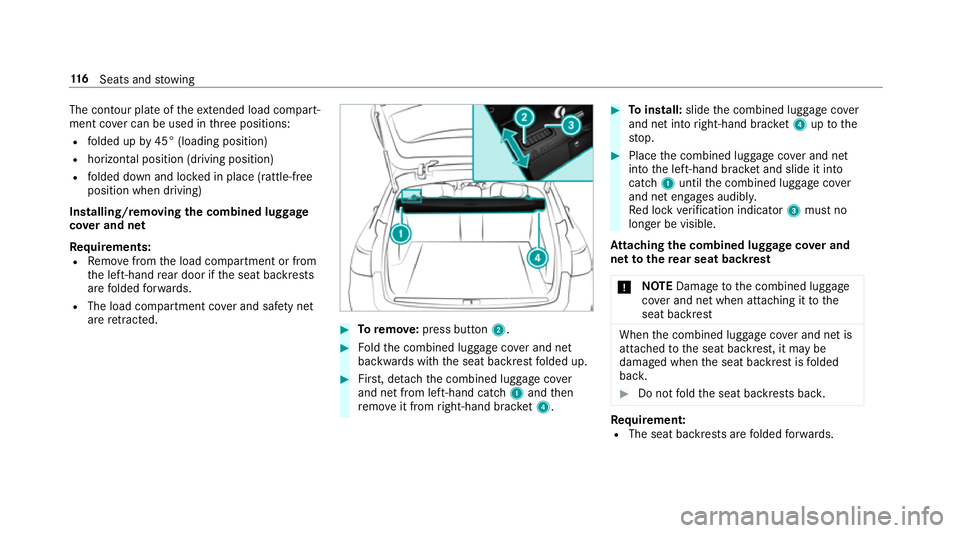
The contour plate of
theex tended load compa rt‐
ment co ver can be used in thre e positions:
R folded up by45° (loading position)
R horizontal position (driving position)
R folded down and loc ked in place (rattle-free
position when driving)
Installing/removing the combined luggage
co ver and net
Re quirements:
R Remo vefrom the load compartment or from
th e left-hand rear door if the seat backrests
are folded forw ards.
R The load compartment co ver and saf ety net
are retracted. #
Toremo ve:press button 2. #
Foldthe combined luggage co ver and net
backwards with the seat backrest folded up. #
First, de tach th e combined luggage co ver
and net from left-hand cat ch1 and then
re mo veit from right-hand brac ket4. #
Toinstall: slidethe combined luggage co ver
and net into right-hand brac ket4 uptothe
st op. #
Place the combined luggage co ver and net
into the left-hand brac ket and slide it into
catch 1until the combined luggage co ver
and net engages audibl y.
Re d lock verification indicator 3must no
longer be visible.
At taching the combined luggage co ver and
net tothere ar seat backrest
* NO
TEDama getothe combined luggage
co ver and net when attaching it tothe
seat backrest When
the combined luggage co ver and net is
attached tothe seat backrest, it may be
damaged when the seat backrest is folded
bac k. #
Do not fold the seat backrests bac k. Re
quirement:
R The seat backrests are folded forw ards. 11 6
Seats and stowing
Page 120 of 565
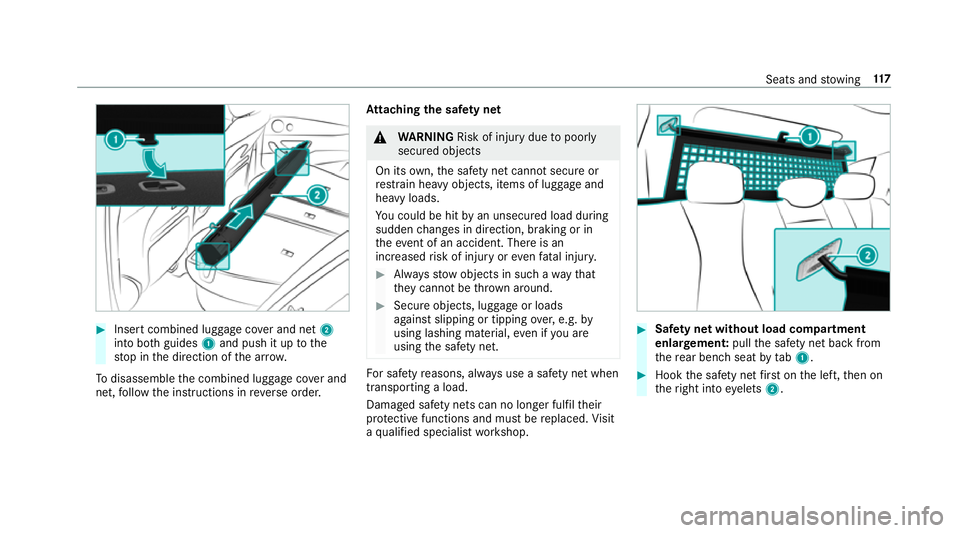
#
Insert combined luggage co ver and net 2
into bo thguides 1and push it up tothe
st op in the direction of the ar row.
To disassemble the combined luggage co ver and
net, follow the instructions in reve rse order. At
taching the saf ety net &
WARNING Risk of inju rydue topoorly
secured objects
On its own,the saf ety net cannot secure or
re stra in heavy objects, items of luggage and
heavy loads.
Yo u could be hit byan unsecured load during
sudden changes in direction, braking or in
th eev ent of an accident. There is an
increased risk of injury or even fata l injur y. #
Alw aysstow objects in such a wayth at
th ey cannot be thro wn around. #
Secure objects, luggage or loads
against slipping or tipping over,e.g. by
using lashing material, even if you are
using the saf ety net. Fo
r saf etyre asons, alw ays use a saf ety net when
transporting a load.
Damaged saf ety nets can no lon ger fulfil their
pr otective functions and must be replaced. Visit
a qu alified specialist workshop. #
Safety net without load compartment
enlar gement: pullthe saf ety net back from
th ere ar ben chseat bytab1. #
Hook the saf ety net firs t on the left, then on
th eright into eyelets 2. Seats and
stowing 117
Page 121 of 565
#
Safety net with load compartment
enlar gement: guidethe saf ety net up bytab
1 and hook it into eyelets 2. Overview of
the tie-down eyes 1
Tie-down eyes
Re lated topic:
Loading guidelines (→ page108). Overview of bag hoo
ks &
WARNING Risk of inju rywhen using bag
hooks with heavy objects
The bag hooks cannot restra in heavy objects
or items of luggage.
Objects or items of luggage could be thrown
around and thereby hit vehicle occupants
when braking or abruptly changing direc‐
tions. #
Onlyhang light objects on the bag
hooks. #
Never hang hard, sharp-edged or fragile
objects on the bag hooks. The bag hook can bear a maximum load of 3
kg.
Do not use it tosecure a load. 11 8
Seats and stowing
Page 122 of 565
1
Bag hook
Re lated topic:
Loading guidelines (→ page108). EASY
-PAC K load-secu ring kit Note
s onthe EAS Y-PA CK load-securing kit
The EA SY-PAC K load-securing kit allows youto
use your load co mpartment for a variet y of pur‐
poses. The co mponents are located under the
load compartment floor. 1
Bag containing the brac kets and luggage
holder
2 Telescopic rod Seats and
stowing 11 9