2016 MERCEDES-BENZ E-CLASS ESTATE inflation pressure
[x] Cancel search: inflation pressurePage 394 of 565
nering, when accele
rating stronglyand when
braking. #
Do not exceed the maximum permissi‐
ble speed. #
Avoid any abrupt steering and driving
manoeuvres as well as driving over
obs tacles (kerbs, pot holes, off-road).
This applies, in pa rticular, toa loaded
ve hicle. #
Stop driving in run-flat mode if you
notice:
R banging noise
R vehicle vibration
R smoke which smells like rubber
R continuous ESP ®
inter vention
R crac ksin tyre side walls #
After driving in run-flat mode, ha vethe
ri ms checkedby aqu alified specialist
wo rkshop with rega rd totheir fur ther
use. #
The defective tyre must be replaced in
eve rycase. Driving distance possible in li
mp-home mode
af te r the pressure loss warning Load condition Driving distance pos‐
sible in limp-homemode
Pa rtially laden 80 km
Fu lly laden 30 km R
The driving dis tance possible in li mp-home
mode may vary depending on the driving
st yle.
R Maximum permissible speed 80 km/h.
If a tyre has gone flat and cannot be replaced
with an MOEx tended tyre, a standard tyre may
be used as a temp orary measure. TIREFIT kit
storage location The TIREFIT kit is located under
the load com‐
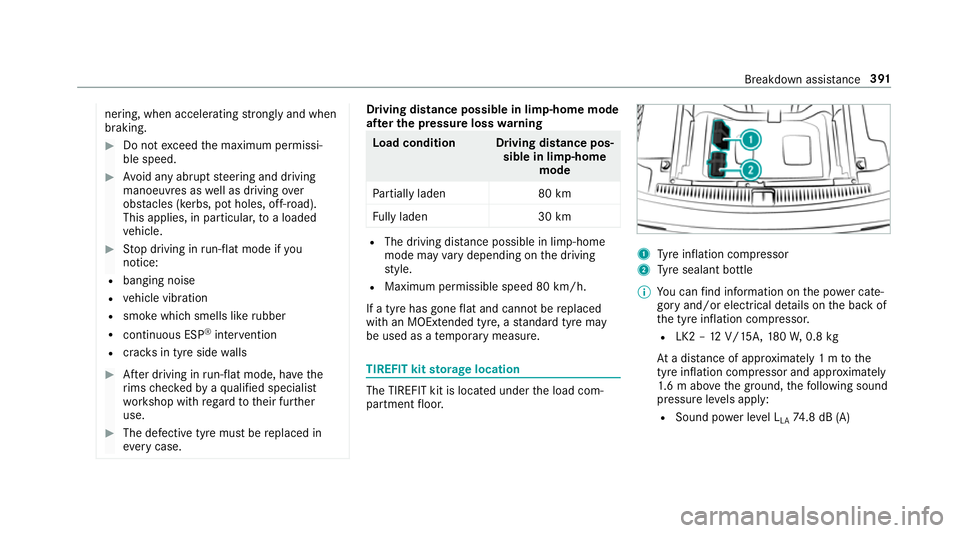
partment floor. 1
Tyre inflation compressor
2 Tyre sealant bottle
% You can find information on the po wer cate‐
gory and/or electrical de tails on the back of
th e tyre inflation compressor.
R LK2 – 12V/15A, 180W, 0.8 kg
At a dis tance of appr oximately 1 m tothe
tyre inflation compressor and appr oximately
1. 6 m abo vethe ground, thefo llowing sound
pressure le vels apply:
R Sound po wer le vel L
LA 74
.8 dB (A) Breakdown assis
tance 391
Page 396 of 565
Ha
ve the tyre sealant bottle replaced everyfour
ye ars at a qualified specialist workshop. #
Do not remo veany fore ign objects which
ha ve penetra tedth e tyre. #
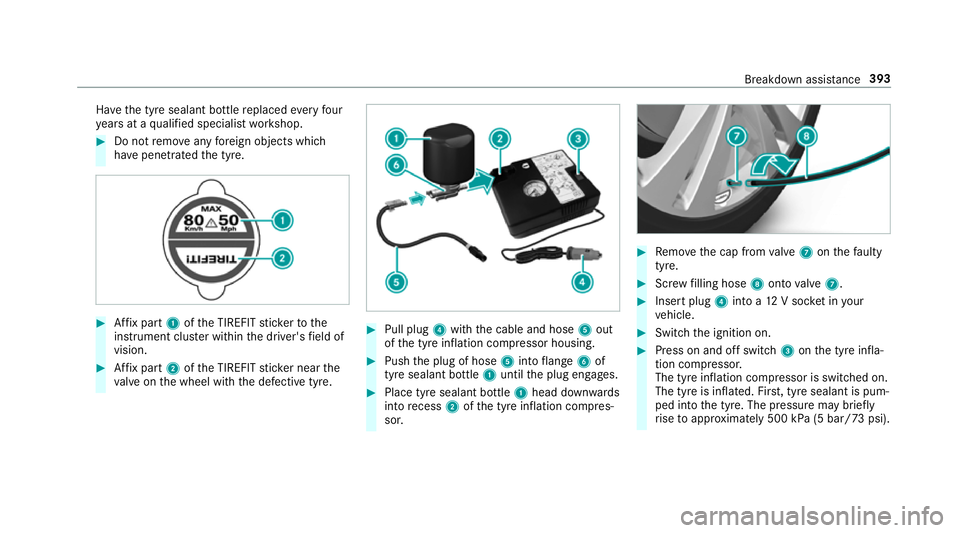
Affix pa rt1 ofthe TIREFIT sticke rto the
instrument clus ter within the driver's field of
vision. #
Affix pa rt2 ofthe TIREFIT sticke r near the
va lve on the wheel with the defective tyre. #
Pull plug 4with the cable and hose 5out
of the tyre inflation compressor housing. #
Push the plug of hose 5into flange 6of
tyre sealant bottle 1until the plug engages. #
Place tyre sealant bottle 1head down wards
into recess 2ofthe tyre inflation compres‐
sor. #
Remo vethe cap from valve 7 onthefa ulty
tyre. #
Screw filling hose 8onto valve 7. #
Insert plug 4into a 12V soc ket in your
ve hicle. #
Switch the ignition on. #
Press on and off switch 3onthe tyre infla‐
tion compressor.
The tyre inflation compressor is switched on.
The tyre is inflated. Fir st, tyre sealant is pum‐
ped into the tyre. The pressure may brief ly
ri se toappr oximately 500 kPa (5 bar/73 psi). Breakdown assis
tance 393
Page 397 of 565
Do not swit
choff the ty reinflation compres‐
sor during this phase. #
Let the tyre inflation compressor runfo r a
maximum of ten minu tes.
The tyre should then ha veattained a tyre
pressure of at least 200 kPa (2.0 bar/
29 psi).
If tyre sealant leaks out, make sure you clean the
af fected area as quickly as possible. It is prefera‐
ble touse clean water.
If yo uge t tyre sealant on your clo thing, ha veit
cleaned as soon as possible with per chloroe thy‐
lene.
If, af terte n minutes, a tyre pressure of
200 kPa (2.0 bar/29 psi) has not been ach‐
ie ve d: #
Switch off the tyre inflation compressor. #
Unscr ew thefilling hose from theva lve of the
defective tyre.
Please no tethat tyre sealant may leak out when
unscr ewing thefilling hose. #
Very slowly drive forw ards or reve rse appr ox‐
imately 10m. #
Pump up the tyre again.
Af ter a maximum of ten minu testh e tyre
pressure must be at least 200 kPa (2.0 bar/
29 psi). &
WARNING Risk of accident due tothe
specified tyre pressure not being ach‐
ie ved
If th e specified tyre pressure is not achie ved
af te rth e specified time, the tyre is too badly
damaged. The tyre sealant cannot repair the
tyre in this ins tance.
Dama ged tyres and a tyre pressure that is
to o low can significantly impair braking and
handling characteristics. #
Do not drive on. #
Consult a qualified specialist workshop. If, af
terte n minutes, a tyre pressure of
200 kPa (2.0 bar/29 psi) has been achie ved: &
WARNING Risk of accident from driving
wi th sealed tyres
A tyre temp orarily sealed with tyre sealant
impairs handling characteristics and is not
suitable for higher speeds. #
Adapt your driving style according lyand
drive carefull y. #
Do not exceed the specified maximum
speed with a tyre that has been sealed
using tyre sealant. #
Obse rveth e maximum permissible speed for
a tyre sealed with tyre sealant 80 km/h. #
Affix th e upper section of the TIREFIT sticker
to the instrument clus ter where it will be eas‐
ily seen bythe driver.
* NO
TEStaining from leaking tyre sealant Af
ter use, excess tyre sealant may leak out
from thefilling hose. 394
Breakdown assis tance
Page 398 of 565
#
Therefore, place thefilling hose in the
plastic bag that con tained the TIREFIT
kit. +
ENVIRONMEN
TALNO TEEnvironmental
pollution caused byenvironmen tally ir re‐
sponsible disposal Ty
re sealant contains polluta nts.#
Have the tyre sealant bottle disposed of
professionall y,e.g. at a Mercedes-Benz
service cent re. #
Switch off the tyre inflation compressor. #
Unscr ew thefilling hose from theva lve of the
defective tyre. #
Stow th e tyre sealant bottle, the tyre inflation
compressor and thewa rning triangle. #
Pull away immediatel y. #
Stop af ter driving for appro ximately ten
minutes and check the tyre pressure using
th e tyre inflation compressor.
The tyre pressure must now be at least
13 0 kPa (1.3 bar/19 psi). &
WARNING Risk of accident due tothe
specified tyre pressure not being ach‐
ie ved
If th e specified tyre pressure is not achie ved
af te r a brief drive, the tyre is too badly dam‐
aged. The tyre sealant cannot repair the tyre
in this ins tance.
Dama ged tyres and a tyre pressure that is
to o low can significantly impair braking and
handling characteristics. #
Do not drive on. #
Consult a qualified specialist workshop. Countries
that ha veMercedes-Benz
Service24h: ast icke r with the phone number
can also be found in your vehicle, e.g. on the
B‑pillar on the driver's side. #
Cor rect the tyre pressure if it is still at least
13 0 kPa (1.3 bar/19 psi). See the tyre pres‐
sure table on the fuel filler flap forva lues. #
Toincrease the ty repressure: switch on
th e tyre inflation compressor. #
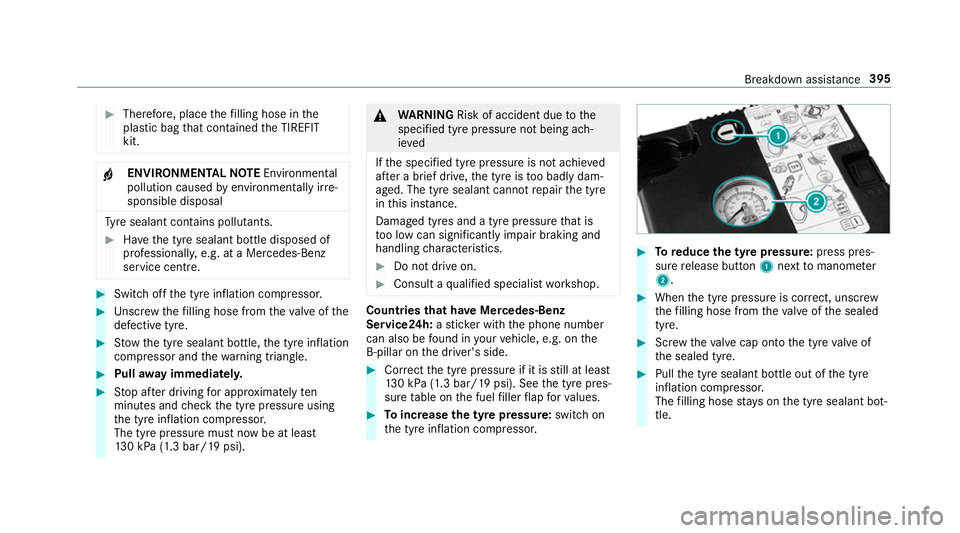
Toreduce the tyre pressure: press pres‐
su re re lease button 1next tomanome ter
2 . #
When the tyre pressure is cor rect, unscr ew
th efilling hose from theva lve of the sealed
tyre. #
Screw theva lve cap onto the tyre valve of
th e sealed tyre. #
Pull the tyre sealant bottle out of the tyre
inflation compressor.
The filling hose stay s on the tyre sealant bot‐
tle. Breakdown assis
tance 395
Page 556 of 565
St
oring .................................................3 67
Using a voice tag ................................. 367
Tw o-w ayradio telephone
see Mobile phone
Tw o-w ayradios ........................................ 429
Fr equencies ......................................... 430
No tes on ins tallation .......................... .429
Tr ansmission output (maximum) ........ .430
Ty pe appr oval number (EU) .................... 431
Ty pes of commands (LINGU ATRO NIC) ... 268
Ty re inflation compressor
see TIREFIT kit
Ty re pressure ........................................... 392
Checking (ty repressure monitoring
sy stem) ................................................ 413
No tes ................................................... 41 0
Re starting the tyre pressure loss
wa rning sy stem .................................... 417
Re starting the tyre pressure monitor‐
ing sy stem ...........................................4 13
Ty re pressure loss warning sy stem
(function) ............................................. 416
Ty re pressure monitoring sy stem
(function) ............................................. 412Ty
re pressure table ...............................4 11
Ty re pressure loss warning sy stem
Fu nction ............................................... 416
Re starting ............................................ 417
Ty re pressure moni toring sy stem
Checking the tyre pressures ................4 13
Fu nction ............................................... 412
Re starting ............................................ 413
Te ch nical da ta...................................... 414
Ty re pressure table .................................. 411
Ty re tread ................................................. 409
Ty re-change tool kit
Overview .............................................. 421
Ty res
Changing ............................................ .422
Changing hub caps .............................. 422
Che cking the tyre pressure (tyre
pressure monitoring sy stem) ............... 413
Fitting .................................................. 425
Flat tyre ............................................... 390
MOExtended tyres ............................... 390
Noise ................................................... 409
No tes on fitting .................................... 417
Re moving ............................................ 425 Re
placing .............................................4 17
Re starting the tyre pressure loss
wa rning sy stem .................................... 417
Re starting the tyre pressure monitor‐
ing sy stem ...........................................4 13
Selection .............................................. 417
Snow chains ........................................ 409
St oring .................................................4 21
TIREFIT kit ...........................................3 92
Ty re pressure (N otes) ........................... 41 0
Ty re pressure loss warning sy stem
(function) ............................................. 416
Ty re pressure monitoring sy stem
(function) ............................................. 412
Ty re pressure table ...............................4 11
Ty re(s) .................................................4 09
Un usual handling characteristics ........ 409 U
Un its of measurement
Setting ................................................ .291
Un locking setting ...................................... 65
USB devices Connecting .......................................... 351 Index
553