Page 184 of 565

*
NO
TEDama getotheve hicle or the driv‐
et ra in caused bytheve hicle rolling away #
Alw ays proper lysecure theve hicle
against rolling away. #
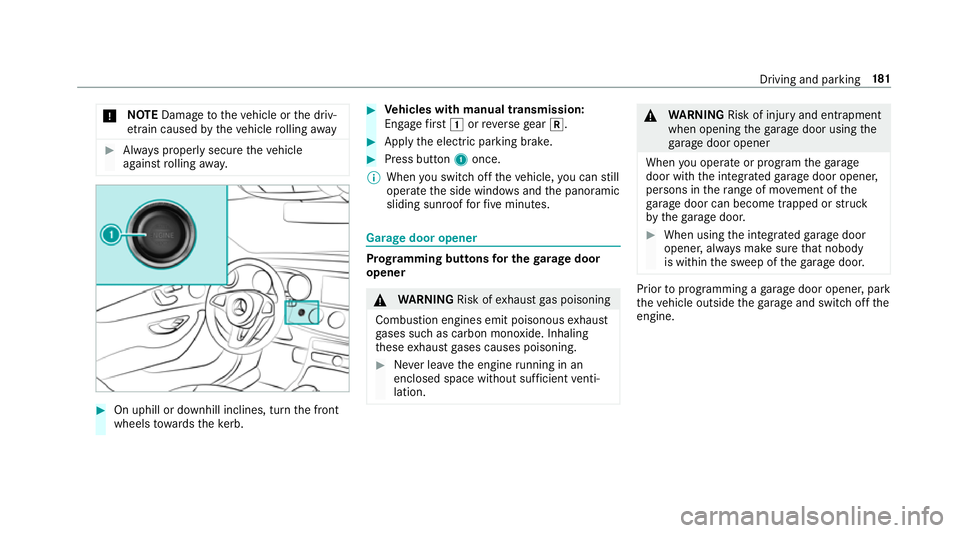
On uphill or downhill inclines, turn the front
wheels towa rdsth eke rb. #
Vehicles with manual transmission:
Engage firs t1 orreve rsege ar k. #
App lythe electric parking brake. #
Press button 1once.
% When you swit choff theve hicle, you can still
opera tethe side windo wsand the panoramic
sliding sunroof forfive minutes. Garage door opener
Prog
ramming buttons for the garage door
opener &
WARNING Risk ofexhaust gas poisoning
Combustion engines emit poisonous exhaust
ga ses such as carbon monoxide. Inhaling
th ese exhaust gases causes poisoning. #
Never lea vethe engine running in an
enclosed space wi thout suf ficient venti‐
lation. &
WARNING Risk of inju ryand ent rapment
when opening thega rage door using the
ga rage door opener
When you operate or program thega rage
door with the integrated garage door opener,
persons in thera nge of mo vement of the
ga rage door can become trapped or stru ck
by thega rage door. #
When using the integrated garage door
opener, alw ays make sure that nobody
is within the sweep of thega rage door. Prior
toprog ramming a garage door opener, park
th eve hicle outside thega rage and swit choff the
engine. Driving and parking
181
Page 185 of 565

#
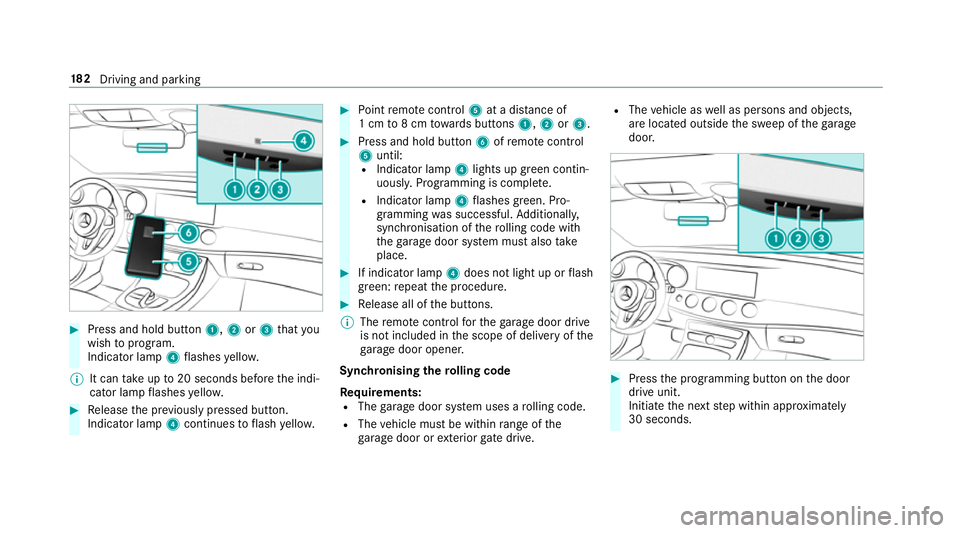
Press and hold button 1,2or3 that you
wish toprog ram.
Indicator lamp 4flashes yello w.
% It can take up to20 seconds before the indi‐
cator lamp flashes yello w. #
Release the pr eviously pressed button.
Indicator lamp 4continues toflash yello w. #
Point remo tecontrol 5at a di stance of
1 cm to8 cm towa rds buttons 1,2or3. #
Press and hold button 6ofremo tecontrol
5 until:
R Indicator la mp4lights up green contin‐
uousl y.Programming is comple te.
R Indicator lamp 4flashes green. Pro‐
gr amming was successful. Additionally,
synchronisation of thero lling code with
th ega rage door sy stem must also take
place. #
If indicator lamp 4does not light up or flash
green: repeat the procedure. #
Release all of the buttons.
% The remo tecontrol forth ega rage door drive
is not included in the scope of delivery of the
ga rage door opener.
Synchronising thero lling code
Re quirements:
R The garage door sy stem uses a rolling code.
R The vehicle must be within range of the
ga rage door or exterior gate drive. R
The vehicle as well as persons and objects,
are located outside the sweep of thega rage
door. #
Press the programming button on the door
drive unit.
Initiate the next step within appr oximately
30 seconds. 18 2
Driving and pa rking
Page 186 of 565

#
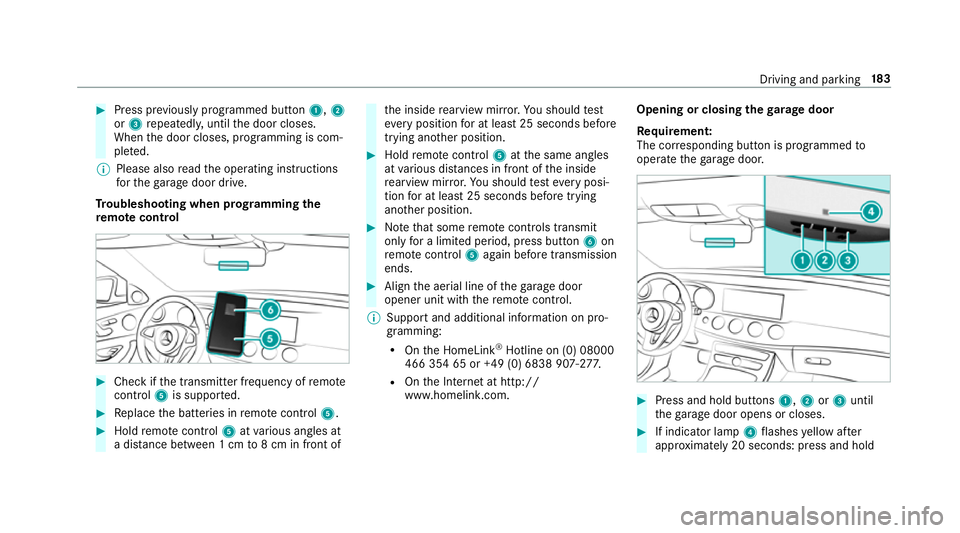
Press pr eviously prog rammed button 1,2
or 3 repeatedl y,until the door closes.
When the door closes, programming is com‐
ple ted.
% Please also read the operating instructions
fo rth ega rage door drive.
Tr oubleshooting when prog ramming the
re mo tecont rol #
Check if the transmit ter frequency of remo te
control 5is suppo rted. #
Replace the batteries in remo tecontrol 5. #
Hold remo tecontrol 5atvarious angles at
a dis tance between 1 cm to8 cm in front of th
e inside rearview mir ror.Yo u should test
eve ryposition for at least 25 seconds before
trying ano ther position. #
Hold remo tecontrol 5atthe same angles
at various dis tances in front of the inside
re arview mir ror.Yo u should test eve ryposi‐
tion for at least 25 seconds before trying
ano ther position. #
Notethat some remo tecontrols transmit
only for a limi ted period, press button 6on
re mo tecontrol 5again before transmission
ends. #
Align the aerial line of thega rage door
opener unit with there mo tecontrol.
% Support and additional information on pro‐
gramming:
R Onthe HomeLink ®
Hotline on (0) 08000
466 354 65 or +49 (0) 6838 907-2 77.
R Onthe Internet at http://
www.homelin k.com. Opening or closing the
garage door
Requ irement:
The cor responding button is programmed to
operate thega rage door. #
Press and hold buttons 1,2or3 until
th ega rage door opens or closes. #
If indicator lamp 4flashes yellow af ter
appr oximately 20 seconds: press and hold Driving and parking
18 3
Page 537 of 565

Fu
ses ........................................................ 406
Assignment diagram ............................4 06
Before changing .................................. 406
Fu se box in the engine compartment .. 407
Fu se box in the front-passen gerfo ot‐
we ll ...................................................... 408
Fu se box in the load compartment ...... 408
Fu se box on the dashboard ................. 408
No tes .................................................. 406 G
Garage door opener Cleari ngthe memory ........................... 184
Opening or closing thega rage door .....1 83
Programming buttons .......................... 181
Ra dio equipment appr oval number ...... 184
Re solving problems ............................. 183
Synchronising thero lling code ............ 182
Gearshift paddles see Steering wheel gearshift paddles
Gea rshift recommendation .............170, 173
Genuine parts ............................................ 22
Genuine wood (Care) .............................. 385
Glide mode .............................................. .174 Glo
vebox
Air vent ................................................ 15 9
Locking/unlocking ...............................1 10
Gross mass ............................................. .431 H
Handbrake see Electric parking brake
Handling characteristics (unusual) ....... 409
HANDS-FREE ACCESS ................................ 76
HANDS-FREE ACCESS
see Opening theta ilgate using your foot
Hands-free sy stem .................................... 69
Hazard warning lights ............................ .134
HD prog rammes
see CAmodule (TV)
Head restra int .......................................... .95
Fr ont (adjusting manually) ..................... 95
Fr ont (luxury head restra int) .................. 96
Re ar (adjusting) .................................... .97
Re ar (lo wering from the front) ............... 97
Re ar (removing/fitting) .......................... 97Head-up display
Adjusting brightness (on-board com‐
pu ter) .................................................. 264
Ad justing display elements (on-board
compu ter) ............................................ 264
Fu nction .............................................. 265
Menu (on-board compu ter) .................. 264
Setting the position (on-board com‐
puter) .................................................. 264
Switching on/off ................................. 266
Using the memory function ................. 107
Head-up display see Menu (on-boa rdcompu ter)
Head-up display menu see On-board computer
Headlamp flashing .................................. 13 3
Heating see Climate control
High-pressure cleaner (care) ................. 380
Hill start assi st........................................ 212
HOLD function ......................................... 212
Ac tivating/deactivating ...................... .212
Fu nction/no tes .................................... 212534
Index