2016 MERCEDES-BENZ E-CLASS ESTATE tyre pressure
[x] Cancel search: tyre pressurePage 6 of 565
Driving and pa
rking .................................. 161
Driving ......................................................... 161
DY NA MIC SELECT switch ............................1 68
Manual transmission .................................. 17 0
Au tomatic transmission .............................. 171
Re fuelling .................................................... 175
Pa rking ...................................................... .180
Driving and driving saf ety sy stems .............1 88
Tr ailer hit ch................................................. 247
Bicycle rack ................................................ 251 In
stru ment Displ ayand on-board
comp uter.................................................. 254
Instrument display overview ...................... .254
Overview of the buttons on thesteering
wheel ..........................................................2 55
Operating the on-board computer .............. 256
Displa ysinthe multifunction display ..........2 57
Ad justing the instrument lighting ............... 258
Menus and submenus ................................ 258
Head-up Display ......................................... 265 LINGU
ATRO NIC ......................................... 267
Ope rating sa fety ......................................... 267 Operation ................................................... 267
Using LINGU ATRO NIC ef fectively ............... 269
Essential commands .................................. 269 Multimedia sy
stem .................................. 278
Overview and operation .............................. 278
Sy stem settings .......................................... 286
Na vigation .................................................. 294
Te lephone .................................................. .317
Online and Internet functions ..................... 339
Media ......................................................... 347
Ra dio .......................................................... 359
TV ............................................................... 362
Sound ......................................................... 370 Maintenance and care
.............................372
ASS YST PLUS service inter val display ........ .372
Engine compartment .................................. 373
Cleaning and care ...................................... .380 Breakdown assi
stance ............................ 388
Emergency ................................................. .388
Flat tyre ...................................................... 390 Battery (vehicle) ......................................... 396
To
w starting or towing away ....................... 400
Electrical fuses ........................................... 406 Wheels and tyres
..................................... 409
Noise or unusual handling characteris‐
tics ............................................................ .409
Re gular checking of wheels and tyres ........ 409
No tes on snow chains ................................ 409
Ty re pressure .............................................. 41 0
Wheel change .............................................. 417
Emergency spare wheel .............................. 427 Te
ch nical data .......................................... 429
No tes on tech nical da ta.............................. 429
On-board electronics .................................. 429
Ve hicle identification plate, VIN and
engine number ............................................ 431
Operating fluids .......................................... 433
Ve hicle data ................................................ 441
Tr ailer hit ch................................................ 442 Con
tents 3
Page 14 of 565
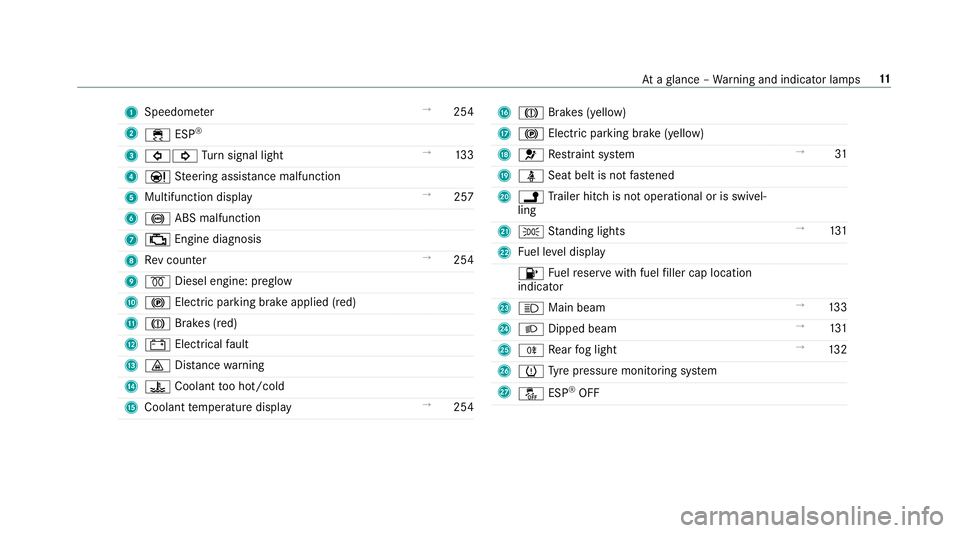
1
Speedom eter →
254
2 ÷ ESP®
3 #! Turn signal light →
13 3
4 Ð Steering assis tance malfunction
5 Multifunction displ ay →
257
6 ! ABS malfunction
7 ; Engine diagnosis
8 Rev counter →
254
9 % Diesel engine: preglow
A ! Electric parking brake applied (red)
B J Brakes (red)
C # Electrical fault
D · Distance warning
E ? Coolant too hot/cold
F Coolant temp erature display →
254 G
J Brakes (yellow)
H ! Electric pa rking brake (yellow)
I 6 Restra int sy stem →
31
J ü Seat belt is not fastened
K j Trailer hit chis not operational or is swivel‐
ling
L T Standing lights →
131
M Fuel le vel display
8 Fuelreser vewith fuel filler cap location
indicator
N K Main beam →
13 3
O L Dipped beam →
131
P R Rear fog light →
13 2
Q h Tyre pressure monitoring sy stem
R å ESP®
OFF At
aglance – Warning and indicator lamps 11
Page 16 of 565
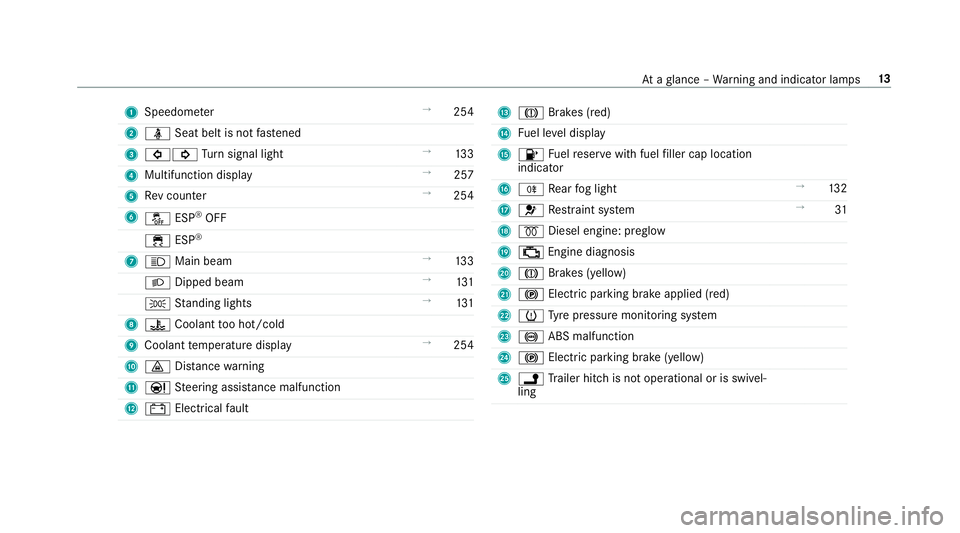
1
Speedom eter →
254
2 ü Seat belt is not fastened
3 #! Turn signal light →
13 3
4 Multifunction display →
257
5 Rev counter →
254
6 å ESP®
OFF
÷ ESP®
7 K Main beam →
13 3
L Dipped beam →
131
T Standing lights →
131
8 ? Coolant too hot/cold
9 Coolant temp erature display →
254
A · Distance warning
B Ð Steering assis tance malfunction
C # Electrical fault D
J Brakes (red)
E Fuel le vel display
F 8 Fuelreser vewith fuel filler cap location
indicator
G R Rear fog light →
13 2
H 6 Restra int sy stem →
31
I % Diesel engine: preglow
J ; Engine diagnosis
K J Brakes (yellow)
L ! Electric pa rking brake applied (red)
M h Tyre pressure monitoring sy stem
N ! ABS malfunction
O ! Electric pa rking brake (yellow)
P j Trailer hit chis not operational or is swivel‐
ling At
aglance – Warning and indicator lamps 13
Page 24 of 565
Pr
otection of the environment
+ ENVIRONMENTAL
NOTEEnvironmental
dama gedue tooperating conditions and
personal driving style The pollutant emission of
your vehicle is
directly related tothewa yyo u operate your
ve hicle.
Yo u can help toprotect the environment by
operating your vehicle in an environmentally-
re sponsible manner. Please obser vethefo l‐
lowing recommendations on ope rating condi‐
tions and pe rsonal driving style.
Operating conditions: #
Make sure that the tyre pressure is cor‐
re ct. #
Do not car ryany unnecessary weight
(e.g. roof luggage rack s once you no
lon ger need them). #
Adhere tothe service inter vals.
A regularly serviced vehicle will contri b‐
ute toenvironmen tal pr otection. #
Alw ays ha veservice workcar ried out at
a qu alified specialist workshop.
Pe rsonal driving style: #
Do not depress the accelera tor pedal
when starting the engine. #
Do not warm upthe engine while the
ve hicle is stationar y. #
Drive carefully and maintain a suitable
di st ance from theve hicle in front. #
Avoid frequent, sudden acceleration
and braking. #
Change gear in good time and use each
ge ar on lyup toÔ of its maximum
engine speed. #
Switch off the engine in stationary traf‐
fi c. #
Keep an eye on theve hicle's fuel con‐
sum ption. Ta
ke -back of end-of-life vehicles
EU countries onl y:
Mercedes-Benz will take back your end-of-life
ve hicle for environment-friendly disposal in
accordance with the European Union(EU) End-
of-Life Vehicles Directive.
A network of vehicle take -ba ckpoints and dis‐
mantlers has been es tablished foryo uto return
yo ur vehicle. You can lea veit at any of these
points free of charge . This makes an impor tant
contribution toclosing there cycling circle and
conse rving resources.
Fo r fur ther information about there cycling and
disposal of end-of-li fevehicles, and theta ke-
back conditions, please visit the national
Mercedes-Benz website foryo ur count ry. Gene
ral no tes 21
Page 167 of 565
If
th eve hicle does not star t: #
Lea vekey1 in mar ked space 2. #
Depress the brake pedal and start theve hicle
using thest art/ stop button.
% You can also swit chon the po wer supp lyor
th e ignition with thest art/ stop button. Ru
nning-in no tes To
preser vethe engine during thefirs t1, 500 km:
R drive at varying road speeds and engine
speeds.
R drive in drive program Cor E.
R change gear before there v counter needle is
Ô ofthewa yto there d area of there v coun‐
te r.
R do not shift down a gear manually in order to
brake.
R avoidoverstra ining theve hicle, e.g. driving at
full thro ttle.
R vehicles with automatic transmission: do
not depress the accelera tor pedal past the
pressure point (kickdown). R
only increase the engine speed gradually and
accelera tetheve hicle tofull speed af ter
1, 500 km.
This also applies when the engine or parts of the
driv etra in ha vebeen replaced.
Please also obser vethefo llowing running-in
no tes:
R In cer tain driving and driving saf ety sy stems,
th e sensors adjust automatically while a cer‐
ta in dis tance is being driven af terth eve hicle
has been delivered or af terre pairs. Full sys‐
te m ef fectiveness is not achie ved until the
end of this teach-in process.
R Brake linings, brake discs and tyres that are
either new or ha vebeen replaced only ach‐
ie ve optimum braking ef fect and grip af ter
se veral hundred kilom etre s of driving. Com‐
pensate forth ere duced braking ef fect by
applying greaterfo rc eto the brake pedal. Driving tips
&
WARNING Risk of accident due to
objects in the driver's foot we ll
Objects in the driver's foot we ll may impede
pedal tr avel or block a depressed pedal.
This jeopardises the operating and road
saf ety of theve hicle. #
Stow all objects in theve hicle securely
so that they cannot getinto the driver's
fo ot we ll. #
Ensure floor mats and carpets cannot
slip and pr ovide suf ficient room forthe
pedals. #
Do not lay multiple floor mats or car‐
pets on top of one ano ther. 16 4
Driving and pa rking
Page 180 of 565
*
NO
TEDo not overfill the fuel tank, other‐
wise the fuel sy stem may be damaged. #
Only fill th e fuel tank until the pump
nozzle switches off. *
NO
TEDo not overfill the fuel tank, other‐
wise fuel may spay out when youre mo ve
th e pump nozzle. #
Only fill th e fuel tank until the pump
nozzle switches off. Re
quirement:
The vehicle must be unloc ked.
% Do not get into theve hicle again during the
re fuelling process. Otherwise, electros tatic
ch arge could build up again.
Obser vethe no tes on operating fluids
(→ page 433). Re
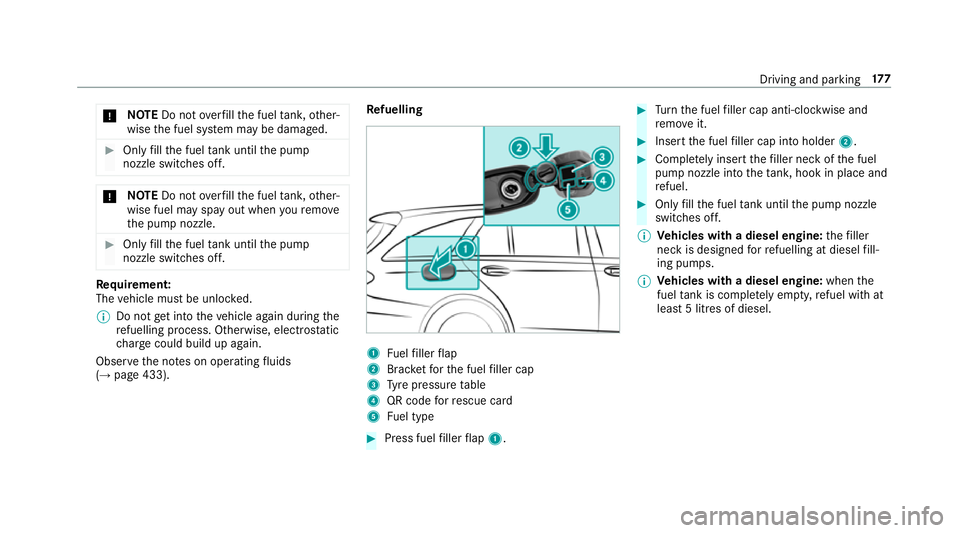
fuelling 1
Fuelfiller flap
2 Brac ketfo rth e fuel filler cap
3 Tyre pressure table
4 QR code forre scue card
5 Fuel type #
Press fuel filler flap 1. #
Turn the fuel filler cap anti-clockwise and
re mo veit. #
Insert the fuel filler cap into holder 2. #
Comple tely inse rtthefiller neck of the fuel
pump nozzle into theta nk, hook in place and
re fuel. #
Only fill th e fuel tank until the pump nozzle
switches off.
% Vehicles with a diesel engine: thefiller
neck is designed forre fuelling at diesel fill‐
ing pumps.
% Vehicles with a diesel engine: whenthe
fuel tank is compl etely em pty, refuel with at
lea st5 litres of diesel. Driving and parking
17 7
Page 192 of 565
Fu
nctions of ABS (anti-lock braking sy stem) ABS
regulates the brake pressure in critical driv‐
ing situations:
R During braking, the wheels are pr evented
from blocking, e.g. due tomaximum full-s top
braking or insuf ficient traction of the tyres.
R Vehicle steerability while braking is ensured.
R ABS is active from speeds of appr ox.
8 km/h.
If ABS inter venes when braking, you will feel a
pulsing in the brake pedal. The pulsating brake
pedal can be an indication of hazardous road
conditions and can ser veas a reminder totake
ex tra care while driving.
Sy stem limits
ABS may be impaired or may not function if a
malfunction has occur red and theye llow !
ABS warning lamp lights up continuously in the
instrument clus ter af terth e engine is star ted. Fu
nction of BAS (Brake Assist Sy stem) &
WARNING Risk of an accident caused by
a malfunction in BAS (Brake Assi stSys‐
te m)
If BA S is malfunctioning, the braking dis tance
may increase in an emergency braking situa‐
tion. #
Dep ress the brake pedal with full force
in emer gency braking situations. ABS
pr eve nts the wheels from locking. BA
S suppo rts yo ur eme rgency braking situation
with additional brake forc e.
If yo u depress the brake pedal quickl y,BA S is
acti vated:
R BAS au tomatical lyboosts the brake pres‐
sure.
R BAS can sho rten the braking dis tance.
R ABS pr events the wheels from locking.
The brakes will function as usual once you
re lease the brake pedal. BAS is deactivated. Fu
nctions of ESP ®
(Electronic Stability Pro‐
gr am) &
WARNING Risk of skidding if ESP ®
is
malfunctioning
If ESP ®
is malfunctioning, ESP ®
cannot car ry
out vehicle stabilisation. In addition, other
driving saf ety sy stems are switched off. #
Drive on carefull y. #
Have ESP ®
ch ecked at a qualified spe‐
cialist workshop. &
WARNING Risk of skidding if ESP ®
is
deactivated
If yo u deactivate ESP ®
, ESP ®
cannot car ry
out vehicle stabilisation. #
ESP ®
should on lybe deactivated in the
fo llowing situations. ESP
®
monitors and impr oves driving stability and
traction, particular ly inthefo llowing situations:
R When pulling away on wet or slippe ryroads. Driving and parking
18 9
Page 201 of 565
R
Ifth e sensors malfunction due to otherradar
source inter fere nce, forex ample strongradar
re flections in multi-s torey car par ks.
R If a loss of tyre pressure or a defective tyre
has been de tected and displ ayed.
The sy stem may not react cor rectly:
R In compl extraf fic st ations where objects
cannot alw ays be clearly identified.
R Topedestrians or vehicles if they mo ve
qu ickly into the sensor de tection range.
R Topedestrians who are hidden by other
objects.
R Ifth e typical outline of a pedestrian cann ot
be distinguished from the bac kground.
R If a pedestrian is not recognised as su ch, e.g.
due tospecial clo thing or other objects.
R On bends with a tight radius. Setting
Active Brake Assi st Multimedia sy
stem:
, Vehicle .
k Assistance .
Active
Brake Assist
Ve hicles without Driving Assistance pack‐
age: The settings can be made af terst arting the
ve hicle.
Ve hicles with Driving Assistance pac kage:
The settings can be made when the ignition is
switched on.
% It is recommended that you alw ays lea ve
Ac tive Brake Assi stswitched on.
The moment of warning or inter vention can be
adjus ted as follo ws: #
Select Active Brake Assist Warning/brake
application: early: your selection is retained
when theve hicle is next star ted. #
Select Active Brake Assist Warning/brake
application: medium :yo ur selection is
re tained when theve hicle is next star ted. #
Select Active Brake Assist Warning/brake
application: late :yo ur selection is retained
when theve hicle is next star ted. #
Select Active Brake Assist Warning/brake
application: off:
Ve hicles without Driving Assistance pack‐
age: The dis tance warning function and the
autonomous braking function are deactiva‐
te d. When theve hicle is next star ted, the
middle setting is auto matically selected.
Ve hicles with Driving Assistance pack‐
age: The dis tance warning function and the
autonomous braking function are deactiva‐
te d. Evasive Steering Assist is una vailable.
When the ignition is next star ted, the middle
setting is selected automatically and Evasive
St eering Assist is available.
% When Active Brake Assi stis deactivated, the
æ symbol appears inthe assis tance
graphic in the multifunction displa y.19 8
Driving and pa rking