2016 MERCEDES-BENZ E-CLASS ESTATE buttons
[x] Cancel search: buttonsPage 152 of 565
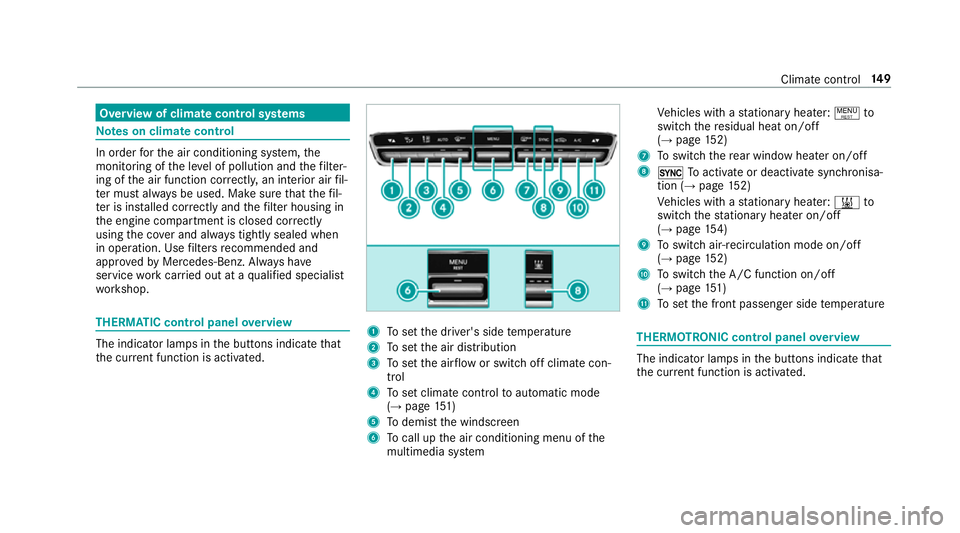
Overview of climate control sy
stems Note
s on climate control In order
forth e air conditioning sy stem, the
monitoring of the le vel of pollution and thefilter‐
ing of the air function cor rectly, an interior air fil‐
te r must alw ays be used. Make sure that thefil‐
te r is ins talled cor rectly and thefilter housing in
th e engine compartment is closed cor rectly
using the co ver and alw ays tightly sealed when
in operation. Use filters recommended and
appr ovedby Mercedes-Benz. Alw ays ha ve
service workcar ried out at a qualified specialist
wo rkshop. THERMATIC control panel
overview The indicator lamps in
the buttons indicate that
th e cur rent function is acti vated. 1
Toset the driver's side temp erature
2 Toset the air distribution
3 Toset the air flow or switch off climate con‐
trol
4 Toset climate contro lto automatic mode
(→ page 151)
5 Todemist the windscreen
6 Tocall up the air conditioning menu of the
multimedia sy stem Ve
hicles with a stationary heater: !to
switch there sidual heat on/off
(→ page 152)
7 Toswitch there ar wind owheater on/off
8 0 Toactivate or deactivate syn chronisa‐
tion (→ page 152)
Ve hicles with a stationary heater: &to
switch thest ationary heater on/off
(→ page 154)
9 Toswitch air-recirculation mode on/off
(→ page 152)
A Toswitch the A/C function on/off
(→ page 151)
B Toset the front passenger side temp erature THERMOTRONIC control panel
overview The indicator lamps in
the buttons indicate that
th e cur rent function is acti vated. Climate control
14 9
Page 159 of 565
R
yello w: departure time is preselected
The stationary heater/ stationary ventilation
switches off au tomatical lyafte r 50 minutes.
Setting thest ationary heater/stationary ven‐
tilation using the multimedia sy stem
Multimedia sy stem:
, Vehicle .
b Climate control .
Aux-
iliary heating
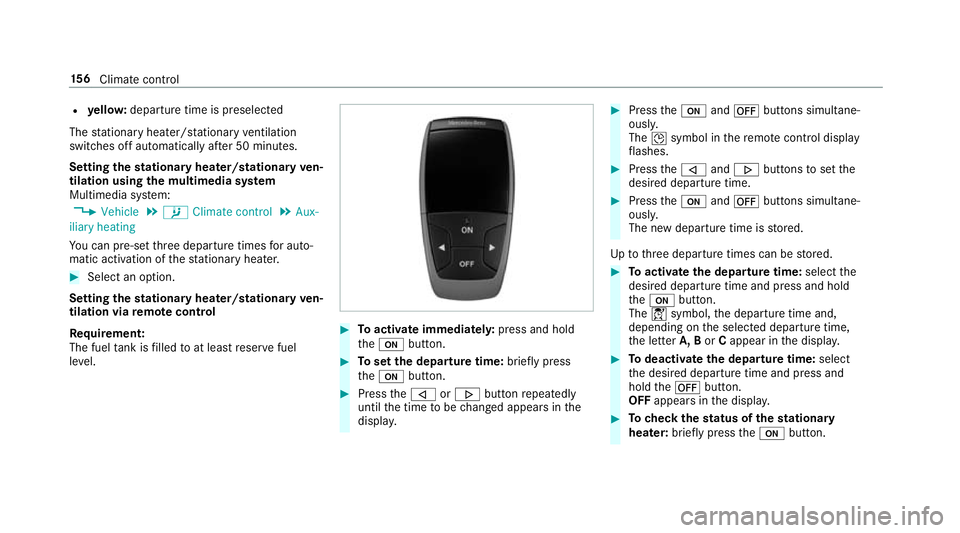
Yo u can pre-set thre e departure times for auto‐
matic activation of thest ationary heater. #
Select an option.
Setting thest ationary heater/stationary ven‐
tilation via remo tecont rol
Re quirement:
The fuel tank is filled toat least reser vefuel
le ve l. #
Toactivate immediatel y:press and hold
th eu button. #
Toset the departu retime: briefly press
th eu button. #
Press the, or. button repeatedly
until the time tobe changed appears in the
displa y. #
Press theu and^ buttons simultane‐
ousl y.
The Îsymbol in there mo tecontrol displ ay
fl ashes. #
Press the, and. buttons toset the
desired departure time. #
Press theu and^ buttons simultane‐
ousl y.
The new departure time is stored.
Up tothre e departure times can be stored. #
Toactivate the departu retime: select the
desired departure time and press and hold
th eu button.
The Ísymbol, the departure time and,
depending on the selected departure time,
th e letter A, BorCappear in the displa y. #
Todeactivate the departure time: select
th e desired departure time and press and
hold the^ button.
OFF appears in the displa y. #
Tocheck thest atus of thest ationary
heater: briefly press theu button. 15 6
Climate cont rol
Page 184 of 565
*
NO
TEDama getotheve hicle or the driv‐
et ra in caused bytheve hicle rolling away #
Alw ays proper lysecure theve hicle
against rolling away. #
On uphill or downhill inclines, turn the front
wheels towa rdsth eke rb. #
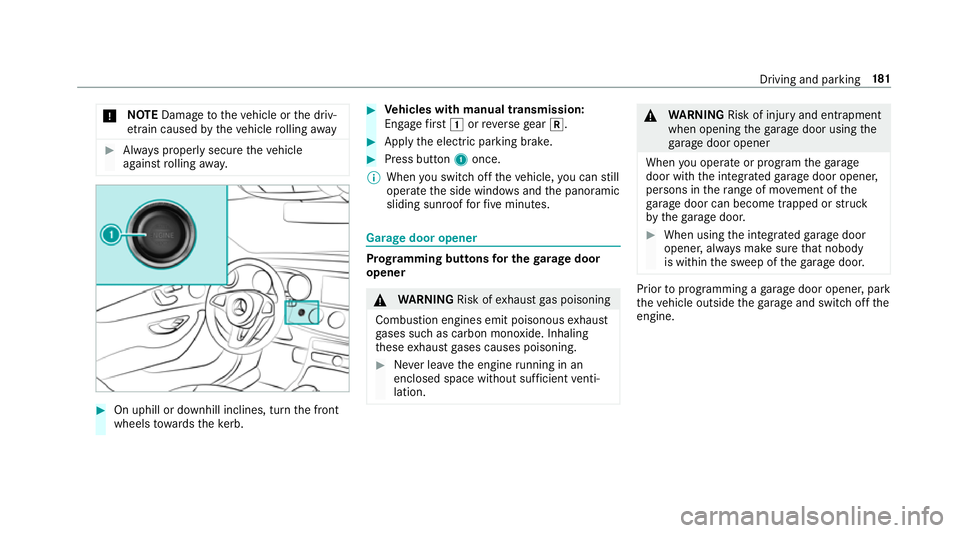
Vehicles with manual transmission:
Engage firs t1 orreve rsege ar k. #
App lythe electric parking brake. #
Press button 1once.
% When you swit choff theve hicle, you can still
opera tethe side windo wsand the panoramic
sliding sunroof forfive minutes. Garage door opener
Prog
ramming buttons for the garage door
opener &
WARNING Risk ofexhaust gas poisoning
Combustion engines emit poisonous exhaust
ga ses such as carbon monoxide. Inhaling
th ese exhaust gases causes poisoning. #
Never lea vethe engine running in an
enclosed space wi thout suf ficient venti‐
lation. &
WARNING Risk of inju ryand ent rapment
when opening thega rage door using the
ga rage door opener
When you operate or program thega rage
door with the integrated garage door opener,
persons in thera nge of mo vement of the
ga rage door can become trapped or stru ck
by thega rage door. #
When using the integrated garage door
opener, alw ays make sure that nobody
is within the sweep of thega rage door. Prior
toprog ramming a garage door opener, park
th eve hicle outside thega rage and swit choff the
engine. Driving and parking
181
Page 185 of 565
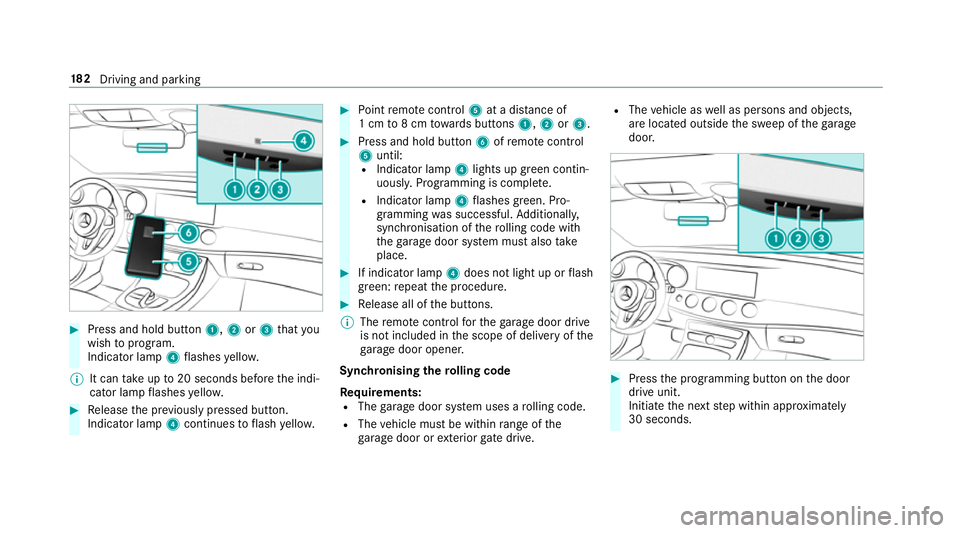
#
Press and hold button 1,2or3 that you
wish toprog ram.
Indicator lamp 4flashes yello w.
% It can take up to20 seconds before the indi‐
cator lamp flashes yello w. #
Release the pr eviously pressed button.
Indicator lamp 4continues toflash yello w. #
Point remo tecontrol 5at a di stance of
1 cm to8 cm towa rds buttons 1,2or3. #
Press and hold button 6ofremo tecontrol
5 until:
R Indicator la mp4lights up green contin‐
uousl y.Programming is comple te.
R Indicator lamp 4flashes green. Pro‐
gr amming was successful. Additionally,
synchronisation of thero lling code with
th ega rage door sy stem must also take
place. #
If indicator lamp 4does not light up or flash
green: repeat the procedure. #
Release all of the buttons.
% The remo tecontrol forth ega rage door drive
is not included in the scope of delivery of the
ga rage door opener.
Synchronising thero lling code
Re quirements:
R The garage door sy stem uses a rolling code.
R The vehicle must be within range of the
ga rage door or exterior gate drive. R
The vehicle as well as persons and objects,
are located outside the sweep of thega rage
door. #
Press the programming button on the door
drive unit.
Initiate the next step within appr oximately
30 seconds. 18 2
Driving and pa rking
Page 186 of 565
#
Press pr eviously prog rammed button 1,2
or 3 repeatedl y,until the door closes.
When the door closes, programming is com‐
ple ted.
% Please also read the operating instructions
fo rth ega rage door drive.
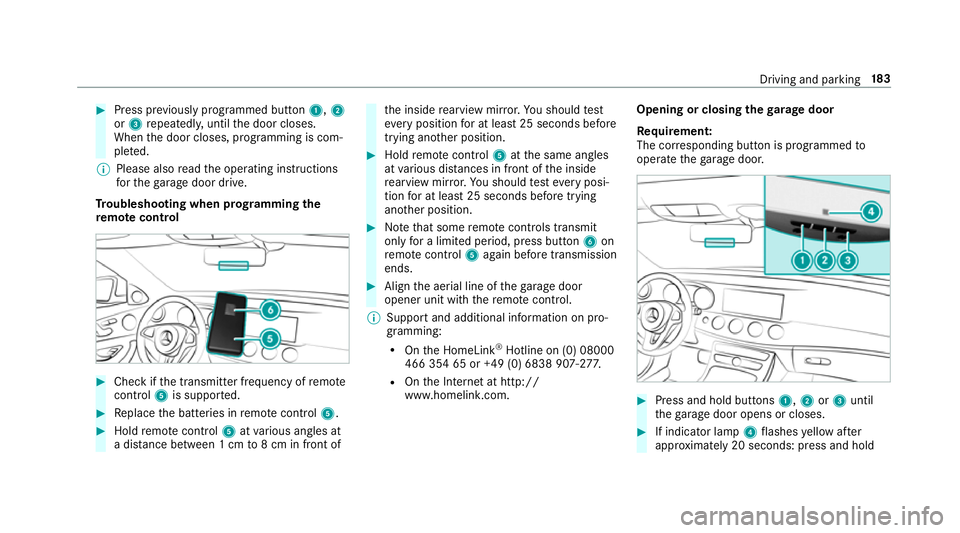
Tr oubleshooting when prog ramming the
re mo tecont rol #
Check if the transmit ter frequency of remo te
control 5is suppo rted. #
Replace the batteries in remo tecontrol 5. #
Hold remo tecontrol 5atvarious angles at
a dis tance between 1 cm to8 cm in front of th
e inside rearview mir ror.Yo u should test
eve ryposition for at least 25 seconds before
trying ano ther position. #
Hold remo tecontrol 5atthe same angles
at various dis tances in front of the inside
re arview mir ror.Yo u should test eve ryposi‐
tion for at least 25 seconds before trying
ano ther position. #
Notethat some remo tecontrols transmit
only for a limi ted period, press button 6on
re mo tecontrol 5again before transmission
ends. #
Align the aerial line of thega rage door
opener unit with there mo tecontrol.
% Support and additional information on pro‐
gramming:
R Onthe HomeLink ®
Hotline on (0) 08000
466 354 65 or +49 (0) 6838 907-2 77.
R Onthe Internet at http://
www.homelin k.com. Opening or closing the
garage door
Requ irement:
The cor responding button is programmed to
operate thega rage door. #
Press and hold buttons 1,2or3 until
th ega rage door opens or closes. #
If indicator lamp 4flashes yellow af ter
appr oximately 20 seconds: press and hold Driving and parking
18 3
Page 187 of 565
th
e pr eviously pressed button again until the
ga rage door opens or closes.
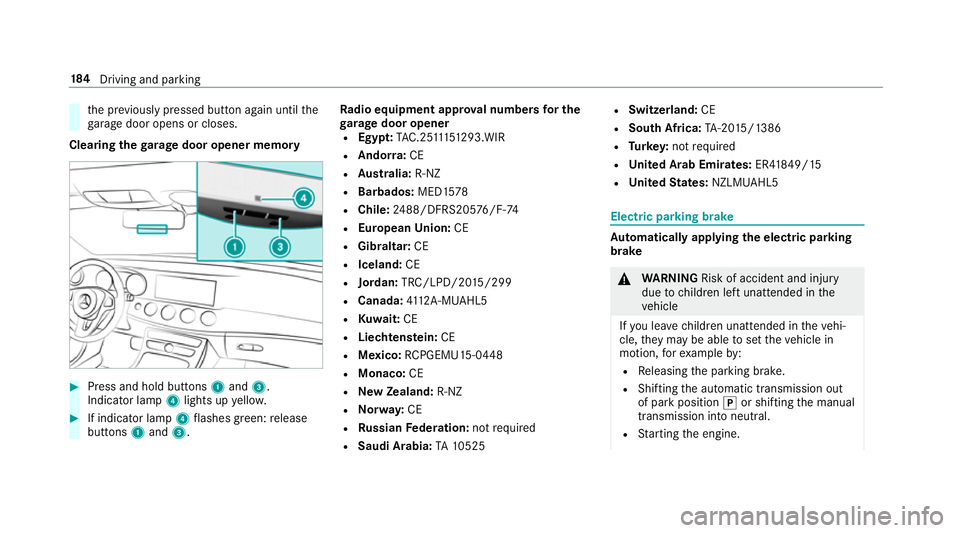
Clearing thega rage door opener memo ry#
Press and hold buttons 1and 3.
Indicator lamp 4lights up yello w. #
If indicator lamp 4flashes green: release
buttons 1and 3. Ra
dio equipment appr oval numbers for the
ga rage door opener
R Egypt: TAC.2 5111 51 293.WIR
R Ando rra: CE
R Austra lia: R-NZ
R Barbados: MED1578
R Chile: 2488/DFRS205 76/F-74
R European Union: CE
R Gibraltar: CE
R Iceland: CE
R Jordan: TRC/LPD/20 15/299
R Canada: 4112 A-MUAHL5
R Kuwa it:CE
R Liechtens tein: CE
R Mexico: RCPGEMU15-0448
R Monaco: CE
R New Zealand: R-NZ
R Norway: CE
R Russian Federation: notrequ ired
R Saudi Arabia: TA10525 R
Switzerland: CE
R South Africa: TA-20 15/1386
R Turkey: not requ ired
R United Arab Emirates: ER41849/15
R United States: NZLMUAHL5 Electric parking brake
Au
tomatically applying the electric parking
brake &
WARNING Risk of accident and inju ry
due tochildren left unat tended in the
ve hicle
If yo u lea vechildren unat tended in theve hi‐
cle, they may be able toset theve hicle in
motion, forex ample by:
R Releasing the parking brake.
R Shifting the automatic transmission out
of park position jor shifting the manual
transmission into neutral.
R Starting the engine. 184
Driving and pa rking
Page 267 of 565
R
Updating data...: the call list is being upda‐
te d.
R Importing contacts... :th e conta cts from the
mobile phone or from a storage medium are
impor ted.
Ac cepting/rejecting a call
When youre cei vea call, a message appears in
th e Head-up-Display Incoming call.#
Swipe upwards or down wards on the left-
hand Touch Control and select 6(Accept)
or ~ (Reject). #
Press the left-hand Touch Control.
The call may be accep ted/rejec ted using the
6 or~ buttons on thesteering wheel. Setting display content
On-board computer:
, Content
% This function is only available forve hicles
with a widescreen cockpit. Yo
u can select thefo llowing display con tent:
R Right display: select contents forth eright-
hand display content (Progressive style)
R Assist. graphic (Progressivestyle)
R Power meter : power me ter (Progressive
st yle)
R Revs :re v counter ( ClassicandSport styles)
R Power meter : power me ter (Classic and
Sport styles)
R Date (Progressive style)
R Navigation
R ECO display
R Consumption #
Toselect display content: swipe upwards
or down wards on the left-hand side of Touch
Control. #
Press the left-hand Touch Control.
Classic andSport style: the selected display
conte nts are shown in theright-hand instru‐
ment displa y. Progressive
style: the selected display con‐
te nt appears on the left-hand side of the
instrument displa y.
Contents forri ght-hand display contents
(Progressive style) #
Select Right display and pressthe left-hand
side of Touch Control. #
Swipe upwards or down wards on the left-
hand side of Touch Control toselect display
content. #
Press the left-hand Touch Control.
The selected displ aycontent appea rson the
ri ght-hand side of the instrument displa y. Ad
justing the head-up display settings in the
on-board co mputer On-board computer:
, HUD
The following head-up display settings can be
adjus ted:
R Position
R Brightness 264
Instrument Display and on-board computer
Page 525 of 565
HOLD function ....................................
.212
Limited braking ef fect (salt-trea ted
ro ads) .................................................. 16 4
New/replaced brake linings/brake
discs .................................................... 16 4
Ru nning-in no tes ..................................1 64
Brakes see Active Brake Assi st
Braking assistance see BAS (Brake Assi stSystem)
Breakdown ............................................... 390
Assis tance overview .............................. 18
To w- starting ........................................ 405
To wing away ........................................ 401
Tr ansporting theve hicle ......................4 03
Wheel change ...................................... 422
Breakdown assistance call see Service call
Breakdown management see Service call
Bu rm ester ®
sur round sound sy stem .....3 70
Ad justing the balance/fader ................3 71
Ad justing the sound focus ................... 371
Ad justing treble, mid and bass ............ 371Calling up
the sound menu .................. 370
Information .......................................... 370
Switching the sur round sound on/off
............................................................ .371
Buttons Steering wheel .................................... 255 C
CA module (TV) ........................................ 370
Calling up a menu ................................ 370
Inserting .............................................. 369
Call list Making a call ....................................... 324
Options in the call list .......................... 324
Overview ............................................. 324
Calling up the sound menu
Burmes ter®
sur round sound sy stem ... 370
Calls .......................................................... 321
Ac cepting ............................................ 321
Ac tivating functions du ring a call ......... 321
Calls wi thseveral participants ............ .321
Declining ............................................. 321
Ending a call ....................................... .321
Incoming call during an existing call .... 322 Making ................................................
.321
Vi ath eove rhead control panel
(Mercedes me connect) ....................... 327
Camera see 360° Camera
see Reversing camera
Car wash
see Care
Car wash (care) ....................................... 380
Care ..........................................................3 85
AIRPANEL ............................................ 383
Car wash ............................................. 380
Carpet .................................................3 85
Displ ay................................................ 385
Exterior lighting ................................... 383
Genuine wood/trim elements .............3 85
High-p ressure cleaner .........................3 80
Matt finish ........................................... 382
Pa int .................................................... 382
Plastic trim .......................................... 385
Re versing camera/360° Camera ........ 383
Ro of lining ...........................................3 85
Seat belt .............................................. 385
Seat co ver ........................................... 385 522
Index