Page 305 of 377

Cup holder (vehicles with manual transmission)
X To fit : insert the cup holder at the front and
then slide it backwards until it reaches edge
= of the underside of the stowage compart-
ment. Insert the cup holder so that the wedge of the upper section of the cup holder faces
forwards.
X Slide upper cup holder sections :on the
driver's and front-passenger sides outwards,
until both left and right sides ;engage. Cup holder (vehicles with automatic transmis-
sion)
If you remove the cup holder insert, you can use
the resulting compartment for stowage.
X To open: open the stowage compartment
(Y page 297).
X To remove: slide catch=forwards and pull
out cup holder ;.
X To insert: insert cup holder ;and slide back
catch =.
X To close: push cover :of the stowage com-
partment closed.
You can remove the rubber mat of the cup
holder to clean it. Wash it with clean, lukewarm water only. Sun visors
Overview :
Mirror light
; Retainer
= Retaining clip, e.g. for a car park ticket
? Vanity mirror
A Mirror cover
Vanity mirror in the sun visor Mirror light
:only functions if the sun visor is
clipped into retainer ;and mirror cover Ahas
been folded up.
Glare from the side X
Fold down the sun visor.
X Pull the sun visor out of retainer ;.
X Swing the sun visor to the side. Ashtray
Front ashtray !
The stowage space under the ashtray is not
heat resistant. Before placing lit cigarettes in the ashtray, make sure that the ashtray is
properly engaged. Otherwise, the stowage
space could be damaged. 302
FeaturesStowing and features
Page 306 of 377

X
To open: open the stowage compartment
(Y page 297).
X Push the cover of the ashtray upwards on its
right side =.
X To remove the insert: hold the sides of
insert ?, push it forwards slightly and lift it
up ; and out.
X To refit the insert: press insert?into the
holder until it engages.
X To close: close the cover of the ashtray.
X Push cover :of the stowage compartment
closed.
i You can remove the ashtray insert and use
the resultant compartment for stowage.
Rear-compartment ashtray X
To open: pull cover ;out by its top handle
edge.
X To remove the insert: push ribbing=from
the left side and pull insert :up and out.
X To fit the insert: fit insert:into the holder
from above and press down into the holder
until it engages. Cigarette lighter
G
WARNING
You can burn yourself if you touch the hot
heating element or the socket of the cigarette lighter.
In addition, flammable materials can ignite if:
R the hot cigarette lighter falls
R a child holds the hot cigarette lighter to
objects, for example
There is a risk of fire and injury.
Always hold the cigarette lighter by the knob.
Always make sure that the cigarette lighter is
out of reach of children. Never leave children unattended in the vehicle.
Your attention must always be focused on the
traffic conditions. Use the cigarette lighter only when road and traffic conditions permit. Cigarette lighter (example)
X Turn the key to position 2in the ignition lock
(Y page 133).
X To open: open the stowage compartment
(Y page 297).
X Press in cigarette lighter ;.
Cigarette lighter ;will pop out automatically
when the heating element is red-hot.
X To close: push cover :of the stowage com-
partment closed. 12 V sockets
General notes X
Turn the key to position 1in the ignition lock
(Y page 133). Features
303Stowing an d features Z
Page 307 of 377

The sockets can be used for accessories with a
maximum draw of 180 W (15 A). Accessories
include such items as mobile phone chargers.
If you use the sockets for long periods when the engine is switched off, the battery may dis-
charge.
An emergency cut-off ensures that the on-board voltage does not drop too low. If the on-board
voltage is too low, the power to the sockets is
automatically cut. This ensures that there is suf-
ficient power to start the engine.
If you have connected a device to the 12 V
power socket, leave the cover of the stowage
compartment open. This prevents the cover
from being blocked.
Socket on the front centre console 12 V socket (example)
X To open: open the stowage compartment
(Y page 297).
X Lift up the cover of socket ;.
X To close: push cover :of the stowage com-
partment closed.
Socket on the rear-compartment centre console X
Pull cover ;out by its top handle edge.
X Lift up the cover of socket :. Mercedes-Benz emergency call sys-
tem
Information on these requirements can be found in the Digital Owner's Manual. X
To open: press cover :.
X To make an emergency call: press SOS but-
ton ;briefly.
The indicator lamp in SOS button ;flashes
until the emergency call is concluded.
X Wait for a voice connection to the Mercedes-
Benz emergency call centre.
X After the emergency call, close cover :.
You will see a message if:
R a connection to the Mercedes-Benz emer-
gency call centre cannot be made
R a call has not been automatically forwarded
to the public emergency call centre
In this case, dial the 112emergency number
on your mobile phone.
You can find more information on the Mercedes- Benz emergency call system in the Digital Own-
er's Manual. MB Contact/Mercedes me connect
General notes Vehicles with the Audio 20 multimedia sys-
tem: MB Contact offers fast assistance at the
touch of a button – around the clock. For any
queries about the vehicle, MB Contact offers a
fast and easy connecting call to the Mercedes-
Benz Customer Assistance Centre. You can, for 304
FeaturesStowing and features
Page 308 of 377

example, request an appointment or call for help
in the event of a breakdown.
Vehicles with the COMAND Online multime-
dia system: Mercedes me connect offers fast
assistance at the touch of a button – around the
clock. For any queries about the vehicle,
Mercedes me connect offers a fast and easy
connecting call to the Mercedes-Benz Customer Assistance Centre. You can, for example,
request an appointment or call for help in the
event of a breakdown.
The display of the multimedia system indicates
that a call is active. During the call, you can
change to the navigation menu by pressing the
Ø button on the multimedia system, for
example. Voice output is not available in this
case.
The Digital Owner's Manual contains further
information about:
R vehicles with the AUDIO 20 multimedia
system: MB Contact
R vehicles with the COMAND Online multi-
media system: Mercedes me connect
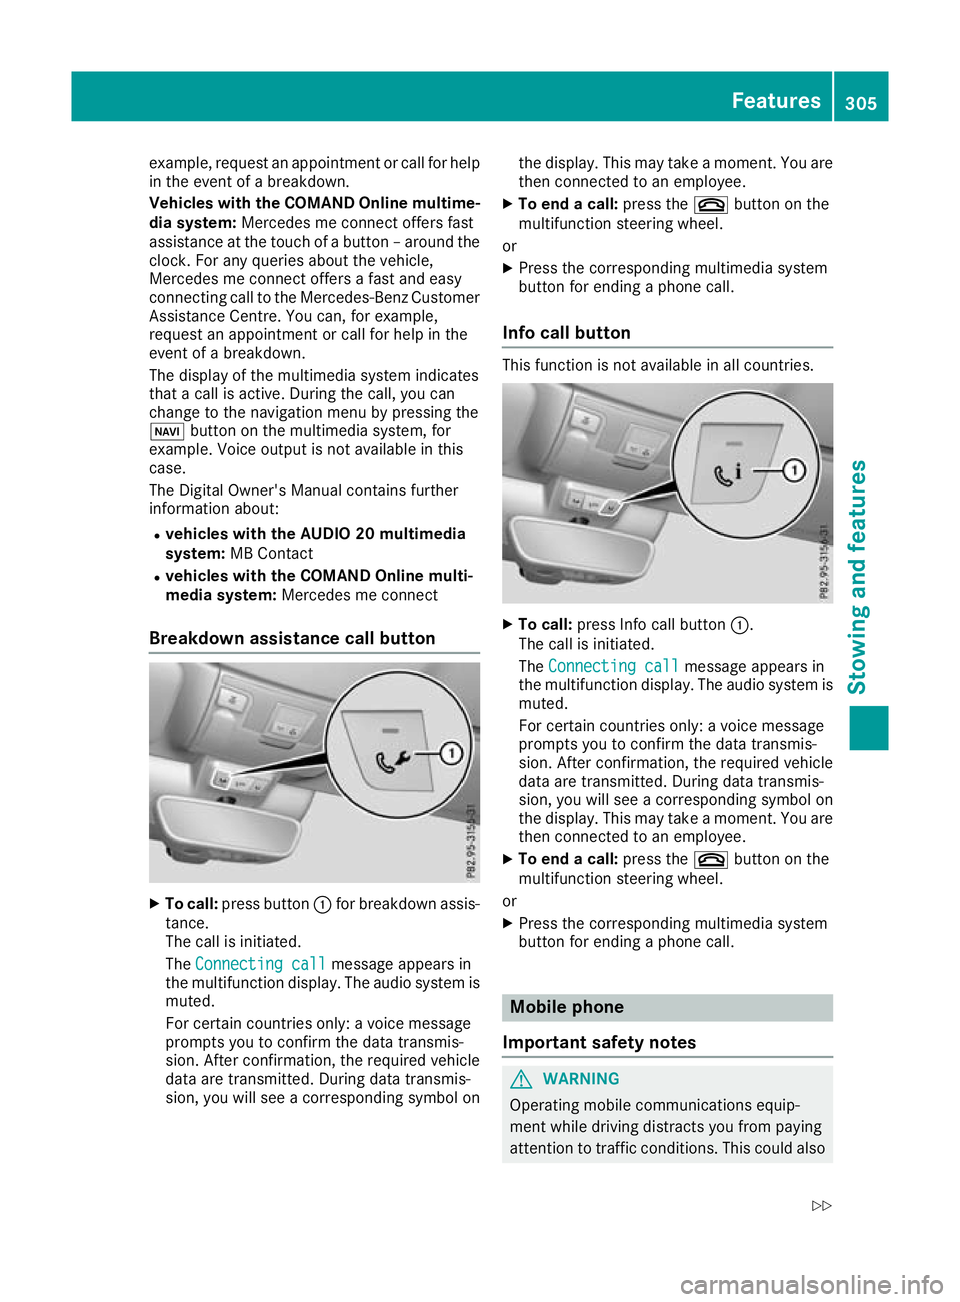
Breakdown assistance call button X
To call: press button :for breakdown assis-
tance.
The call is initiated.
The Connecting call Connecting call message appears in
the multifunction display. The audio system is muted.
For certain countries only: a voice message
prompts you to confirm the data transmis-
sion. After confirmation, the required vehicle
data are transmitted. During data transmis-
sion, you will see a corresponding symbol on the display. This may take a moment. You are
then connected to an employee.
X To end a call: press the~button on the
multifunction steering wheel.
or
X Press the corresponding multimedia system
button for ending a phone call.
Info call button This function is not available in all countries.
X
To call: press Info call button :.
The call is initiated.
The Connecting call Connecting call message appears in
the multifunction display. The audio system is muted.
For certain countries only: a voice message
prompts you to confirm the data transmis-
sion. After confirmation, the required vehicle
data are transmitted. During data transmis-
sion, you will see a corresponding symbol on
the display. This may take a moment. You are
then connected to an employee.
X To end a call: press the~button on the
multifunction steering wheel.
or
X Press the corresponding multimedia system
button for ending a phone call. Mobile phone
Important safety notes G
WARNING
Operating mobile communications equip-
ment while driving distracts you from paying
attention to traffic conditions. This could also Features
305Stowing and features
Z
Page 309 of 377

cause you to lose control of the vehicle. There
is a risk of an accident.
Use this device only when the vehicle is sta-
tionary.
You must observe the legal requirements for the country in which you are currently driving whenoperating mobile communications equipment in
the vehicle.
If it is permitted by law to operate communica-
tions equipment while the vehicle is in motion,
you may do so only if the traffic situation per-
mits. You may otherwise be distracted from the traffic conditions, cause an accident and injure
yourself and others.
Excessive levels of electromagnetic radiation
may cause damage to your health and to the
health of others. The use of an exterior aerial
takes into consideration the scientific discus-
sion surrounding the possible health risk posed
by electromagnetic fields.
Mercedes-Benz recommends the use of an
approved exterior aerial. This ensures:
R optimal mobile phone reception quality in the
vehicle
R that mutual interference between the vehicle
electronics and mobile phones is minimised
An exterior aerial has the following advantages:
R it conducts the electromagnetic fields gener-
ated by a wireless device to the exterior
R the field strength in the vehicle interior is
lower than in a vehicle that does not have an exterior aerial
Information on retrofitting two-way radios and
mobile phones (RF transmitters) (Y page 358).
General notes Depending on the vehicle equipment, there are
various mobile phone brackets that may be fit-
ted in your vehicle; in some cases, these are
country-specific.
More information on suitable mobile phones,
mobile phone brackets and on connecting Blue-
tooth ®
-capable mobile phones with the multi-
media system can be obtained:
R at a qualified specialist workshop
R on the internet at http://www.mercedes-
benz.com/connect The functions and services available when you
use the phone depend on your mobile phone
model and service provider.
Using a mobile phone To connect a mobile phone to the exterior aerial
and charge it, insert it into the mobile phone
bracket.
X Open the telephone compartment
(Y page 298).
X Place the mobile phone bracket into the pre-
installed fitting; see the separate installation
instructions for the mobile phone fitting.
X Insert the mobile phone into the mobile phone
bracket; see the separate installation instruc-
tions for the mobile phone fitting.
i The mobile phone can also be operated
without being in the bracket. However, the
charging function and aerial function are not
available.
In order to use Bluetooth ®
(SAP profile) on your
telephone module, you must first insert the tele-
phone module into the pre-installed fitting. This connects it to the exterior aerial. If you wish to
charge the mobile phone, you must connect it to
a USB port.
Further information on the telephone module
with Bluetooth ®
(SAP profile) can be found in the
Digital Owner's Manual.
Operating the mobile phone You can operate the phone using the
6and
~ buttons on the multifunction steering
wheel. You can operate other mobile phone
functions via the on-board computer
(Y page 230).
When you remove the key from the ignition lock, the mobile phone is disconnected from the vehi-cle. You can then no longer make calls using the
hands-free system.
If a call is active and you remove the key from
the ignition lock, the conversation is transferred
over to the mobile phone. It is then possible to
continue the conversation on the mobile phone. 306
FeaturesStowing and features
Page 310 of 377

Floormats
G
WARNING
Objects in the driver's footwell may restrict
the clearance around the pedals or block a
depressed pedal. This jeopardises the oper-
ating and road safety of the vehicle. There is a risk of an accident.
Stow all objects securely in the vehicle so that
they do not get into the driver's footwell.
Always fit the floormats securely and as pre-
scribed in order to ensure that there is always sufficient room for the pedals. Do not use
loose floormats and do not place several floor- mats on top of one another. X
Slide the relevant seat back.
X To fit: lay the floormat in the footwell.
X Press studs :onto retainers ;.
X To remove: pull the floormat away from
retainers ;.
X Remove the floormat. Retrofitted anti-glare film
Retrofitted anti-glare film on the inside of the
windows can interfere with radio/mobile tele-
phone reception. This is particularly the case for conductive or metallic-coated films. You can
obtain information about anti-glare film from a
qualified specialist workshop. Features
307Stowing and featu res Z
Page 311 of 377

Engine compartment
Bonnet
Important safety notes G
WARNING
An unlocked bonnet may open up when the
vehicle is in motion and block your view. There is a risk of an accident.
Never unlock the bonnet when driving. Before
every trip, ensure that the bonnet is locked. G
WARNING
When being opened and closed, the bonnet
may suddenly fall into the closed position.
There is a risk of injury to persons in the range of movement of the bonnet.
Open and close the bonnet only when nobody
is in the range of movement. G
WARNING
If you open the bonnet while the engine is
overheating or while there is a fire in the
engine compartment, you could come into
contact with hot gases or other leaking ser-
vice products. There is a danger of injury.
Allow an overheating engine to cool down
before opening the bonnet. If there is a fire in the engine compartment, leave the bonnet
closed and notify the fire brigade. G
WARNING
There are moving components in the engine
compartment. Certain components may con-
tinue to move or suddenly move again even
after the ignition has been switched off, e.g.
the radiator fan. There is a risk of injury.
If you have to carry out work in the engine
compartment:
R switch off the ignition
R never touch the dangerous areas surround-
ing moving components, e.g. the rotation
area of the fan R
remove jewellery and watches
R keep items of clothing and hair, for exam-
ple, away from moving parts.
Active bonnet (pedestrian protection) Operating principle
! An active bonnet that had been triggered
must be repaired at a qualified specialist
workshop. The active bonnet function will
then be available again. The additional pedes- trian protection provided by the active bonnet
will then be restored.
The active bonnet is available only in certain
countries.
The active bonnet can reduce the risk of injury to pedestrians in certain accident situations. Rais-
ing the active bonnet increases the clearance to hard components, such as the engine.
If the active bonnet has been triggered, it is
raised at the rear in the area around the hinges by approximately 80 mm. The active bonnet is
triggered by pyrotechnics.
For the drive to the workshop, reset the trig-
gered active bonnet yourself. If the active bon-
net has been triggered, pedestrian protection
may be limited.
Resetting G
WARNING
Certain components in the engine compart-
ment could be very hot, e.g. the engine, the
radiator and parts of the exhaust system.
There is a risk of injury when accessing the
engine compartment.
As far as possible, allow the engine to cool
down and only touch the components descri- bed in the following. 308
Engine compartmentMaintenance and care
Page 312 of 377

X
With your hand flat, push down the active
bonnet :in the area around the hinges on
both sides (arrows).
Do so until you feel the active bonnet :
engage.
If you can raise the active bonnet slightly at the rear in the area around the hinges, it is not
engaged correctly. Repeat the step.
Opening the bonnet G
WARNING
Certain components in the engine compart-
ment could be very hot, e.g. the engine, the
radiator and parts of the exhaust system.
There is a risk of injury when accessing the
engine compartment.
As far as possible, allow the engine to cool
down and only touch the components descri- bed in the following. G
WARNING
When the bonnet is open, and the windscreen wipers are set in motion, you can be injured by
the wiper linkage. There is a risk of injury.
Always switch off the windscreen wipers and
the ignition before opening the bonnet.
! Make sure that the windscreen wipers are
not folded away from the windscreen. Other-
wise, you could damage the windscreen wip-
ers or the bonnet. X
Make sure that the windscreen wipers are
switched off.
X Pull release lever :on the bonnet.
The bonnet is released. X
Reach into the gap, pull bonnet catch han-
dle ;up and lift the bonnet.
If you lift the bonnet by approximately 40 cm, the bonnet is opened and held open automat-
ically by the gas-filled struts.
Closing the bonnet X
Lower the bonnet and let it fall from a height
of approximately 20 cm.
X Check that the bonnet has engaged properly.
If the bonnet can be raised slightly, it is not
properly engaged. Open it again and close it
with a little more force. Radiator
Do not cover up the radiator. Do not use thermal mats, insect protection covers or anything sim-
ilar. Otherwise, the values of the European on-
board diagnostics may be affected. Some of
these values are required by law and must
always be correct. Engine compartment
309Maintenance and care Z