2016 MERCEDES-BENZ B-Class ELECTRIC lock
[x] Cancel search: lockPage 266 of 342
When using the integrated garage door
opener, always make sure that nobody is
within the range of movement of the garage
door.
Programming
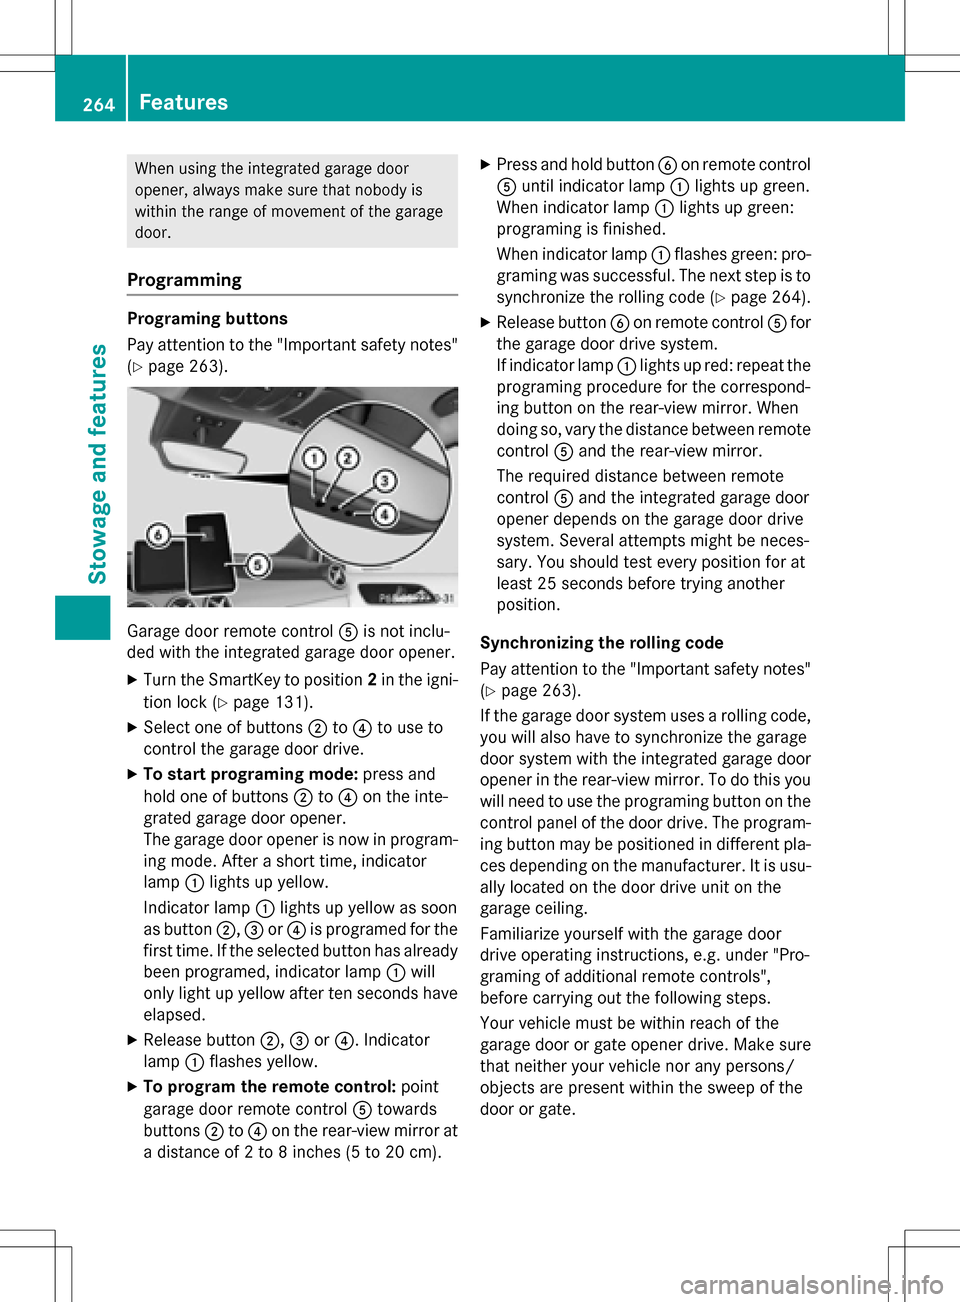
Programing buttons
Pay attention to the "Important safety notes"
(
Ypage 263).
Garage door remote controlAis not inclu-
ded with the integrated garage door opener.
XTurn the SmartKey to position 2in the igni-
tion lock (
Ypage 131).
XSelect one of buttons ;to? to use to
control the garage door drive.
XTo start programing mode: press and
hold one of buttons ;to? on the inte-
grated garage door opener.
The garage door opener is now in program-
ing mode. After a short time, indicator
lamp :lights up yellow.
Indicator lamp :lights up yellow as soon
as button ;,=or? is programed for the
first time. If the selected button has already
been programed, indicator lamp :will
only light up yellow after ten seconds have
elapsed.
XRelease button ;,=or?. Indicator
lamp :flashes yellow.
XTo program the remote control: point
garage door remote control Atowards
buttons ;to? on the rear-view mirror at
a distance of 2 to 8 inches (5 to 20 cm).
XPress and hold button Bon remote control
A until indicator lamp :lights up green.
When indicator lamp :lights up green:
programing is finished.
When indicator lamp :flashes green: pro-
graming was successful. The next step is to
synchronize the rolling code (
Ypage 264).
XRelease button Bon remote control Afor
the garage door drive system.
If indicator lamp :lights up red: repeat the
programing procedure for the correspond-
ing button on the rear-view mirror. When
doing so, vary the distance between remote
control Aand the rear-view mirror.
The required distance between remote
control Aand the integrated garage door
opener depends on the garage door drive
system. Several attempts might be neces-
sary. You should test every position for at
least 25 seconds before trying another
position.
Synchronizing the rolling code
Pay attention to the "Important safety notes"
(
Ypage 263).
If the garage door system uses a rolling code,
you will also have to synchronize the garage
door system with the integrated garage door
opener in the rear-view mirror. To do this you
will need to use the programing button on the
control panel of the door drive. The program- ing button may be positioned in different pla-
ces depending on the manufacturer. It is usu-
ally located on the door drive unit on the
garage ceiling.
Familiarize yourself with the garage door
drive operating instructions, e.g. under "Pro-
graming of additional remote controls",
before carrying out the following steps.
Your vehicle must be within reach of the
garage door or gate opener drive. Make sure
that neither your vehicle nor any persons/
objects are present within the sweep of the
door or gate.
264Features
Stowage and features
Page 267 of 342
XTurn the SmartKey to position2in the igni-
tion lock (
Ypage 131).
XGet out of the vehicle.
XPress the programing button on the door
drive unit.
Usually, you now have 30 seconds to ini-
tiate the next step.
XGet into the vehicle.
XPress previously programed button ;,=
or ? on the integrated garage door opener
repeatedly until the door closes.
The rolling code synchronization is then
complete.
Notes on programing the remote control
Canadian radio frequency laws require a
"break" (or interruption) of the transmission
signals after broadcasting for a few seconds.
Therefore, these signals may not last long
enough for the integrated garage door
opener. The signal is not recognized during
programing. Comparable with Canadian law,
some U.S. garage door openers also feature a
"break".
Proceed as follows:
Rif you live in Canada
Rif you have difficulties programing the
garage door opener (regardless of where
you live) when using the programing steps.
XPress and hold one of buttons ;to? on
the integrated garage door opener.
After a short time, indicator lamp :lights
up yellow.
XRelease the button.
Indicator lamp :flashes yellow.
XPress button Bof garage door remote
control Afor two seconds, then release it
for two seconds.
XPress button Bagain for two seconds.
XRepeat this sequence on button Bof
remote control Auntil indicator lamp :
lights up green.
When indicator lamp :lights up green:
programing is finished. When indicator lamp
:flashes green: pro-
graming was successful. The next step is to
synchronize the rolling code.
XRelease button Bof remote control Aof
the garage door drive.
If indicator lamp :lights up red: repeat the
programing process for the corresponding
button on the rear-view mirror. When doing
so, vary the distance between remote con-
trol Aand the rear-view mirror.
The required distance between remote
control Aand the integrated garage door
opener depends on the garage door drive
system. Several attempts might be neces-
sary. You should test every position for at
least 25 seconds before trying another
position.
Problems when programing
If you experience problems programing the
integrated garage door opener on the rear-
view mirror, take note of the following instruc-
tions:
RCheck the transmitter frequency used by
garage door drive remote control Aand
whether it is supported. The transmitter
frequency can usually be found on the back
of the garage door drive remote control.
The integrated garage door opener is com- patible with devices that have units which
operate in the frequency range of 280 to
433 MHz.
RReplace the batteries in garage door
remote control A. This increases the like-
lihood that garage door remote control A
will transmit a strong and precise signal to
the integrated garage door opener.
RWhen programing, hold remote control A
at varying distances and angles from the
button which you are programing. Try vari-
ous angles at a distance between 2and
12 inches (5to 30 cm) or at the same angle
but at varying distances.
RIf another remote control is available for the
same garage door drive, repeat the same
programing steps with this remote control.
Features265
Stowage and features
Z
Page 268 of 342
Before performing these steps, make sure
that new batteries have been installed in
garage door drive remote controlA.
RNote that some remote controls only trans-
mit for a limited amount of time (the indi-
cator lamp on the remote control goes out).
Press buttonBon remote control Aagain
before transmission ends.
RAlign the antenna cable of the garage door
opener unit. This can improve signal recep-
tion/transmission.
Opening/closing the garage door
After it has been programmed, the integrated
garage door opener assumes the function of
the garage door system's remote control.
Please also read the operating instructions
for the garage door system.
XTurn the SmartKey to position 2in the igni-
tion lock (
Ypage 131).
XPress button ;,=or? that has been
programmed to operate the garage door.
Garage door system with a fixed code: indi-
cator lamp :lights up green.
Garage door system with a rolling code:
indicator lamp :flashes green.
The transmitter will transmit a signal as
long as the button is pressed. The trans-
mission is halted after a maximum of ten
seconds and indicator lamp :lights up
yellow.
XPress button ;,=or? again if neces-
sary.
Clearing the memory
Make sure that you clear the memory of the
integrated garage door opener before selling
the vehicle.
XTurn the SmartKey to position 2in the igni-
tion lock (
Ypage 131).
XPress and hold buttons ;and ?.
The indicator lamp initially lights up yellow
and then green.
XRelease buttons ;and ?.
The memory of the integrated garage door
opener in the rear-view mirror is cleared.
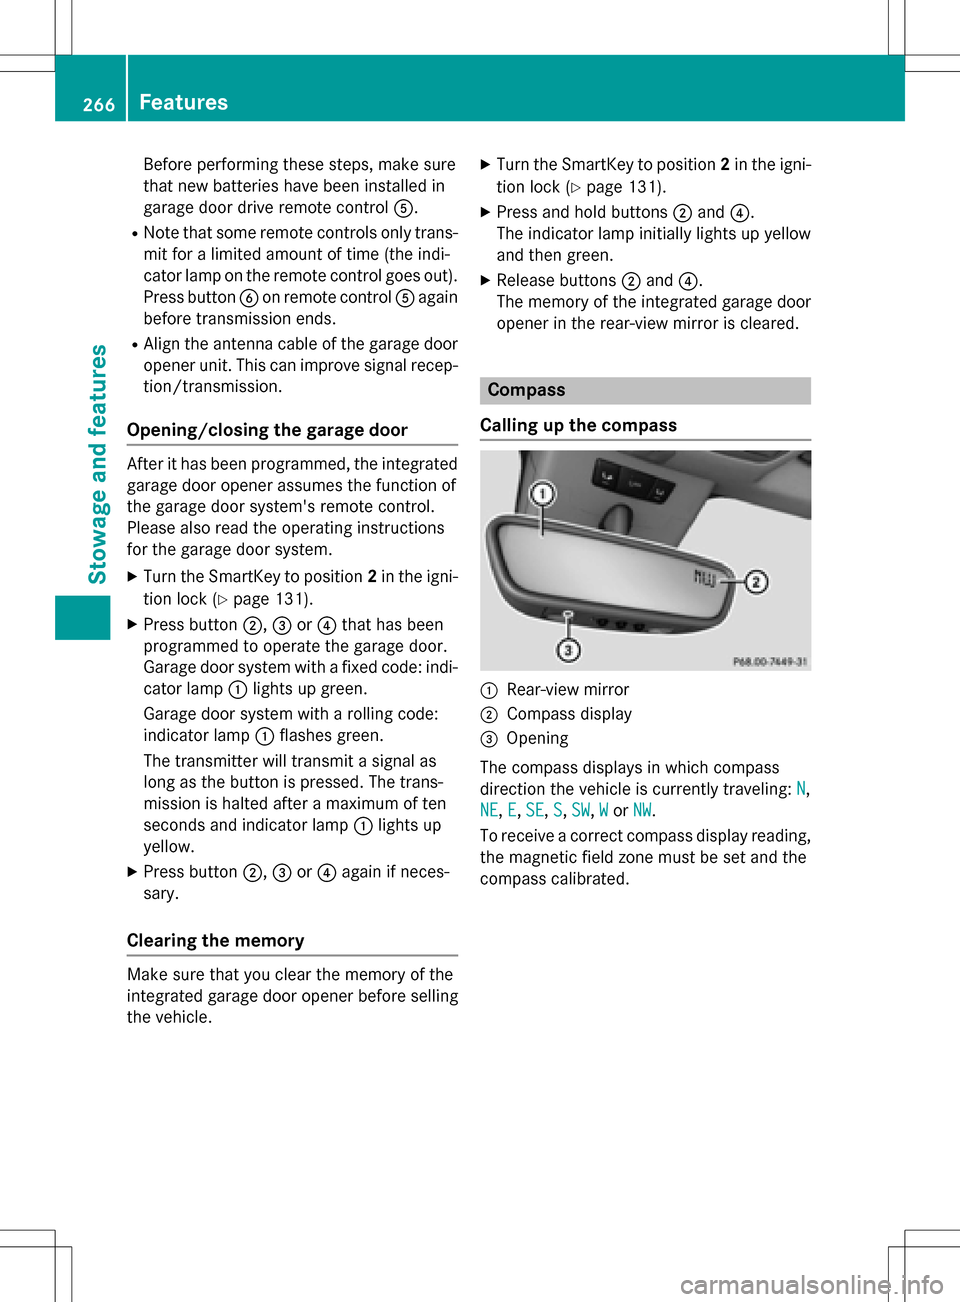
Compass
Calling up the compass
:Rear-view mirror
;Compass display
=Opening
The compass displays in which compass
direction the vehicle is currently traveling: N
,
NE
, E,SE, S,SW,Wor NW.
To receive a correct compass display reading, the magnetic field zone must be set and the
compass calibrated.
266Features
Stowage and features
Page 272 of 342
Useful information
i
This Operator's Manual describes all
models and all standard and optional equip-
ment of your vehicle available at the time of
publication of the Operator's Manual.
Country-specific differences are possible.
Please note that your vehicle may not be
equipped with all features described. This
also applies to safety-related systems and
functions.
iRead the information on qualified special-
ist workshops (
Ypage 26).
Engine compartment
Hood
Important safety notes
GWARNING
If the hood is unlatched, it may open up when the vehicle is in motion and block your view.
There is a risk of an accident.
Never unlatch the hood while driving. Before
every trip, ensure that the hood is locked.
GWARNING
When opening and closing the hood, it may
suddenly fall into the closed position. There is a risk of injury to persons within range of
movement of the hood.
Open and close the hood only when no one is
within its range of movement.
GWARNING
Certain components in the engine compart-
ment may be very hot, e.g. the drive system
and radiator. Working in the engine compart-
ment poses a risk of injury.
If possible, let the drive system cool down and only touch the components described in the
following.
GWARNING
The engine compartment contains moving
components. Certain components, such as
the radiator fan, may continue to run or start
again suddenly when the ignition is off. There is a risk of injury.
If you need to do any work inside the engine
compartment:
Rswitch off the ignition
Rnever reach into the area where there is a
risk of danger from moving components,
such as the fan rotation area
Rremove jewelry and watches
Rkeep items of clothing and hair, for exam-
ple, away from moving parts
Opening the hood
GWARNING
Certain components in the engine compart-
ment may be very hot, e.g. the drive system
and radiator. Working in the engine compart-
ment poses a risk of injury.
If possible, let the drive system cool down and only touch the components described in the
following.
GWARNING
When the hood is open and the windshield
wipers are set in motion, you can be injured by
the wiper linkage. There is a risk of injury.
Always switch off the windshield wipers and
the ignition before opening the hood.
!Make sure that the windshield wipers are
not folded away from the windshield. You
could otherwise damage the windshield
wipers or the hood.
270Engine compartment
Maintenance and care
Page 274 of 342

XPark the vehicle on a level surface.
Only check the coolant level when the vehi-
cle is on a level surface and the drive sys-
tem has cooled down.
XTurn the SmartKey to position2in the igni-
tion lock (
Ypage 131).
XCheck the coolant temperature display in
the instrument cluster.
The coolant temperature must be below
104 ‡ (40 †).
XTurn the SmartKey to position 0in the igni-
tion lock (
Ypage 131).
XSlowly turn cap :counter-clockwise to
relieve excess pressure.
XTurn cap :further counter-clockwise and
remove it.
If the coolant is at the level of marker bar =
in the filler neck when cold, there is enough
coolant in coolant expansion tank ;.
XIf necessary, add coolant that has been tes-
ted and approved by Mercedes-Benz.
XReplace cap:and turn it clockwise as far
as it will go.
For further information on coolant, see
(
Ypage 336).
Windshield washer system
GWARNING
Certain components in the engine compart-
ment may be very hot, e.g. the drive system
and radiator. Working in the engine compart-
ment poses a risk of injury.
If possible, let the drive system cool down and only touch the components described in the
following.
GWARNING
Windshield washer concentrate is highly flam- mable. If it comes into contact with hot com-
ponents in the front compartment, it may
ignite. There is a risk of fire and injury.
Make sure that no windshield washer con-
centrate is spilled next to the filler neck.
XTo open: pull cap:upwards by the tab.
XAdd the premixed washer fluid.
XTo close: press cap :onto the filler neck
until it engages.
If the washer fluid level drops below the rec-
ommended minimum of 1 liter, a message
appears in the multifunction display prompt-
ing you to add washer fluid (
Ypage 227).
Further information on windshield washer
fluid/antifreeze (
Ypage 336).
ASSYST PLUS
Service message
The ASSYST PLUS service interval display
informs you of the next service due date.
You can find information on the type of ser-
vice and service intervals in the Maintenance
Booklet.
You can obtain further information from an
authorized Mercedes-Benz Center or at
http://www.mbusa.com (USA only).
The multifunction display shows a service
message for several seconds, e.g.:
RService A in .. Days
RService A Due
RService A Exceeded by .. Days
Depending on the operating conditions of the
vehicle, the remaining time or distance until
the next service due date is displayed.
The letter A
orB, possibly in connection with a
number or another letter, indicates the type
272ASSYST PLUS
Maintenance and care
Page 280 of 342
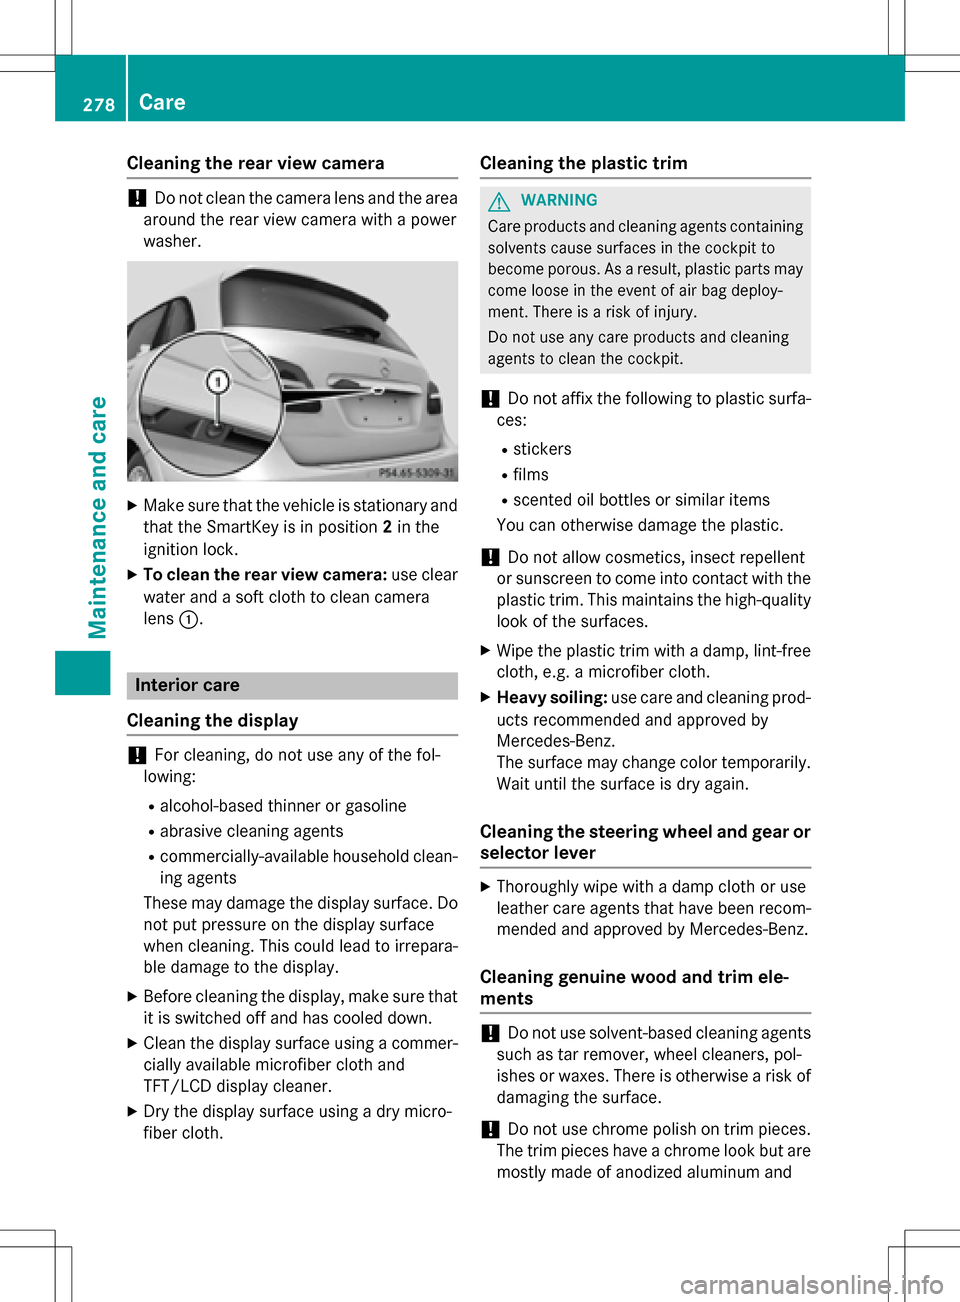
Cleaning the rear view camera
!Do not clean the camera lens and the area
around the rear view camera with a power
washer.
XMake sure that the vehicle is stationary and that the SmartKey is in position 2in the
ignition lock.
XTo clean the rear view camera: use clear
water and a soft cloth to clean camera
lens :.
Interior care
Cleaning the display
!For cleaning, do not use any of the fol-
lowing:
Ralcohol-based thinner or gasoline
Rabrasive cleaning agents
Rcommercially-available household clean-
ing agents
These may damage the display surface. Do not put pressure on the display surface
when cleaning. This could lead to irrepara-
ble damage to the display.
XBefore cleaning the display, make sure thatit is switched off and has cooled down.
XClean the display surface using a commer-
cially available microfiber cloth and
TFT/LCD display cleaner.
XDry the display surface using a dry micro-
fiber cloth.
Cleaning the plastic trim
GWARNING
Care products and cleaning agents containing solvents cause surfaces in the cockpit to
become porous. As a result, plastic parts may
come loose in the event of air bag deploy-
ment. There is a risk of injury.
Do not use any care products and cleaning
agents to clean the cockpit.
!Do not affix the following to plastic surfa-
ces:
Rstickers
Rfilms
Rscented oil bottles or similar items
You can otherwise damage the plastic.
!Do not allow cosmetics, insect repellent
or sunscreen to come into contact with the
plastic trim. This maintains the high-quality
look of the surfaces.
XWipe the plastic trim with a damp, lint-free
cloth, e.g. a microfiber cloth.
XHeavy soiling: use care and cleaning prod-
ucts recommended and approved by
Mercedes-Benz.
The surface may change color temporarily.
Wait until the surface is dry again.
Cleaning the steering wheel and gear or
selector lever
XThoroughly wipe with a damp cloth or use
leather care agents that have been recom-
mended and approved by Mercedes-Benz.
Cleaning genuine wood and trim ele-
ments
!Do not use solvent-based cleaning agents
such as tar remover, wheel cleaners, pol-
ishes or waxes. There is otherwise a risk of
damaging the surface.
!Do not use chrome polish on trim pieces.
The trim pieces have a chrome look but are
mostly made of anodized aluminum and
278Care
Maintenance and care
Page 285 of 342
It is therefore recommended that you addi-
tionally equip your vehicle with a TIREFIT kit if
you mount tires that do not feature run-flat
properties, e.g. winter tires. A TIREFIT kit maybe obtained from a qualified specialist work-
shop.
Information on changing and mounting
wheels (
Ypage 323).
XStop the vehicle on solid, non-slippery and
level ground, as far away as possible from
traffic.
XSwitch on the hazard warning lamps.
XSecure the vehicle against rolling away
(
Ypage 153).
XIf possible, bring the front wheels into the
straight-ahead position.
XSwitch off the drive system.
XVehicles without KEYLESS-GO: remove
the SmartKey from the ignition lock.
XVehicles with KEYLESS-GO start-func-
tion or KEYLESS-GO: open the driver's
door.
The on-board electronics now have status
0. This is the same as the SmartKey having
been removed.
XVehicles with KEYLESS-GO start-func-
tion or KEYLESS-GO: remove the Start/
Stop button from the ignition lock
(
Ypage 131).
XMake sure that the passengers are not
endangered as they do so. Make sure that
no one is near the danger area while a
wheel is being changed. Anyone who is not directly assisting in the wheel change
should, for example, stand behind the bar-
rier.
XGet out of the vehicle. Pay attention to traf-
fic conditions when doing so.
XClose the driver's door.
MOExtended tires (tires with run-flat
properties)
General notes
With MOExtended tires (tires with run flat
characteristics), you can continue to drive
your vehicle even if there is a total loss of
pressure in one or more tires. The affected
tire must not show any clearly visible damage.
You can recognize MOExtended tires by the
MOExtended marking which appears on the
sidewall of the tire. You will find this marking next to the tire size designation, the load-
bearing capacity and the speed index
(
Ypage 317).
MOExtended tires may only be used in con-
junction with an active tire pressure monitor.
If a pressure loss warning message
appears in the multifunction display:
Robserve the instructions in the display mes-
sages (
Ypage 223).
Rcheck the tire for damage.
Rif driving on, observe the following notes.
The driving distance possible in run-flat mode
is approximately 50 miles (80 km) when the
vehicle is partially laden. When the vehicle is
fully laden it is approximately
19 miles(30 km).
In addition to the vehicle load, the driving dis-
tance possible depends upon:
Rvehicle speed
Rroad condition
Routside temperature
The driving distance possible in run-flat mode
may be reduced by extreme driving condi-
tions or maneuvers, or it can be increased
through a moderate style of driving.
The driving distance possible in run-flat mode
is counted from the moment the tire pressure
loss warning appears in the multifunction dis-
play.
You must not exceed a maximum speed of
50 mph (80 km/h).
Flat tire283
Breakdown assistance
Page 287 of 342
Comply with the manufacturer’s safety
instructions on the sticker on the tire inflation
compressor.
Using the TIREFIT kit
XDo not remove any foreign objects which
have penetrated the tire, e.g. screws or
nails.
XRemove the tire sealant bottle, the accom-
panying TIREFIT sticker and the tire infla-
tion compressor from the stowage well
underneath the cargo compartment floor
(
Ypage 282).
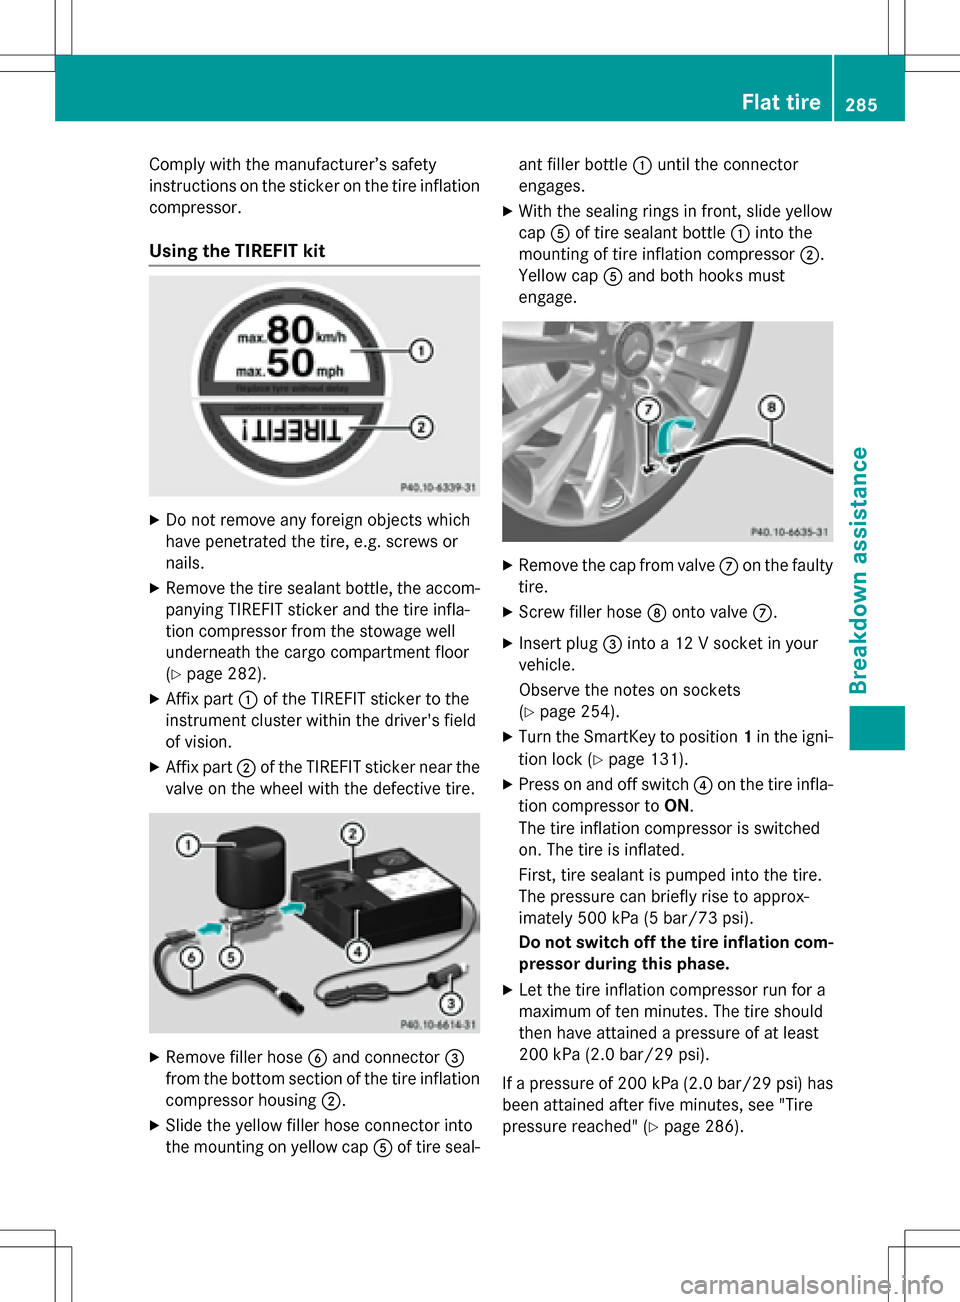
XAffix part:of the TIREFIT sticker to the
instrument cluster within the driver's field
of vision.
XAffix part ;of the TIREFIT sticker near the
valve on the wheel with the defective tire.
XRemove filler hose Band connector =
from the bottom section of the tire inflation
compressor housing ;.
XSlide the yellow filler hose connector into
the mounting on yellow cap Aof tire seal- ant filler bottle
:until the connector
engages.
XWith the sealing rings in front, slide yellow
cap Aof tire sealant bottle :into the
mounting of tire inflation compressor ;.
Yellow cap Aand both hooks must
engage.
XRemove the cap from valve Con the faulty
tire.
XSc rew filler hose Donto valve C.
XInsert plug =into a 12 V socket in your
vehicle.
Observe the notes on sockets
(
Ypage 254).
XTurn the SmartKey to position 1in the igni-
tion lock (
Ypage 131).
XPress on and off switch ?on the tire infla-
tion compressor to ON.
The tire inflation compressor is switched
on. The tire is inflated.
First, tire sealant is pumped into the tire.
The pressure can briefly rise to approx-
imately 500 kPa (5 bar/73 psi).
Do not switch off the tire inflation com-
pressor duri ngthis phase.
XLet the tire inflation compressor run for a
maximum of ten minutes. The tire should
then have attained a pressure of at least
200 kPa (2.0 bar/29 psi).
If a pressure of 200 kPa( 2.0 bar/29 psi) has
been attained after five minutes, see "Tire
pressure reached" (
Ypage 286).
Flat tire285
Breakdown assistance
Z