2016 MERCEDES-BENZ B-Class ELECTRIC lock
[x] Cancel search: lockPage 248 of 342

XSlide locking mechanism=in the direc-
tion of the arrow.
XSwing flap ;fully to the side.
Flap ;is held open by a magnet.
XTo close: swing flap ;in the cargo com-
partment back until it engages.
XFold armrest :up fully if necessary.
Observe the loading guidelines (
Ypage 242).
Cargo compartment enlargement
Important safety notes
GWARNING
If the rear bench seat/rear seat and seat
backrest are not engaged they could fold for-
wards, e.g. when braking suddenly or in the
event of an accident.
RThe vehicle occupant would thereby be
pushed into the seat belt by the rear bench
seat/rear seat or by the seat backrest. The
seat belt can no longer offer the intended
level of protection and could even cause
injuries.
RObjects or loads in the trunk/cargo com-
partment cannot be restrained by the seat
backrest.
There is an increased risk of injury.
Before every trip, make sure that the seat
backrests and the rear bench seat/rear seat
are engaged.
!Before folding the backrest in the rear
compartment forwards, make sure that the rear compartment armrest and the
cupholder are folded in. They may other-
wise be damaged.
Observe the loading guidelines (
Ypage 242).
The left-hand and right-hand rear seat backr-
ests can be folded forwards separately to
increase the cargo compartment capacity.
Folding the rear seat backrest forwards
and back
Folding the rear seat backrests forward
XFully insert the backrest head restraints if
necessary (
Ypage 92).
XMove the driver's or front-passenger seat
forward if necessary.
XPull left-hand or right-hand release han-
dle ;of the seat backrest forwards.
Corresponding seat backrest :is
released.
XFold backrest :forwards.
XMove the driver's or front-passenger seat
back if necessary.
Folding the rear seat backrest back
!Make sure that the seat belt does not
become trapped when folding the rear seat
backrest back. Otherwise, it could be dam-
aged.
246Stowage areas
Stowage and features
Page 249 of 342
XMove the driver's or front-passenger seat
forward if necessary.
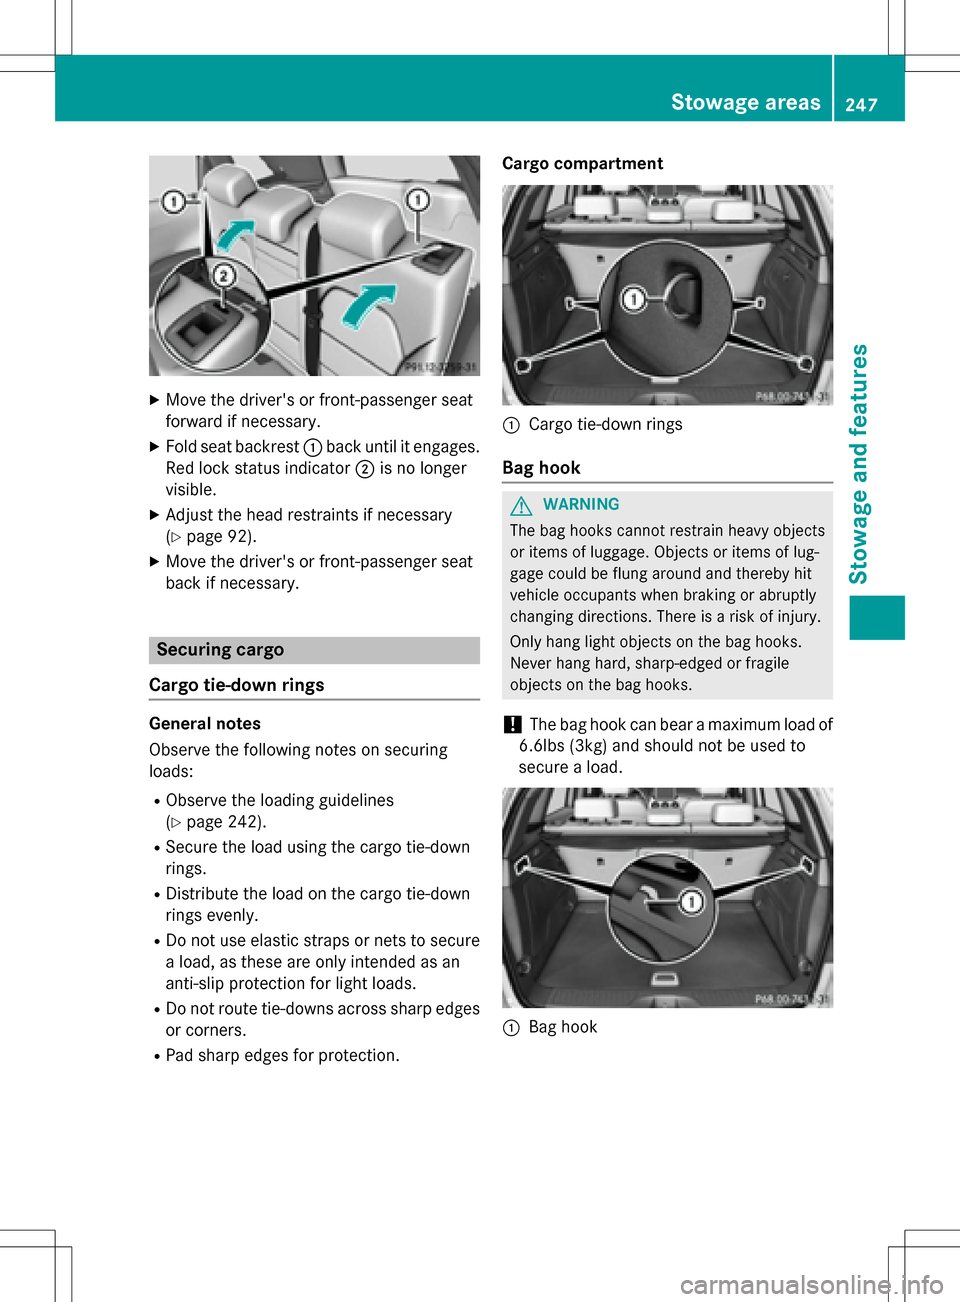
XFold seat backrest:back until it engages.
Red lock status indicator ;is no longer
visible.
XAdjust the head restraints if necessary
(
Ypage 92).
XMove the driver's or front-passenger seat
back if necessary.
Securing cargo
Cargo tie-down rings
General notes
Observe the following notes on securing
loads:
RObserve the loading guidelines
(
Ypage 242).
RSecure the load using the cargo tie-down
rings.
RDistribute the load on the cargo tie-down
rings evenly.
RDo not use elastic straps or nets to secure
a load, as these are only intended as an
anti-slip protection for light loads.
RDo not route tie-downs across sharp edges or corners.
RPad sharp edges for protection. Cargo compartment
:Cargo tie-down rings
Bag hook
GWARNING
The bag hooks cannot restrain heavy objects
or items of luggage. Objects or items of lug-
gage could be flung around and thereby hit
vehicle occupants when braking or abruptly
changing directions. There is a risk of injury.
Only hang light objects on the bag hooks.
Never hang hard, sharp-edged or fragile
objects on the bag hooks.
!The bag hook can bear a maximum load of
6.6lbs (3kg) and should not be used to
secure a load.
:Bag hook
Stowage areas247
Stowage and features
Z
Page 252 of 342
Always close the cargo compartment floor
before a journey.
!The maximum load capacity of the stow-
age well under the cargo compartment
floor is 55 lbs (25 kg).
There is a stowage area for TIREFIT, the vehi-
cle tool kit, a folding box, etc. underneath the
cargo compartment floor.
Opening/closing the cargo compart-
ment floor
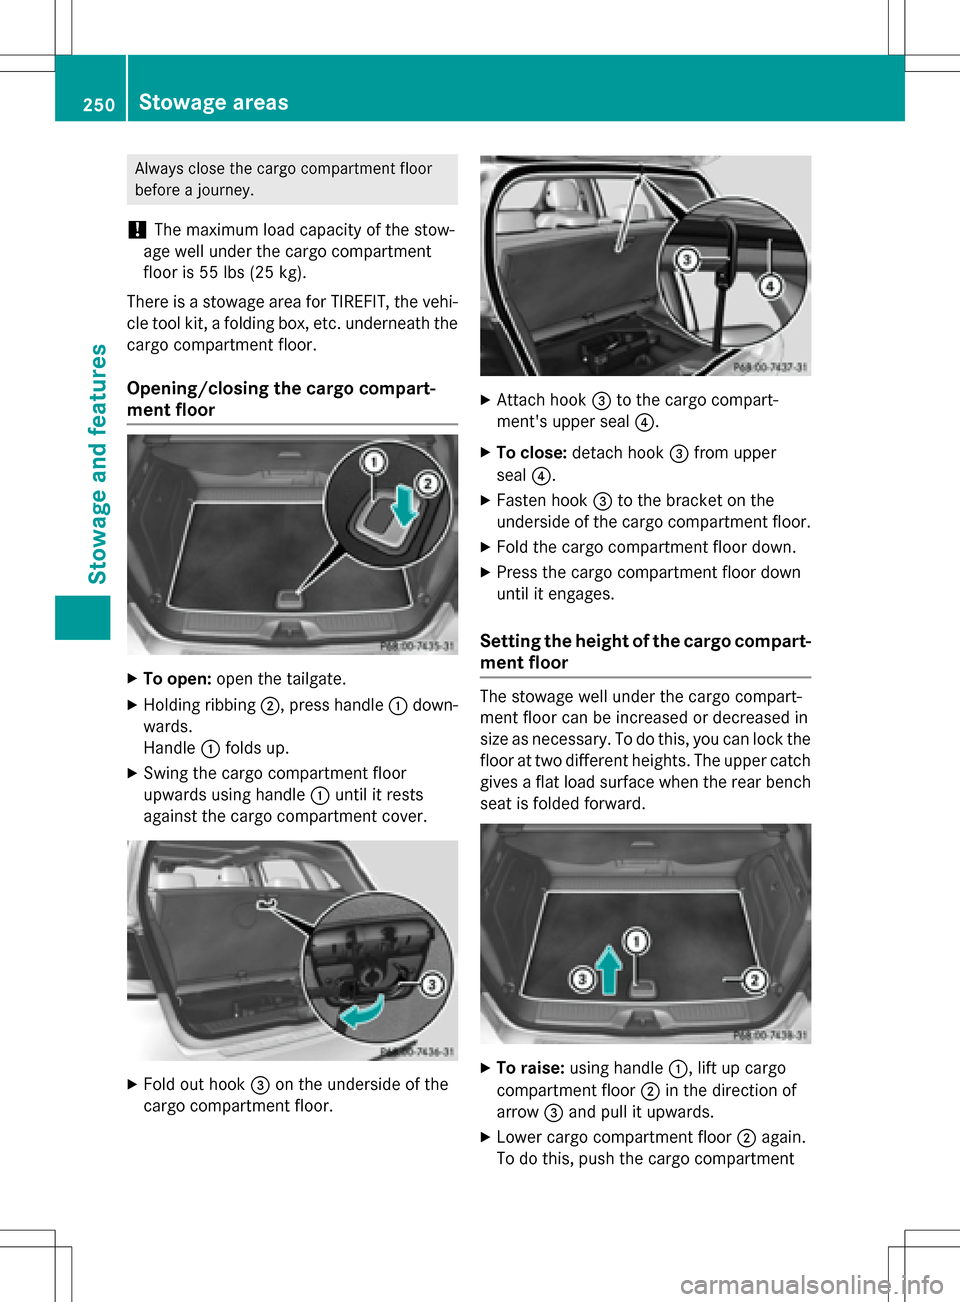
XTo open: open the tailgate.
XHolding ribbing ;, press handle :down-
wards.
Handle :folds up.
XSwing the cargo compartment floor
upwards using handle :until it rests
against the cargo compartment cover.
XFold out hook =on the underside of the
cargo compartment floor.
XAttach hook =to the cargo compart-
ment's upper seal ?.
XTo close:detach hook =from upper
seal ?.
XFasten hook =to the bracket on the
underside of the cargo compartment floor.
XFold the cargo compartment floor down.
XPress the cargo compartment floor down
until it engages.
Setting the height of the cargo compart- ment floor
The stowage well under the cargo compart-
ment floor can be increased or decreased in
size as necessary. To do this, you can lock the
floor at two different heights. The upper catch
gives a flat load surface when the rear bench
seat is folded forward.
XTo raise: using handle :, lift up cargo
compartment floor ;in the direction of
arrow =and pull it upwards.
XLower cargo compartment floor ;again.
To do this, push the cargo compartment
250Stowage areas
Stowage and features
Page 254 of 342
There is a risk of injury, particularly in the
event of sudden braking or a sudden change
in direction.
RAlways stow objects so that they cannot be
thrown around in such situations.
RAlways make sure that objects do not pro-
trude from stowage spaces, parcel nets or
stowage nets.
RClose the lockable stowage spaces before
starting a journey.
RStow and secure objects that are heavy,
hard, pointed, sharp-edged, fragile or too
large in the cargo compartment.
!Only use the cup holders for containers of
the right size and which have lids. The
drinks could otherwise spill.
Observe the loading guidelines (
Ypage 242).
The stowage compartments in the doors pro-
vide space for bottles:
Rfront: capacity up to 51 fl. oz. (1.5 l)
Rrear: capacity up to 17 fl. oz. (0.5 l)
Cup holder in the front-compartment
center console
The cup holder and the rubber mat under-
neath can be removed for cleaning. Clean
them with clean, lukewarm water only.
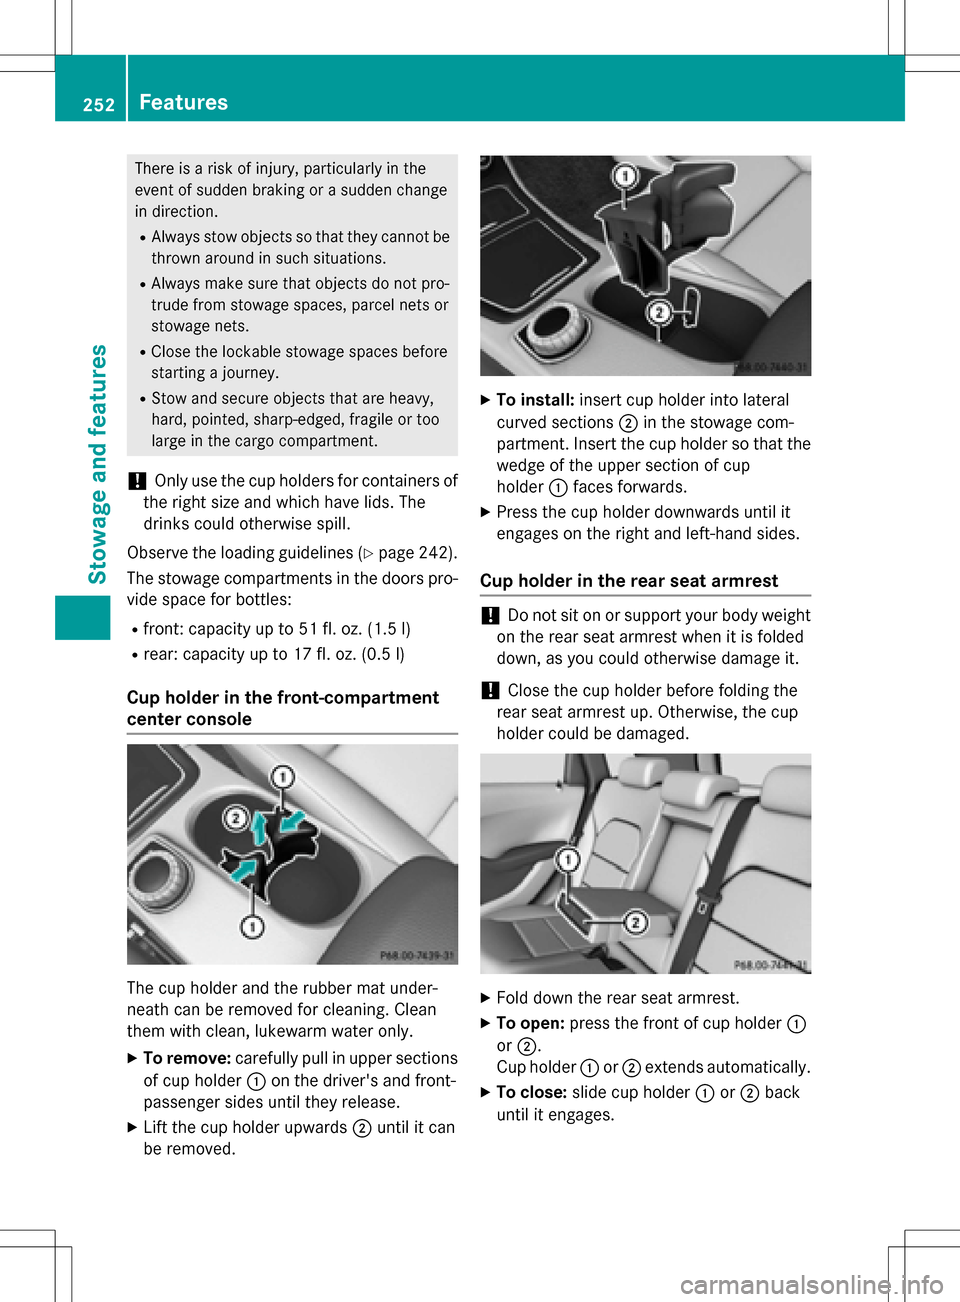
XTo remove:carefully pull in upper sections
of cup holder :on the driver's and front-
passenger sides until they release.
XLift the cup holder upwards ;until it can
be removed.
XTo install: insert cup holder into lateral
curved sections ;in the stowage com-
partment. Insert the cup holder so that the wedge of the upper section of cup
holder :faces forwards.
XPress the cup holder downwards until it
engages on the right and left-hand sides.
Cup holder in the rear seat armrest
!Do not sit on or support your body weight
on the rear seat armrest when it is folded
down, as you could otherwise damage it.
!Close the cup holder before folding the
rear seat armrest up. Otherwise, the cup
holder could be damaged.
XFold down the rear seat armrest.
XTo open: press the front of cup holder :
or ;.
Cup holder :or; extends automatically.
XTo close: slide cup holder :or; back
until it engages.
252Features
Stowage and features
Page 256 of 342
Cigarette lighter
GWARNING
You can burn yourself if you touch the hot
heating element or the socket of the cigarette lighter.
In addition, flammable materials can ignite if:
Rthe hot cigarette lighter falls
Ra child holds the hot cigarette lighter to
objects, for example
There is a risk of fire and injury.
Always hold the cigarette lighter by the knob.
Always make sure that the cigarette lighter is
out of reach of children. Never leave children
unsupervised in the vehicle.
Your attention must always be focused on the
traffic conditions. Only use the cigarette
lighter when road and traffic conditions per-
mit.
XTurn the SmartKey to position 2in the igni-
tion lock (
Ypage 131).
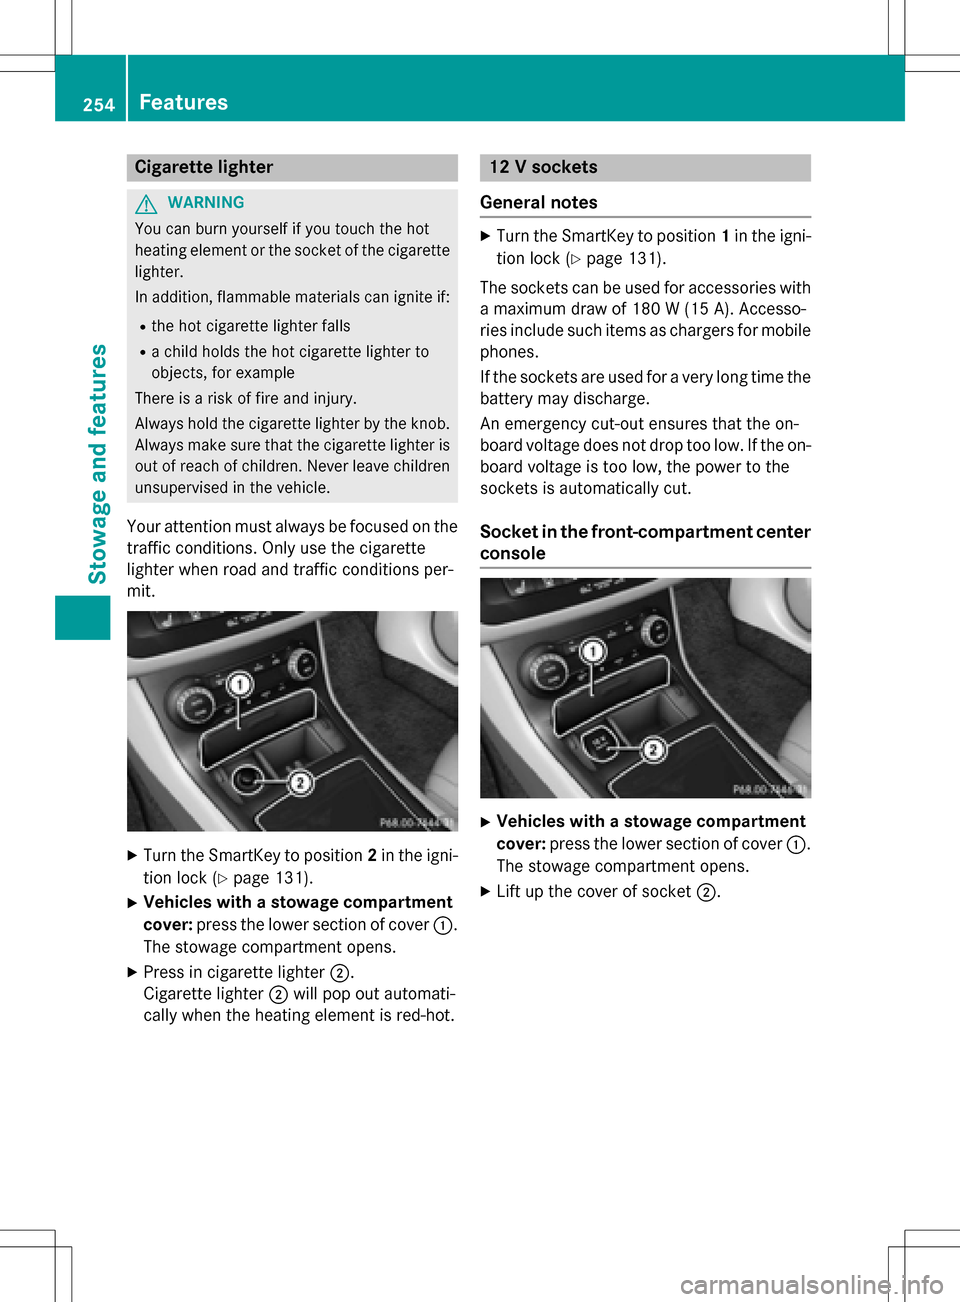
XVehicles with a stowage compartment
cover: press the lower section of cover :.
The stowage compartment opens.
XPress in cigarette lighter ;.
Cigarette lighter ;will pop out automati-
cally when the heating element is red-hot.
12 V sockets
General notes
XTurn the SmartKey to position 1in the igni-
tion lock (
Ypage 131).
The sockets can be used for accessories with a maximum draw of 180 W (15A). Accesso-
ries include such items as chargers for mobile
phones.
If th e sockets are used foravery long time the
battery may discharge.
An emergency cut-out ensures that the on-
board voltage does not drop too low. If the on-
board voltage is too low, the power to the
sockets is automatically cut.
Socket in the front-compartment center
console
XVehicles with a stowage compartment
cover: press the lower section of cover :.
The stowage compartment opens.
XLift up the cover of socket ;.
254Features
Stowageand features
Page 262 of 342
Search & Send
General notes
To use "Search & Send", your vehicle must be
equipped with mbrace and a navigation sys-
tem. Additionally, an mbrace service sub-
scription must be completed.
"Search & Send" is a destination entry ser-
vice. A destination address which is found on
Google Maps
®can be transferred via mbrace
directly to your vehicle's navigation system.
Specifying and sending the destination
address
XGo to the website http://
maps.google.com and enter a destination
address into the entry field.
XTo send the destination address to the
e-mail address of your mbrace account:
click on the corresponding button on the
website.
Example:
If you select 'Send to vehicle' and then
'Mercedes-Benz', the destination address
will be sent to your vehicle.
XWhen the "Send" dialog window appears:
Enter the e-mail address you specified
when setting up your mbrace account into
the corresponding field.
XClick "Send".
Information on specific commands such as
"Address entry" or "Send" can be found on the
website.
Calling up a transmitted destination
address
XTurn the SmartKey to position 2in the igni-
tion lock (
Ypage 131).
The transmitted destination address is loa-
ded into the vehicle's navigation system. A display message appears, asking
whether navigation should be started.
XSelect
Yesby turning 3or sliding 1
the controller and confirm with 7.
The system calculates the route and sub-
sequently starts the route guidance with
the address entered.
If you select No
the address can be stored in
the address book.
If you have sent more than one destination
address, each individual destination must
be confirmed separately.
Destination addresses are loaded in the same
order as the order in which they were sent.
If you own multiple Mercedes-Benz vehicles
with mbrace and activated mbrace accounts:
If multiple vehicles are registered under the
same e-mail address, the destination will be
sent to all the vehicles.
Vehicle remote opening
You can use the vehicle remote opening if you
have unintentionally locked your vehicle and
a replacement SmartKey is not available.
The vehicle can be opened by the Mercedes-
Benz Customer Assistance Center.
The vehicle can be immediately opened
remotely within four days of the ignition being turned off. After this time, the remote unlock-
ing may be delayed by 15 to 60 minutes. After
30 days, the vehicle can no longer be opened
remotely.
The vehicle remote unlocking feature is avail-
able if the relevant mobile phone network is
available and a data connection is possible.
XContact the following service hotlines:
Mercedes-Benz Customer Assistance Cen-
ter at 1-800-FOR-MERCedes
(1-800-367-6372) or 1-866-990-9007
You will be asked for your password.
XReturn to your vehicle at the time agreed
upon with the Mercedes-Benz Customer
Assistance Center.
260Features
Stowage and features
Page 263 of 342

Alternatively, the vehicle can be opened via:
Rthe Internet, under the "Owners Online"
section
Rthe telephone application (e.g. for iPhone®,
Android)
To do this, you will need your identification
number and password.
Vehicle remote closing
The vehicle remote-closing feature can be
used when you have forgotten to lock the
vehicle and you are no longer nearby.
The vehicle can then be locked by the
Mercedes-Benz Customer Assistance Center.
The vehicle can be immediately remotely
locked within four days of the ignition being
turned off. After this time, remote closing may
be delayed by 15 to 60 minutes. After 30 days
the vehicle can no longer be locked remotely.
The vehicle remote closing feature is availa-
ble if the relevant mobile phone network is
available and a data connection is possible.
XContact the following service hotlines:
Mercedes-Benz Customer Assistance Cen-
ter at 1-800-FOR-MERCedes
(1-800-367-6372) or 1-866-990-9007
You will be asked for your password.
The next time you are inside the vehicle and
you switch on the ignition, the Doors
Locked Remotelymessage appears in the
multifunction display.
Alternatively, the vehicle can be locked via:
Rthe Internet, under the "Owners Online"
section
Rthe telephone application (e .g. for iPhone®,
Android)
To do this, you will need your identification
number and password.
Stolen vehicle recovery service
If your vehicle has been stolen:
XNotify the police.
The police will issue a numbered incident
report.
XThis number will be forwarded to the
Mercedes-Benz Customer Assistance Cen-
ter together with your PIN.
The Mercedes-Benz Customer Assistance
Center then tries to locate the system. The
Mercedes-Benz Customer Assistance Cen-
ter contacts you and the local law enforce-
ment agency if the vehicle is located.
However, only the law enforcement agency
is informed of the location of the vehicle.
If the anti-theft alarm system is activated for
longer than 30 seconds, the Mercedes-Benz
Customer Assistance Center is automatically
notified.
Vehicle Health Check
With the Vehicle Health Check, the Customer
Assistance Center can provide improved sup-
port for problems with your vehicle. During an
existing call, vehicle data is transferred to the
Customer Assistance Center.
The customer service representative can use
the received data to decide what kind of
assistance is required. You are then, for
example, guided to the nearest authorized
Mercedes-Benz Center or a recovery vehicle
is called.
If vehicle data needs to be transferred during an MB Info call or a Roadside Assistance call,
this is initiated by the Customer Assistance
Center.
The Roadside Assistance Connected
message appears in the display. If the Vehicle
Health Check can be started, the Request
for Vehicle Diagnostics Received
Start vehicle diagnostics?message
appears in the display.
Features261
Stowage and features
Z
Page 264 of 342

XPress theYesbutton to confirm the mes-
sage.
XWhen the Vehicle Diagnostics
Please Start Ignitionmessage
appears: turn the SmartKey to position 2in
the ignition lock (
Ypage 131).
XIf the Please follow the instruc‐
tions received by phone and move
your vehicle to a safe position.
message appears: please follow the
instructions received by phone and move
your vehicle to a safe position.
The message in the display disappears.
The vehicle operating state check begins.
During this procedure, you will see the
Vehicle
DiagnosticsActivemessage.
If you select Cancel
, the Vehicle Health
Check is canceled completely.
When the check is complete, the Sending
vehicle diagnostics data. (Voice
connection may be interrupted dur‐
ingdatatransfer)message appears. The
vehicle data can now be sent.
XPress the OKbutton to confirm the mes-
sage.
The voice connection with the Customer
Assistance Center is terminated.
The Vehicle Diagnostics: Transfer‐
ring Data...message appears.
The vehicle data is sent to the Customer
Assistance Center.
Depending on what the customer service rep-
resentative agreed with you, the voice con-
nection is re-established after the transfer is
complete. If necessary, you will be contacted
at a later time by another means, e.g. by e-
mail or phone.
Another function of the Vehicle Health Check
is the transfer of service data to the Customer
Assistance Center. If a service is due, the dis-
play shows a message to this effect together
with information about any special offers at
your workshop.
This information can also be called up under
"Owners Online" at http://www.mbusa.com. Information on the data stored in the vehicle
(
Ypage 27).
Information on Roadside Assistance
(
Ypage 22).
Downloading routes
Downloading routes allows you to transfer
and save predefined routes in the navigation
system.
A route can be prepared and sent by either a
customer service representative or under
"Owners Online" at http://www.mbusa.com.
Each route can include up to four way points.
Once a route has been received by the navi-
gation system, you will see the The
to "Previous Destinations". Would
youliketostartnavigation?message
on the COMAND/Audio 20 display.
The route is saved.
XTo start route guidance: selectYes.
An overview of the route is shown in the
display.
If you select No
the saved route can be
called up later in the navigation menu.
XSelect Start.
Route guidance starts.
Downloaded and saved routes can be called
up again.
You can find further information in the sepa-
rate COMAND/Audio 20 operating instruc-
tions.
Speed alert
You can define the upper speed limit, which
must not be exceeded by the vehicle.
If this selected speed is exceeded by the vehi-
cle, a message will be sent to the Customer
Assistance Center. The Customer Assistance Center then forwards this information to you.
You can select the way in which you receive
this information beforehand. Possible options
include text message, e-mail or an automated
call.
262Features
Stowage and features