2016 MERCEDES-BENZ B-Class ELECTRIC lock
[x] Cancel search: lockPage 158 of 342
The electric parking brake can only be
released:
Rwhen the SmartKey is in position1or 2in
the ignition lock (
Ypage 131) or
Rif the ignition was switched on using the
Start/Stop button
Applying automatically
When the vehicle's HOLD function is holding
the vehicle at a standstill, the electric parking
brake is engaged automatically.
In addition, at least one of the following con-
ditions must be fulfilled:
Rthe drive system is switched off.
Rthe driver's door is open and the seat belt is
not fastened.
Rthere is a system malfunction.
Rthe power supply is insufficient.
Rthe vehicle is stationary for a lengthy
period.
The red F(USA only) or !(Canada
only) indicator lamp in the instrument cluster
lights up.
Releasing automatically
Your vehicle's electric parking brake is auto-
matically released if all of the following con-
ditions are met:
Rthe vehicle has been started.
Rthe transmission is in position Dor R.
Rthe seat belt has been fastened.
Ryou depress the accelerator pedal.
If the transmission is in position R, the tailgate
must be closed.
If your seat belt is not fastened, the following
conditions must be fulfilled to automatically
release the electric parking brake:
Rthe driver's door is closed.
Ryou have shifted out of transmission posi-
tion Por you have previously driven faster
than 2 mph (3 km/h). Ensure that you do not depress the acceler-
ator pedal unintentionally. Otherwise the
parking brake will be released and the vehicle
will start to move.
Emergency braking
The vehicle can also be braked during an
emergency by using the electric parking
brake.
XWhile driving, push handle :of the electric
parking brake (
Ypage 155).
The vehicle is braked as long as you keep
handle :of the electric parking brake
pressed. The longer the electric parking
brake handle :is depressed, the greater
the braking force.
During braking:
Ra warning tone sounds
Rthe Please Release Parking Brake
message appears
Rthe red F(USA only) or !(Canada
only) indicator lamp in the instrument clus-
ter flashes
When the vehicle has been braked to a stand-
still, the electric parking brake is applied.
Parking the vehicle for a long period
If you leave the vehicle parked for longer than
four weeks, the battery may be damaged by
exhaustive discharging.
If you leave the vehicle parked for longer than six weeks, the vehicle may suffer damage as a
result of lack of use.
XVisit a qualified specialist workshop and
seek advice.
iYou can obtain information about trickle
chargers from a qualified specialist work-
shop.
156Parking
Driving and parking
Page 161 of 342

Do not depress the brake pedal continuously
while the vehicle is in motion, e.g. causing the
brakes to rub by constantly applying light
pressure to the pedal. This results in exces-
sive and premature wear to the brake pads.
Heavy and light loads
GWARNING
If you rest your foot on the brake pedal while
driving, the braking system can overheat. This increases the stopping distance and can even
cause the braking system to fail. There is a
risk of an accident.
Never use the brake pedal as a footrest. Never
depress the brake pedal and the accelerator
pedal at the same time.
!Depressing the brake pedal constantly
results in excessive and premature wear to
the brake pads.
If the brakes have been subjected to a heavy
load, do not stop the vehicle immediately.
Drive on for a short while. This allows the air-
flow to cool the brakes more quickly.
Wet roads
If you have driven for a long time in heavy rain
without braking, there may be a delayed reac-
tion from the brakes when braking for the first
time. This may also occur after the vehicle has
been washed or driven through deep water.
You have to depress the brake pedal more
firmly. Maintain a greater distance from the
vehicle in front.
After driving on a wet road or having the vehi-
cle washed, brake firmly while paying atten-
tion to the traffic conditions. This will warm up
the brake discs, thereby drying them more
quickly and protecting them against corro-
sion.
Limited braking performance on salt-
treated roads
If you drive on salted roads, a layer of salt
residue may form on the brake discs and brake pads. This can result in a significantly
longer braking distance.
RIn order to prevent any salt build-up, apply
the brakes occasionally while paying atten-
tion to the traffic conditions.
RCarefully depress the brake pedal and the
beginning and end of a journey.
RMaintain a greater distance to the vehicle
ahead.
Servicing the brakes
!The brake fluid level may be too low, if:
Rif the red brake warning lamp lights up in
the instrument cluster and
Ryou hear a warning tone while the engineis running
Observe additional warning messages in
the multifunction display.
The brake fluid level may be too low due to
brake pad wear or leaking brake lines.
Have the brake system checked immedi-
ately. Consult a qualified specialist work-
shop to arrange this.
!A function or performance test should
only be carried out on a 2-axle dynamom-
eter. If you wish to operate the vehicle on
such a dynamometer, please consult a
qualified specialist workshop in advance.
You could otherwise damage the drive train
or the brake system.
!As the ESP®system operates automati-
cally, the engine and the ignition must be
switched off (the SmartKey must be in posi-
tion 0or 1in the ignition lock) if:
Rthe electric parking brake is tested on a
brake dynamometer (for a maximum of
ten second s)
Rthe vehicle is towed with the front axle
raised.
Braking triggered automatically by ESP
®
may seriously damage the brake system.
Driving tips159
Driving and parking
Z
Page 167 of 342

The electric parking brake secures the vehicle
automatically if the HOLD function is activa-
ted and:
Rthe driver's seat belt is not fastened and the
driver's door is open.
Rthe engine is switched off, unless it is auto- matically switched off by the ECO start/
stop function.
Ra system malfunction occurs.
Rthe power supply is not sufficient.
The Brake Immediately
message may also
appear in the multifunction display.
XImmediately depress the brake firmly until
the warning message in the multifunction
display goes out.
The HOLD function is deactivated. The horn
sounds at regular intervals if you have
switched off the engine, released the seat
belt and opened the driver's door with the
HOLD function activated. The sounding of the
horn alerts you to the fact that the HOLD
function is still activated. If you attempt to
lock the vehicle, the tone becomes louder.
The vehicle cannot be locked until you have
deactivated the HOLD function.
iAfter switching off the engine, it can only
be started again once you have deactivated
the HOLD function.
PARKTRONIC
Important safety notes
PARKTRONIC is an electronic parking aid with ultrasonic sensors. It monitors the area
around your vehicle using six sensors in the
front bumper and six sensors in the rear
bumper. PARKTRONIC indicates visually and
audibly the distance between your vehicle
and an object.
PARKTRONIC is only an aid. It is not a replace-
ment for your attention to your immediate
surroundings. You are always responsible for
safe maneuvering, parking and exiting a park-
ing space. When maneuvering, parking or pulling out of a parking space, make sure that
there are no persons, animals or objects in
the area in which you are maneuvering.
!When parking, pay particular attention to
objects above or below the sensors, such
as flower pots or trailer drawbars.
PARKTRONIC does not detect such objects
when they are in the immediate vicinity of
the vehicle. You could damage the vehicle
or the objects.
The sensors may not detect snow and other
objects that absorb ultrasonic waves.
Ultrasonic sources such as an automatic
car wash, the compressed-air brakes on a
truck or a pneumatic drill could cause
PARKTRONIC to malfunction.
PARKTRONIC may not function correctly on
uneven terrain.
PARKTRONIC is activated automatically when
you:
Rswitch on the ignition
Rshift the transmission to position D,Ror N
Rshift the transmission to position D,Ror N
Rrelease the electric parking brake
Range of the sensors
General notes
PARKTRONIC does not take objects into con-
sideration that are:
Rbelow the detection range, e.g. people, ani-
mals or objects.
Rabove the detection range, e.g. overhang-
ing loads, truck overhangs or loading
ramps.
Driving systems165
Driving and parking
Z
Page 169 of 342
ments. PARKTRONIC is operational if yellow
segments showing operational readiness=
light up.
The transmission position of the automatic
transmission and the direction in which the
vehicle is rolling determine which warning
display is active when the engine is running.
Transmission
positionWarning display
DFront area activated
R, Nor the vehicle
is rolling back-
wardsRear and front areas
activated
PNo areas activated
One or more segments light up as the vehicle
approaches an obstacle, depending on the
vehicle's distance from the obstacle.
From the:
Rsixth segment onwards, you will hear an
intermittent warning tone for approx-
imately two seconds.
Rseventh segment onwards, you will hear a
warning tone for approximately two sec-
onds. This indicates that you have now
reached the minimum distance.
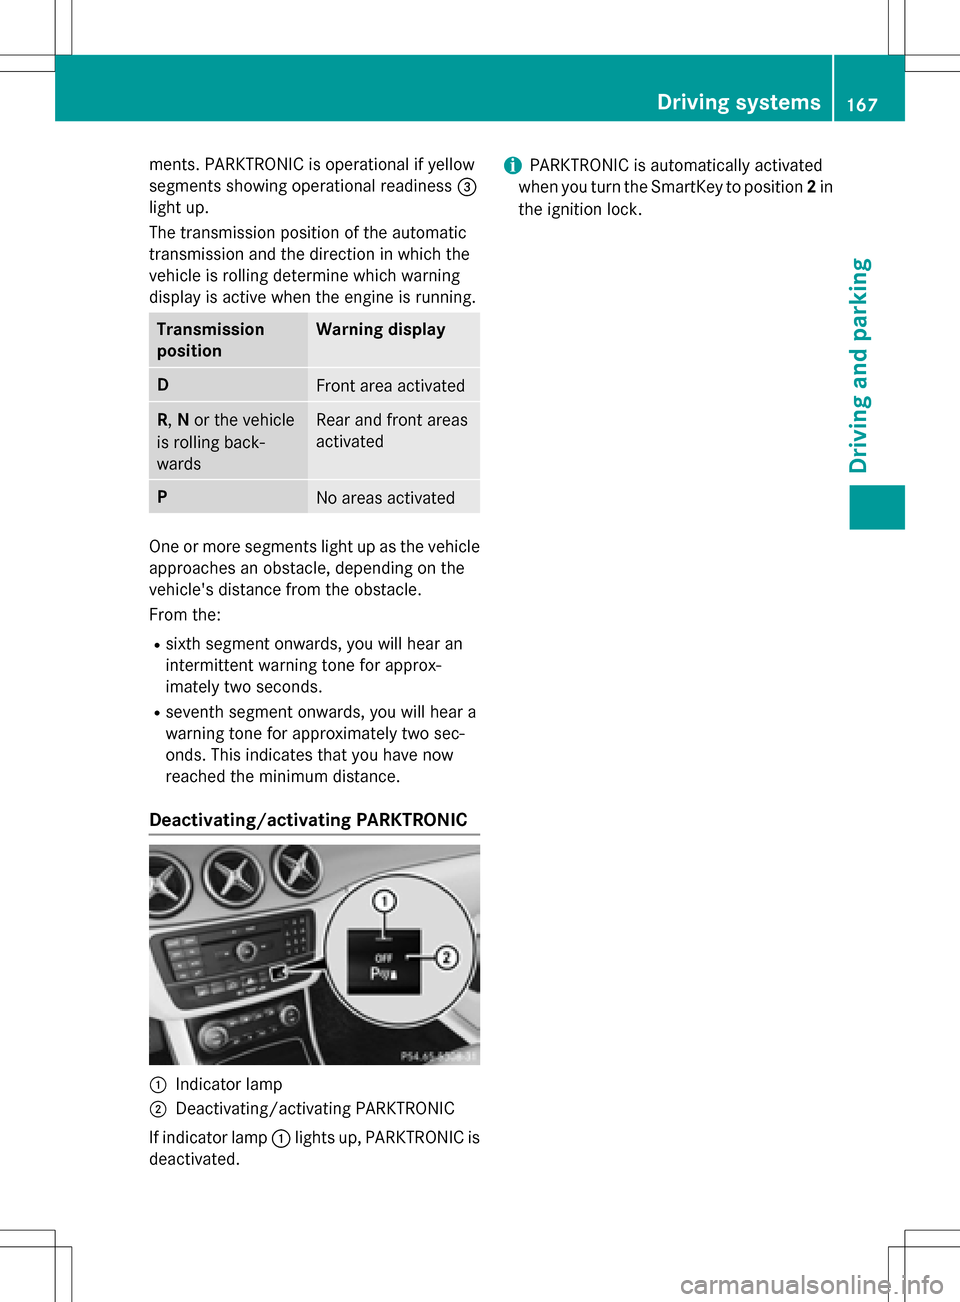
Deactivating/activating PARKTRONIC
:Indicator lamp
;Deactivating/activating PARKTRONIC
If indicator lamp :lights up, PARKTRONIC is
deactivated.
iPARKTRONIC is automatically activated
when you turn the SmartKey to position 2in
the ignition lock.
Driving systems167
Driving and parking
Z
Page 171 of 342
Parking tips:
ROn narrow roads, drive as close to the park-
ing space as possible.
RParking spaces that are littered or over-
grown might be identified or measured
incorrectly.
RParking spaces that are partially occupied
by trailer drawbars might not be identified
as such or be measured incorrectly.
RSnowfall or heavy rain may lead to a parking
space being measured inaccurately.
RPay attention to the PARKTRONIC
(
Ypage 166) warning messages during the
parking procedure.
RYou can intervene in the steering procedure
to correct it at any time. Active Parking
Assist will then be canceled.
RWhen transporting a load which protrudes
from your vehicle, you should not use
Active Parking Assist.
RNever use Active Parking Assist when snow
chains are installed.
RMake sure that the tire pressures are
always correct. This has a direct influence
on the parking characteristics of the vehi-
cle.
Use Active Parking Assist for parking spaces:
Rthat are parallel to the direction of travel
Rthat are on straight roads, not bends
Rthat are on the same level as the road, e.g.
not on the pavement
Detecting parking spaces
Objects located above the height range of
Active Parking Assist will not be detected
when the parking space is measured. These
are not taken into account when the parking
procedure is calculated, e.g. overhanging
loads, tail sections or loading ramps of goods
vehicles.
GWARNING
If there are objects above the detection range:
RActive Park Assist may steer too early
Rthe vehicle may not stop in front of these
objects
You may cause a collision as a result. There is
a risk of an accident.
If objects are located above the detection
range, stop and deactivate Active Parking
Assist.
For further information on the detection
range (
Ypage 165).
Active Parking Assist does not support you
parking in spaces that are parallel to the
direction of travel if:
Rthe parking space is on a curb
Rthe parking space is apparently blocked,
for example by foliage or grass paving
blocks
Rthe range of movement is too small
Rthe parking space is bordered by an obsta-
cle which is not clearly defined such as a
tree or a trailer
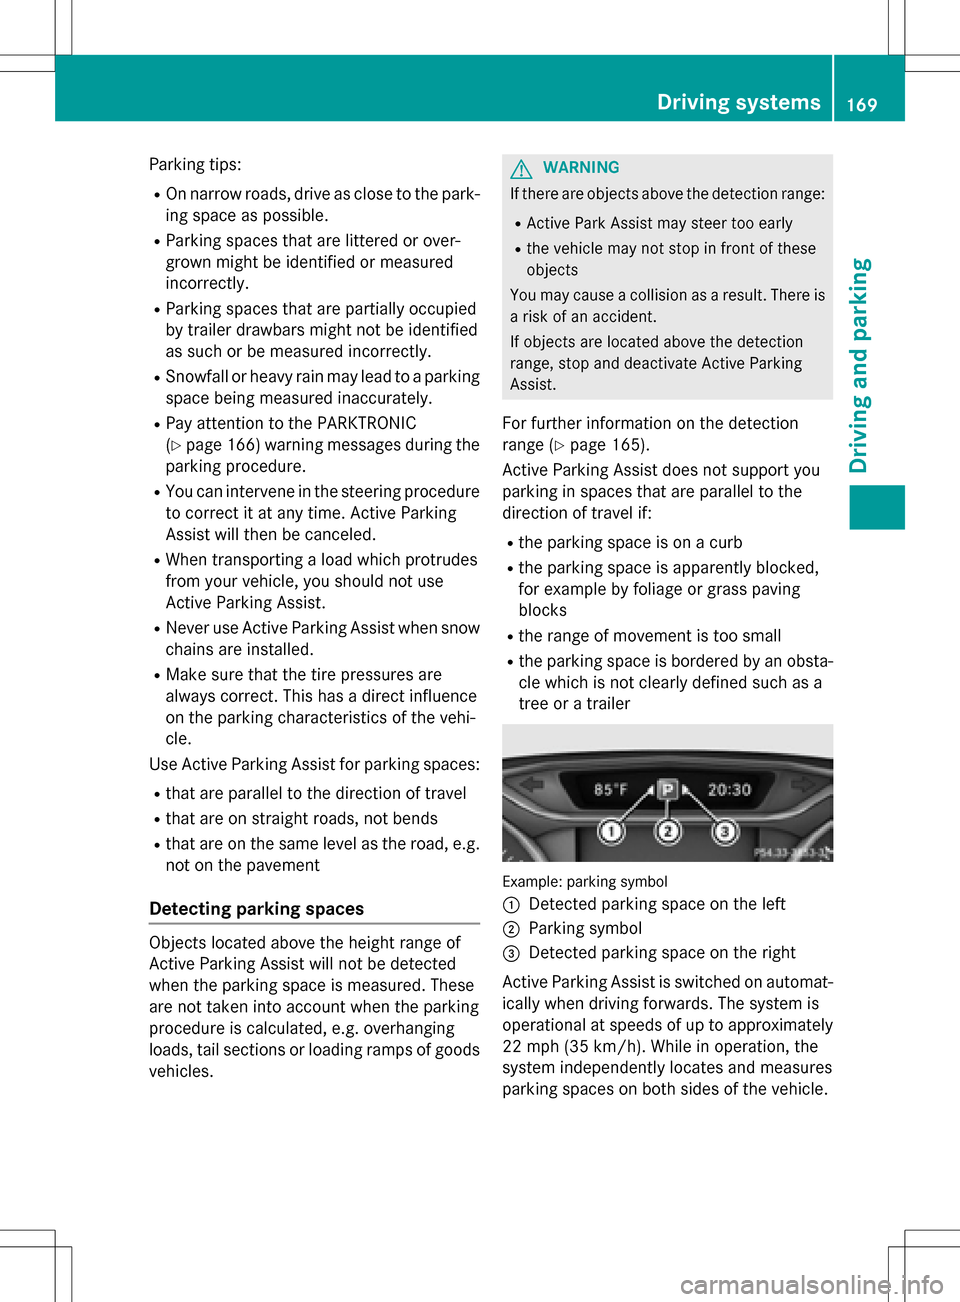
Example: parking symbol
:
Detected parking space on the left
;Parking symbol
=Detected parking space on the right
Active Parking Assist is switched on automat-
ically when driving forwards. The system is
operational at speeds of up to approximately
22 mph (35 km/h). While in operation, the
system independently locates and measures
parking spaces on both sides of the vehicle.
Driving systems169
Driving and parking
Z
Page 175 of 342
Under the following circumstances, the rear
view camera will not function, or will function
in a limited manner:
Rif the tailgate is open
Rin heavy rain, snow or fog
Rat night or in very dark places
Rif the camera is exposed to very bright light
Rif the area is lit by fluorescent bulbs or LED
lighting (the display may flicker)
Rif there is a sudden change in temperature,
e.g. when driving into a heated garage in
winter
Rif the camera lens is dirty or obstructed
Observe the notes on cleaning
(
Ypage 278)
Rif the rear of your vehicle is damaged. In this
event, have the camera position and setting
checked at a qualified specialist workshop
The field of vision and other functions of the
rear view camera may be restricted due to
additional accessories on the rear of the vehi-
cle (e.g. license plate holder, bicycle rack).
Activating/deactivating the rear view
camera
XTo activate: make sure that the SmartKey
is in position 2in the ignition lock.
XMake sure that the Activation by R
gearfunction is selected in Audio 20/
COMAND; see the Digital Operator's Man-
ual.
XEngage reverse gear.
The area behind the vehicle is shown with
guide lines in the Audio 20/COMAND dis-
play.
The image from the rear view camera is
available throughout the maneuvering
process.
To deactivate: the rear view camera deacti-
vates if you shift the transmission to Por after
driving forwards a short distance.
Displays in the Audio 20/COMAND dis-
play
The rear view camera may show a distorted
view of obstacles, show them incorrectly or
not at all. The rear view camera does not show
objects in the following positions:
Rvery close to the rear bumper
Runder the rear bumper
Rin the area immediately above the tailgate
handle
!Objects not at ground level may appear to
be further away than they actually are, e.g.:
Rthe bumper of a parked vehicle
Rthe drawbar of a trailer
Rthe ball coupling of a trailer tow hitch
Rthe rear section of an HGV
Ra slanted post
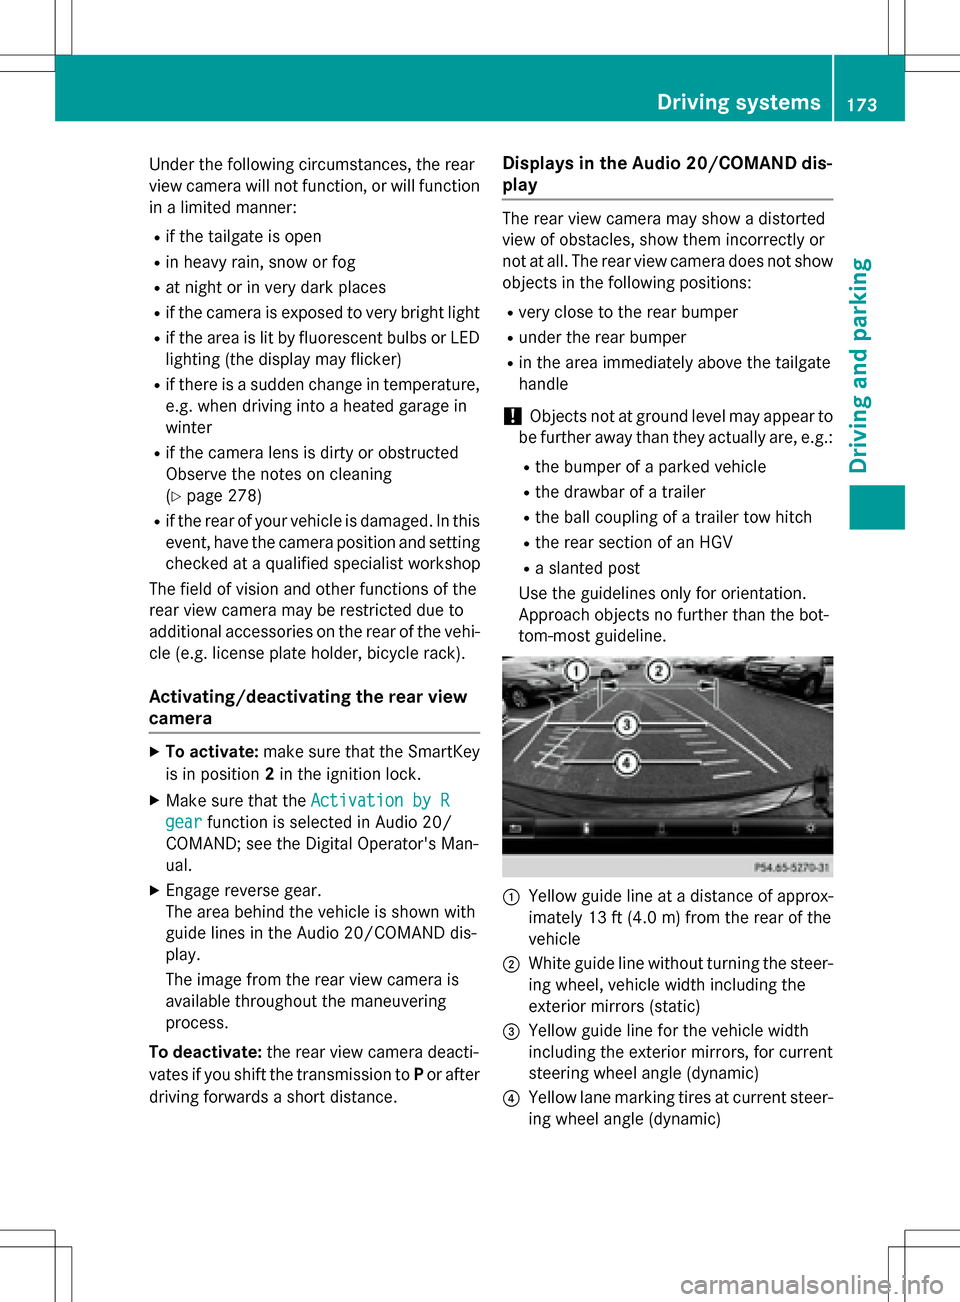
Use the guidelines only for orientation.
Approach objects no further than the bot-
tom-most guideline.
:Yellow guide line at a distance of approx-
imately 13 ft (4.0 m) from the rear of the
vehicle
;White guide line without turning the steer-
ing wheel, vehicle width including the
exterior mirrors (static)
=Yellow guide line for the vehicle width
including the exterior mirrors, for current
steering wheel angle (dynamic)
?Yellow lane marking tires at current steer-
ing wheel angle (dynamic)
Driving systems173
Driving and parking
Z
Page 181 of 342
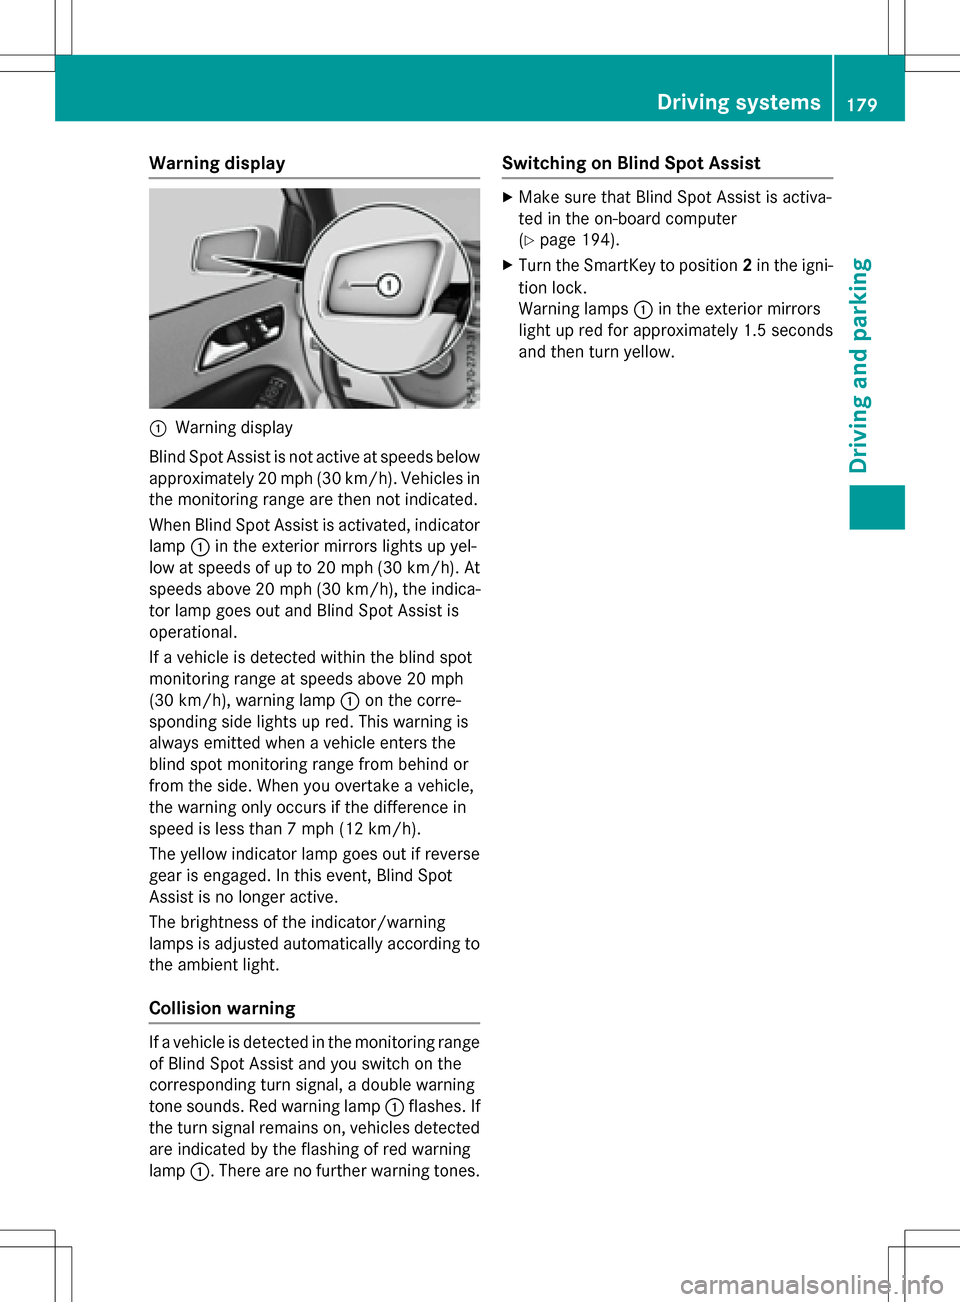
Warning display
:Warning display
Blind Spot Assist is not active at speeds below
approximately 20 mph (30 km/h). Vehicles in the monitoring range are then not indicated.
When Blind Spot Assist is activated, indicator
lamp :in the exterior mirrors lights up yel-
low at speeds of up to 20 mph (30 km/h). At
speeds above 20 mph (30 km/h), the indica-
tor lamp goes out and Blind Spot Assist is
operational.
If a vehicle is detected within the blind spot
monitoring range at speeds above 20 mph
(30 km/h), warning lamp :on the corre-
sponding side lights up red. This warning is
always emitted when a vehicle enters the
blind spot monitoring range from behind or
from the side. When you overtake a vehicle,
the warning only occurs if the difference in
speed is less than 7 mph (12 km/h).
The yellow indicator lamp goes out if reverse
gear is engaged. In this event, Blind Spot
Assist is no longer active.
The brightness of the indicator/warning
lamps is adjusted automatically according to
the ambient light.
Collision warning
If a vehicle is detected in the monitoring range
of Blind Spot Assist and you switch on the
corresponding turn signal, a double warning
tone sounds. Red warning lamp :flashes. If
the turn signal remains on, vehicles detected
are indicated by the flashing of red warning
lamp :. There are no further warning tones.
Switching on Blind Spot Assist
XMake sure that Blind Spot Assist is activa-
ted in the on-board computer
(
Ypage 194).
XTurn the SmartKey to position 2in the igni-
tion lock.
Warning lamps :in the exterior mirrors
light up red for approximately 1.5 seconds
and then turn yellow.
Driving systems179
Driving and parking
Z
Page 184 of 342

Useful information
i
This Operator's Manual describes all
models and all standard and optional equip-
ment of your vehicle available at the time of
publication of the Operator's Manual.
Country-specific differences are possible.
Please note that your vehicle may not be
equipped with all features described. This
also applies to safety-related systems and
functions.
iRead the information on qualified special-
ist workshops (
Ypage 26).
Important safety notes
GWARNING
If you operate information systems and com-
munication equipment integrated in the vehi-
cle while driving, you will be distracted from
traffic conditions. You could also lose control
of the vehicle. There is a risk of an accident.
Only operate the equipment when the traffic
situation permits. If you are not sure that this
is possible, park the vehicle paying attention
to traffic conditions and operate the equip-
ment when the vehicle is stationary.
You must observe the legal requirements for
the country in which you are currently driving
when operating the on-board computer.
GWARNING
If the instrument cluster has failed or mal-
functioned, you may not recognize function
restrictions in systems relevant to safety. The
operating safety of your vehicle may be
impaired. There is a risk of an accident.
Drive on carefully. Have the vehicle checked
at a qualified specialist workshop immedi-
ately.
The on-board computer only shows messages
or warnings from certain systems in the mul-
tifunction display. You should therefore make sure your vehicle is operating safely at all
times.
If the operating safety of your vehicle is
impaired, pull over as soon as it is safe to do
so. Contact a qualified specialist workshop.
For an overview, see the instrument panel
illustration (
Ypage 31).
Displays and operation
Instrument cluster lighting
The light sensor in the instrument cluster
automatically controls the brightness of the
multifunction display. In daylight, the displays
in the instrument cluster are not illuminated.
The lighting in the instrument cluster, in the
displays and the controls in the vehicle inte-
rior can be adjusted using the brightness con-
trol knob.
The brightness control knob is located on the
bottom left of the instrument cluster
(
Ypage 31).
XTurn the brightness control knob clockwise
or counter-clockwise.
If the light switch is set to the
Ã,Tor
L position, the brightness is dependent
upon the brightness of the ambient light.
READY indicator
When the drive system is started and the
vehicle is ready to drive, READY indicator :
appears in the multifunction display. This indi-
cates that the vehicle is operational.
182Displays and operation
On-board computer and displays