2016 MERCEDES-BENZ B-Class ELECTRIC ad blue
[x] Cancel search: ad bluePage 2 of 342

Publication details
Internet
Further information about Mercedes-Benz
vehicles and about Daimler AG can be found
on the following websites:
http://www.mbusa.com
Editorial office
©Daimler AG: not to be reprinted, translated
or otherwise reproduced, in whole or in part,
without written permission from Daimler AG.
Vehicle manufacturer
Daimler AG
Mercedesstraße 137
70327 Stuttgart
Germany
Symbols
Registered trademarks:
RBluetooth®is a registered trademark of
Bluetooth SIG Inc.
RDTS is a registered trademark of DTS, Inc.
RDolby and MLP are registered trademarks
of DOLBY Laboratories.
RBabySmart™, ESP®and PRE-SAFE®are
registered trademarks of Daimler AG.
RHomeLink®is a registered trademark of
Johnson Controls.
RiPod®and iTunes®are registered trade-
marks of Apple Inc.
RLogic7®is a registered trademark of Har-
man International Industries.
RMicrosoft®and Windows media®are reg-
istered trademarks of Microsoft Corpora-
tion.
RSIRIUS is a registered trademark of Sirius
XM Radio Inc.
RHD Radio is a registered trademark of iBiq-
uity Digital Corporation.
RGracenote®is a registered trademark of
Gracenote, Inc.
RZAGATSurvey®and related brands are reg-
istered trademarks of ZagatSurvey, LLC.
In this Operator's Manual you will find the fol-
lowing symbols:
GWARNING
Warning notes make you aware of dangers
which could pose a threat to your health or
life, or to the health and life of others.
HEnvironmental note
Environmental notes provide you with infor-
mation on environmentally aware actions or
disposal.
!Notes on material damage alert you to
dangers that could lead to damage to your
vehicle.
iPractical tips or further information that
could be helpful to you. X
This symbol indicates an instruction
that must be followed.
X Several of these symbols in succes-
sion indicate an instruction with sev-
eral steps.
(Y
page) This symbol tells you where you can
find more information about a topic.
YY This symbol indicates a warning or an
instruction that is continued on the
next page.
Dis‐
play
This text indicates a message on the
multifunction display/multimedia
display.
As at 08.01.2015
Page 104 of 342

Combination switch
Turn signal
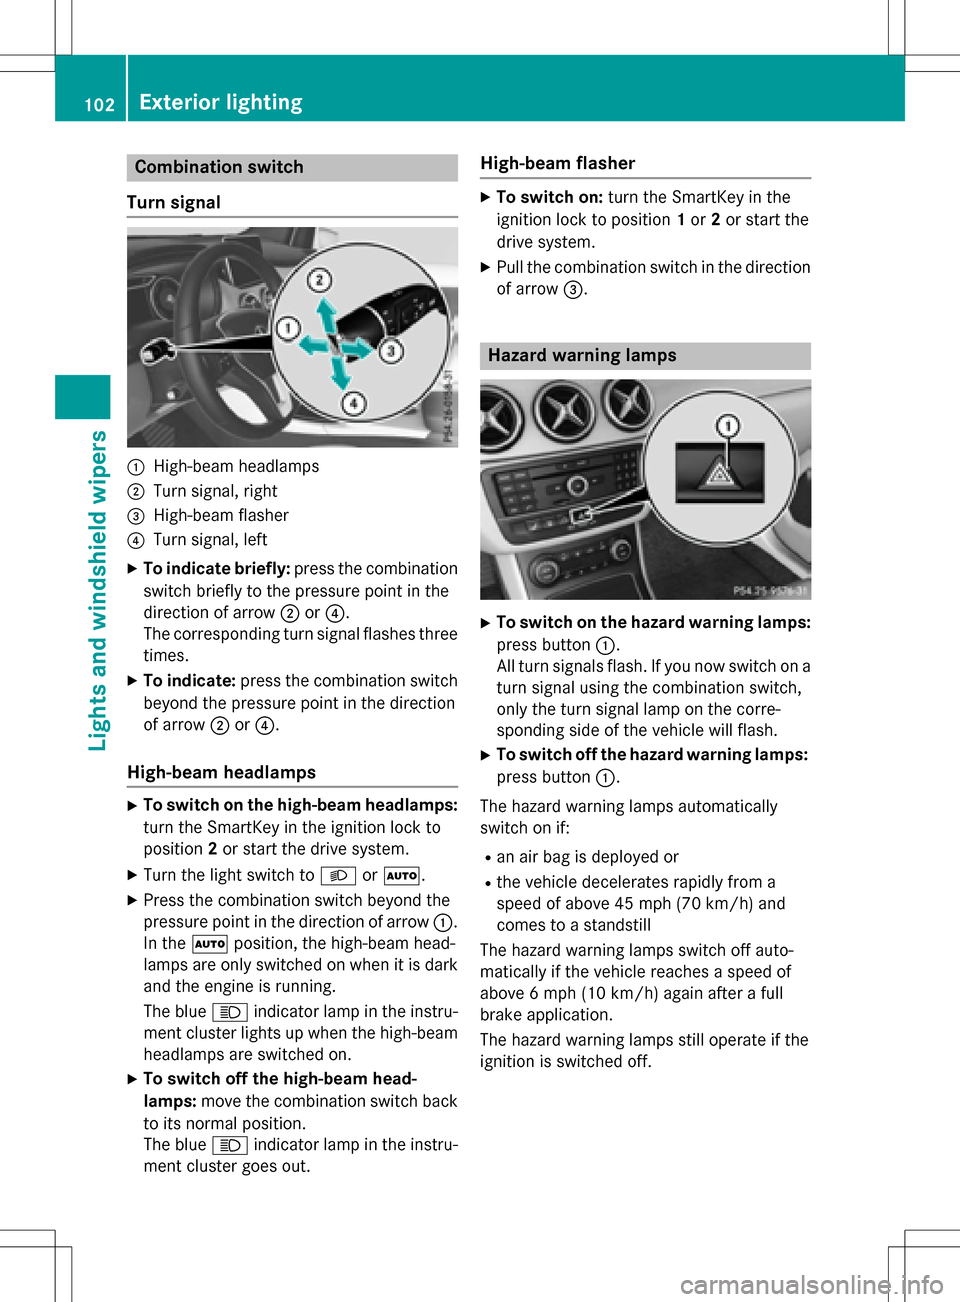
:High-beam headlamps
;Turn signal, right
=High-beam flasher
?Turn signal, left
XTo indicate briefly: press the combination
switch briefly to the pressure point in the
direction of arrow ;or?.
The corresponding turn signal flashes three
times.
XTo indicate: press the combination switch
beyond the pressure point in the direction
of arrow ;or?.
High-beam headlamps
XTo switch on the high-beam headlamps:
turn the SmartKey in the ignition lock to
position 2or start the drive system.
XTurn the light switch to LorÃ.
XPress the combination switch beyond the
pressure point in the direction of arrow :.
In the Ãposition, the high-beam head-
lamps are only switched on when it is dark
and the engine is running.
The blue Kindicator lamp in the instru-
ment cluster lights up when the high-beam
headlamps are switched on.
XTo switch off the high-beam head-
lamps: move the combination switch back
to its normal position.
The blue Kindicator lamp in the instru-
ment cluster goes out.
High-beam flasher
XTo switch on: turn the SmartKey in the
ignition lock to position 1or 2or start the
drive system.
XPull the combination switch in the direction of arrow =.
Hazard warning lamps
XTo switch on the hazard warning lamps:
press button :.
All turn signals flash. If you now switch on a
turn signal using the combination switch,
only the turn signal lamp on the corre-
sponding side of the vehicle will flash.
XTo switch off the hazard warning lamps:
press button :.
The hazard warning lamps automatically
switch on if:
Ran air bag is deployed or
Rthe vehicle decelerates rapidly from a
speed of above 45 mph (70 km/h) and
comes to a standstill
The hazard warning lamps switch off auto-
matically if the vehicle reaches a speed of
above 6 mph (10 km/h)again after a full
brake application.
The hazard warning lamps still operate if the
ignition is switched off.
102Exterior lighting
Lights and windshield wipers
Page 128 of 342

To activate/deactivate "Immediate pre-
entry climate control"
XPress button:in the center console.
The blue or red indicator lamp in the button
lights up or goes out.
The colors of the indicator lamps in the button have the following meanings:
Re dH eating activated
Blue Cooling activated
Yellow Pre-entry climate control at depar- ture is preselected
Air vents
Important safety notes
GWARNING
Very hot or very cold air can flow from the air
vents. This could result in burns or frostbite in
the immediate vicinity of the air vents. There
is a risk of injury.
Make sure that all vehicle occupants always
maintain a sufficient distance to the air out-
lets. If necessary, redirect the airflow to
another area of the vehicle interior.
In order to ensure the direct flow of fresh air
through the air vents into the vehicle interior,
please observe the following notes:
Rkeep the air inlet between the windshield
and the hood free of blockages, such as ice, snow or leaves.
Rnever cover the air vents or air intake grillesin the vehicle interior.
iFor optimal climate control in the vehicle,
open the air vents completely and set the
adjusters to the central position.
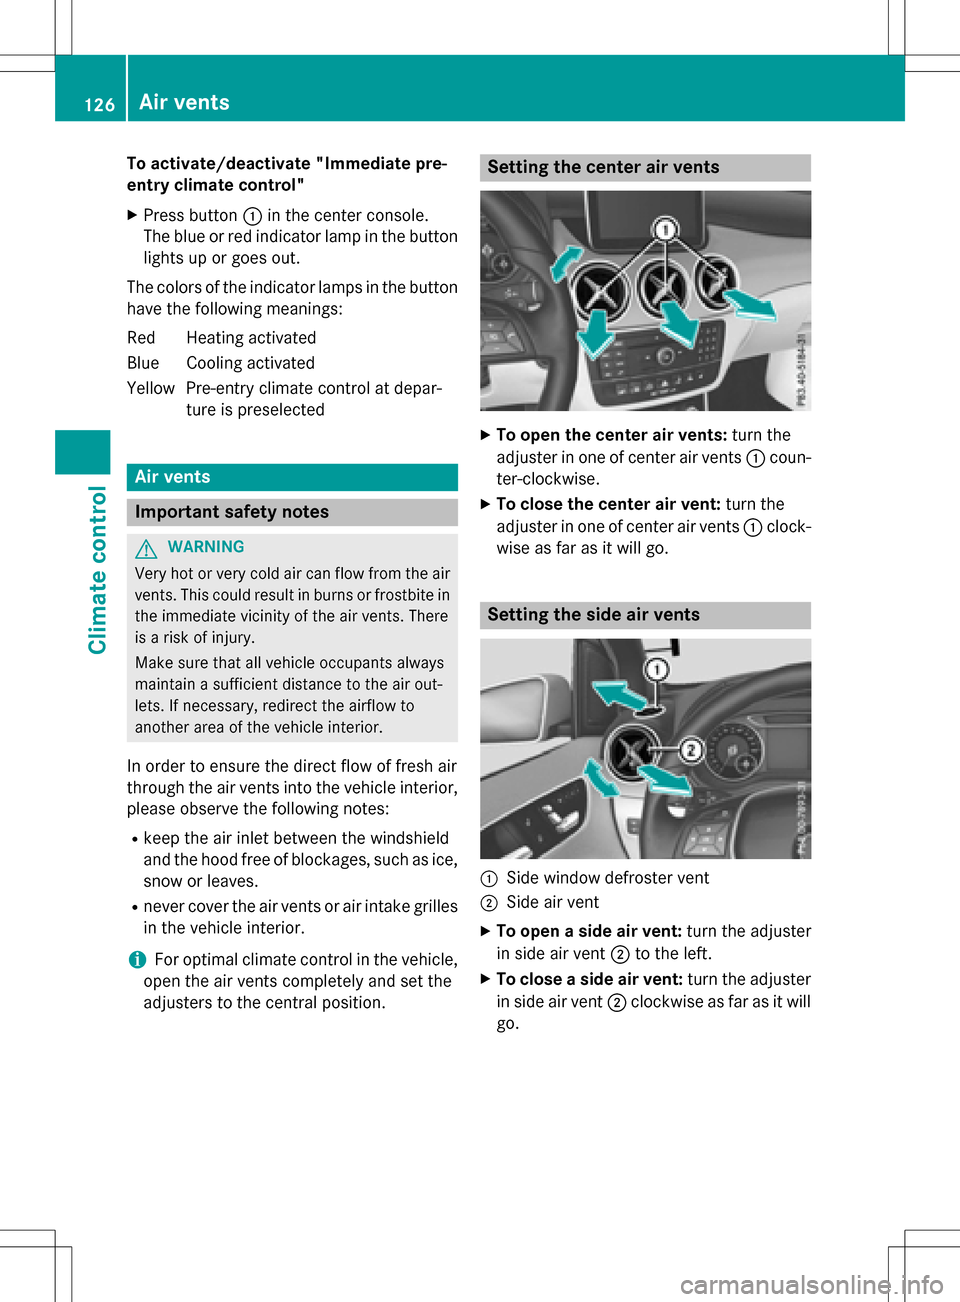
Setting the center air vents
XTo open the center air vents: turn the
adjuster in one of center air vents :coun-
ter-clockwise.
XTo close the center air vent: turn the
adjuster in one of center air vents :clock-
wise as far as it will go.
Setting the side air vents
:Side window defroster vent
;Side air vent
XTo open a side air vent: turn the adjuster
in side air vent ;to the left.
XTo close a side air vent: turn the adjuster
in side air vent ;clockwise as far as it will
go.
126Air vents
Climate control
Page 147 of 342

(Ypage 187) trip computer in theTrip
menu.
Displaying energy consumption and recu-
perated electric energy:
XSwitch on Audio 20/COMAND (see the
separate operating instructions).
XTo select Vehiclefrom the main function
bar: turn and press the controller.
The vehicle menu is displayed.
XTo select Consumption: turn and press the
controller.
Energy consumption :and recuperated
electric energy ;for the last 15 minutes of
the journey are shown.
Exiting the vehicle settings:
XPress the %button on the controller.
or
XTo select %: slide 6and press the
controller.
To reset values: the values are reset along
with the From Start
trip computer
(
Ypage 189).
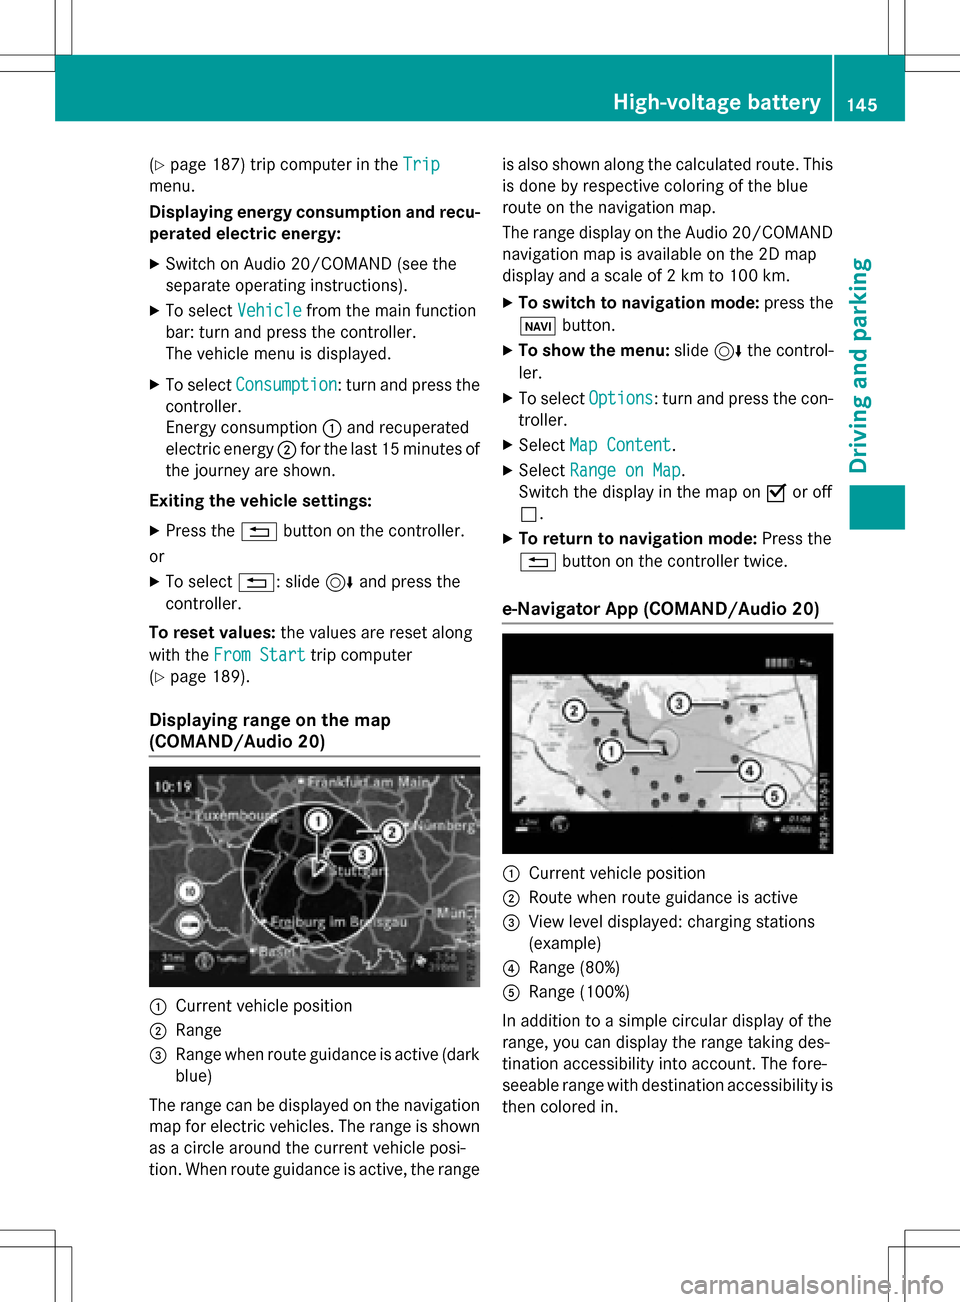
Displaying range on the map
(COMAND/Audio 20)
:Current vehicle position
;Range
=Range when route guidance is active (dark
blue)
The range can be displayed on the navigation
map for electric vehicles. The range is shown
as a circle around the current vehicle posi-
tion. When route guidance is active, the range is also shown along the calculated route. This
is done by respective coloring of the blue
route on the navigation map.
The range display on the Audio 20/COMAND
navigation map is available on the 2D map
display and a scale of 2 km to 100 km.
XTo switch to navigation mode:
press the
ß button.
XTo show the menu: slide6the control-
ler.
XTo select Options: turn and press the con-
troller.
XSelect Map Content.
XSelectRange on Map.
Switch the display in the map on Oor off
ª.
XTo return to navigation mode: Press the
% button on the controller twice.
e-Navigator App (COMAND/Audio 20)
:Current vehicle position
;Route when route guidance is active
=View level displayed: charging stations
(example)
?Range (80%)
ARange (100%)
In addition to a simple circular display of the
range, you can display the range taking des-
tination accessibility into account. The fore-
seeable range with destination accessibility is
then colored in.
High-voltage battery145
Driving and parking
Z
Page 194 of 342

Telephone menu
Introduction
GWARNING
If you operate information systems and com-
munication equipment integrated in the vehi-
cle while driving, you will be distracted from
traffic conditions. You could also lose control
of the vehicle. There is a risk of an accident.
Only operate the equipment when the traffic
situation permits. If you are not sure that this
is possible, park the vehicle paying attention
to traffic conditions and operate the equip-
ment when the vehicle is stationary.
When telephoning, you must observe the
legal requirements for the country in which
you are currently driving.
XSwitch on the mobile phone (see the man-
ufacturer’s operating instructions).
XSwitch on Audio 20 or COMAND, see the
separate operating instructions.
XEstablish a Bluetooth®connection to Audio
20 or COMAND, see the separate operating
instructions.
XPress the =or; button on the steer-
ing wheel to select the Tel
menu.
You will see one of the following display mes-
sages in the multifunction display:
RPhone READYor the name of the network
provider: the mobile phone has found a
network and is ready to receive.
RPhone No Service: there is no network
available or the mobile phone is searching
for a network.
Accepting a call
If someone calls you when you are in the Tel
menu, a display message appears in the mul-
tifunction display.
You can accept a call at any time, even if you
are not in theTel
menu.
XPress the6button on the steering
wheel to accept an incoming call.
Rejecting or ending a call
You can end or reject a call anytime, even if
you are not in the Tel
menu.
XPress the~button on the steering
wheel to reject or end a call.
Selecting an entry in the phone book
XPress the =or; button on the steer-
ing wheel to select the Tel
menu.
XPress the9,:ora button to
switch to the phone book.
XAuthorize access to the phone book on the
phone.
XPress the 9or: button to select the
desired name.
or
XTo begin rapid scrolling: press and hold
the 9 or: button for longer than
one second.
Rapid scrolling stops when you release the
button or reach the end of the list.
XIf only one telephone number is stored
for a name: press the6ora button
to start dialing.
or
XIf there is more than one number for a
particular name: press the6ora
button to display the numbers.
XPress the 9or: button to select the
number you want to dial.
XPress the 6ora button to start dial-
ing.
or
XIf you do not want to make a call: press
the ~ or% button.
192Menus and submenus
On-board computer and displays