2016 MERCEDES-BENZ AMG GT ROADSTER engine
[x] Cancel search: enginePage 93 of 289
X
Press the combination switch beyond the
pressure point in the direction of arrow :.
In the Ãposition, the main-beam head-
lamps are only switched on when it is dark and the engine is running.
The K indicator lamp in the instrument
cluster lights up when the main-beam head-
lamps are switched on.
X To switch off the main-beam headlamps:
move the combination switch back to its nor-
mal position.
The K indicator lamp in the instrument
cluster goes out.
Vehicles with Adaptive Highbeam Assist: when
Adaptive Highbeam Assist is active, it controls
switching on/off of the main-beam headlamps
(Y page 90).
X To flash the headlamps: pull the combina-
tion switch in the direction of arrow =.Hazard warning lamps
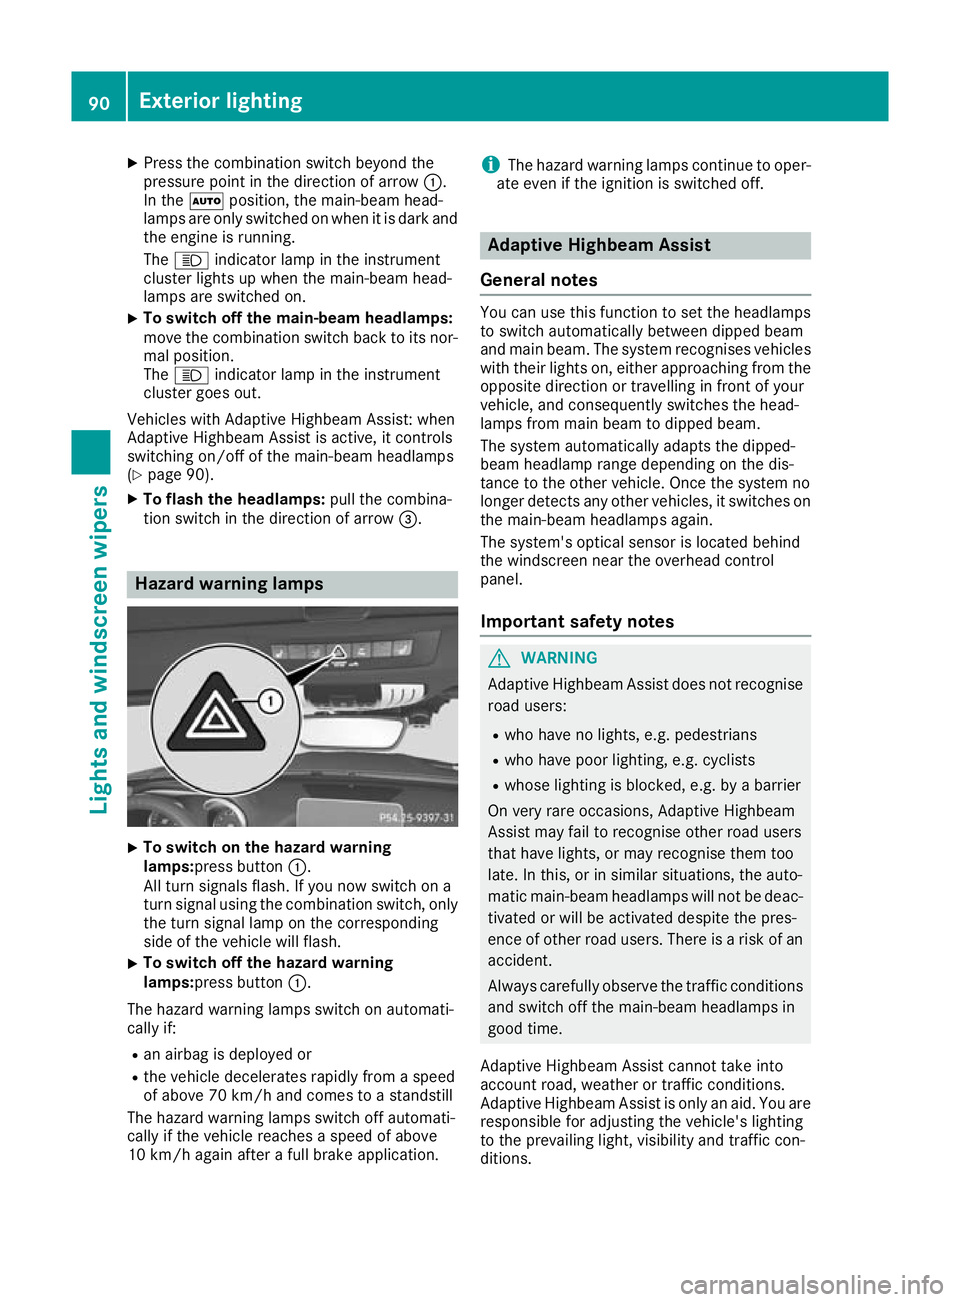
X
To switch on the hazard warning
lamps:press button
:.
All turn signals flash. If you now switch on a
turn signal using the combination switch, only the turn signal lamp on the corresponding
side of the vehicle will flash.
X To switch off the hazard warning
lamps:press button
:.
The hazard warning lamps switch on automati-
cally if:
R an airbag is deployed or
R the vehicle decelerates rapidly from a speed
of above 70 km/h and comes to a standstill
The hazard warning lamps switch off automati-
cally if the vehicle reaches a speed of above
10 km/h again after a full brake application. i
The hazard warning lamps continue to oper-
ate even if the ignition is switched off. Adaptive Highbeam Assist
General notes You can use this function to set the headlamps
to switch automatically between dipped beam
and main beam. The system recognises vehicles
with their lights on, either approaching from the opposite direction or travelling in front of your
vehicle, and consequently switches the head-
lamps from main beam to dipped beam.
The system automatically adapts the dipped-
beam headlamp range depending on the dis-
tance to the other vehicle. Once the system no
longer detects any other vehicles, it switches on the main-beam headlamps again.
The system's optical sensor is located behind
the windscreen near the overhead control
panel.
Important safety notes G
WARNING
Adaptive Highbeam Assist does not recognise road users:
R who have no lights, e.g. pedestrians
R who have poor lighting, e.g. cyclists
R whose lighting is blocked, e.g. by a barrier
On very rare occasions, Adaptive Highbeam
Assist may fail to recognise other road users
that have lights, or may recognise them too
late. In this, or in similar situations, the auto-
matic main-beam headlamps will not be deac-
tivated or will be activated despite the pres-
ence of other road users. There is a risk of an accident.
Always carefully observe the traffic conditions and switch off the main-beam headlamps in
good time.
Adaptive Highbeam Assist cannot take into
account road, weather or traffic conditions.
Adaptive Highbeam Assist is only an aid. You are
responsible for adjusting the vehicle's lighting
to the prevailing light, visibility and traffic con-
ditions. 90
Exterior lightingLights and windscreen wipers
Page 94 of 289
In particular, the detection of obstacles can be
restricted if there is:
R poor visibility, e.g. due to fog, heavy rain or
snow
R dirt on the sensors or if the sensors are
obscured
Switching Adaptive Highbeam Assist
on/off X
To switch on: turn the light switch to the
à position.
X Press the combination switch beyond the
pressure point in the direction of arrow :.
The _ indicator lamp in the multifunction
display lights up when it is dark and the light
sensor switches on the dipped-beam head-
lamps.
If you are driving at speeds above approx-
imately 25 km/h:
The headlamp range is set automatically
depending on the distance between the vehi-
cle and other road users.
If you are driving at speeds above approx-
imately 30 km/h and no other road users are detected:
The main-beam headlamps are switched on
automatically. The Kindicator lamp in the
instrument cluster also lights up.
If you are driving at speeds below approx-
imately 25 km/h or other road users are
detected or the roads are adequately lit:
The main-beam headlamps are switched off
automatically. The Kindicator lamp in the
instrument cluster goes out. The _indi-
cator lamp in the multifunction display
remains lit.
X To switch off:move the combination switch
back to its normal position or move the light
switch to another position.
The _ indicator lamp in the instrument
cluster goes out. Headlamps misted up on the inside
Certain climatic and physical conditions may
cause moisture to form in the headlamp. This
moisture does not affect the functionality of the headlamp. Interior lighting
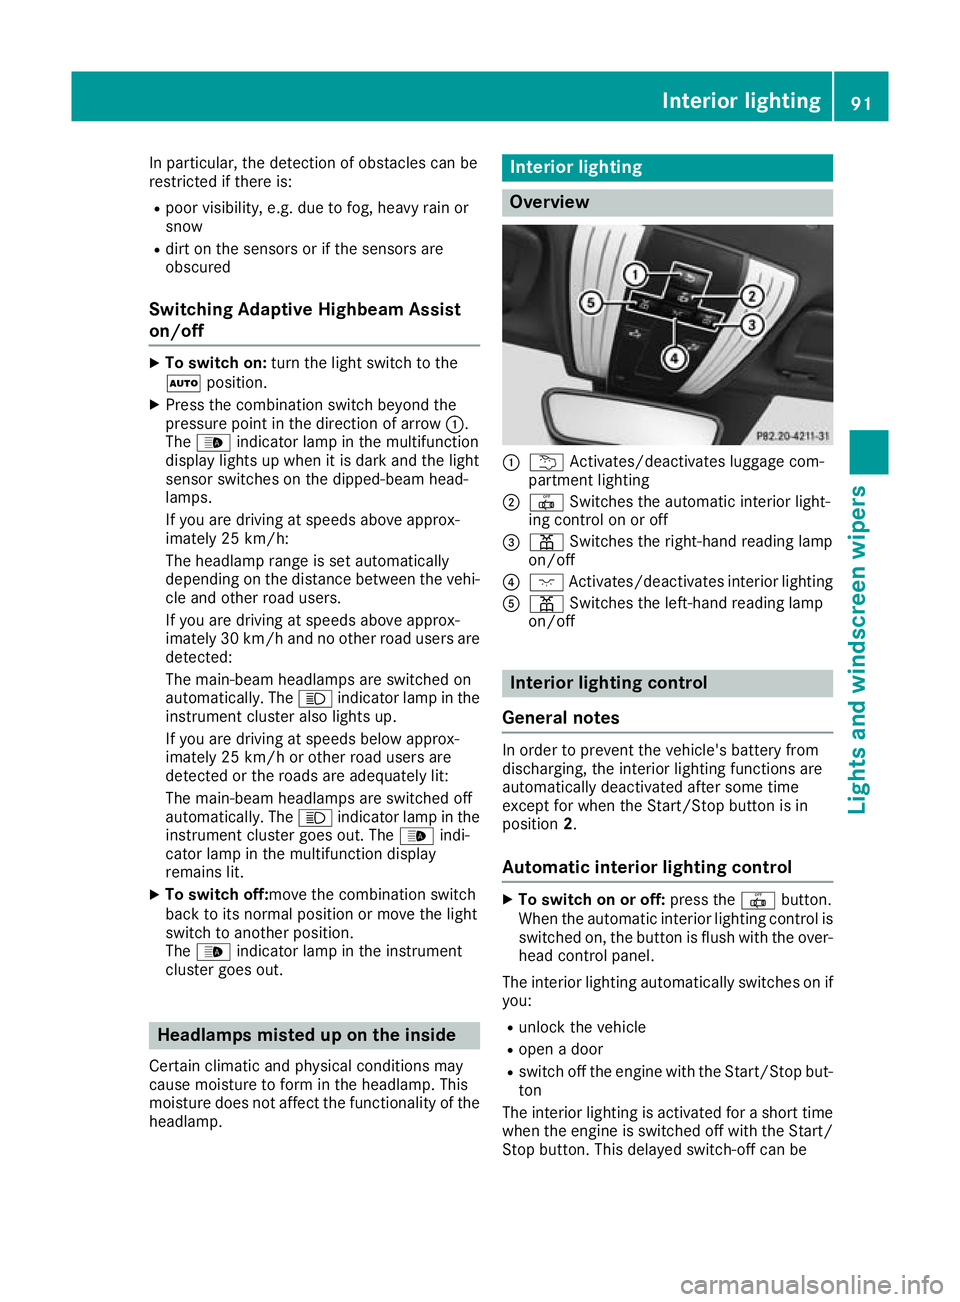
Overview
:
u Activates/deactivates luggage com-
partment lighting
; | Switches the automatic interior light-
ing control on or off
= p Switches the right-hand reading lamp
on/off
? c Activates/deactivates interior lighting
A p Switches the left-hand reading lamp
on/off Interior lighting control
General notes In order to prevent the vehicle's battery from
discharging, the interior lighting functions are
automatically deactivated after some time
except for when the Start/Stop button is in
position
2.
Automatic interior lighting control X
To switch on or off: press the|button.
When the automatic interior lighting control is
switched on, the button is flush with the over- head control panel.
The interior lighting automatically switches on if
you:
R unlock the vehicle
R open a door
R switch off the engine with the Start/Stop but-
ton
The interior lighting is activated for a short time when the engine is switched off with the Start/
Stop button. This delayed switch-off can be Interior lighting
91Lights and windscreen wipers Z
Page 96 of 289
Never fold a windscreen wiper arm without a
wiper blade back onto the windscreen.
Hold the windscreen wiper arm firmly when
you change the wiper blade. If you release the
windscreen wiper arm without a wiper blade
and it falls onto the windscreen, the wind-
screen may be damaged by the force of the
impact.
Mercedes-Benz recommends that you have
the wiper blades changed at a qualified spe-
cialist workshop.
! To avoid damaging the windscreen wiper
blades, make sure that you touch only the
wiper arm of the windscreen wiper.
Replacing the wiper blades Moving the wiper blades to the vertical
position
X Switch off the engine.
X Remove your foot from the brake pedal.
X Set the windscreen wipers to position °.
X Press the Start/Stop button repeatedly until
the windscreen wipers start.
X When the wiper arms have reached the verti-
cal position, press the Start/Stop button.
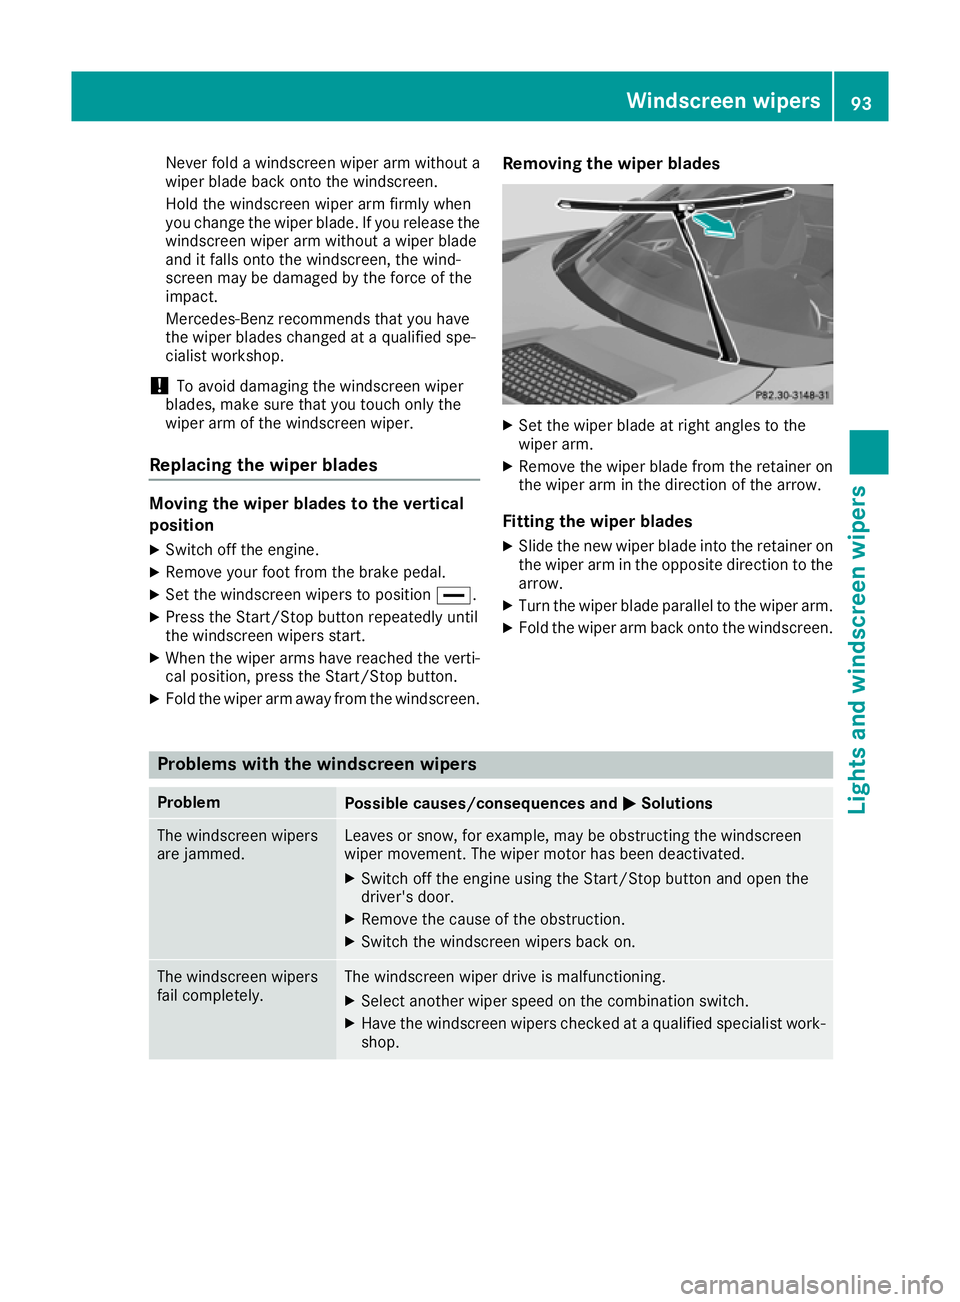
X Fold the wiper arm away from the windscreen. Removing the wiper blades X
Set the wiper blade at right angles to the
wiper arm.
X Remove the wiper blade from the retainer on
the wiper arm in the direction of the arrow.
Fitting the wiper blades
X Slide the new wiper blade into the retainer on
the wiper arm in the opposite direction to the
arrow.
X Turn the wiper blade parallel to the wiper arm.
X Fold the wiper arm back onto the windscreen. Problems with the windscreen wipers
Problem
Possible causes/consequences and
M MSolutions The windscreen wipers
are jammed. Leaves or snow, for example, may be obstructing the windscreen
wiper movement. The wiper motor has been deactivated.
X Switch off the engine using the Start/Stop button and open the
driver's door.
X Remove the cause of the obstruction.
X Switch the windscreen wipers back on. The windscreen wipers
fail completely. The windscreen wiper drive is malfunctioning.
X Select another wiper speed on the combination switch.
X Have the windscreen wipers checked at a qualified specialist work-
shop. Windscreen wipers
93Lights and windscreen wipers Z
Page 98 of 289
Overview of climate control systems
General notes
Observe the settings recommended on the fol-
lowing pages. The windows could otherwise
mist up.
To prevent the windows from misting up:
R switch off climate control only briefly
R switch on air-recirculation mode only briefly
R switch on the cooling with air dehumidifica-
tion function
R switch on the windscreen demisting function
briefly, if required
Climate control regulates the temperature and
air humidity in the vehicle interior. The interior
filter cleans the air, thus improving the interior
climate.
The cooling with air dehumidification function is
only available when the engine is running. Opti- mum climate control is only achieved with the
side windows closed.
i Ventilate the vehicle for a brief period during
warm weather, e.g. using the convenience opening feature (Y
page 75). This will speed
up the cooling process and the desired inte-
rior temperature will be reached more
quickly.
i The integrated filter filters out most parti-
cles of dust and soot and completely filters
out pollen. It also reduces gaseous pollutants and odours. A clogged filter reduces the
amount of air supplied to the vehicle interior.
For this reason, you should always observe
the interval for replacing the filter, which is
specified in the Service Booklet. As this
depends on environmental conditions, e.g.
heavy air pollution, the interval may be
shorter than stated in the Service Booklet.
i It is possible that the blower may be activa-
ted automatically 60 minutes after the engine
has been switched off depending on various
factors, e.g. the outside temperature. The
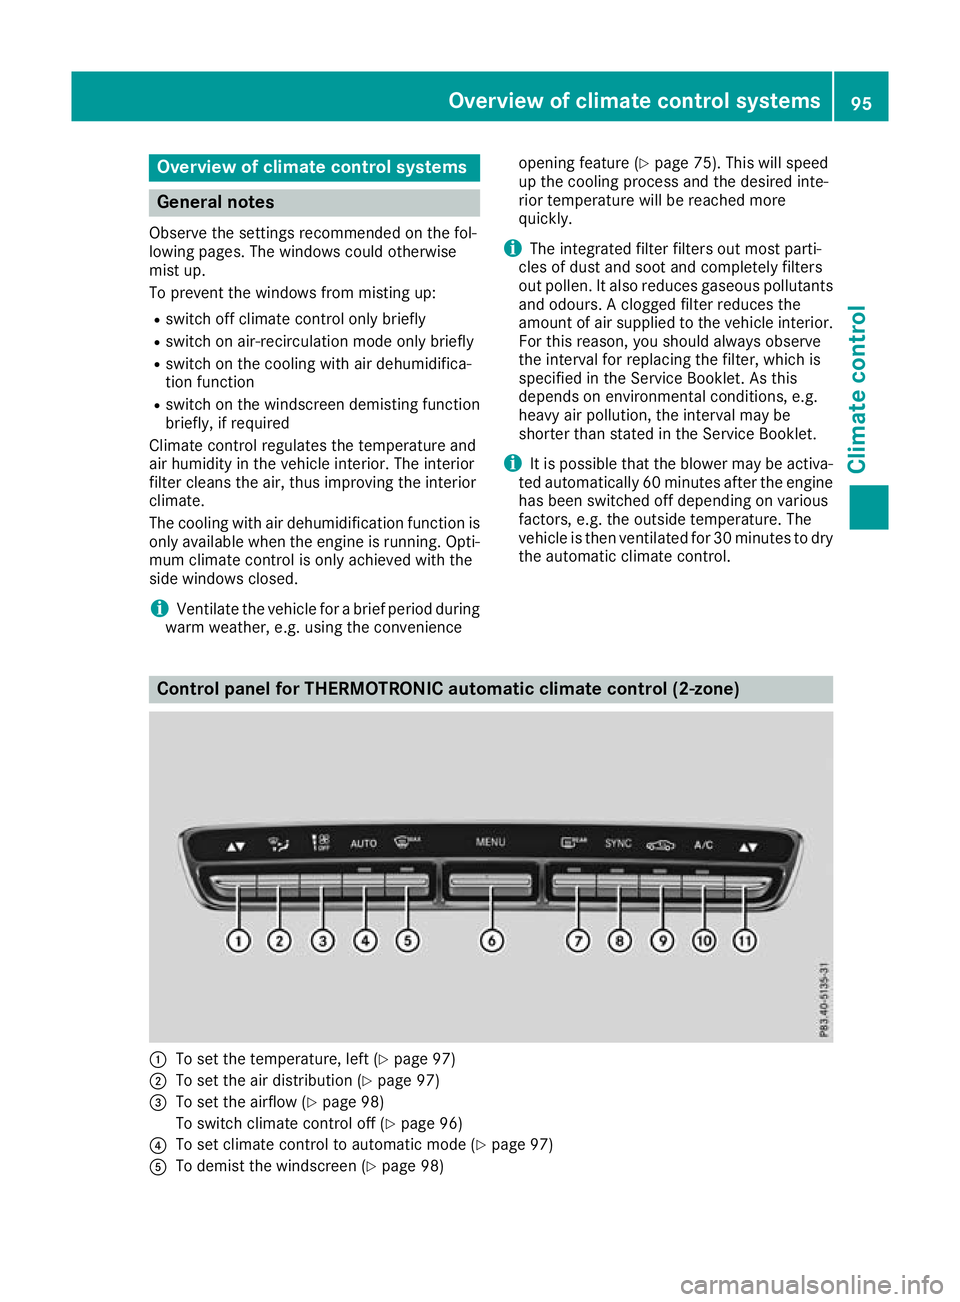
vehicle is then ventilated for 30 minutes to dry the automatic climate control. Control panel for THERMOTRONIC automatic climate control (2-zone)
:
To set the temperature, left (Y page 97)
; To set the air distribution (Y page 97)
= To set the airflow (Y page 98)
To switch climate control off (Y page 96)
? To set climate control to automatic mode (Y page 97)
A To demist the windscreen (Y page 98) Overview of climate control systems
95Climate control
Page 99 of 289
B
To call up the climate control menu of the multimedia system (Y page 209)
C To switch the rear window heating on/off (Y page 99)
D To activate or deactivate synchronisation (Y page 98)
E To activate or deactivate air-recirculation mode manually (Y page 99)
F To activate or deactivate cooling with air dehumidification (Y page 96)
G To set the temperature, right (Y page 97)Information on operating
THERMOTRONIC automatic climate
control
THERMOTRONIC automatic climate
control The following contains instructions and recom-
mendations to enable you to get the most out of
your THERMOTRONIC automatic climate con-
trol:
R Activate climate control using the Ã
rocker switch. The indicator lamp above the
à rocker switch lights up. The "Cooling
with air dehumidification" function is not acti- vated automatically in automatic mode. Acti-
vate this function as necessary (Y page 96).
R Set the temperature to 22 †.
R Use the windscreen demisting function only
briefly until the windscreen is clear again.
R Use the "Air-recirculation mode" function only
briefly, e.g. if there are unpleasant outside
odours or when in a tunnel. The windows
could otherwise mist up as no fresh air is
drawn into the vehicle in air-recirculation
mode.
ECO start/stop function During automatic engine switch-off, the climate
control operates only at a reduced capacity. If
you require the full climate control output, you
can switch off the ECO start/stop function by
pressing the ECO button (Y page 106).Operating the climate control system
Switching climate control on/off
General notes When climate control is switched off, the air
supply and air circulation are also switched off. The windows could mist up. Therefore, only
switch off climate control briefly.
Switch on climate control primarily using the
Ã
rocker switch (Y page 97).
Switching on/off X
Select key position 2with the Start/Stop but-
ton (Y page 103).
X To switch on: set the airflow to level 1 or
higher using the Hrocker switch.
X To switch off: set the airflow to level 0 using
the H rocker switch. Activating/deactivating the cooling
with air dehumidification function
General notes If you deactivate the "Cooling with air dehumid-
ification" function, the air inside the vehicle will
not be cooled. The air inside the vehicle will also
not be dehumidified. The windows can mist up
more quickly. Therefore, deactivate the "Cooling
with air dehumidification" function only briefly.
The "Cooling with air dehumidification" function
is only available when the engine is running. The air inside the vehicle is cooled and dehumidified
according to the temperature selected.
Condensation may drip from the underside of
the vehicle when cooling mode is active. This is
normal and not a sign that there is a malfunc-
tion.
Activating/deactivating X
Press the ¿rocker switch up or down.
The indicator lamp above the ¿rocker
switch lights up or goes out. 96
Operating the climate control systemClimate control
Page 104 of 289
Running-in notes
Important safety notes
In certain driving and driving safety systems, the sensors adjust automatically while a certain dis-
tance is being driven after the vehicle has been delivered or after repairs. Full system effective-
ness is not reached until the end of this teach-in process.
Brake pads/linings and discs that either are new or have been replaced achieve optimum braking
effect only after several hundred kilometres of
driving. Compensate for the reduced braking
effect by applying greater force to the brake
pedal. The first 1,500 km
The more you treat the engine with sufficient
care at the start, the more satisfied you will be
with the engine performance later on.
Observe the following notes on running-in the
engine: R you should therefore drive at varying road
speeds and engine speeds for the first
1,500 km.
R drive the vehicle mainly in drive program Cfor
the first 1,500 km.
R do not drive at speeds above 140 km/h for
the first 1,500 km.
R only allow the engine to reach a maximum
engine speed of 4,500 rpm briefly.
R avoid overstraining the vehicle during this
period, e.g. driving at full throttle.
R do not exceed Ôof the maximum permitted
engine speed for each gear.
R in manual mode Mand temporary manual
drive program, shift up in good time.
R do not perform a RACE START.
R do not shift down a gear manually in order to
brake.
R try to avoid depressing the accelerator pedal
beyond the pressure point (kickdown).
After 1,500 km, you can increase the engine
speed gradually and accelerate the vehicle to
full speed.
You should also observe these notes on running- in if the engine or parts of the drive train on your
vehicle have been replaced.
Always observe the applicable speed limit. Driving
Important safety notes
G
WARNING
Objects in the driver's footwell may restrict
the clearance around the pedals or block a
depressed pedal. This jeopardises the oper-
ating and road safety of the vehicle. There is a risk of an accident.
Stow all objects securely in the vehicle so that
they do not get into the driver's footwell.
Always fit the floormats securely and as pre-
scribed in order to ensure that there is always sufficient room for the pedals. Do not use
loose floormats and do not place several floor-mats on top of one another. G
WARNING
Unsuitable footwear can hinder correct usage of the pedals, e.g.:
R shoes with thick soles
R shoes with high heels
R slippers
There is a risk of an accident.
Wear suitable footwear to ensure correct
usage of the pedals. G
WARNING
If you switch off the ignition while driving,
safety-relevant functions are only available
with limitations, or not at all. This could affect, for example, the power steering and the brake
boosting effect. You will require considerably
more effort to steer and brake. There is a risk of an accident.
Do not switch off the ignition while driving. G
WARNING
If the parking brake has not been fully
released when driving, the parking brake can:
R overheat and cause a fire
R lose its hold function.
There is a risk of fire and an accident. Release
the parking brake fully before driving off. Driving
101Driving and parking Z
Page 105 of 289
!
Do not warm up the engine when the vehicle
is stationary. Drive off immediately. Avoid
high engine speeds and driving at full throttle
until the engine has reached its operating
temperature.
Only shift the automatic transmission to the
desired drive position when the vehicle is sta- tionary.
Where possible, avoid spinning the drive
wheels when pulling away on slippery roads.
You could otherwise damage the drive train.
! During a cold start with low engine oil tem-
peratures (below 0 †), the maximum engine
speed is restricted in order to protect the
engine. To protect the engine and maintain
smooth engine operation, avoid driving at full throttle when the engine is cold. Key positions
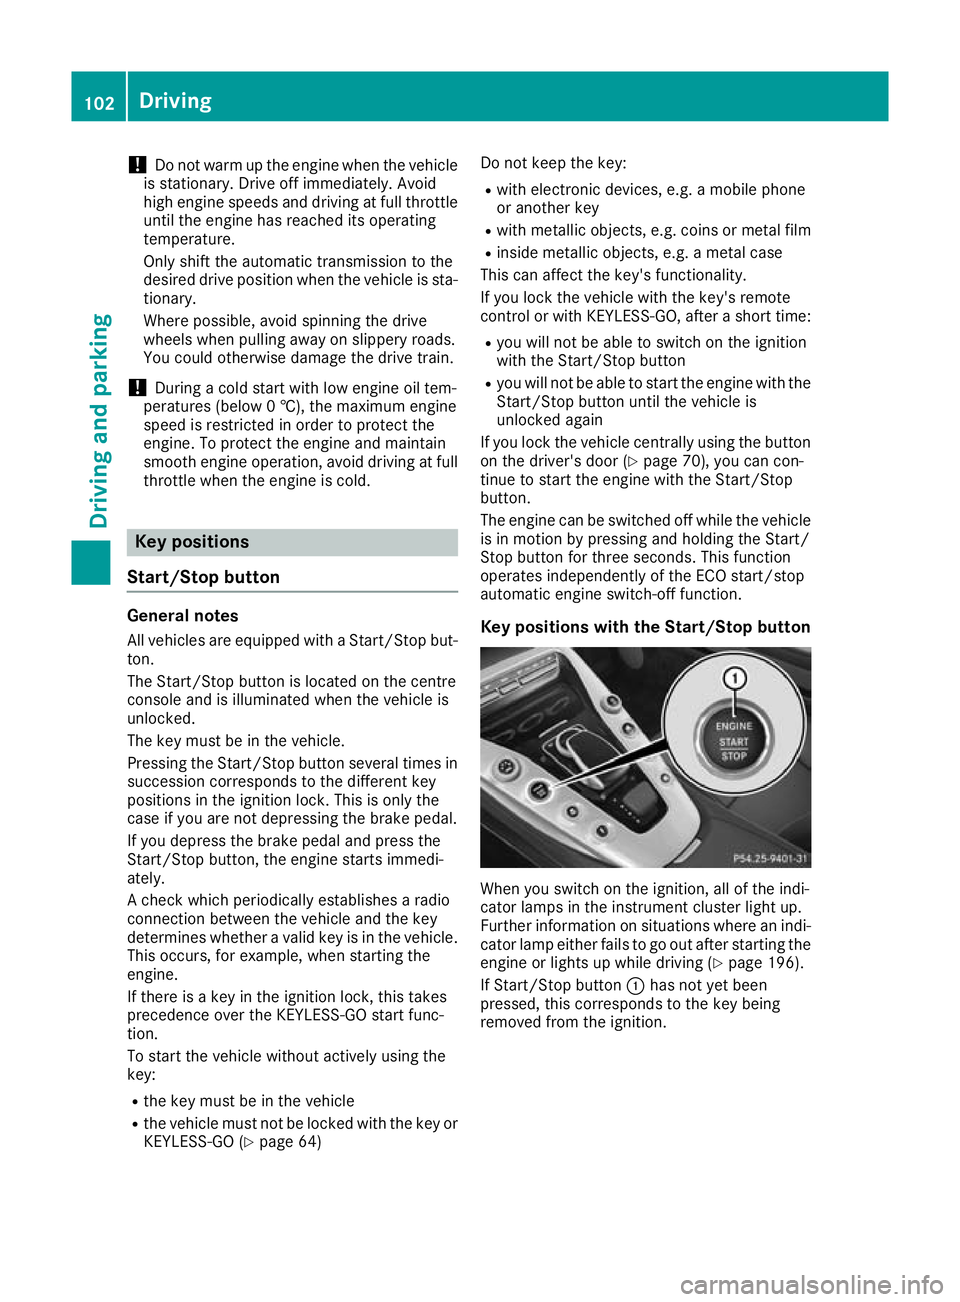
Start/Stop button General notes
All vehicles are equipped with a Start/Stop but-
ton.
The Start/Stop button is located on the centre
console and is illuminated when the vehicle is
unlocked.
The key must be in the vehicle.
Pressing the Start/Stop button several times in
succession corresponds to the different key
positions in the ignition lock. This is only the
case if you are not depressing the brake pedal.
If you depress the brake pedal and press the
Start/Stop button, the engine starts immedi-
ately.
A check which periodically establishes a radio
connection between the vehicle and the key
determines whether a valid key is in the vehicle. This occurs, for example, when starting the
engine.
If there is a key in the ignition lock, this takes
precedence over the KEYLESS-GO start func-
tion.
To start the vehicle without actively using the
key:
R the key must be in the vehicle
R the vehicle must not be locked with the key or
KEYLESS-GO (Y page 64) Do not keep the key:
R
with electronic devices, e.g. a mobile phone
or another key
R with metallic objects, e.g. coins or metal film
R inside metallic objects, e.g. a metal case
This can affect the key's functionality.
If you lock the vehicle with the key's remote
control or with KEYLESS-GO, after a short time:
R you will not be able to switch on the ignition
with the Start/Stop button
R you will not be able to start the engine with the
Start/Stop button until the vehicle is
unlocked again
If you lock the vehicle centrally using the button
on the driver's door (Y page 70), you can con-
tinue to start the engine with the Start/Stop
button.
The engine can be switched off while the vehicle is in motion by pressing and holding the Start/
Stop button for three seconds. This function
operates independently of the ECO start/stop
automatic engine switch-off function.
Key positions with the Start/Stop button When you switch on the ignition, all of the indi-
cator lamps in the instrument cluster light up.
Further information on situations where an indi-
cator lamp either fails to go out after starting the engine or lights up while driving (Y page 196).
If Start/Stop button :has not yet been
pressed, this corresponds to the key being
removed from the ignition. 102
DrivingDriving and parking
Page 106 of 289
X
To switch on the power supply: press
Start/Stop button :once.
The power supply is switched on. You can now activate the windscreen wipers, for example.
The power supply is switched off again if:
R the driver's door is opened and
R you press Start/Stop button :twice when in
this position
X To switch on the ignition: press Start/Stop
button :twice.
The ignition is switched on.
If you press Start/Stop button :once when
in this position, the ignition is switched off
again.
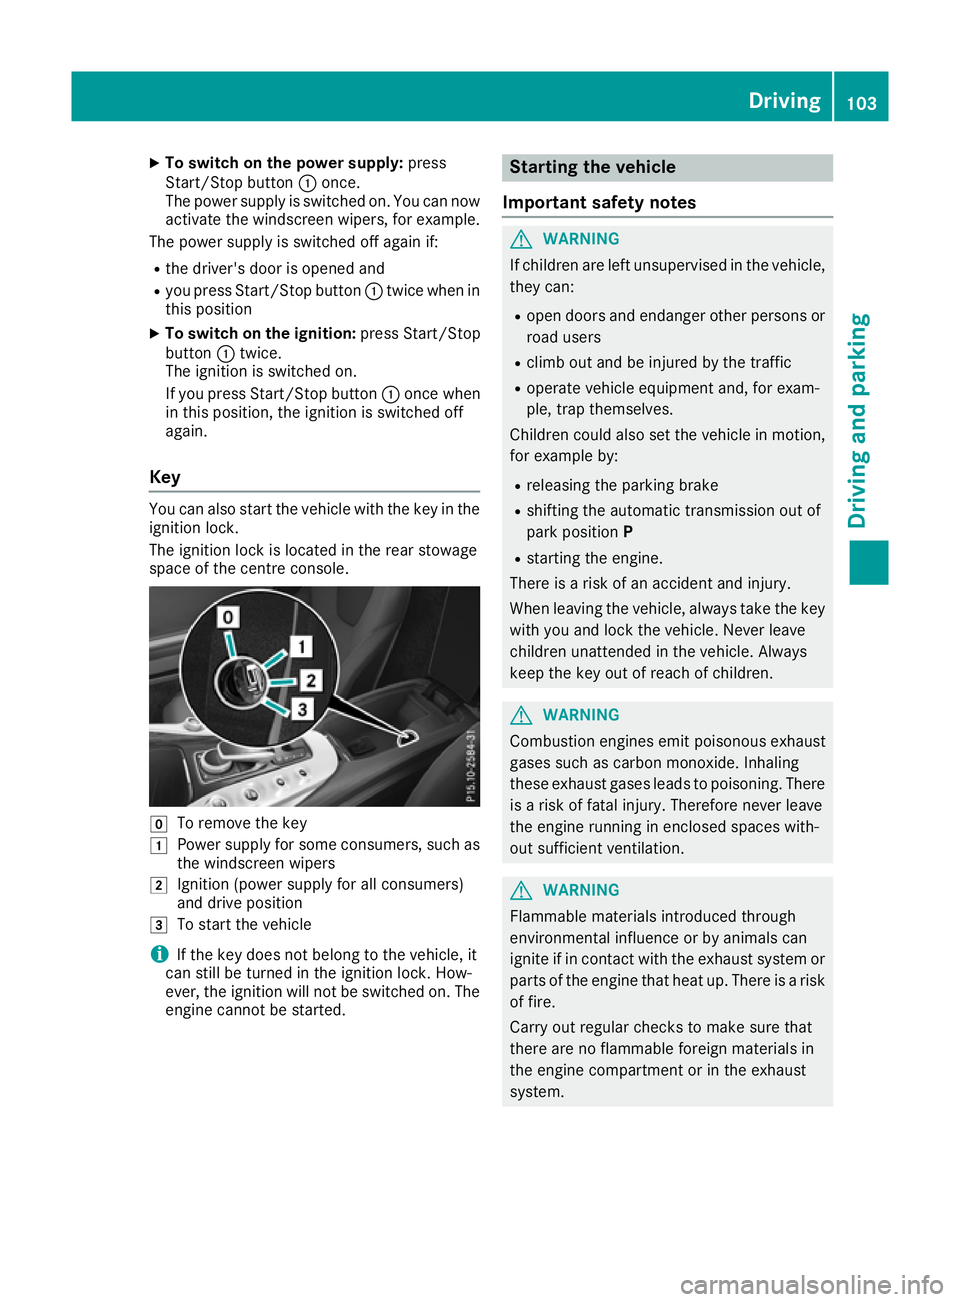
Key You can also start the vehicle with the key in the
ignition lock.
The ignition lock is located in the rear stowage
space of the centre console. g
To remove the key
1 Power supply for some consumers, such as
the windscreen wipers
2 Ignition (power supply for all consumers)
and drive position
3 To start the vehicle
i If the key does not belong to the vehicle, it
can still be turned in the ignition lock. How-
ever, the ignition will not be switched on. The
engine cannot be started. Starting the vehicle
Important safety notes G
WARNING
If children are left unsupervised in the vehicle, they can:
R open doors and endanger other persons or
road users
R climb out and be injured by the traffic
R operate vehicle equipment and, for exam-
ple, trap themselves.
Children could also set the vehicle in motion, for example by:
R releasing the parking brake
R shifting the automatic transmission out of
park position P
R starting the engine.
There is a risk of an accident and injury.
When leaving the vehicle, always take the key
with you and lock the vehicle. Never leave
children unattended in the vehicle. Always
keep the key out of reach of children. G
WARNING
Combustion engines emit poisonous exhaust
gases such as carbon monoxide. Inhaling
these exhaust gases leads to poisoning. There is a risk of fatal injury. Therefore never leave
the engine running in enclosed spaces with-
out sufficient ventilation. G
WARNING
Flammable materials introduced through
environmental influence or by animals can
ignite if in contact with the exhaust system or parts of the engine that heat up. There is a risk
of fire.
Carry out regular checks to make sure that
there are no flammable foreign materials in
the engine compartment or in the exhaust
system. Driving
103Driving an d parking Z