2016 MERCEDES-BENZ AMG GT ROADSTER buttons
[x] Cancel search: buttonsPage 9 of 289

Brake force distribution
see EBD (electronic brake force
distribution)
Brake lamps
Adaptive ........................................... 57
Brakes
ABS .................................................. 54
Adaptive Brake Assist ...................... 56
AMG high-performance and
ceramic brakes .............................. 124
BAS .................................................. 54
Brake fluid (notes) ......................... 279
Display message ............................ 172
Driving tips .................................... 123
Hill start assist ............................... 104
Important safety notes .................. 123
Parking brake ................................ 121
Warning lamp ................................. 196
Breakdown
Where will I find...? ........................ 244
see Flat tyre
see Towing away
Buttons on the steering column ...... 156C
Calling up a fault see Display messages
Calling up the climate control bar
Multimedia system ........................ 209
Calling up the climate control
menu
Multimedia system ........................ 209
Car
see Vehicle
Car wash (care) ................................. 238
Care
Automatic car wash ....................... 238
Carpets .......................................... 243
Display ........................................... 242
Exhaust pipe .................................. 242
Exterior lighting ............................. 241
Gear or selector lever .................... 243
High-pressure cleaner .................... 239
Interior ........................................... 242
Matt paintwork .............................. 240
Note s............................................. 238
Paint .............................................. 239 Plastic trim .................................... 242
Reversing camera .......................... 241
Roof lining ...................................... 243
Seat belt ........................................ 243
Seat cove r..................................... 243
Sensors ......................................... 241
Steering wheel ............................... 243
Trim pieces .................................... 243
Washing by hand ........................... 239
Wheels ........................................... 240
Windows ........................................ 240
Wiper blades .................................. 241
Wooden trim .................................. 243
CD
See also Digital Owner's Manua l... 205
CD player (on-board computer) ........ 161
Central locking
Locking/unlocking (key) .................. 64
Centre console
Overview .......................................... 31
Changing the media source ............. 161
Charge retention
Socket ........................................... 122
Charge-air pressure (on-board
computer) .......................................... 167
Child
Restraint system .............................. 49
Child seat
Forward-facing restraint system ...... 51
On the front-passenger sea t............ 50
Rearward-facing restraint system .... 51
Recommendations ........................... 52
Suitable positions ............................ 51
Children in the vehicle
Important safety notes .................... 49
Cigarette lighter ................................ 222
Cleaning
Mirror turn signal ........................... 241
Climate control
Controlling automaticall y................. 97
Convenience opening/closing
(air-recirculation mode) ................... 99
Cooling with air dehumidification ..... 96
Cooling with air dehumidification
(multimedia system) ...................... 209
Demisting the windows .................... 98
Demisting the windscreen ............... 98
ECO start/stop function .................. 96 6
Index
Page 20 of 289
Sound
Switching on/off ........................... 206
Specialist workshop ............................25
Speed, controlling
see Cruise control
Speedometer
Activating/deactivating the addi-
tional speedometer ........................ 166
Digital ............................................ 158
Segments ...................................... 155
Selecting a display unit .................. 165
SPEEDTRONIC
Deactivating variable ..................... 130
Display message ............................1 87
Function/notes ............................ .128
Important safety notes .................. 128
LIM indicator lamp ......................... 128
Permanent ..................................... 130
Selecting ........................................ 128
Storing the current spee d.............. 129
Variabl e......................................... 128
SPORT handling mode
activating/deactivating .................... 58
Warning lamp ................................. 199
Sports exhaust system
see AMG sports exhaust system
Start/Stop button
General notes ................................ 102
Key positions ................................. 102
Starting the engine ........................ 104
Start/stop function
see ECO start/stop function
Starting (engine) ................................ 103
Steering
Display message ............................ 193
Warning lamps ............................... 204
Steering wheel
Adjusting (electrically) ..................... 83
Adjusting (manually) ........................ 82
Button overview ............................... 30
Buttons (on-board computer) ......... 156
Cleaning ......................................... 243
EASY ENTRY/EXIT feature ............... 83
Gearshift paddle s........................... 113
Important safety notes .................... 82
Storing settings (memory func-
tion) ................................................. 87
Steering wheel gearshift paddles .... 113Stopwatch (RACETIMER)
................... 168
Stowage areas ................................... 217
Stowage compartments
Armrest (front) ............................... 218
Armrest (under) ............................. 218
Cup holde r..................................... 220
Glove compartment ....................... 218
Important safety information ......... 217
Stowage net ....................................... 218
Stowage space
Stowage net ................................... 218
Summer tyres
In winter ........................................ 263
Sun visor ............................................ 220
Suspension settings
AMG RIDE CONTROL sports sus-
pension .......................................... 140
SETUP (on-board computer) .......... 168
Switching on media mode
Via the device list .......................... 215 T
Tail lamps Display message ............................ 182
see Lights
Tailgate
Display message ............................ 192
Emergency unlocking ....................... 73
Important safety notes .................... 71
Opening (automatically from
inside) .............................................. 73
Opening dimensions ...................... 281
Opening/closing .............................. 71
Opening/closing (from outside) ....... 72
Unlocking with KEYLESS-GO ............ 72
Technical data
Capacities ...................................... 277
Emergency spare wheel ................. 273
Information .................................... 275
Tyres/wheels ................................. 272
Vehicle data ................................... 281
Telephone
Accepting a call (multifunction
steering wheel) .............................. 163
Authorising a mobile phone (con-
necting) ......................................... 211 Index
17
Page 35 of 289

Overhead control panel
Function Page
:
c
Seat heating 81
;
Extends/retracts rear
spoiler
224
=
£
Hazard warning lamps 90
?
PASSENGER AIRBAG indica-
tor lamps
35
ATA indicator lamp 60
A
c
PARKTRONIC 141
B
|
Switches the automatic
interior lighting control
on/off 91
C
p
Switches the right-
hand reading lamp on/off 91
D
ë
Deactivates tow-away
protection 61 Function Page
E
Rear-view mirror 85
F
Transmitter buttons for the
garage door opener 226
G
G
SOS button (Mercedes-
Benz emergency call system) 223
H
ê
Deactivates the interior
motion sensor 61
I
p
Switches the left-hand
reading lamp on/off 91
J
c
Switches the interior
lighting on/off K
u
Switches the luggage
compartment lighting on/off 9132
Overhead control panelAt a glance
Page 68 of 289
Deactivating and activating
If you do not intend to use the vehicle for an
extended period of time, you can deactivate
KEYLESS-GO. The key will then use very little
power, thereby conserving battery power. For
the purposes of activation or deactivation, the
vehicle does not have to be nearby.
X To deactivate: press the&button on the
key twice in rapid succession.
The battery check lamp of the key flashes
twice briefly and lights up once, then KEY-
LESS-GO is deactivated (Y page 66).
X To activate: press any button on the key.
or X Insert the key into the ignition lock.
KEYLESS-GO and all of its associated features
are available again. KEYLESS-GO start function
General notes Bear in mind that the engine can be started by
any of the vehicle occupants if there is a key in
the vehicle (Y page 104). Changing the settings of the locking
system
You can change the settings of the locking sys-
tem. This means that only the driver's door and
the fuel filler flap are unlocked when the vehicle is unlocked. This is useful if you frequently travel
alone.
X To change the setting: press and hold down
the % and& buttons simultaneously
for about six seconds until the battery indica-
tor lamp flashes twice (Y page 66).
If the setting of the locking system is changed
within the signal range of the vehicle, pressing
the & or% button:
R locks or
R unlocks the vehicle
The key now functions as follows:
X To unlock: press the%button once.
X To unlock centrally: press the%button
twice.
X To lock: press the &button. The KEYLESS-GO functions can be changed as
follows:
X To unlock the driver's door: touch the inner
surface of the door handle on the driver's
door.
X To unlock centrally: touch the inner surface
of the front-passenger door handle.
X To lock centrally: touch the outer sensor
surface on one of the door handles.
X To restore the factory settings: press and
hold down the %and& buttons simul-
taneously for approximately six seconds until
the battery check lamp flashes twice
(Y page 66). Emergency key element
General notes If the vehicle can no longer be unlocked with the
key or KEYLESS-GO, use the emergency key ele-
ment.
If you use the emergency key element to unlock
and open the driver's door, the anti-theft alarm
system will be triggered. Switch off the alarm
(Y page 60).
If you unlock the vehicle using the emergency
key element, the fuel filler flap will not be
unlocked automatically.
X To unlock the fuel filler flap: insert the key
into the ignition lock.
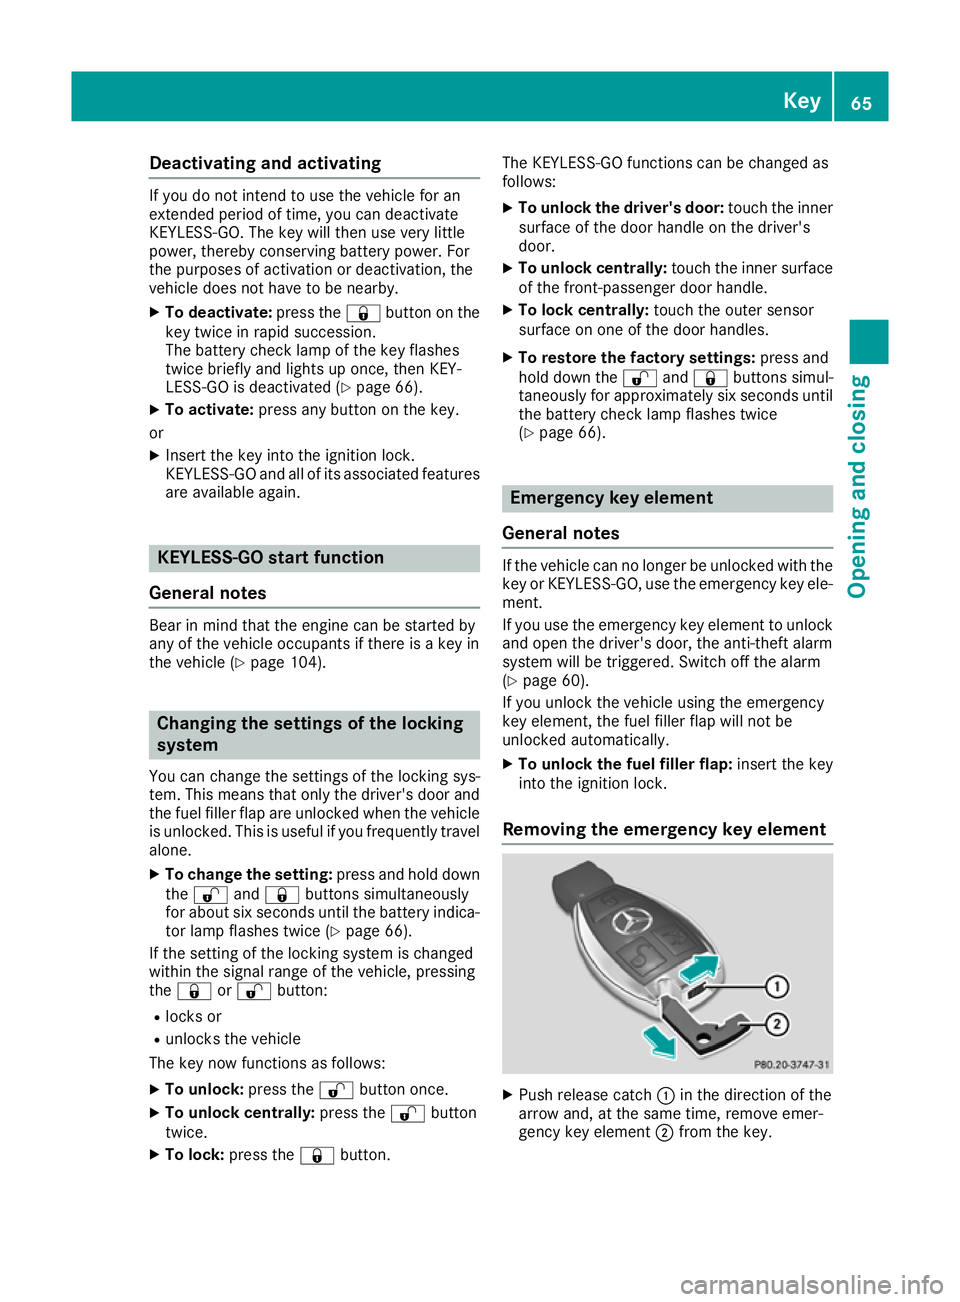
Removing the emergency key element X
Push release catch :in the direction of the
arrow and, at the same time, remove emer-
gency key element ;from the key. Key
65Opening and closing Z
Page 70 of 289
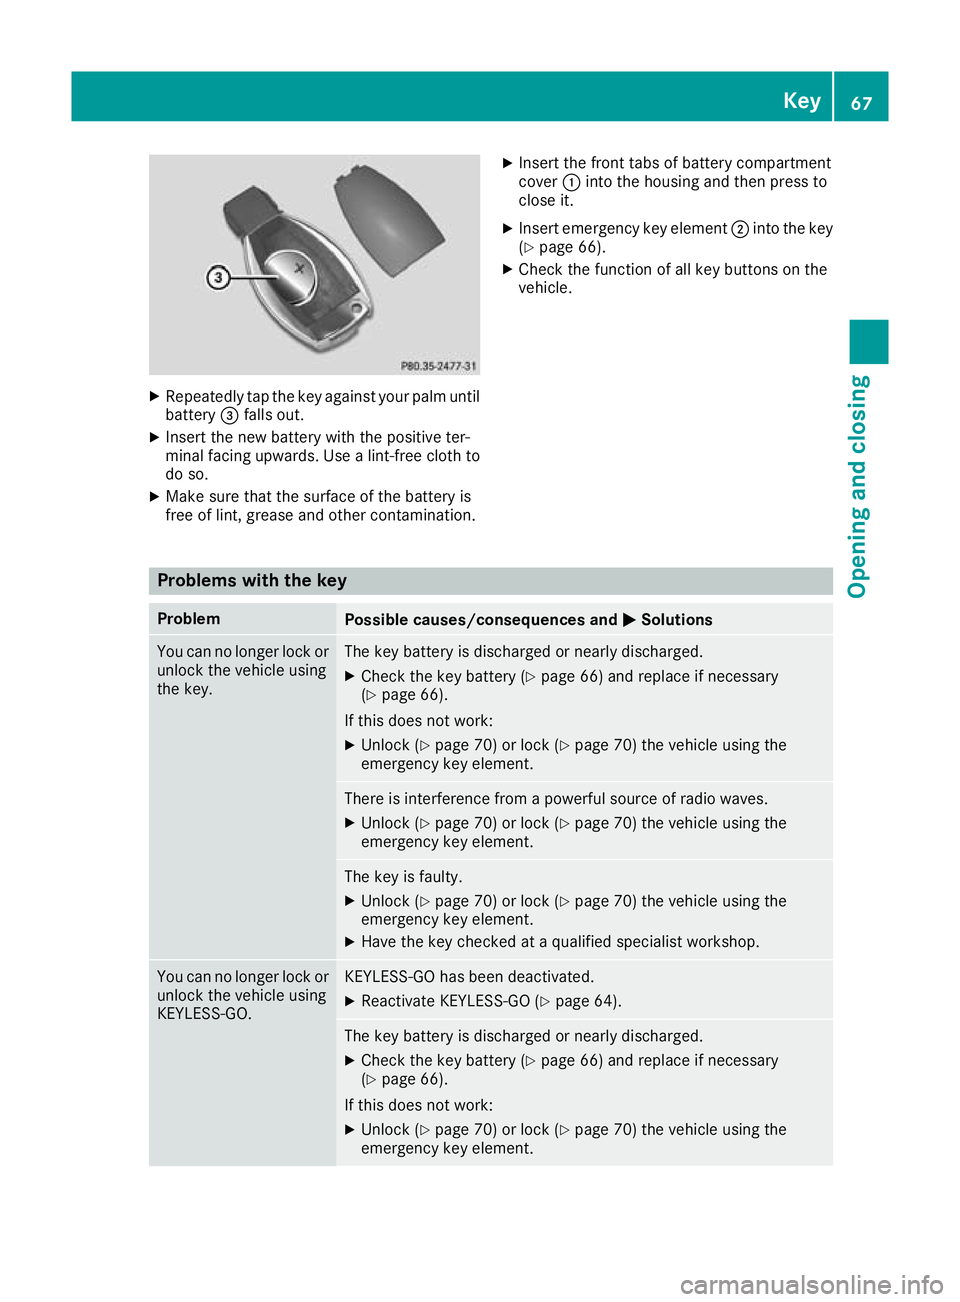
X
Repeatedly tap the key against your palm until
battery =falls out.
X Insert the new battery with the positive ter-
minal facing upwards. Use a lint-free cloth to
do so.
X Make sure that the surface of the battery is
free of lint, grease and other contamination. X
Insert the front tabs of battery compartment
cover :into the housing and then press to
close it.
X Insert emergency key element ;into the key
(Y page 66).
X Check the function of all key buttons on the
vehicle. Problems with the key
Problem
Possible causes/consequences and
M MSolutions You can no longer lock or
unlock the vehicle using
the key. The key battery is discharged or nearly discharged.
X Check the key battery (Y page 66) and replace if necessary
(Y page 66).
If this does not work: X Unlock (Y page 70) or lock (Y page 70) the vehicle using the
emergency key element. There is interference from a powerful source of radio waves.
X Unlock (Y page 70) or lock (Y page 70) the vehicle using the
emergency key element. The key is faulty.
X Unlock (Y page 70) or lock (Y page 70) the vehicle using the
emergency key element.
X Have the key checked at a qualified specialist workshop. You can no longer lock or
unlock the vehicle using
KEYLESS-GO. KEYLESS-GO has been deactivated.
X Reactivate KEYLESS-GO (Y page 64). The key battery is discharged or nearly discharged.
X Check the key battery (Y page 66) and replace if necessary
(Y page 66).
If this does not work: X Unlock (Y page 70) or lock (Y page 70) the vehicle using the
emergency key element. Key
67Opening and closing Z
Page 73 of 289
Centrally locking and unlocking the
vehicle from the inside
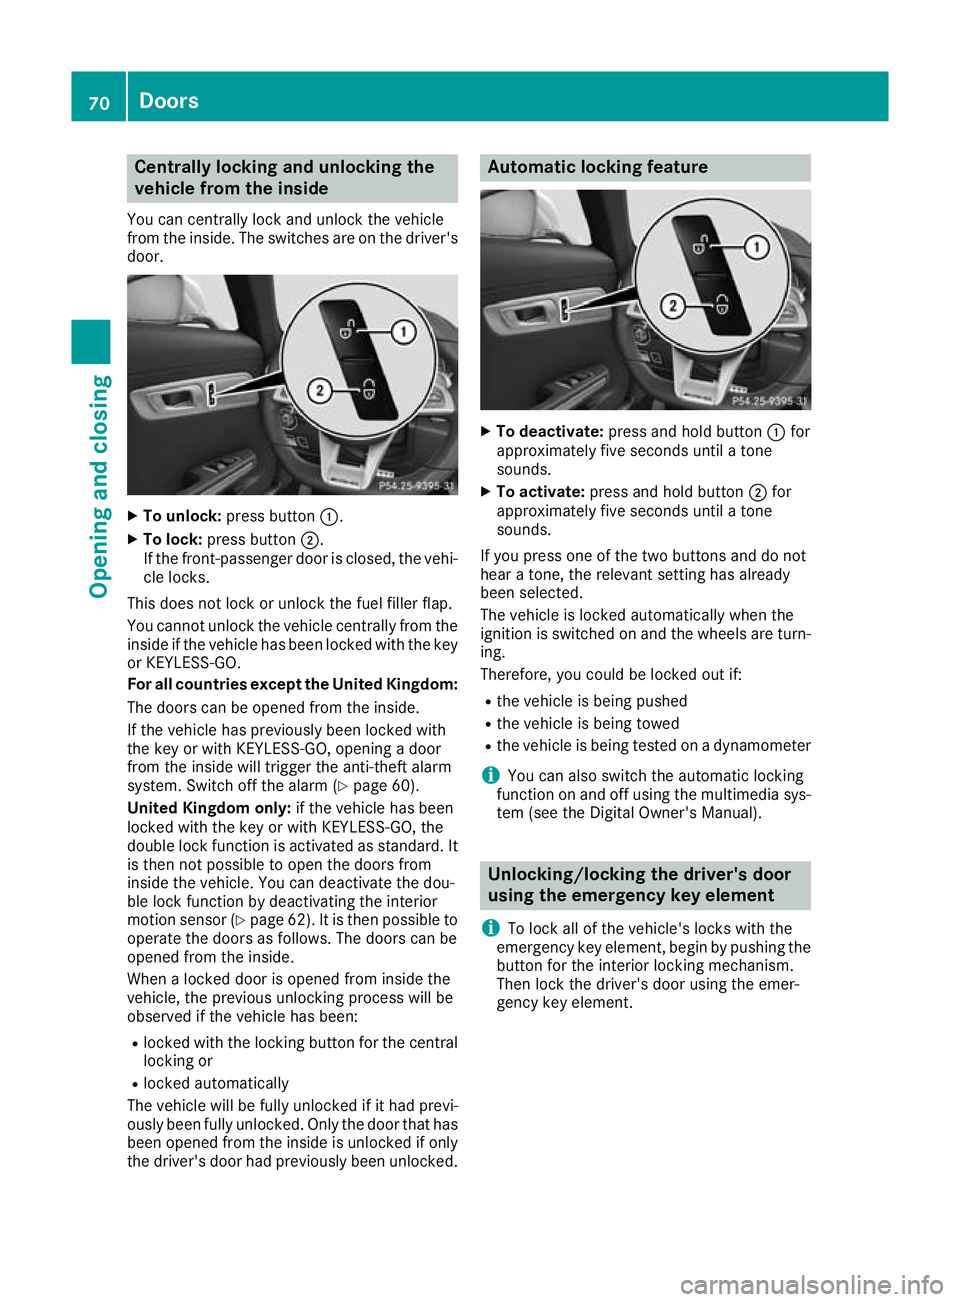
You can centrally lock and unlock the vehicle
from the inside. The switches are on the driver's door. X
To unlock: press button :.
X To lock: press button ;.
If the front-passenger door is closed, the vehi-
cle locks.
This does not lock or unlock the fuel filler flap.
You cannot unlock the vehicle centrally from the
inside if the vehicle has been locked with the key or KEYLESS-GO.
For all countries except the United Kingdom:
The doors can be opened from the inside.
If the vehicle has previously been locked with
the key or with KEYLESS-GO, opening a door
from the inside will trigger the anti-theft alarm
system. Switch off the alarm (Y page 60).
United Kingdom only: if the vehicle has been
locked with the key or with KEYLESS-GO, the
double lock function is activated as standard. It is then not possible to open the doors from
inside the vehicle. You can deactivate the dou-
ble lock function by deactivating the interior
motion sensor (Y page 62). It is then possible to
operate the doors as follows. The doors can be
opened from the inside.
When a locked door is opened from inside the
vehicle, the previous unlocking process will be
observed if the vehicle has been:
R locked with the locking button for the central
locking or
R locked automatically
The vehicle will be fully unlocked if it had previ-
ously been fully unlocked. Only the door that has been opened from the inside is unlocked if only
the driver's door had previously been unlocked. Automatic locking feature
X
To deactivate: press and hold button :for
approximately five seconds until a tone
sounds.
X To activate: press and hold button ;for
approximately five seconds until a tone
sounds.
If you press one of the two buttons and do not
hear a tone, the relevant setting has already
been selected.
The vehicle is locked automatically when the
ignition is switched on and the wheels are turn-
ing.
Therefore, you could be locked out if:
R the vehicle is being pushed
R the vehicle is being towed
R the vehicle is being tested on a dynamometer
i You can also switch the automatic locking
function on and off using the multimedia sys-
tem (see the Digital Owner's Manual). Unlocking/locking the driver's door
using the emergency key element
i To lock all of the vehicle's locks with the
emergency key element, begin by pushing the
button for the interior locking mechanism.
Then lock the driver's door using the emer-
gency key element. 70
DoorsOpening and closing
Page 82 of 289
G
WARNING
You could lose control of the vehicle while
driving if you:
R adjust the driver's seat, steering wheel or
mirrors
R fasten the seat belt
There is a risk of an accident.
Adjust the driver's seat, head restraint, steer-
ing wheel and mirrors and fasten your seat
belt before starting the engine.
For safety reasons, seat fore-and-aft adjustment
on electrically adjustable seats is only possible
for a maximum of two seconds when the vehicle is in motion. The seat fore-and-aft adjustment
can then no longer be set. G
WARNING
If you adjust the seat height carelessly, you or other vehicle occupants could be trapped andthereby injured. Children in particular could
accidentally press the electrical seat adjust-
ment buttons and become trapped. There is a
risk of injury.
While moving the seats, make sure that your
hands or other body parts do not get under the
lever assembly of the seat adjustment sys-
tem. G
WARNING
If head restraints are not adjusted correctly,
they cannot provide protection as intended.
There is an increased risk of injury in the head
and neck area, e.g. in the event of an accident or when braking.
Before driving off, make sure for every vehicle
occupant that the centre of the head restraint supports the back of the head at about eye
level. G
WARNING
The seat belt does not offer the intended level of protection if you have not moved the back-
rest to an almost vertical position. When brak-
ing or in the event of an accident, you could
slide underneath the seat belt and sustain
abdomen or neck injuries, for example. This poses an increased risk of injury or even fatal
injury.
Adjust the seat properly before beginning
your journey. Always ensure that the backrestis in an almost vertical position and that the
shoulder section of your seatbelt is routed
across the centre of your shoulder.
! To avoid damage to the seats and the seat
heating, observe the following information:
R do not spill any liquids on the seats. If liquid
is spilled on the seats, dry them as soon as possible.
R if the seat covers are damp or wet, do not
switch on the seat heating. The seat heat-
ing should also not be used to dry the seats.
R clean the seat covers as recommended;
see "Interior care".
R do not transport heavy loads on the seats.
Do not place sharp objects on the seat
cushions, e.g. knives, nails or tools. The
seats should only be occupied by passen-
gers, if possible.
R when the seat heating is in operation, do
not cover the seats with insulating materi-
als, e.g. blankets, coats, bags, seat covers,
child seats or booster seats.
! Make sure that there are no objects in the
footwell under or behind the seats when mov-
ing the seats back. There is a risk that the
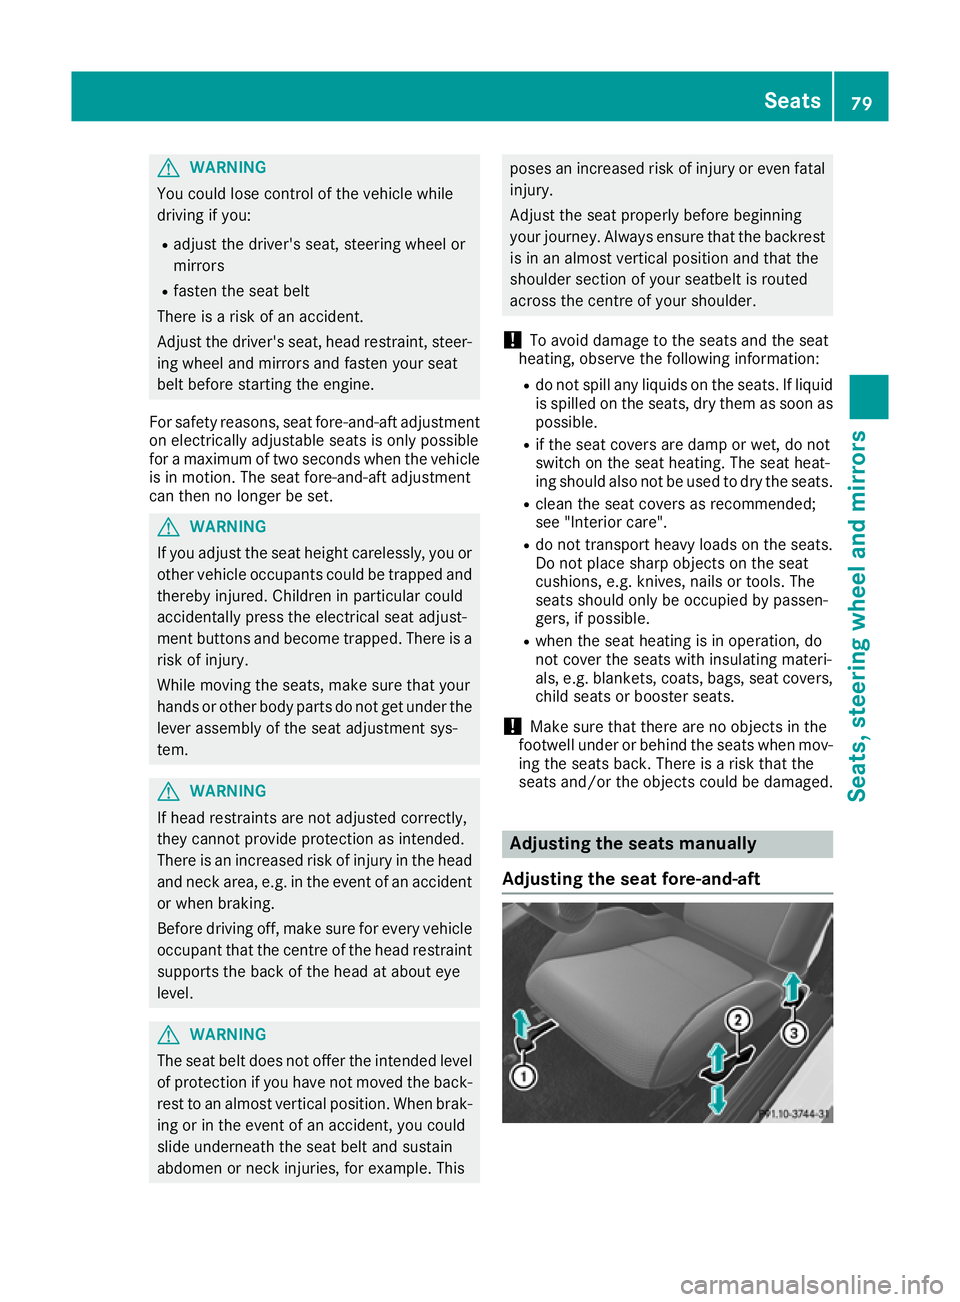
seats and/or the objects could be damaged. Adjusting the seats manually
Adjusting the seat fore-and-aft Seats
79Seats, steering wheel and mirrors Z
Page 112 of 289
Selecting the drive program
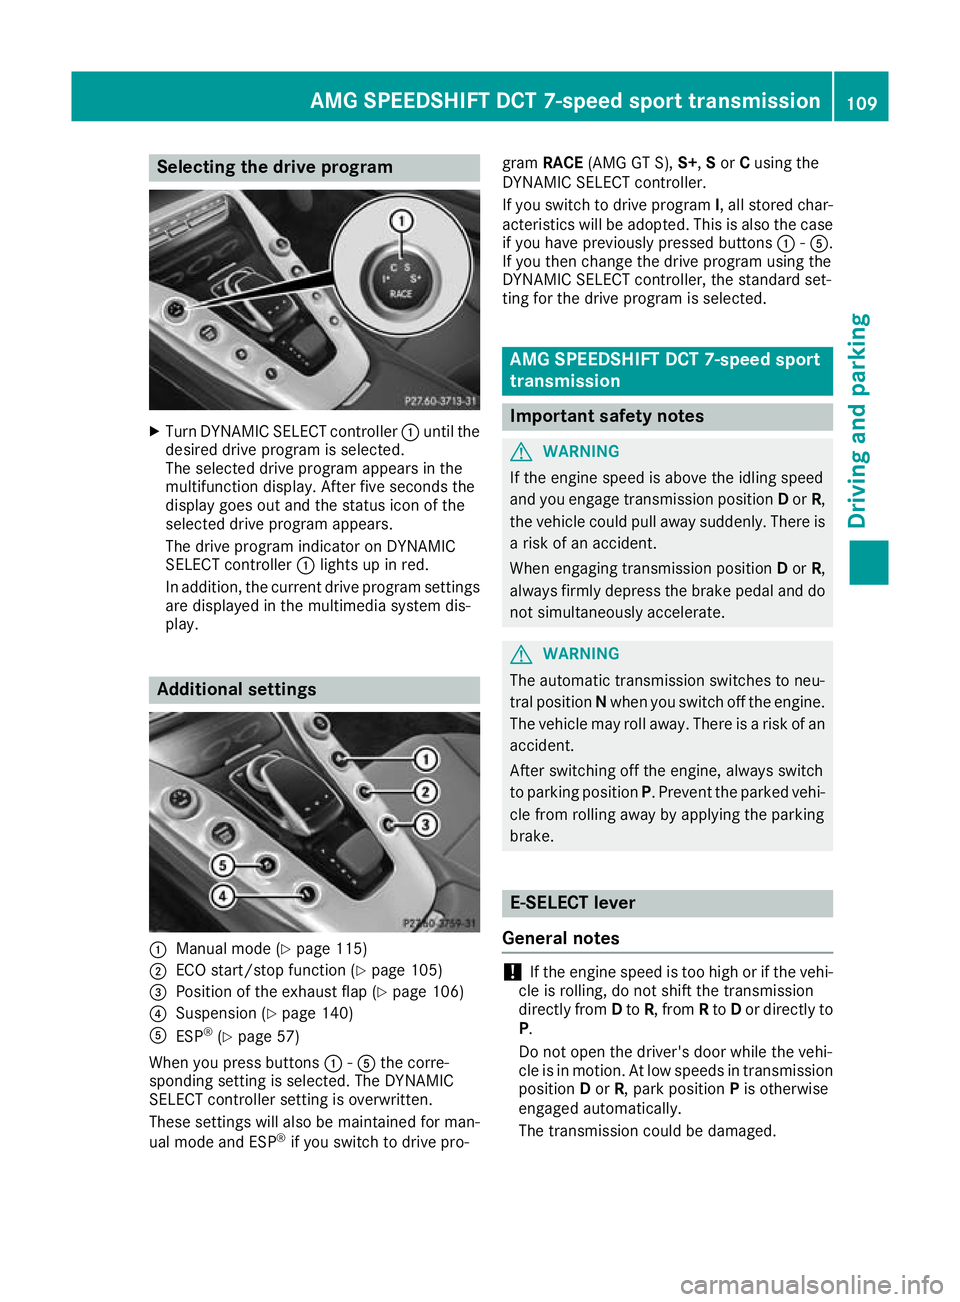
X
Turn DYNAMIC SELECT controller :until the
desired drive program is selected.
The selected drive program appears in the
multifunction display. After five seconds the
display goes out and the status icon of the
selected drive program appears.
The drive program indicator on DYNAMIC
SELECT controller :lights up in red.
In addition, the current drive program settings are displayed in the multimedia system dis-
play. Additional settings
:
Manual mode (Y page 115)
; ECO start/stop function (Y page 105)
= Position of the exhaust flap (Y page 106)
? Suspension (Y page 140)
A ESP ®
(Y page 57)
When you press buttons :-A the corre-
sponding setting is selected. The DYNAMIC
SELECT controller setting is overwritten.
These settings will also be maintained for man-
ual mode and ESP ®
if you switch to drive pro- gram
RACE (AMG GT S), S+,Sor Cusing the
DYNAMIC SELECT controller.
If you switch to drive program I, all stored char-
acteristics will be adopted. This is also the case
if you have previously pressed buttons :-A.
If you then change the drive program using the
DYNAMIC SELECT controller, the standard set-
ting for the drive program is selected. AMG SPEEDSHIFT DCT 7-speed sport
transmission
Important safety notes
G
WARNING
If the engine speed is above the idling speed
and you engage transmission position Dor R,
the vehicle could pull away suddenly. There is a risk of an accident.
When engaging transmission position Dor R,
always firmly depress the brake pedal and do not simultaneously accelerate. G
WARNING
The automatic transmission switches to neu-
tral position Nwhen you switch off the engine.
The vehicle may roll away. There is a risk of an
accident.
After switching off the engine, always switch
to parking position P. Prevent the parked vehi-
cle from rolling away by applying the parking
brake. E-SELECT lever
General notes !
If the engine speed is too high or if the vehi-
cle is rolling, do not shift the transmission
directly from Dto R, from Rto Dor directly to
P.
Do not open the driver's door while the vehi-
cle is in motion. At low speeds in transmission position Dor R, park position Pis otherwise
engaged automatically.
The transmission could be damaged. AMG SPEEDSHIFT DCT 7-speed sport transmission
109Driving and parking Z