2016 MERCEDES-BENZ AMG GT ROADSTER dimensions
[x] Cancel search: dimensionsPage 20 of 289
Sound
Switching on/off ........................... 206
Specialist workshop ............................25
Speed, controlling
see Cruise control
Speedometer
Activating/deactivating the addi-
tional speedometer ........................ 166
Digital ............................................ 158
Segments ...................................... 155
Selecting a display unit .................. 165
SPEEDTRONIC
Deactivating variable ..................... 130
Display message ............................1 87
Function/notes ............................ .128
Important safety notes .................. 128
LIM indicator lamp ......................... 128
Permanent ..................................... 130
Selecting ........................................ 128
Storing the current spee d.............. 129
Variabl e......................................... 128
SPORT handling mode
activating/deactivating .................... 58
Warning lamp ................................. 199
Sports exhaust system
see AMG sports exhaust system
Start/Stop button
General notes ................................ 102
Key positions ................................. 102
Starting the engine ........................ 104
Start/stop function
see ECO start/stop function
Starting (engine) ................................ 103
Steering
Display message ............................ 193
Warning lamps ............................... 204
Steering wheel
Adjusting (electrically) ..................... 83
Adjusting (manually) ........................ 82
Button overview ............................... 30
Buttons (on-board computer) ......... 156
Cleaning ......................................... 243
EASY ENTRY/EXIT feature ............... 83
Gearshift paddle s........................... 113
Important safety notes .................... 82
Storing settings (memory func-
tion) ................................................. 87
Steering wheel gearshift paddles .... 113Stopwatch (RACETIMER)
................... 168
Stowage areas ................................... 217
Stowage compartments
Armrest (front) ............................... 218
Armrest (under) ............................. 218
Cup holde r..................................... 220
Glove compartment ....................... 218
Important safety information ......... 217
Stowage net ....................................... 218
Stowage space
Stowage net ................................... 218
Summer tyres
In winter ........................................ 263
Sun visor ............................................ 220
Suspension settings
AMG RIDE CONTROL sports sus-
pension .......................................... 140
SETUP (on-board computer) .......... 168
Switching on media mode
Via the device list .......................... 215 T
Tail lamps Display message ............................ 182
see Lights
Tailgate
Display message ............................ 192
Emergency unlocking ....................... 73
Important safety notes .................... 71
Opening (automatically from
inside) .............................................. 73
Opening dimensions ...................... 281
Opening/closing .............................. 71
Opening/closing (from outside) ....... 72
Unlocking with KEYLESS-GO ............ 72
Technical data
Capacities ...................................... 277
Emergency spare wheel ................. 273
Information .................................... 275
Tyres/wheels ................................. 272
Vehicle data ................................... 281
Telephone
Accepting a call (multifunction
steering wheel) .............................. 163
Authorising a mobile phone (con-
necting) ......................................... 211 Index
17
Page 22 of 289
Trim pieces (cleaning instruc-
tions)
.................................................. 243
Trip computer (on-board com-
puter) .................................................. 158
Trip meter
Calling up ....................................... 157
Resetting (on-board computer) ...... 158
Turn signals
Switching on/off .............................. 89
Two-way radio
Frequencies ................................... 275
Installation ..................................... 275
Transmission output (maximum) .... 275
Type identification plate
see Vehicle identification plate
Tyre changing tool kit ....................... 246
Tyre inflation compressor
see TIREFIT kit
Tyre pressure
Calling up (on-board computer) ..... 265
Display message ............................ 189
Not reached (TIREFIT) .................... 249
Reached (TIREFIT) .......................... 249
Recommended ............................... 264
Tyre pressure monitor
Checking the tyre pressure elec-
tronically ........................................ 266
Function/note s............................. 265
General notes ................................ 265
Important safety notes .................. 266
Restarting ...................................... 267
Warning lamp ................................. 203
Warning message .......................... 267
Tyres
Changing a whee l.......................... 267
Checking ........................................ 262
Direction of rotation ...................... 268
Display message ............................ 189
Important safety notes .................. 261
Information on driving .................... 261
Replacing ....................................... 267
Service life ..................................... 262
Storing ........................................... 268
Summer tyres in winter ................. 263
Tyre size (data ).............................. 272
Tyre tread ...................................... 262
Wheel and tyre combinations ........ 272
see Flat tyre U
Unlocking Emergency unlocking ....................... 70
From inside the vehicle (central
unlocking button) ............................. 70
USB devices
Connecting to the Media Inter-
face ............................................... 216 V
Vanity mirror (in sun visor) .............. 221
Vehicle
Correct use ...................................... 25
Data acquisition ............................... 26
Display message ............................ 190
Electronics ..................................... 275
Equipment ....................................... 23
Implied warranty .............................. 25
Individual settings .......................... 164
Leaving parked up ......................... 122
Locking (in an emergency) ............... 70
Locking (key) ................................... 64
Lowering ........................................ 272
Operating safety .............................. 23
Parking .......................................... 119
Pulling away ................................... 104
Raising ........................................... 269
Registration ..................................... 25
Securing from rolling away ............ 268
Towing away .................................. 256
Transporting .................................. 258
Unlocking (in an emergency) ........... 70
Unlocking (key) ................................ 64
Vehicle data ................................... 281
Vehicle data
Boot load (maximum) ..................... 281
Vehicle dimensions ........................... 281
Vehicle emergency locking ................ 70
Vehicle identification number
see VIN
Vehicle identification plate .............. 276
Vehicle tool kit .................................. 246
Video
Operating the DVD ......................... 162
See also Digital Owner's Manua l... 205 Index
19
Page 74 of 289
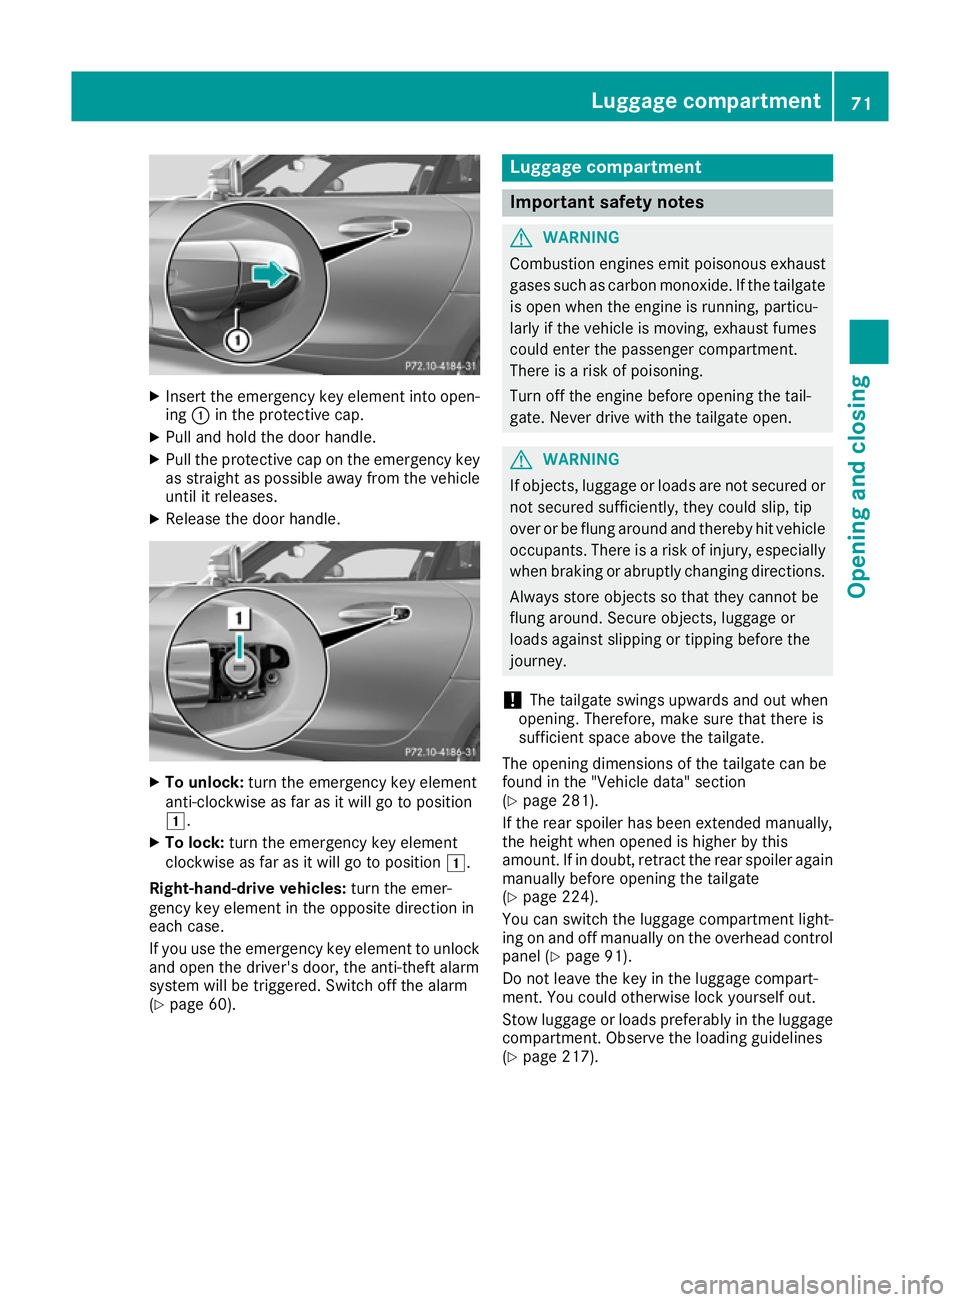
X
Insert the emergency key element into open-
ing :in the protective cap.
X Pull and hold the door handle.
X Pull the protective cap on the emergency key
as straight as possible away from the vehicle until it releases.
X Release the door handle. X
To unlock: turn the emergency key element
anti-clockwise as far as it will go to position
1.
X To lock: turn the emergency key element
clockwise as far as it will go to position 1.
Right-hand-drive vehicles: turn the emer-
gency key element in the opposite direction in
each case.
If you use the emergency key element to unlock
and open the driver's door, the anti-theft alarm
system will be triggered. Switch off the alarm
(Y page 60). Luggage compartment
Important safety notes
G
WARNING
Combustion engines emit poisonous exhaust
gases such as carbon monoxide. If the tailgate is open when the engine is running, particu-
larly if the vehicle is moving, exhaust fumes
could enter the passenger compartment.
There is a risk of poisoning.
Turn off the engine before opening the tail-
gate. Never drive with the tailgate open. G
WARNING
If objects, luggage or loads are not secured or not secured sufficiently, they could slip, tip
over or be flung around and thereby hit vehicle
occupants. There is a risk of injury, especially when braking or abruptly changing directions.
Always store objects so that they cannot be
flung around. Secure objects, luggage or
loads against slipping or tipping before the
journey.
! The tailgate swings upwards and out when
opening. Therefore, make sure that there is
sufficient space above the tailgate.
The opening dimensions of the tailgate can be
found in the "Vehicle data" section
(Y page 281).
If the rear spoiler has been extended manually,
the height when opened is higher by this
amount. If in doubt, retract the rear spoiler again manually before opening the tailgate
(Y page 224).
You can switch the luggage compartment light-
ing on and off manually on the overhead control
panel (Y page 91).
Do not leave the key in the luggage compart-
ment. You could otherwise lock yourself out.
Stow luggage or loads preferably in the luggage compartment. Observe the loading guidelines
(Y page 217). Luggage compartment
71Opening and closing Z
Page 270 of 289
Warning messages of the tyre pressure
monitor If the tyre pressure monitor detects a pressure
loss in one or more tyres, a warning message is shown in the multifunction display. The yellow
tyre pressure warning lamp then lights up.
R If the Please correct tyre pressure
Please correct tyre pressure
message appears in the multifunction display,
the tyre pressure in at least one tyre is too
low. The tyre pressure must be corrected
when the opportunity arises.
R If the Check Check tyre(s)
tyre(s) message appears in the
multifunction display, the tyre pressure in at
least one tyre has dropped significantly. The
tyres must be checked.
R If the Warning tyre defect Warning tyre defect message
appears in the multifunction display, the tyre
pressure in at least one tyre has dropped sud- denly. The tyres must be checked.
Observe the instructions and safety notes in the display messages in the "Tyres" section
(Y page 189).
If the wheel positions on the vehicle are inter-
changed, the tyre pressures may be displayed
for the wrong positions for a short time. After a
few minutes of driving, this is rectified and the
tyre pressures are displayed for the correct
positions.
Restarting the tyre pressure monitor When you restart the tyre pressure monitor, all
existing warning messages are deleted and the
warning lamps go out. The monitor uses the cur-
rently set tyre pressures as the reference values
for monitoring. In most cases, the tyre pressure monitor will automatically detect the new refer-
ence values after you have changed the tyre
pressure. However, you can also set reference
values manually as described here. The tyre
pressure monitor then monitors the new tyre
pressure values.
X Use the table on the inside of the fuel filler flap
to ensure that the tyre pressure is set cor-
rectly in all four tyres for the current operating
conditions.
Also observe the notes in the section on tyre
pressures (Y page 264).
X Switch the ignition on (Y page 103).
X Press the òbutton on the steering wheel
to call up the list of menus. X
Press 9or: on the steering wheel to
select the Service
Service menu.
X Press the abutton.
X Select Tyre pressure
Tyre pressure with9 or:.
X Press the abutton.
The current tyre pressure for each wheel or
the Tyre Tyre pressures
pressures will
willbe
bedisplayed
displayed
after a few minutes of driving
after a few minutes of driving mes-
sage will be displayed in the multifunction
display.
X Press the :button.
The Use Use current
current pressures
pressures as
asnew
new ref‐
ref‐
erence
erence values
valuesmessage appears in the mul-
tifunction display.
If you wish to confirm the restart: X Press the abutton.
The Tyre
Tyre press.
press. monitor
monitor restarted
restarted mes-
sage appears in the multifunction display.
After you have driven for a few minutes, the
system checks whether the current tyre pres-
sures are within the specified range. The new tyre pressures are then accepted as refer-
ence values and monitored.
If you wish to cancel the restart: X Press the %button.
The tyre pressure values stored at the last
restart will continue to be monitored. Changing a wheel
Flat tyre
You can find information on what to do in the
event of a flat tyre in the "Breakdown assis-
tance" section (Y page 247).
Vehicles with an emergency spare wheel: in
the event of a flat tyre, the emergency spare
wheel is fitted according to the description
under "Fitting a wheel" (Y page 268). Interchanging the wheels
G
WARNING
Interchanging the front and rear wheels may
severely impair the driving characteristics if
the wheels or tyres have different dimensions. The wheel brakes or suspension components Changing a wheel
267Wheels and tyres
Z
Page 271 of 289
may also be damaged. There is a risk of acci-
dent.
Interchange front and rear wheels only if the
wheels and tyres are of the same dimensions.
! On vehicles fitted with a tyre pressure mon-
itor, electronic components are located in the wheel.
Tyre-fitting tools should not be applied in thearea of the valve, as this could damage the
electronic components.
Only have tyres changed at a qualified spe-
cialist workshop.
Interchanging front and rear wheels of differing
dimensions can render the general operating
permit invalid.
Observe the instructions and safety notes in the "Fitting a wheel" section (Y page 268).
The wear patterns on the front and rear tyres
differ depending on the operating conditions.
Interchange the wheels before a clear wear pat-
tern has formed on the tyres. Front tyres typi-
cally wear more on the shoulders and the rear
tyres in the centre.
On vehicles that have the same size front and
rear wheels, you can interchange the wheels
every 5000 to 10,000 km depending on the
degree of tyre wear. Ensure the direction of
rotation is maintained.
Clean the contact surfaces of the wheel and the brake disc thoroughly every time a wheel is
interchanged. Check the tyre pressure and reac-
tivate the tyre pressure monitor if necessary. Direction of rotation
Tyres with a specified direction of rotation have additional benefits, e.g. if there is a risk of aqua- planing. These advantages can only be gained if
the tyres are fitted corresponding to the direc-
tion of rotation.
An arrow on the sidewall of the tyre indicates its correct direction of rotation. Storing wheels
Store wheels in a cool, dry and preferably dark
place if they are not being used. Protect the
tyres against oil, grease, petrol and diesel. Fitting a wheel
Preparing the vehicle X
Stop the vehicle on solid, non-slippery and
level ground.
X Apply the electric parking brake manually.
X Move the front wheels to the straight-ahead
position.
X Shift the transmission to position P.
X Switch off the engine.
X Pump the tyre to the specified tyre pres-
sure:
open the driver's door.
The on-board electronics now have status 0.
This is the same as the key having been
removed.
or X Remove the key from the ignition lock.
X If included in the vehicle equipment, remove
the tyre-change tool kit from the vehicle.
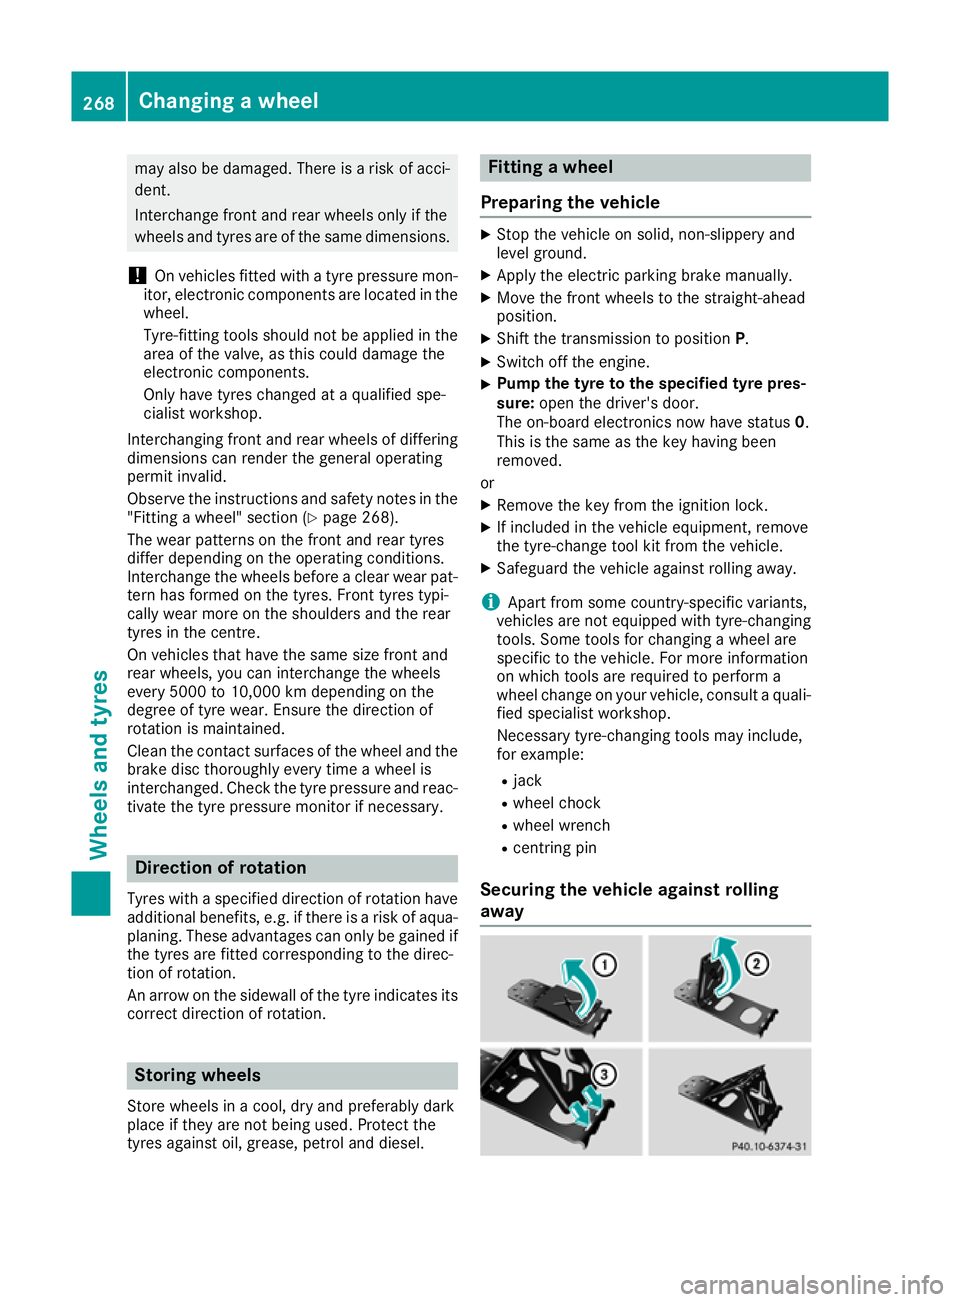
X Safeguard the vehicle against rolling away.
i Apart from some country-specific variants,
vehicles are not equipped with tyre-changing
tools. Some tools for changing a wheel are
specific to the vehicle. For more information
on which tools are required to perform a
wheel change on your vehicle, consult a quali- fied specialist workshop.
Necessary tyre-changing tools may include,
for example:
R jack
R wheel chock
R wheel wrench
R centring pin
Securing the vehicle against rolling
away 268
Changing a wheelWheels and tyres
Page 276 of 289
The recommended tyre pressures can be found
in the tyre pressure table on the fuel filler flap.
For further information on tyre pressure, see
(Y page 264). Check tyre pressures regularly
and only when the tyres are cold.
Notes on the vehicle equipment – always fit the
vehicle:
R with tyres of the same size across an axle
(left/right)
R with the same type of tyres on all wheels at a
given time (summer tyres, winter tyres)
Exception: it is permissible to fit a different
type or make in the event of a flat tyre. Emergency spare wheel
Important safety notes
G
WARNING
The wheel/tyre dimensions and the tyre type of the spare wheel/emergency spare wheel
and the wheel to be replaced may differ. Fit-
ting a spare wheel/emergency spare wheel
may severely impair the driving characteris-
tics. There is a risk of accident.
To prevent hazardous situations:
R Adapt your driving style accordingly and
drive carefully.
R Never fit more than one spare wheel/emer-
gency spare wheel if the dimensions are
different to those of the wheel being
replaced.
R Only use a spare wheel/emergency spare
wheel briefly if the dimensions are different to those of the wheel being replaced.
R Do not switch off ESP ®
.
R Have the spare wheel/emergency spare
wheel in question replaced at the nearest
qualified specialist workshop. Make sure
that the wheel/tyre dimensions and tyre
type are correct.
When using an emergency spare wheel or spare wheel of a different size, you must not exceed
the maximum speed of 80 km/h.
Snow chains must not be fitted to emergency
spare wheels. General notes
You can ask for information regarding permitted emergency spare wheels at a Mercedes-Benz
Service Centre.
You should regularly check the pressure of all
your tyres, including the emergency spare
wheel, particularly prior to long trips, and cor-
rect the pressure as necessary (Y page 264).
The value on the wheel is valid.
An emergency spare wheel may also be fitted
against the direction of rotation. Observe the
time restriction on use as well as the speed lim- itation specified on the emergency spare wheel.
Replace the tyres after six years at the latest,
regardless of wear. This also applies to the
emergency spare wheel.
i If you are driving with the emergency spare
wheel fitted, the tyre pressure monitor cannot function reliably. Only restart the tyre pres-
sure monitor when the defective wheel has
been replaced with a new wheel.
If an emergency spare wheel is fitted, for a few minutes the system may continue to show the
tyre pressure of the wheel that has been
removed. The value displayed for the position
where the emergency spare wheel is fitted is
not the same as the current tyre pressure of
the emergency spare wheel. Removing the collapsible emergency
spare wheel
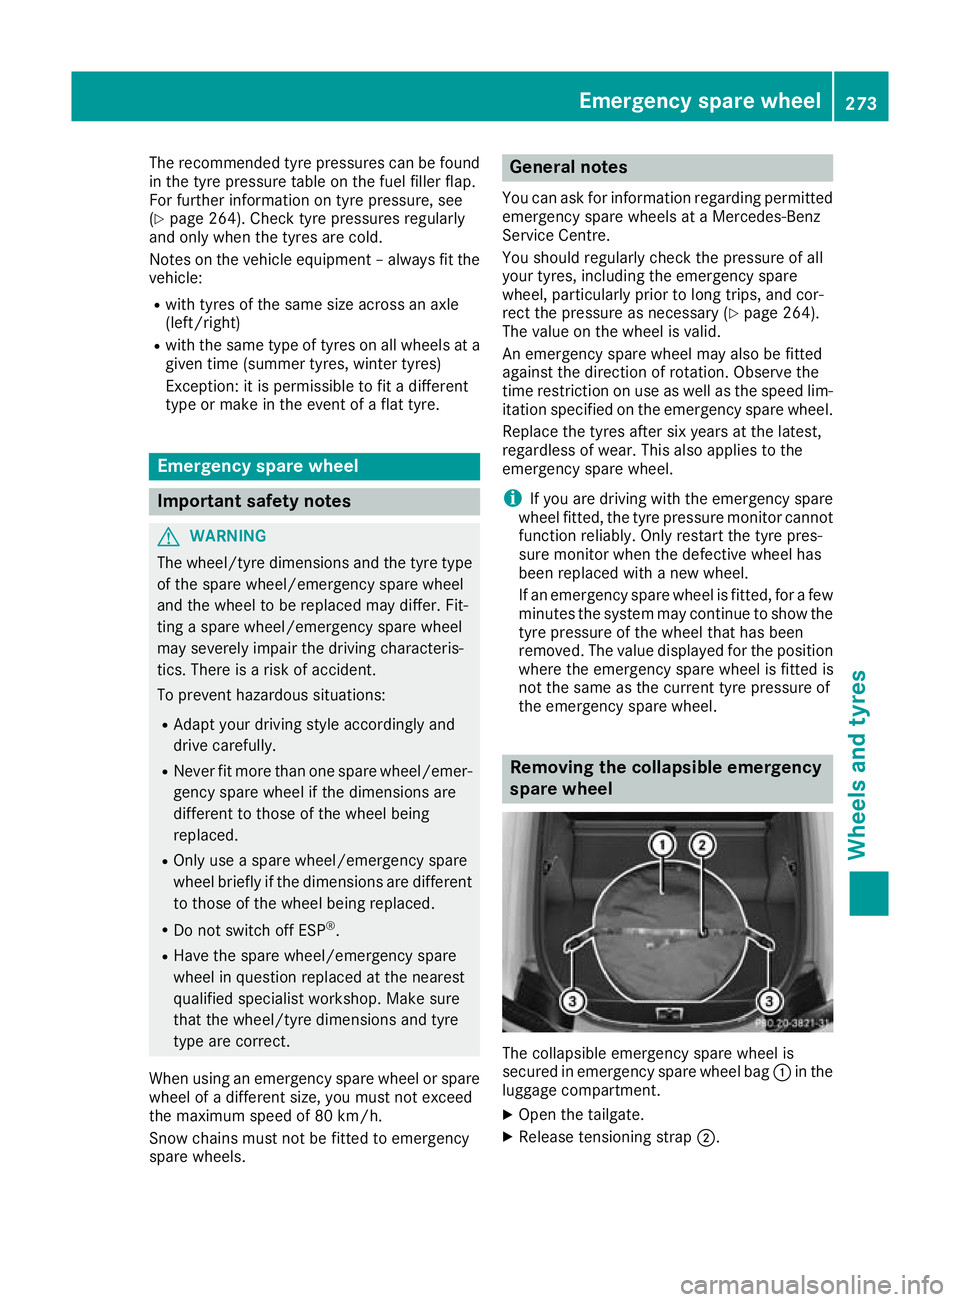
The collapsible emergency spare wheel is
secured in emergency spare wheel bag
:in the
luggage compartment.
X Open the tailgate.
X Release tensioning strap ;. Emergency spare wheel
273Wheels and tyres Z
Page 284 of 289
the exhaust system, it can ignite. There is a
risk of fire and injury.
Make sure the windscreen washer concen-
trate does not come into contact with the filler neck.
! Only use washer fluid that is suitable for
plastic lamp lenses, e.g. MB SummerFit or MB
WinterFit. Unsuitable washer fluid could dam-
age the plastic lenses of the headlamps.
! Only the washer fluids SummerFit and Win-
terFit can be mixed. Otherwise, the spraying
nozzles could become blocked.
Do not use distilled or de-ionised water. Other-
wise, the level sensor may give a false reading.
At temperatures above freezing: X Fill the washer fluid reservoir with a mixture of
water and washer fluid, e.g. MB SummerFit.
Mix 1 part MB SummerFit to 100 parts water.
At temperatures below freezing:
X Fill the washer fluid reservoir with a mixture of
water and washer fluid, e.g. MB WinterFit.
For the correct mixing ratio, refer to the infor- mation on the antifreeze reservoir.
i Add washer fluid concentrate, e.g. MB Sum-
merFit or MB WinterFit, to the washer fluid all
year round. Vehicle data
General notes
Please note that for the specified vehicle data:
R the heights specified may vary as a result of:
- tyres
- load
- condition of the suspension
- optional equipment
R optional equipment reduces the maximum
payload
R vehicle-specific weight information can be
found on the vehicle identification plate
(Y page 276)
R for certain countries only: you can find vehi-
cle-specific vehicle data in the COC docu-
ments (CERTIFICATE OF CONFORMITY). These documents are delivered with your
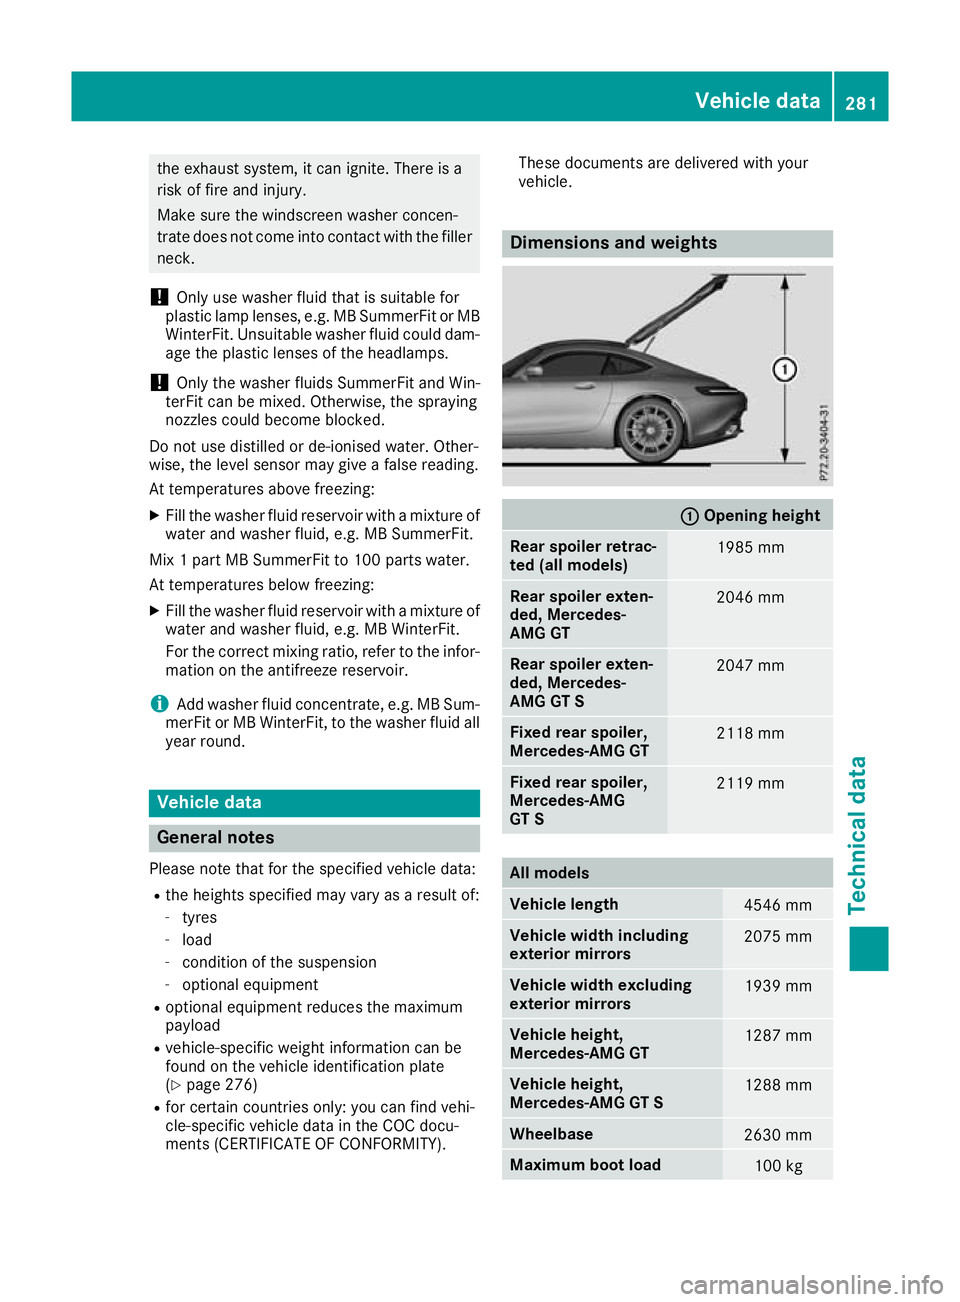
vehicle. Dimensions and weights
: :
Opening height Rear spoiler retrac-
ted (all models)
1985 mm
Rear spoiler exten-
ded, Mercedes-
AMG GT
2046 mm
Rear spoiler exten-
ded, Mercedes-
AMG GT S
2047 mm
Fixed rear spoiler,
Mercedes-AMG GT
2118 mm
Fixed rear spoiler,
Mercedes-AMG
GT S
2119 mm
All models
Vehicle length
4546 mm
Vehicle width including
exterior mirrors
2075 mm
Vehicle width excluding
exterior mirrors
1939 mm
Vehicle height,
Mercedes‑
AMG GT 1287 mm
Vehicle height,
Mercedes‑
AMG GT S 1288 mm
Wheelbase
2630 mm
Maximum boot load
100 kgVehicle data
281Technical data Z