2016 MERCEDES-BENZ AMG GT ROADSTER steering
[x] Cancel search: steeringPage 62 of 289
G
WARNING
When SPORT handling mode is activated,
there is a greater risk of skidding and acci-
dents.
Only activate SPORT handling mode in the sit- uations described in the following.
In the following situations, it may be better to
activate SPORT handling mode or deactivate
ESP ®
:
R when snow chains are used
R in deep snow
R on sand or gravel
R on closed roads when the vehicle's own over-
steering and understeering characteristics
are desired
Driving in SPORT handling mode or without
ESP ®
requires a highly qualified and experi-
enced driver.
Activate ESP ®
as soon as the situations descri-
bed above no longer apply. ESP ®
will otherwise
not be able to stabilise the vehicle if the vehicle
starts to skid or a wheel starts to spin.
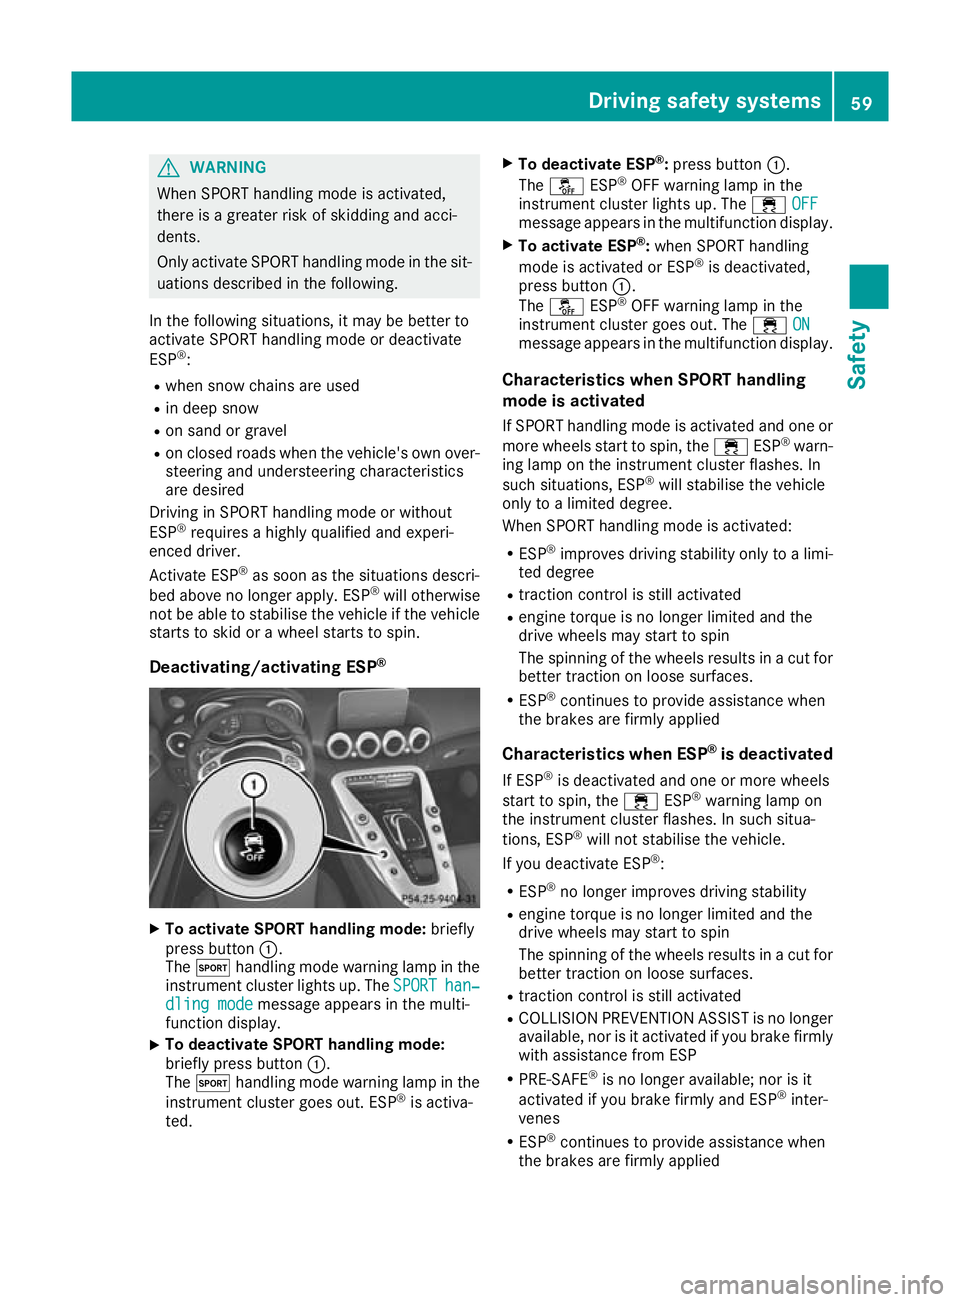
Deactivating/activating ESP ®X
To activate SPORT handling mode: briefly
press button :.
The M handling mode warning lamp in the
instrument cluster lights up. The SPORT SPORThan‐
han‐
dling mode
dling mode message appears in the multi-
function display.
X To deactivate SPORT handling mode:
briefly press button
:.
The M handling mode warning lamp in the
instrument cluster goes out. ESP ®
is activa-
ted. X
To deactivate ESP ®
:press button :.
The å ESP®
OFF warning lamp in the
instrument cluster lights up. The ÷OFF
OFF
message appears in the multifunction display.
X To activate ESP ®
:when SPORT handling
mode is activated or ESP ®
is deactivated,
press button :.
The å ESP®
OFF warning lamp in the
instrument cluster goes out. The ÷ON ON
message appears in the multifunction display.
Characteristics when SPORT handling
mode is activated
If SPORT handling mode is activated and one or
more wheels start to spin, the ÷ESP®
warn-
ing lamp on the instrument cluster flashes. In
such situations, ESP ®
will stabilise the vehicle
only to a limited degree.
When SPORT handling mode is activated:
R ESP ®
improves driving stability only to a limi-
ted degree
R traction control is still activated
R engine torque is no longer limited and the
drive wheels may start to spin
The spinning of the wheels results in a cut for
better traction on loose surfaces.
R ESP ®
continues to provide assistance when
the brakes are firmly applied
Characteristics when ESP ®
is deactivated
If ESP ®
is deactivated and one or more wheels
start to spin, the ÷ESP®
warning lamp on
the instrument cluster flashes. In such situa-
tions, ESP ®
will not stabilise the vehicle.
If you deactivate ESP ®
:
R ESP ®
no longer improves driving stability
R engine torque is no longer limited and the
drive wheels may start to spin
The spinning of the wheels results in a cut for
better traction on loose surfaces.
R traction control is still activated
R COLLISION PREVENTION ASSIST is no longer
available, nor is it activated if you brake firmly
with assistance from ESP
R PRE-SAFE ®
is no longer available; nor is it
activated if you brake firmly and ESP ®
inter-
venes
R ESP ®
continues to provide assistance when
the brakes are firmly applied Driving safety systems
59Safety Z
Page 81 of 289
Correct driver's seat position
G
WARNING
You could lose control of the vehicle while
driving if you:
R adjust the driver's seat, steering wheel or
mirrors
R fasten the seat belt
There is a risk of an accident.
Adjust the driver's seat, head restraint, steer-
ing wheel and mirrors and fasten your seat
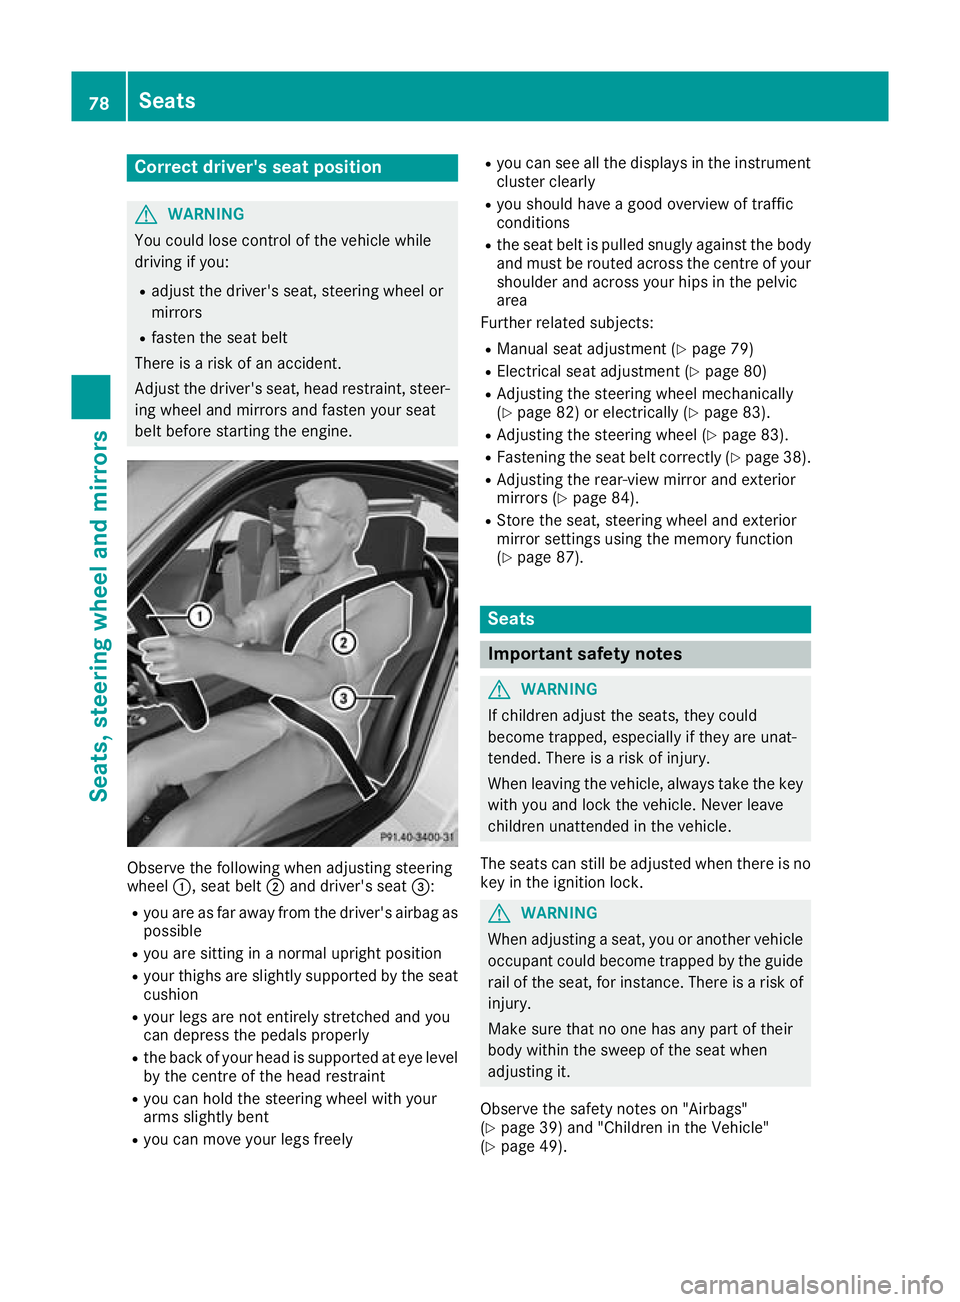
belt before starting the engine. Observe the following when adjusting steering
wheel
:, seat belt ;and driver's seat =:
R you are as far away from the driver's airbag as
possible
R you are sitting in a normal upright position
R your thighs are slightly supported by the seat
cushion
R your legs are not entirely stretched and you
can depress the pedals properly
R the back of your head is supported at eye level
by the centre of the head restraint
R you can hold the steering wheel with your
arms slightly bent
R you can move your legs freely R
you can see all the displays in the instrument
cluster clearly
R you should have a good overview of traffic
conditions
R the seat belt is pulled snugly against the body
and must be routed across the centre of your
shoulder and across your hips in the pelvic
area
Further related subjects:
R Manual seat adjustment (Y page 79)
R Electrical seat adjustment (Y page 80)
R Adjusting the steering wheel mechanically
(Y page 82) or electrically (Y page 83).
R Adjusting the steering wheel (Y page 83).
R Fastening the seat belt correctly (Y page 38).
R Adjusting the rear-view mirror and exterior
mirrors (Y page 84).
R Store the seat, steering wheel and exterior
mirror settings using the memory function
(Y page 87). Seats
Important safety notes
G
WARNING
If children adjust the seats, they could
become trapped, especially if they are unat-
tended. There is a risk of injury.
When leaving the vehicle, always take the key with you and lock the vehicle. Never leave
children unattended in the vehicle.
The seats can still be adjusted when there is no
key in the ignition lock. G
WARNING
When adjusting a seat, you or another vehicle occupant could become trapped by the guiderail of the seat, for instance. There is a risk of
injury.
Make sure that no one has any part of their
body within the sweep of the seat when
adjusting it.
Observe the safety notes on "Airbags"
(Y page 39) and "Children in the Vehicle"
(Y page 49). 78
SeatsSeats, steering wheel and
mirrors
Page 82 of 289
G
WARNING
You could lose control of the vehicle while
driving if you:
R adjust the driver's seat, steering wheel or
mirrors
R fasten the seat belt
There is a risk of an accident.
Adjust the driver's seat, head restraint, steer-
ing wheel and mirrors and fasten your seat
belt before starting the engine.
For safety reasons, seat fore-and-aft adjustment
on electrically adjustable seats is only possible
for a maximum of two seconds when the vehicle is in motion. The seat fore-and-aft adjustment
can then no longer be set. G
WARNING
If you adjust the seat height carelessly, you or other vehicle occupants could be trapped andthereby injured. Children in particular could
accidentally press the electrical seat adjust-
ment buttons and become trapped. There is a
risk of injury.
While moving the seats, make sure that your
hands or other body parts do not get under the
lever assembly of the seat adjustment sys-
tem. G
WARNING
If head restraints are not adjusted correctly,
they cannot provide protection as intended.
There is an increased risk of injury in the head
and neck area, e.g. in the event of an accident or when braking.
Before driving off, make sure for every vehicle
occupant that the centre of the head restraint supports the back of the head at about eye
level. G
WARNING
The seat belt does not offer the intended level of protection if you have not moved the back-
rest to an almost vertical position. When brak-
ing or in the event of an accident, you could
slide underneath the seat belt and sustain
abdomen or neck injuries, for example. This poses an increased risk of injury or even fatal
injury.
Adjust the seat properly before beginning
your journey. Always ensure that the backrestis in an almost vertical position and that the
shoulder section of your seatbelt is routed
across the centre of your shoulder.
! To avoid damage to the seats and the seat
heating, observe the following information:
R do not spill any liquids on the seats. If liquid
is spilled on the seats, dry them as soon as possible.
R if the seat covers are damp or wet, do not
switch on the seat heating. The seat heat-
ing should also not be used to dry the seats.
R clean the seat covers as recommended;
see "Interior care".
R do not transport heavy loads on the seats.
Do not place sharp objects on the seat
cushions, e.g. knives, nails or tools. The
seats should only be occupied by passen-
gers, if possible.
R when the seat heating is in operation, do
not cover the seats with insulating materi-
als, e.g. blankets, coats, bags, seat covers,
child seats or booster seats.
! Make sure that there are no objects in the
footwell under or behind the seats when mov-
ing the seats back. There is a risk that the
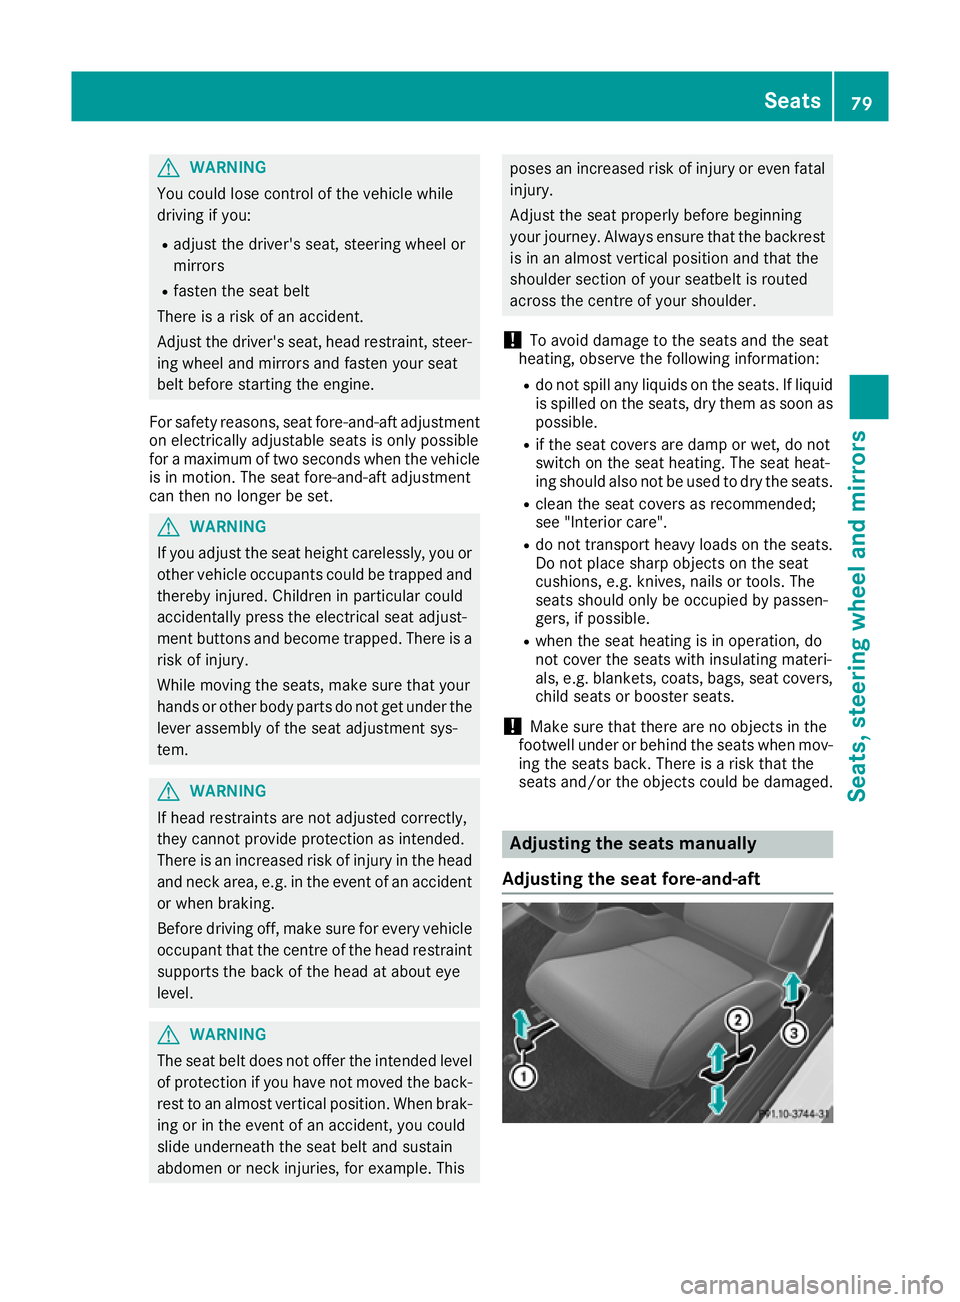
seats and/or the objects could be damaged. Adjusting the seats manually
Adjusting the seat fore-and-aft Seats
79Seats, steering wheel and mirrors Z
Page 83 of 289
X
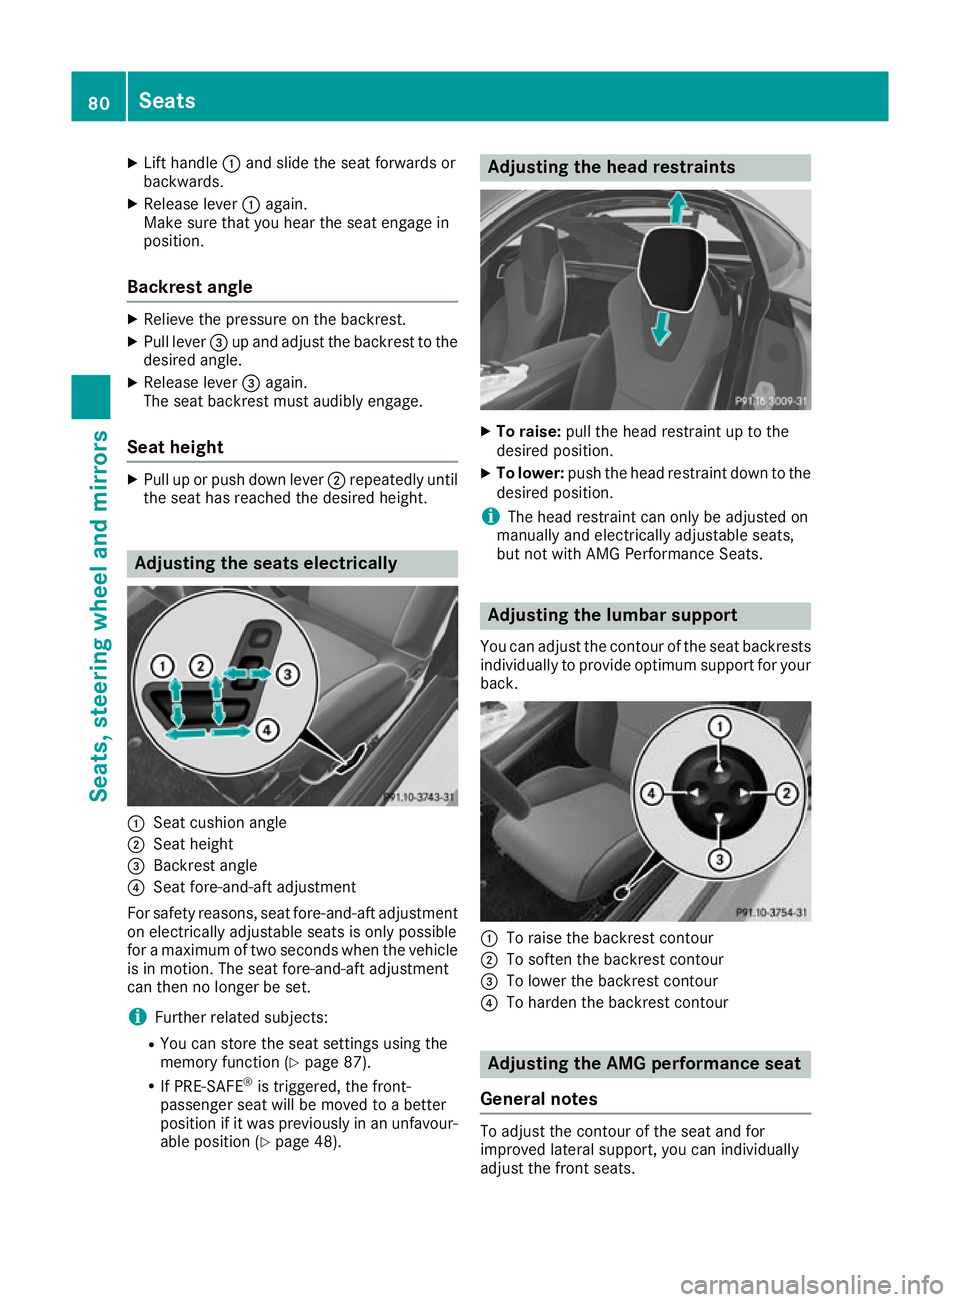
Lift handle :and slide the seat forwards or
backwards.
X Release lever :again.
Make sure that you hear the seat engage in
position.
Backrest angle X
Relieve the pressure on the backrest.
X Pull lever =up and adjust the backrest to the
desired angle.
X Release lever =again.
The seat backrest must audibly engage.
Seat height X
Pull up or push down lever ;repeatedly until
the seat has reached the desired height. Adjusting the seats electrically
:
Seat cushion angle
; Seat height
= Backrest angle
? Seat fore-and-aft adjustment
For safety reasons, seat fore-and-aft adjustment on electrically adjustable seats is only possible
for a maximum of two seconds when the vehicle is in motion. The seat fore-and-aft adjustment
can then no longer be set.
i Further related subjects:
R You can store the seat settings using the
memory function (Y page 87).
R If PRE-SAFE ®
is triggered, the front-
passenger seat will be moved to a better
position if it was previously in an unfavour-
able position (Y page 48). Adjusting the head restraints
X
To raise: pull the head restraint up to the
desired position.
X To lower: push the head restraint down to the
desired position.
i The head restraint can only be adjusted on
manually and electrically adjustable seats,
but not with AMG Performance Seats. Adjusting the lumbar support
You can adjust the contour of the seat backrests
individually to provide optimum support for your back. :
To raise the backrest contour
; To soften the backrest contour
= To lower the backrest contour
? To harden the backrest contour Adjusting the AMG performance seat
General notes To adjust the contour of the seat and for
improved lateral support, you can individually
adjust the front seats.80
SeatsSeats, steering wheel and mirrors
Page 84 of 289
The AMG Performance seat is designed for the
standard three-point seat belt. If you fit another
multipoint seat belt, e.g. sport or racing seat
belts, the restraint system cannot provide the
best level of protection.
Further information about seat belts
(Y page 37).
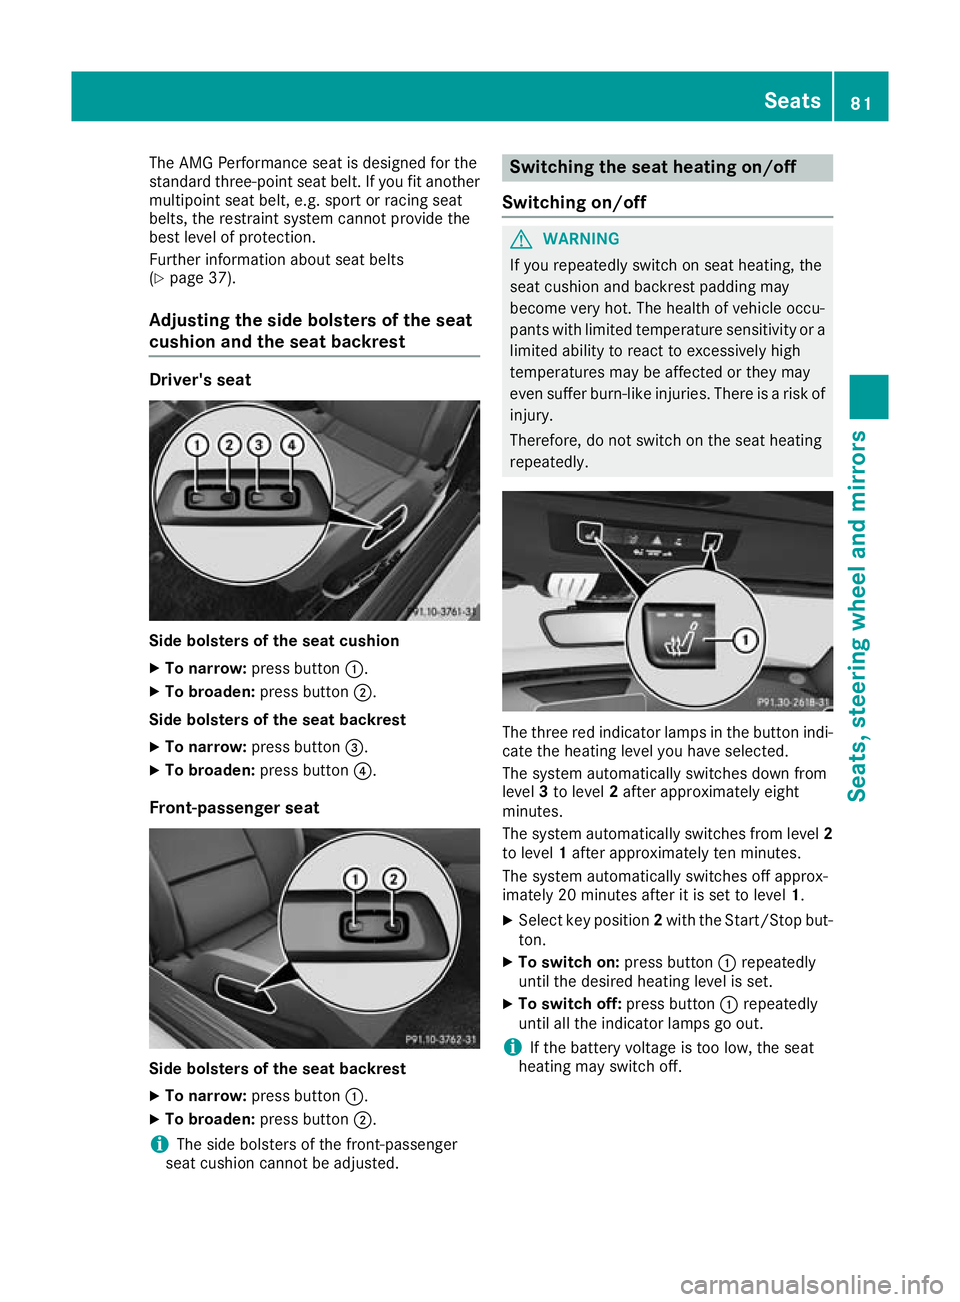
Adjusting the side bolsters of the seat
cushion and the seat backrest Driver's seat
Side bolsters of the seat cushion
X To narrow: press button :.
X To broaden: press button;.
Side bolsters of the seat backrest X To narrow: press button =.
X To broaden: press button?.
Front-passenger seat Side bolsters of the seat backrest
X To narrow: press button :.
X To broaden: press button;.
i The side bolsters of the front-passenger
seat cushion cannot be adjusted. Switching the seat heating on/off
Switching on/off G
WARNING
If you repeatedly switch on seat heating, the
seat cushion and backrest padding may
become very hot. The health of vehicle occu-
pants with limited temperature sensitivity or a limited ability to react to excessively high
temperatures may be affected or they may
even suffer burn-like injuries. There is a risk of
injury.
Therefore, do not switch on the seat heating
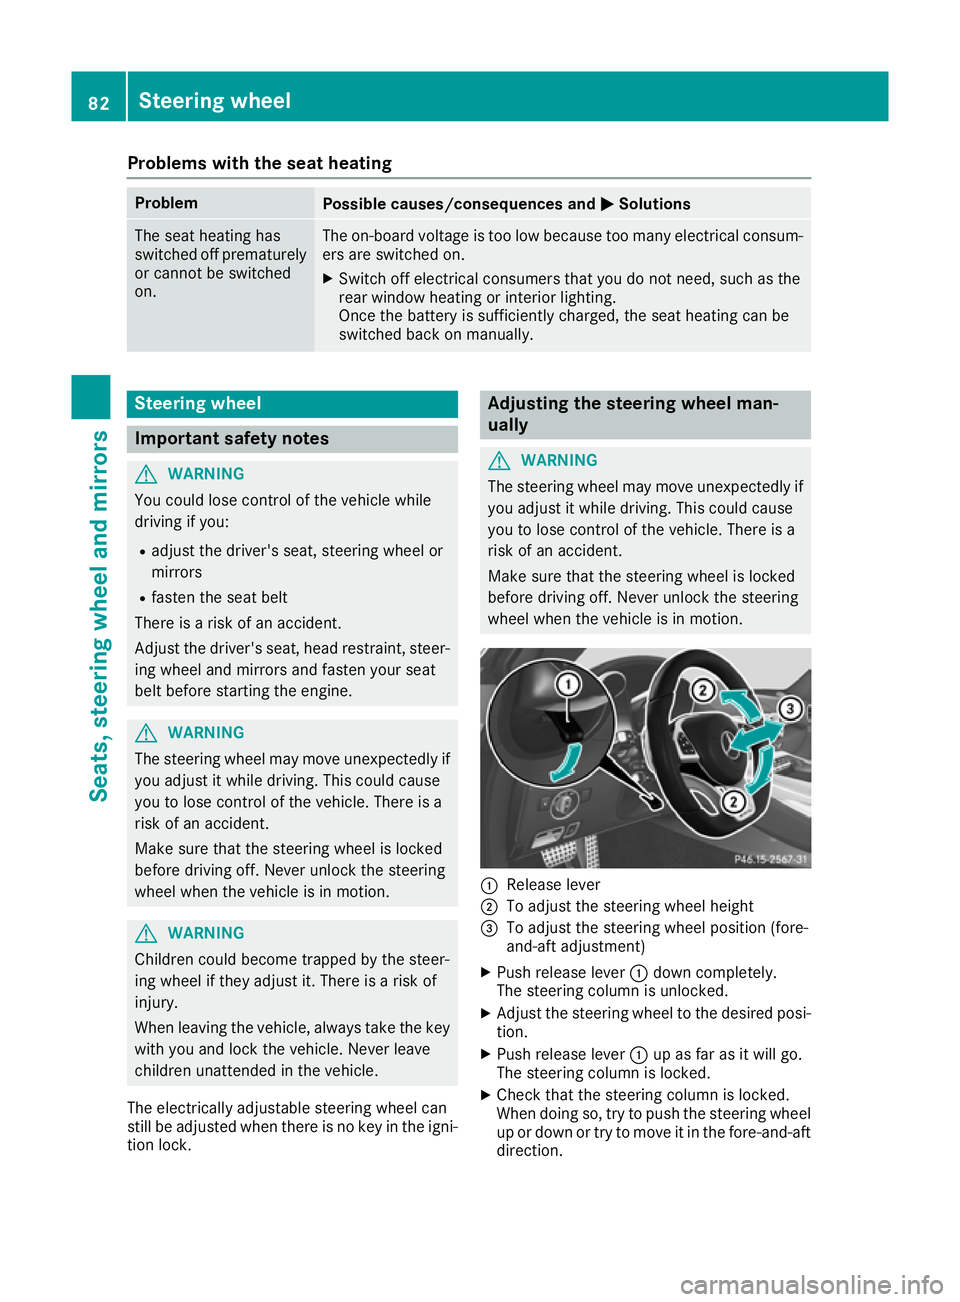
repeatedly. The three red indicator lamps in the button indi-
cate the heating level you have selected.
The system automatically switches down from
level 3to level 2after approximately eight
minutes.
The system automatically switches from level 2
to level 1after approximately ten minutes.
The system automatically switches off approx-
imately 20 minutes after it is set to level 1.
X Select key position 2with the Start/Stop but-
ton.
X To switch on: press button:repeatedly
until the desired heating level is set.
X To switch off: press button:repeatedly
until all the indicator lamps go out.
i If the battery voltage is too low, the seat
heating may switch off. Seats
81Seats, steering wheel and mirrors Z
Page 85 of 289
Problems with the seat heating
Problem
Possible causes/consequences and
M
MSolutions The seat heating has
switched off prematurely
or cannot be switched
on. The on-board voltage is too low because too many electrical consum-
ers are switched on.
X Switch off electrical consumers that you do not need, such as the
rear window heating or interior lighting.
Once the battery is sufficiently charged, the seat heating can be
switched back on manually. Steering wheel
Important safety notes
G
WARNING
You could lose control of the vehicle while
driving if you:
R adjust the driver's seat, steering wheel or
mirrors
R fasten the seat belt
There is a risk of an accident.
Adjust the driver's seat, head restraint, steer-
ing wheel and mirrors and fasten your seat
belt before starting the engine. G
WARNING
The steering wheel may move unexpectedly if you adjust it while driving. This could cause
you to lose control of the vehicle. There is a
risk of an accident.
Make sure that the steering wheel is locked
before driving off. Never unlock the steering
wheel when the vehicle is in motion. G
WARNING
Children could become trapped by the steer-
ing wheel if they adjust it. There is a risk of
injury.
When leaving the vehicle, always take the key with you and lock the vehicle. Never leave
children unattended in the vehicle.
The electrically adjustable steering wheel can
still be adjusted when there is no key in the igni-
tion lock. Adjusting the steering wheel man-
ually
G
WARNING
The steering wheel may move unexpectedly if you adjust it while driving. This could cause
you to lose control of the vehicle. There is a
risk of an accident.
Make sure that the steering wheel is locked
before driving off. Never unlock the steering
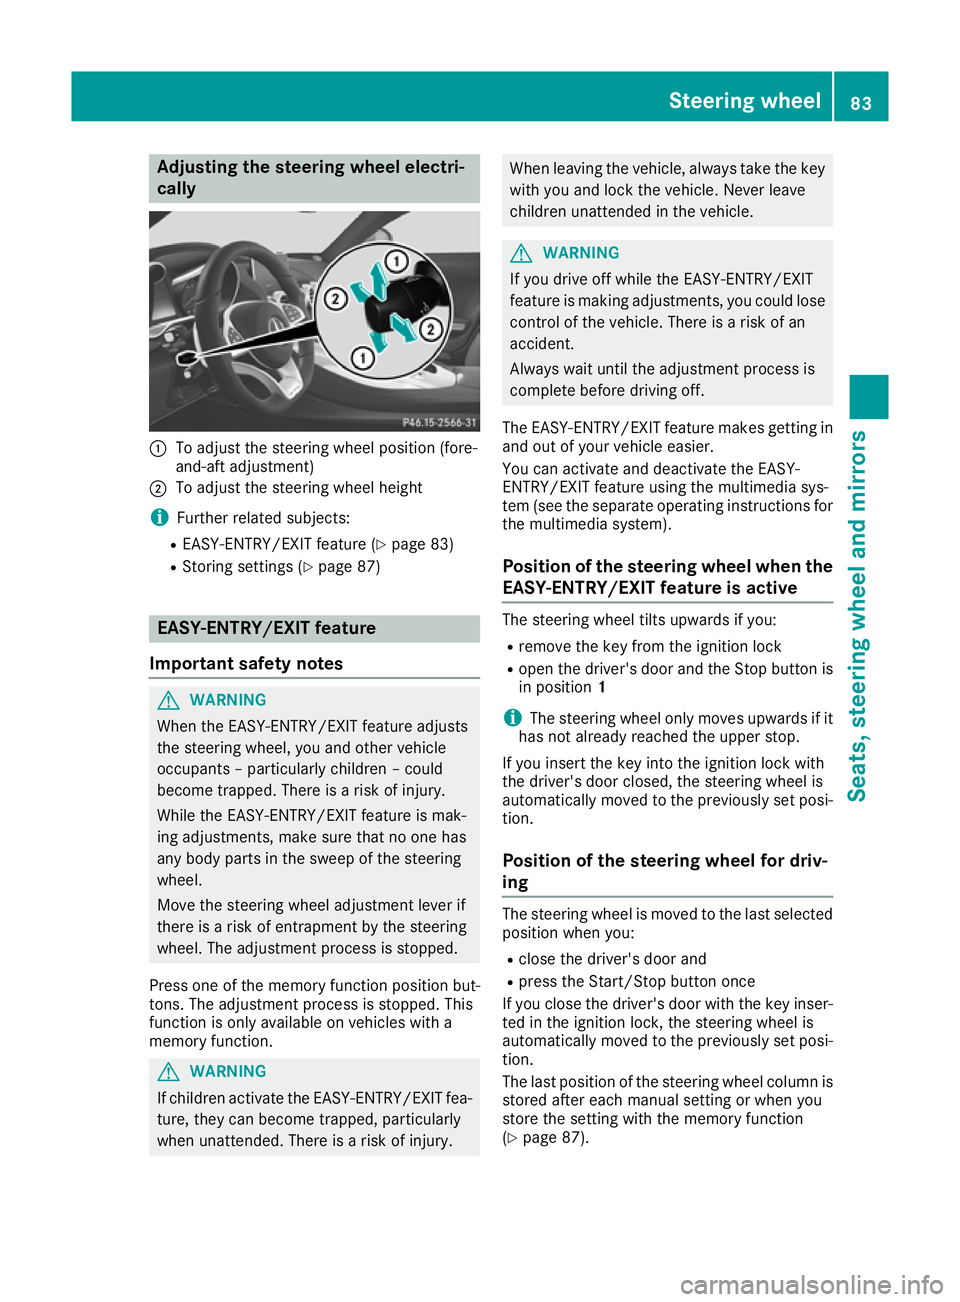
wheel when the vehicle is in motion. :
Release lever
; To adjust the steering wheel height
= To adjust the steering wheel position (fore-
and-aft adjustment)
X Push release lever :down completely.
The steering column is unlocked.
X Adjust the steering wheel to the desired posi-
tion.
X Push release lever :up as far as it will go.
The steering column is locked.
X Check that the steering column is locked.
When doing so, try to push the steering wheel
up or down or try to move it in the fore-and-aft
direction. 82
Steering wheelSeats, steering wheel and mirrors
Page 86 of 289
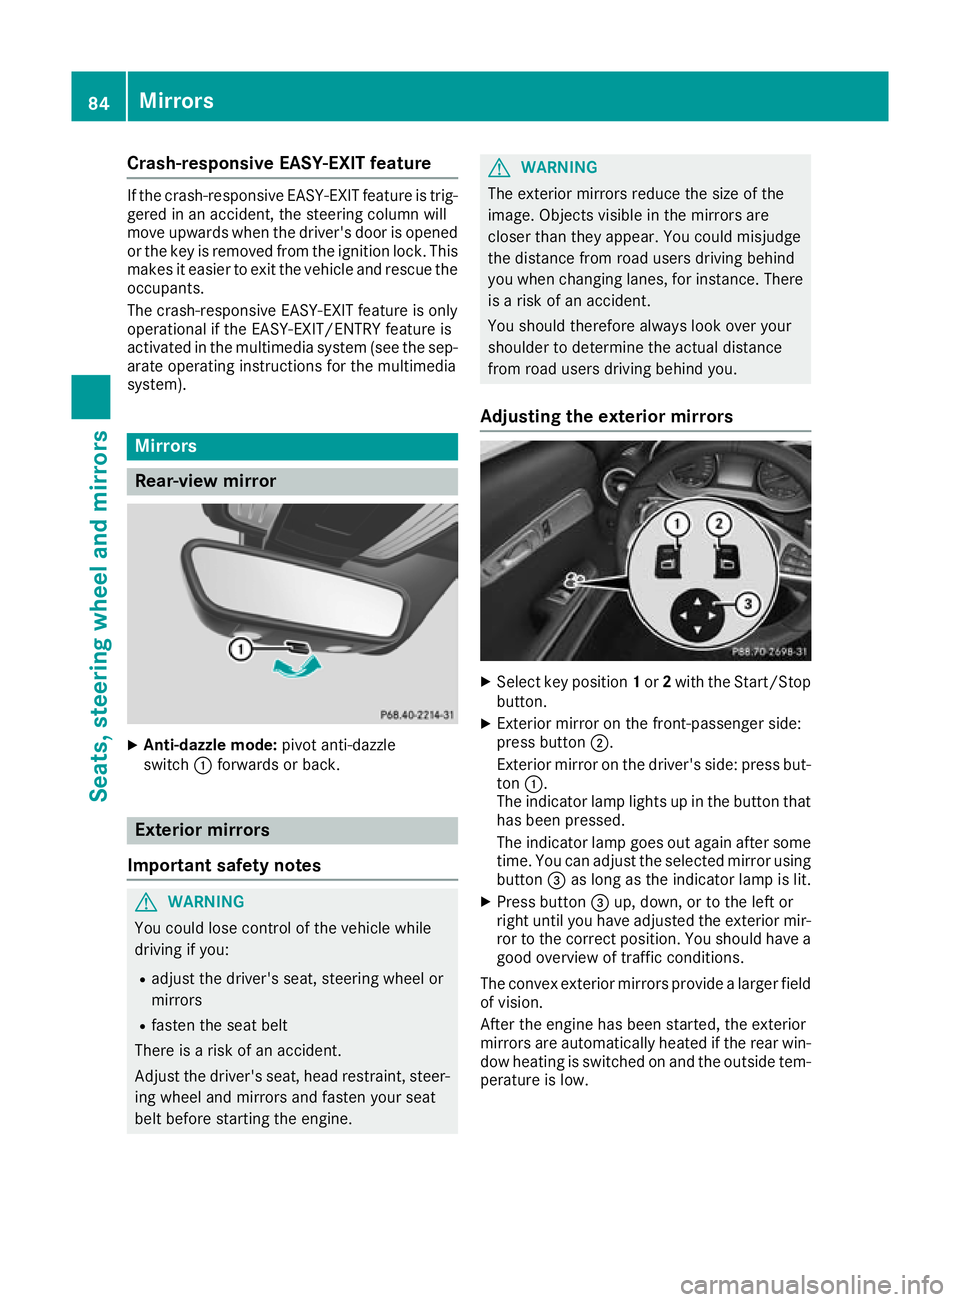
Adjusting the steering wheel electri-
cally :
To adjust the steering wheel position (fore-
and-aft adjustment)
; To adjust the steering wheel height
i Further related subjects:
R EASY-ENTRY/EXIT feature (Y page 83)
R Storing settings (Y page 87) EASY-ENTRY/EXIT feature
Important safety notes G
WARNING
When the EASY-ENTRY/EXIT feature adjusts
the steering wheel, you and other vehicle
occupants – particularly children – could
become trapped. There is a risk of injury.
While the EASY-ENTRY/EXIT feature is mak-
ing adjustments, make sure that no one has
any body parts in the sweep of the steering
wheel.
Move the steering wheel adjustment lever if
there is a risk of entrapment by the steering
wheel. The adjustment process is stopped.
Press one of the memory function position but-
tons. The adjustment process is stopped. This
function is only available on vehicles with a
memory function. G
WARNING
If children activate the EASY-ENTRY/EXIT fea- ture, they can become trapped, particularly
when unattended. There is a risk of injury. When leaving the vehicle, always take the key
with you and lock the vehicle. Never leave
children unattended in the vehicle. G
WARNING
If you drive off while the EASY-ENTRY/EXIT
feature is making adjustments, you could lose
control of the vehicle. There is a risk of an
accident.
Always wait until the adjustment process is
complete before driving off.
The EASY-ENTRY/EXIT feature makes getting in
and out of your vehicle easier.
You can activate and deactivate the EASY-
ENTRY/EXIT feature using the multimedia sys-
tem (see the separate operating instructions for the multimedia system).
Position of the steering wheel when the EASY-ENTRY/EXIT feature is active The steering wheel tilts upwards if you:
R remove the key from the ignition lock
R open the driver's door and the Stop button is
in position 1
i The steering wheel only moves upwards if it
has not already reached the upper stop.
If you insert the key into the ignition lock with
the driver's door closed, the steering wheel is
automatically moved to the previously set posi-
tion.
Position of the steering wheel for driv-
ing The steering wheel is moved to the last selected
position when you:
R close the driver's door and
R press the Start/Stop button once
If you close the driver's door with the key inser- ted in the ignition lock, the steering wheel is
automatically moved to the previously set posi-
tion.
The last position of the steering wheel column is
stored after each manual setting or when you
store the setting with the memory function
(Y page 87). Steering wheel
83Seats, steering wheel and mirrors Z
Page 87 of 289
Crash-responsive EASY-EXIT feature
If the crash-responsive EASY-EXIT feature is trig-
gered in an accident, the steering column will
move upwards when the driver's door is opened
or the key is removed from the ignition lock. This
makes it easier to exit the vehicle and rescue the
occupants.
The crash-responsive EASY-EXIT feature is only
operational if the EASY-EXIT/ENTRY feature is
activated in the multimedia system (see the sep-
arate operating instructions for the multimedia
system). Mirrors
Rear-view mirror
X
Anti-dazzle mode: pivot anti-dazzle
switch :forwards or back. Exterior mirrors
Important safety notes G
WARNING
You could lose control of the vehicle while
driving if you:
R adjust the driver's seat, steering wheel or
mirrors
R fasten the seat belt
There is a risk of an accident.
Adjust the driver's seat, head restraint, steer-
ing wheel and mirrors and fasten your seat
belt before starting the engine. G
WARNING
The exterior mirrors reduce the size of the
image. Objects visible in the mirrors are
closer than they appear. You could misjudge
the distance from road users driving behind
you when changing lanes, for instance. There is a risk of an accident.
You should therefore always look over your
shoulder to determine the actual distance
from road users driving behind you.
Adjusting the exterior mirrors X
Select key position 1or 2with the Start/Stop
button.
X Exterior mirror on the front-passenger side:
press button ;.
Exterior mirror on the driver's side: press but- ton :.
The indicator lamp lights up in the button that has been pressed.
The indicator lamp goes out again after some
time. You can adjust the selected mirror using
button =as long as the indicator lamp is lit.
X Press button =up, down, or to the left or
right until you have adjusted the exterior mir- ror to the correct position. You should have a
good overview of traffic conditions.
The convex exterior mirrors provide a larger field of vision.
After the engine has been started, the exterior
mirrors are automatically heated if the rear win-dow heating is switched on and the outside tem-
perature is low. 84
MirrorsSeats, steering wheel and
mirrors