2016 MERCEDES-BENZ AMG GT ROADSTER trip computer
[x] Cancel search: trip computerPage 17 of 289

Restraint system introduction .......... 34
Restraint system warning lamp ........ 35
Seat belts ........................................ 36
Odometer .......................................... .157
Oil
see Engine oil
On-board computer
AMG menu ..................................... 167
Assistance graphic menu .............. .163
Assistance menu ........................... 164
Display messages .......................... 170
Displaying a service message ....... .237
DISTRONIC PLUS ........................... 136
Factory settings ............................ .166
G-Meter ......................................... 167
Important safety notes .................. 155
Instrument cluster menu .............. .165
Media menu ................................... 161
Menu overview .............................. 157
Message memory .......................... 171
Navigation menu ............................ 159
Operating video DVD ..................... 162
Operation ....................................... 156
RACETIMER ................................... 168
Radio menu ................................... 160
Service menu ................................. 164
Settings menu ............................... 164
Standard displa y............................ 157
Telephone menu ............................ 162
Trip menu ...................................... 157
Vehicle menu ................................. 166
Operating instructions
Vehicle equipment ........................... 23
Operating safety
Declaration of conformity ................ 24
Important safety note ...................... 23
Operating system
see On-board computer
Operation
Digital Owner's Manua l.................... 21
Outside temperature display ........... 155
Overhead control panel ...................... 32
Owner's Manual
Overview .......................................... 23 P
Paint code .......................................... 276 Paintwork (cleaning instructions)
... 239
Panic alarm .......................................... 34
Panorama roof ..................................... 77
Parking
Important safety notes .................. 119
Parking brake ................................ 121
Position of exterior mirror, front-
passenger side ................................. 86
Reversing camera .......................... 144
Switching off the engine ................ 120
see PARKTRONIC
Parking aid
see Exterior mirrors
see PARKTRONIC
Parking brake
Applying automaticall y................... 121
Applying or releasing manually ...... 121
Display message ............................ 174
Electric parking brake .................... 121
Emergency braking ........................ 122
General information ....................... 121
Releasing automaticall y................. 122
Warning lamp ................................. 199
Parking lamps
Display message ............................ 182
Switching on/of f.............................. 89
PARKTRONIC
Deactivating/activating ................. 143
Driving system ............................... 141
Function/note s............................. 141
Important safety notes .................. 141
Problem (fault) ............................... 143
Sensor rang e................................. 141
Warning display ............................. 142
PASSENGER AIR BAG
Display message ............................ 180
Indicator lamps ................................ 35
Problems (malfunctions) ................ 180
Petrol .................................................. 278
Pets in the vehicle ............................... 53
Phone book
See also Digital Owner's Manua l... 205
Plastic trim (cleaning instruc-
tions) .................................................. 242
Power windows
see Side windows 14
Index
Page 22 of 289
Trim pieces (cleaning instruc-
tions)
.................................................. 243
Trip computer (on-board com-
puter) .................................................. 158
Trip meter
Calling up ....................................... 157
Resetting (on-board computer) ...... 158
Turn signals
Switching on/off .............................. 89
Two-way radio
Frequencies ................................... 275
Installation ..................................... 275
Transmission output (maximum) .... 275
Type identification plate
see Vehicle identification plate
Tyre changing tool kit ....................... 246
Tyre inflation compressor
see TIREFIT kit
Tyre pressure
Calling up (on-board computer) ..... 265
Display message ............................ 189
Not reached (TIREFIT) .................... 249
Reached (TIREFIT) .......................... 249
Recommended ............................... 264
Tyre pressure monitor
Checking the tyre pressure elec-
tronically ........................................ 266
Function/note s............................. 265
General notes ................................ 265
Important safety notes .................. 266
Restarting ...................................... 267
Warning lamp ................................. 203
Warning message .......................... 267
Tyres
Changing a whee l.......................... 267
Checking ........................................ 262
Direction of rotation ...................... 268
Display message ............................ 189
Important safety notes .................. 261
Information on driving .................... 261
Replacing ....................................... 267
Service life ..................................... 262
Storing ........................................... 268
Summer tyres in winter ................. 263
Tyre size (data ).............................. 272
Tyre tread ...................................... 262
Wheel and tyre combinations ........ 272
see Flat tyre U
Unlocking Emergency unlocking ....................... 70
From inside the vehicle (central
unlocking button) ............................. 70
USB devices
Connecting to the Media Inter-
face ............................................... 216 V
Vanity mirror (in sun visor) .............. 221
Vehicle
Correct use ...................................... 25
Data acquisition ............................... 26
Display message ............................ 190
Electronics ..................................... 275
Equipment ....................................... 23
Implied warranty .............................. 25
Individual settings .......................... 164
Leaving parked up ......................... 122
Locking (in an emergency) ............... 70
Locking (key) ................................... 64
Lowering ........................................ 272
Operating safety .............................. 23
Parking .......................................... 119
Pulling away ................................... 104
Raising ........................................... 269
Registration ..................................... 25
Securing from rolling away ............ 268
Towing away .................................. 256
Transporting .................................. 258
Unlocking (in an emergency) ........... 70
Unlocking (key) ................................ 64
Vehicle data ................................... 281
Vehicle data
Boot load (maximum) ..................... 281
Vehicle dimensions ........................... 281
Vehicle emergency locking ................ 70
Vehicle identification number
see VIN
Vehicle identification plate .............. 276
Vehicle tool kit .................................. 246
Video
Operating the DVD ......................... 162
See also Digital Owner's Manua l... 205 Index
19
Page 159 of 289
Under normal operating conditions and with the
specified coolant level, the coolant temperature
may rise to 120 †.
At high outside temperatures and when driving
uphill, the coolant temperature may rise to the
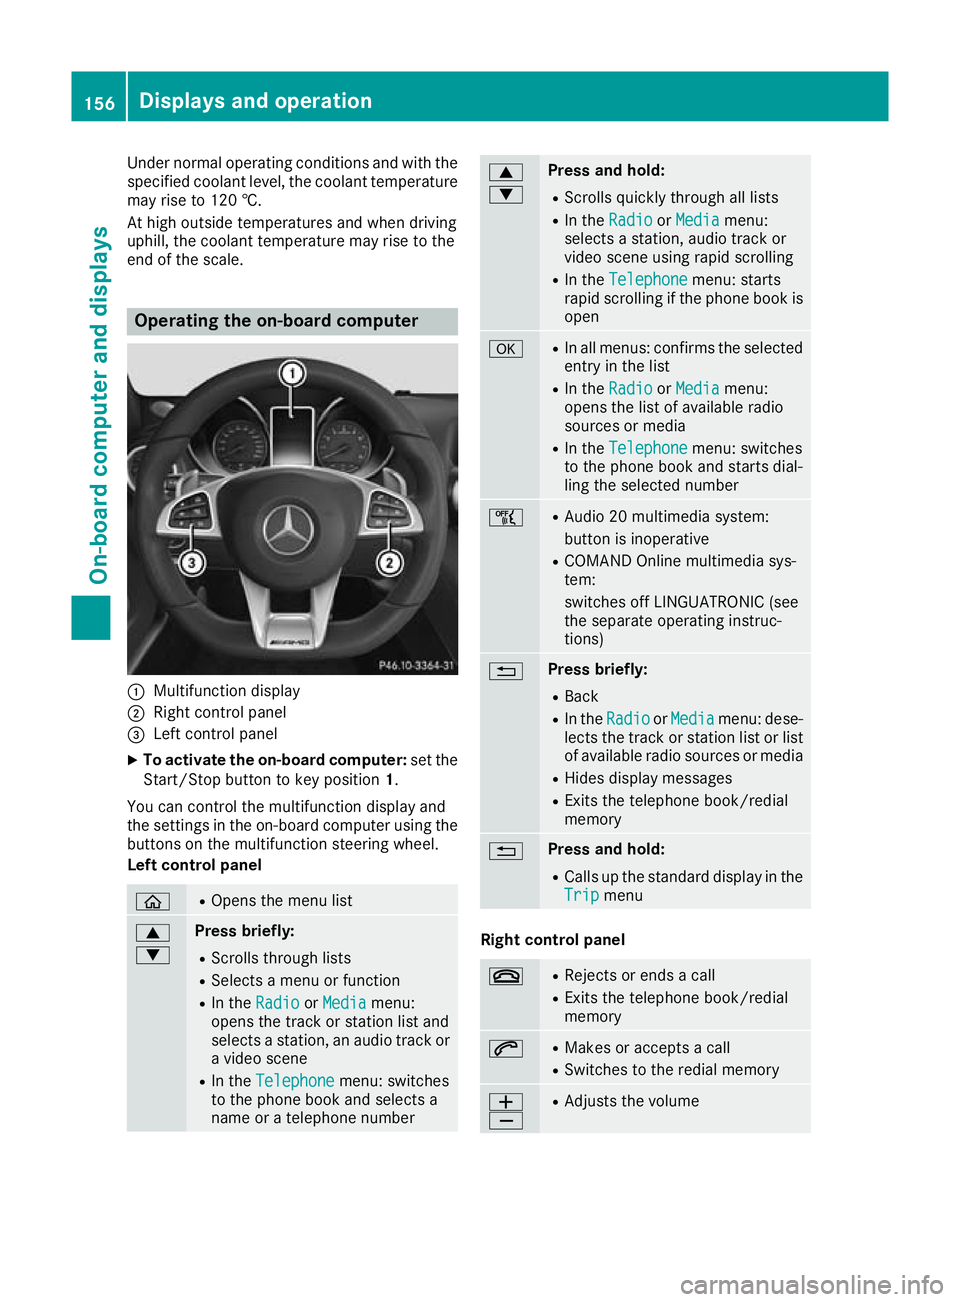
end of the scale. Operating the on-board computer
:
Multifunction display
; Right control panel
= Left control panel
X To activate the on-board computer: set the
Start/Stop button to key position 1.
You can control the multifunction display and
the settings in the on-board computer using the buttons on the multifunction steering wheel.
Left control panel ò R
Opens the menu list 9
: Press briefly:
R Scrolls through lists
R Selects a menu or function
R In the Radio Radio orMedia
Media menu:
opens the track or station list and
selects a station, an audio track or a video scene
R In the Telephone
Telephone menu: switches
to the phone book and selects a
name or a telephone number 9
: Press and hold:
R
Scrolls quickly through all lists
R In the Radio Radio orMedia Media menu:
selects a station, audio track or
video scene using rapid scrolling
R In the Telephone Telephone menu: starts
rapid scrolling if the phone book is open a R
In all menus: confirms the selected
entry in the list
R In the Radio
Radio orMedia
Media menu:
opens the list of available radio
sources or media
R In the Telephone
Telephone menu: switches
to the phone book and starts dial-
ling the selected number ñ R
Audio 20 multimedia system:
button is inoperative
R COMAND Online multimedia sys-
tem:
switches off LINGUATRONIC (see
the separate operating instruc-
tions) % Press briefly:
R Back
R In the Radio Radio orMedia
Media menu: dese-
lects the track or station list or list
of available radio sources or media
R Hides display messages
R Exits the telephone book/redial
memory % Press and hold:
R
Calls up the standard display in the
Trip Trip menu Right control panel
~ R
Rejects or ends a call
R Exits the telephone book/redial
memory 6 R
Makes or accepts a call
R Switches to the redial memory W
X R
Adjusts the volume 156
Displays and operationOn-board computer and displays
Page 160 of 289
8 R
Mute ó R
Audio 20 multimedia system:
button is inoperative
R COMAND Online multimedia sys-
tem:
switches on LINGUATRONIC (see
the separate operating instruc-
tions) Multifunction display
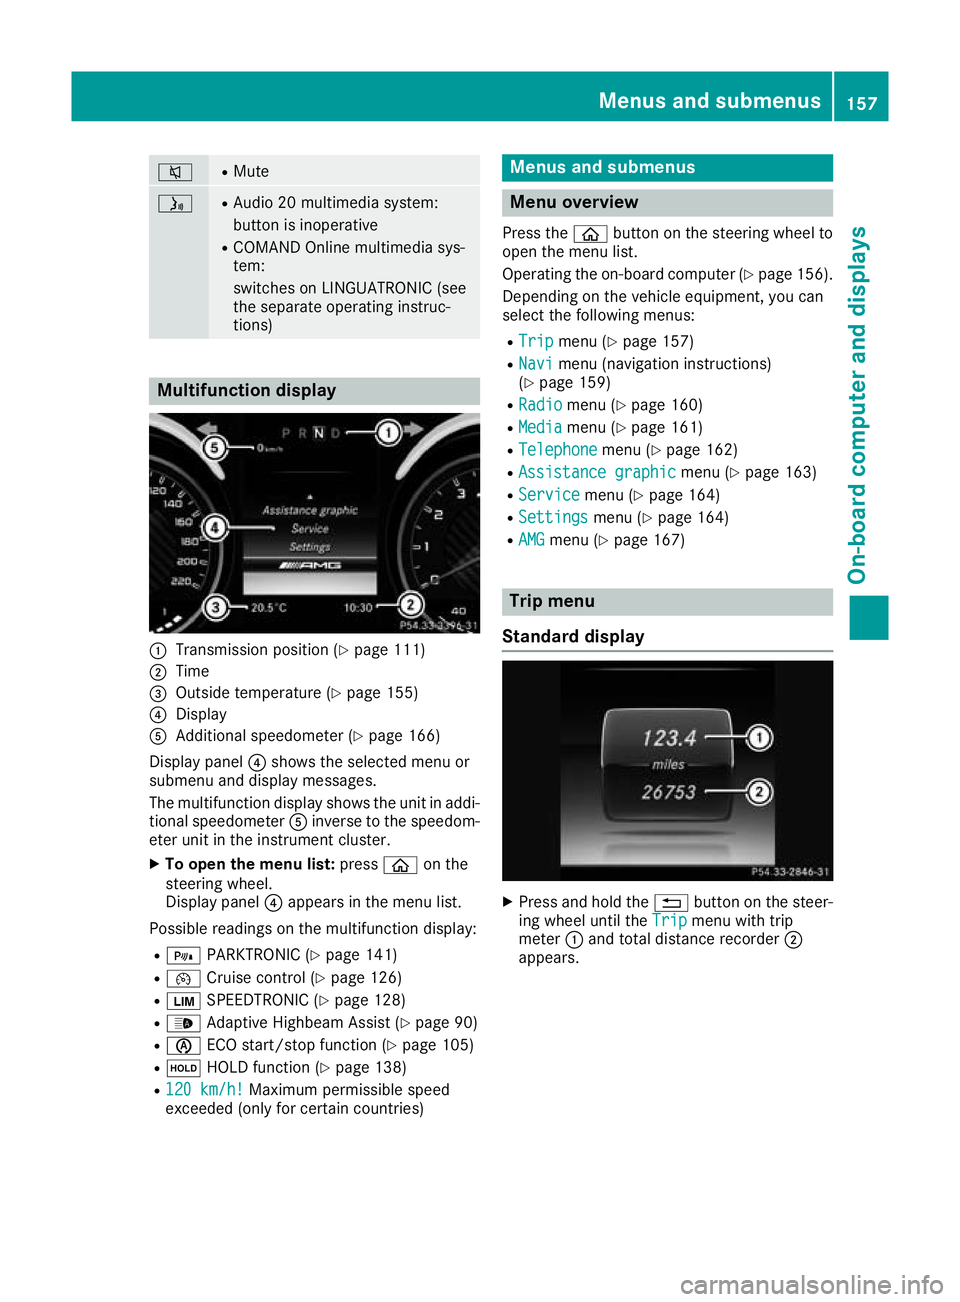
:
Transmission position (Y page 111)
; Time
= Outside temperature (Y page 155)
? Display
A Additional speedometer (Y page 166)
Display panel ?shows the selected menu or
submenu and display messages.
The multifunction display shows the unit in addi- tional speedometer Ainverse to the speedom-
eter unit in the instrument cluster.
X To open the menu list: pressòon the
steering wheel.
Display panel ?appears in the menu list.
Possible readings on the multifunction display:
R = PARKTRONIC (Y page 141)
R ¯ Cruise control (Y page 126)
R È SPEEDTRONIC (Y page 128)
R _ Adaptive Highbeam Assist (Y page 90)
R è ECO start/stop function (Y page 105)
R ë HOLD function (Y page 138)
R 120 km/h!
120 km/h! Maximum permissible speed
exceeded (only for certain countries) Menus and submenus
Menu overview
Press the òbutton on the steering wheel to
open the menu list.
Operating the on-board computer (Y page 156).
Depending on the vehicle equipment, you can
select the following menus:
R Trip Trip menu (Y page 157)
R Navi
Navi menu (navigation instructions)
(Y page 159)
R Radio
Radio menu (Y page 160)
R Media
Media menu (Y page 161)
R Telephone
Telephone menu (Ypage 162)
R Assistance graphic
Assistance graphic menu (Ypage 163)
R Service
Service menu (Ypage 164)
R Settings
Settings menu (Ypage 164)
R AMG
AMG menu (Y page 167) Trip menu
Standard display X
Press and hold the %button on the steer-
ing wheel until the Trip Tripmenu with trip
meter :and total distance recorder ;
appears. Menus and submenus
157On-board computer and displays Z
Page 161 of 289
Displaying the range
X
Press òon the steering wheel to open the
menu list.
X Press :or9 on the steering wheel to
select the Trip
Tripmenu.
X Press :or9 to select the approximate
Range
Range.
The approximate range that can be covered is
calculated according to your current driving
style and the amount of fuel in the tank. If
there is only a small amount of fuel left in the fuel tank, a vehicle being refuelled C
appears instead of approximate range.
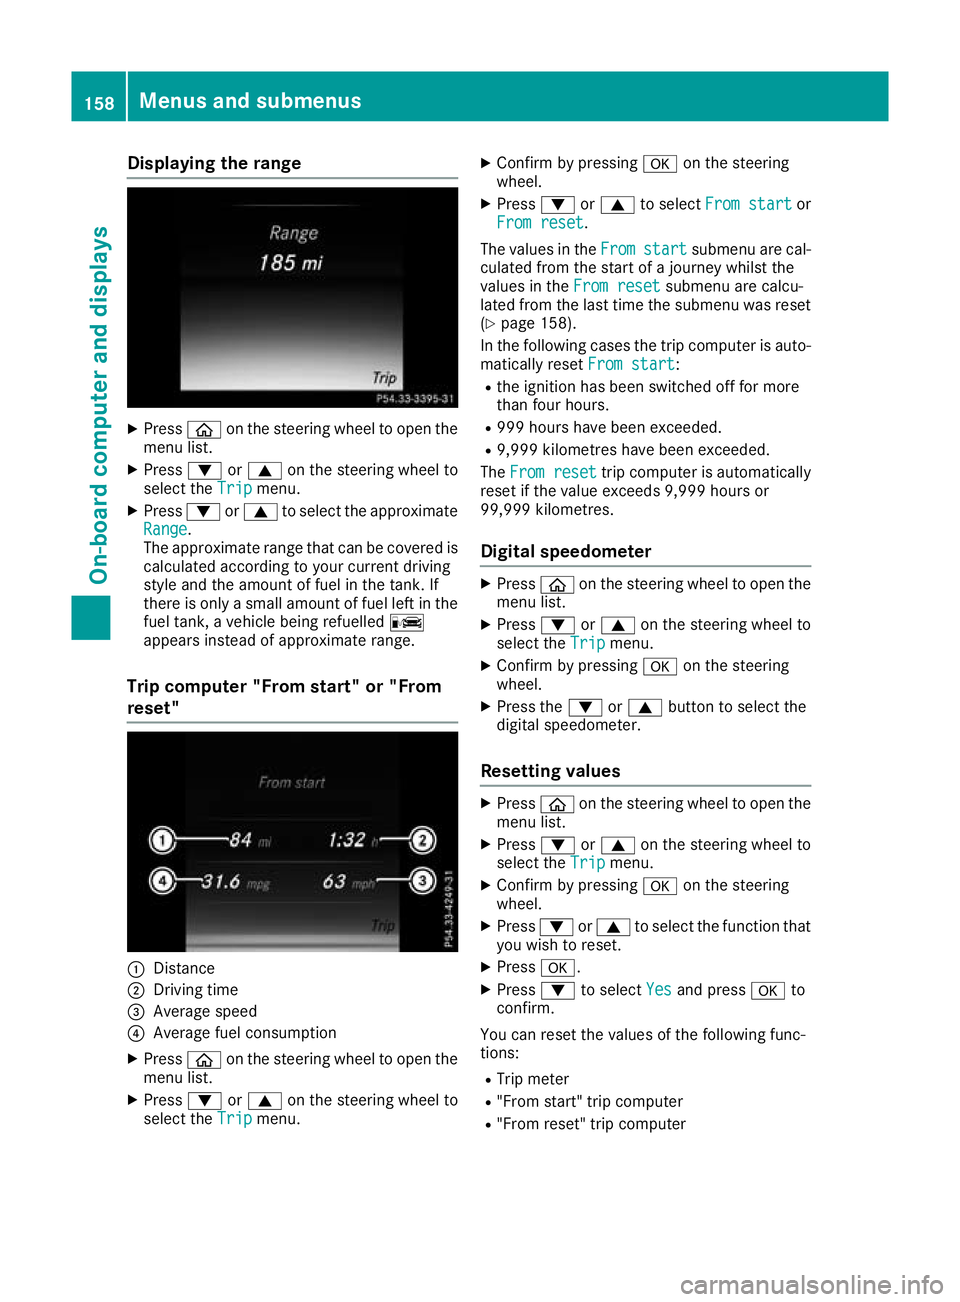
Trip computer "From start" or "From
reset" :
Distance
; Driving time
= Average speed
? Average fuel consumption
X Press òon the steering wheel to open the
menu list.
X Press :or9 on the steering wheel to
select the Trip Tripmenu. X
Confirm by pressing aon the steering
wheel.
X Press :or9 to select From start
From start or
From reset
From reset.
The values in the From
Fromstart
start submenu are cal-
culated from the start of a journey whilst the
values in the From reset From resetsubmenu are calcu-
lated from the last time the submenu was reset
(Y page 158).
In the following cases the trip computer is auto- matically reset From start
From start:
R the ignition has been switched off for more
than four hours.
R 999 hours have been exceeded.
R 9,999 kilometres have been exceeded.
The From reset From reset trip computer is automatically
reset if the value exceeds 9,999 hours or
99,999 kilometres.
Digital speedometer X
Press òon the steering wheel to open the
menu list.
X Press :or9 on the steering wheel to
select the Trip Tripmenu.
X Confirm by pressing aon the steering
wheel.
X Press the :or9 button to select the
digital speedometer.
Resetting values X
Press òon the steering wheel to open the
menu list.
X Press :or9 on the steering wheel to
select the Trip
Trip menu.
X Confirm by pressing aon the steering
wheel.
X Press :or9 to select the function that
you wish to reset.
X Press a.
X Press :to select Yes
Yesand press ato
confirm.
You can reset the values of the following func-
tions:
R Trip meter
R "From start" trip computer
R "From reset" trip computer 158
Menus and submenusOn-boa
rdcompu ter and displays
Page 169 of 289
X
Use ò on the steering wheel to call up the
list of menus.
X Press the :or9 button on the steering
wheel to select the Settings
Settings menu.
X Confirm by pressing aon the steering
wheel.
X Press the :or9 button to select the
Instrument cluster
Instrument cluster submenu.
X Press ato confirm.
X Press the :or9 button to select the
Display unit Speed-/odometer
Display unit Speed-/odometer function.
You will see the selected setting: km
kmorMiles
Miles.
X Press ato save the setting.
The selected unit of measurement for distance
applies to the following:
R digital speedometer in the Trip
Trip menu
R total distance recorder and the trip meter
R trip computer
R range
R navigation instructions in the Navi
Navi menu
R cruise control
R SPEEDTRONIC
R DISTRONIC PLUS
R ASSYST PLUS service interval display
Switching the additional speedometer
on/off
United Kingdom: this function is unavailable.
The additional speedometer is always switched
on.
If the additional speedometer is switched on,
the speed is shown in the status bar of the mul-
tifunction display instead of the outside tem-
perature.
The speed display is inverse to your speedome- ter.
X Press òon the steering wheel to open the
menu list.
X Press :or9 on the steering wheel to
select the Settings
Settings menu.
X Confirm by pressing aon the steering
wheel.
X Press :or9 to select the Instru‐ Instru‐
ment cluster
ment cluster submenu.
X Press ato confirm. X
Press :or9 to select the Digital
Digital
speedo [km/h]
speedo [km/h] function.
The current selection appears.
X To switch on/off: press theabutton
again.
Vehicle submenu Setting permanent SPEEDTRONIC
X Press òon the steering wheel to open the
menu list.
X Press :or9 on the steering wheel to
select the Settings
Settings menu.
X Confirm by pressing aon the steering
wheel.
X Press :or9 to select the Vehicle
Vehicle
submenu.
X Press ato confirm.
X Press :or9 to select the Limit
Limit
speed (winter tyres)
speed (winter tyres) function.
The current setting appears.
X Press ato confirm.
X Press :or9 to adjust permanent
SPEEDTRONIC in increments of ten ( 240
240km/
km/
h
h to 160
160 km/h
km/h). The Off
Offsetting switches per-
manent SPEEDTRONIC off.
X Press ato store the entry.
Further information on permanent SPEED-
TRONIC (Y page 130).
Restoring the factory settings X
Press òon the steering wheel to open the
menu list.
X Press :or9 on the steering wheel to
select the Settings
Settings menu.
X Confirm by pressing aon the steering
wheel.
X Press :or9 to select the Factory Factory
settings
settings submenu.
X Press ato confirm.
The Reset all settings?
Reset all settings? function
appears.
X Press :or9 to select No
NoorYes
Yes.
X Press ato confirm the selection.
If you have selected Yes
Yes, the multifunction
display shows a confirmation message.
For safety reasons, not all functions will be
reset: the Limit speed (winter tyres) Limit speed (winter tyres) per-166
Menus and submenusOn-board computer and displays
Page 227 of 289
Using a mobile phone
To connect a mobile phone to the exterior aerial
and charge it, insert it into the mobile phone
bracket.
X Open the telephone compartment
(Y page 218).
X Place the mobile phone bracket into the pre-
installed fitting; see the separate installation
instructions for the mobile phone fitting.
X Insert the mobile phone into the mobile phone
bracket; see the separate installation instruc- tions for the mobile phone fitting.
i The mobile phone can also be operated
without being in the bracket. However, the
charging function and aerial function are not
available.
In order to use Bluetooth ®
(SAP profile) on your
telephone module, you must first insert the tele-
phone module into the pre-installed fitting. This connects it to the exterior aerial. If you wish to
charge the mobile phone, then you must con-
nect it to a USB port.
Further information on the telephone module
with Bluetooth ®
(SAP profile) can be found in the
Digital Owner's Manual.
Operating the mobile phone You can operate the telephone using the
6
and ~ buttons on the multifunction steering
wheel. You can operate other mobile phone
functions via the on-board computer
(Y page 162).
When you remove the key from the ignition lock, the mobile phone is disconnected from the vehi-cle. You can then no longer make calls using the
hands-free system.
If a call is active and you remove the key from
the ignition lock, the conversation is transferred over to the mobile phone. It is then possible to
continue the conversation on the mobile phone. Rear spoiler
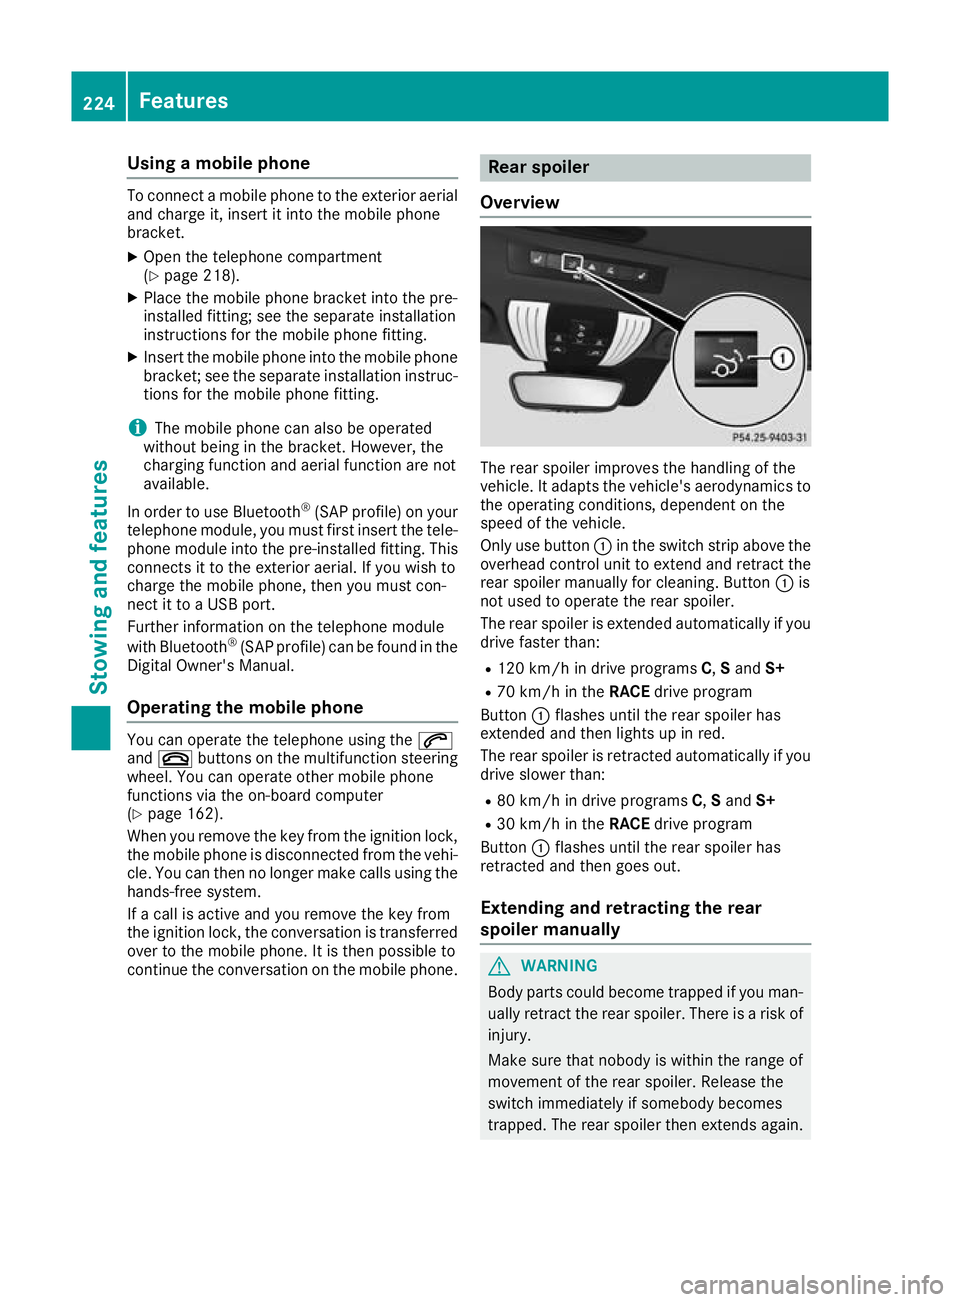
Overview The rear spoiler improves the handling of the
vehicle. It adapts the vehicle's aerodynamics to
the operating conditions, dependent on the
speed of the vehicle.
Only use button :in the switch strip above the
overhead control unit to extend and retract the
rear spoiler manually for cleaning. Button :is
not used to operate the rear spoiler.
The rear spoiler is extended automatically if you
drive faster than:
R 120 km/ hin drive programs C,Sand S+
R 70 km/h in the RACEdrive program
Button :flashes until the rear spoiler has
extended and then lights up in red.
The rear spoiler is retracted automatically if you
drive slower than:
R 80 km/h in drive programs C,Sand S+
R 30 km/h in the RACEdrive program
Button :flashes until the rear spoiler has
retracted and then goes out.
Extending and retracting the rear
spoiler manually G
WARNING
Body parts could become trapped if you man- ually retract the rear spoiler. There is a risk of
injury.
Make sure that nobody is within the range of
movement of the rear spoiler. Release the
switch immediately if somebody becomes
trapped. The rear spoiler then extends again. 224
FeaturesStowing and features