2016 MERCEDES-BENZ AMG GT ROADSTER change time
[x] Cancel search: change timePage 4 of 289
Welcome to the world of Mercedes-Benz
Before you drive off for the first time, read this
Owner's Manual carefully and familiarise your-
self with your vehicle. For your own safety and a longer vehicle life, follow the instructions and
warning notices in this manual. Disregarding
them may result in damage to the vehicle or
personal injury.
The equipment or model designation of your
vehicle may vary according to:
R model
R order
R country variant
R availability
The illustrations in this manual show a left-hand-
drive vehicle. On right-hand-drive vehicles, the
layout of components and controls differs
accordingly.
Mercedes-Benz is constantly updating its vehi-
cles to the state of the art.
Mercedes-Benz therefore reserves the right to
introduce changes in the following areas:
R design
R equipment
R technical features
Consequently, the description may differ from
your vehicle in some cases.
The following are integral parts of the vehicle:
R Digital Owner's Manual
R Printed Owner's Manual
R Service Booklet
R Equipment-dependent supplements
Keep these documents in the vehicle at all
times. If you sell the vehicle, always pass all
documents on to the new owner.
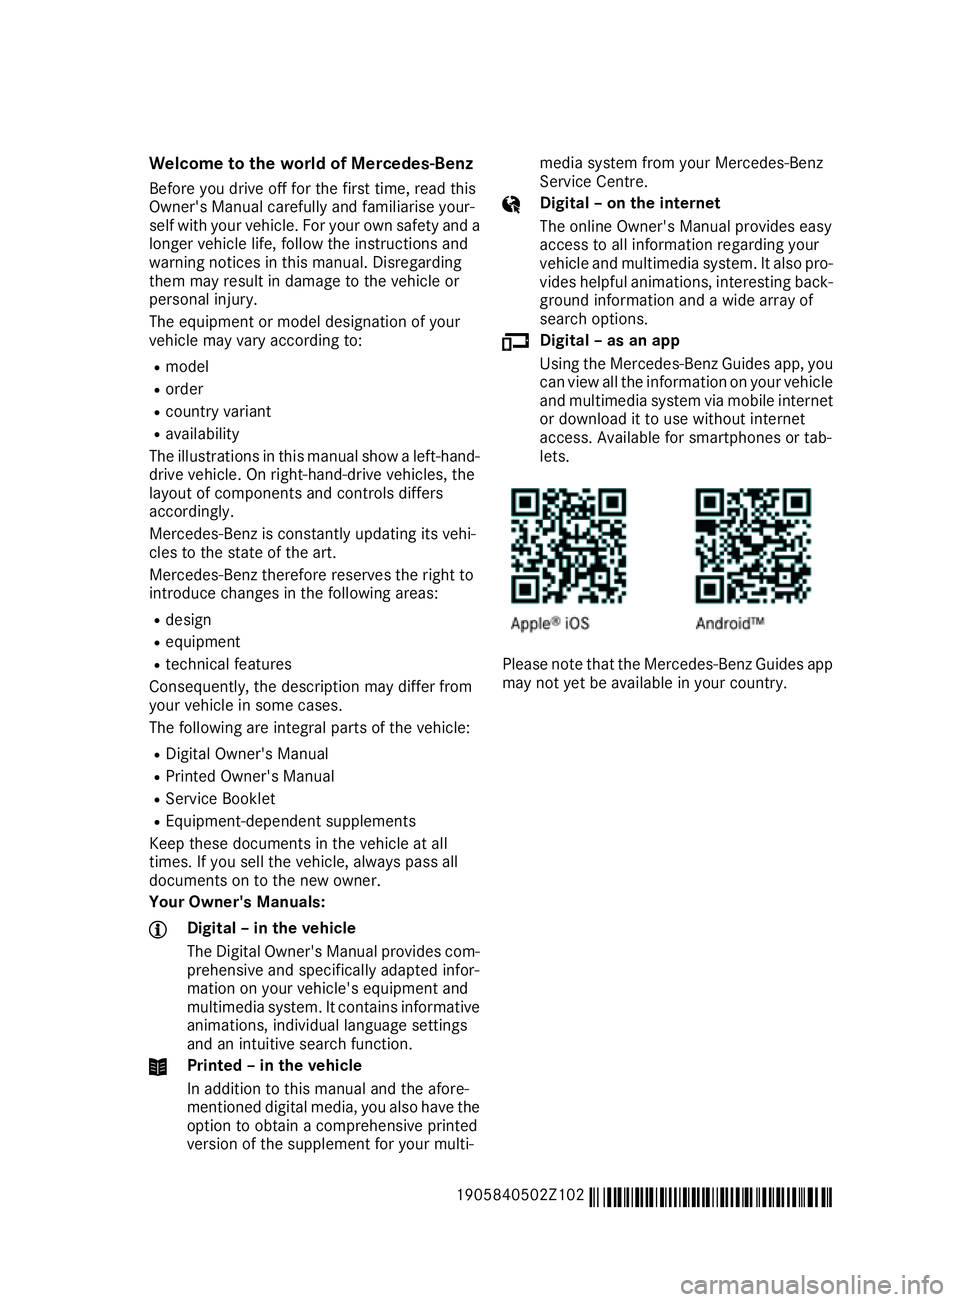
Your Owner's Manuals: Digital – in the vehicle
The Digital Owner's Manual provides com-
prehensive and specifically adapted infor-
mation on your vehicle's equipment and
multimedia system. It contains informative animations, individual language settings
and an intuitive search function. Printed – in the vehicle
In addition to this manual and the afore-
mentioned digital media, you also have the option to obtain a comprehensive printed
version of the supplement for your multi- media system from your Mercedes-Benz
Service Centre. Digital – on the internet
The online Owner's Manual provides easy
access to all information regarding your
vehicle and multimedia system. It also pro-
vides helpful animations, interesting back-
ground information and a wide array of
search options. Digital – as an app
Using the Mercedes-Benz Guides app, you
can view all the information on your vehicle and multimedia system via mobile internet or download it to use without internet
access. Available for smartphones or tab-
lets. Please note that the Mercedes-Benz Guides app
may not yet be available in your country.
1905840502Z102 É1905840502Z102pËÍ
Page 25 of 289
Environmental protection
General notes
H
Environmental note
Daimler's declared policy is one of compre-
hensive environmental protection.
Our objectives are to use the natural resour-
ces which form the basis of our existence on
this planet sparingly and in a manner which
takes the requirements of both nature and
humanity into consideration.
You too can help to protect the environment
by operating your vehicle in an environmen-
tally-responsible manner.
Fuel consumption and the rate of engine,
transmission, brake and tyre wear depend on
the following factors:
R operating conditions of your vehicle
R your personal driving style
You can influence both factors. Therefore,
please bear the following in mind:
Operating conditions:
R avoid short trips, as these increase fuel
consumption.
R observe the correct tyre pressure.
R do not carry any unnecessary weight in the
vehicle.
R remove the roof rack once you no longer
need it.
R a regularly serviced vehicle will contribute
to environmental protection. You should
therefore adhere to the service intervals.
R all maintenance work should be carried out
at a qualified specialist workshop.
Personal driving style:
R do not depress the accelerator pedal when
starting the engine.
R do not warm up the engine when the vehicle
is stationary.
R drive carefully and maintain a safe distance
from the vehicle in front.
R avoid frequent, sudden acceleration and
braking. R
change gear in good time and use each gear
only up to Ôof its maximum engine speed.
R switch off the engine in stationary traffic.
R monitor the vehicle's fuel consumption. Returning an end-of-life vehicle
EU countries only:
Mercedes-Benz will take back your end-of-life
vehicle for environmentally friendly disposal in
accordance with the European Union (EU) End-
Of-Life Vehicles Directive.
A network of vehicle take-back points and dis-
mantlers has been established for you to return
your vehicle. You can leave it at any of these
points free of charge. This makes an important
contribution to closing the recycling circle and
conserving resources.
For further information about the recycling and
disposal of end-of-life vehicles, and the take-
back conditions, please visit the national
Mercedes-Benz website for your country. Genuine Mercedes-Benz parts
H
Environmental note
Daimler AG also supplies reconditioned
assemblies and parts which are of the same
quality as new parts. For these, the same war-
ranty applies as for new parts.
! Airbags and seat belt tensioners, as well as
control units and sensors for these restraint
systems, may be installed in the following
areas of your vehicle:
R doors
R door pillars
R door sills
R seats
R dashboard
R instrument cluster
R centre console
Do not install accessories such as audio sys-
tems in these areas. Do not carry out repairs
or welding. You could impair the operating
efficiency of the restraint systems. 22
Genuine Mercedes-Benz partsIntroduction
Page 26 of 289
Have accessories retrofitted at a qualified
specialist workshop.
You could jeopardise the operating safety of
your vehicle if you use parts, tyres and wheels as
well as accessories relevant to safety that have not been approved by Mercedes-Benz. This
could lead to malfunctions in safety-relevant
systems, e.g. the brake system. Use only genu-
ine Mercedes-Benz parts or parts of equal qual- ity. Use only tyres, wheels and accessories that
have been specifically approved for your vehi-
cle.
Mercedes-Benz tests genuine parts and conver-
sion parts and accessories that have been spe-
cifically approved for your vehicle for their reli-
ability, safety and suitability. Despite ongoing
market research, Mercedes-Benz is unable to
assess other parts. Mercedes-Benz therefore
accepts no responsibility for the use of such
parts in Mercedes-Benz vehicles, even if they
have been officially approved or independently
approved by a testing centre.
In Germany, certain parts are officially approved for installation or modification only if they com-
ply with legal requirements. This also applies to some other countries. All genuine Mercedes-
Benz parts meet the approval requirements. The
use of non-approved parts may invalidate the
vehicle's general operating permit.
This is the case:
R if they cause a change of the vehicle type from
that for which the vehicle's general operating permit was granted
R if other road users could be endangered
R if the emission or noise levels are adversely
affected
Always specify the vehicle identification number (VIN) (Y page 276) when ordering genuine
Mercedes-Benz parts. Owner's Manual
Vehicle equipment
i This Owner's Manual describes all models
and all standard and optional equipment
available for your vehicle at the time of pub-
lication of the Owner's Manual. Country-spe-
cific differences are possible. Note that your
vehicle may not be fitted with all features
described. This is also the case for systems
and functions relevant to safety. Therefore, the equipment on your vehicle may differ from
that in the descriptions and illustrations.
The original purchase contract documentation
for your vehicle contains a list of all the systems in your vehicle.
Should you have any questions concerning
equipment and operation, please consult a
Mercedes-Benz Service Centre.
The Owner's Manual and Service Booklet are
important documents and should be kept in the
vehicle. Operating safety
Important safety notes
G
WARNING
If you do not have the prescribed service/
maintenance work or necessary repairs car-
ried out, this could result in malfunctions or
system failures. There is a risk of an accident. Always have the prescribed service/mainte-
nance work as well as necessary repairs car-
ried out at a qualified specialist workshop. G
WARNING
Flammable material such as leaves, grass or
twigs may ignite if they come into contact with hot parts of the exhaust system. There is a risk of fire.
When driving off road or on unpaved roads,
check the vehicle's underside regularly. In
particular, remove parts of plants or other
flammable materials which have become
trapped. In the case of damage, contact a
qualified specialist workshop. G
WARNING
Modifications to electronic components, their software as well as wiring could affect their
function and/or the operation of other net-
worked components. This could in particular
also be the case for systems relevant to
safety. They might not function properly any-
more and/or jeopardise the operational
safety of the vehicle. There is an increased
risk of an accident and injury. Operating safety
23Introduction
Z
Page 33 of 289
Multifunction steering wheel
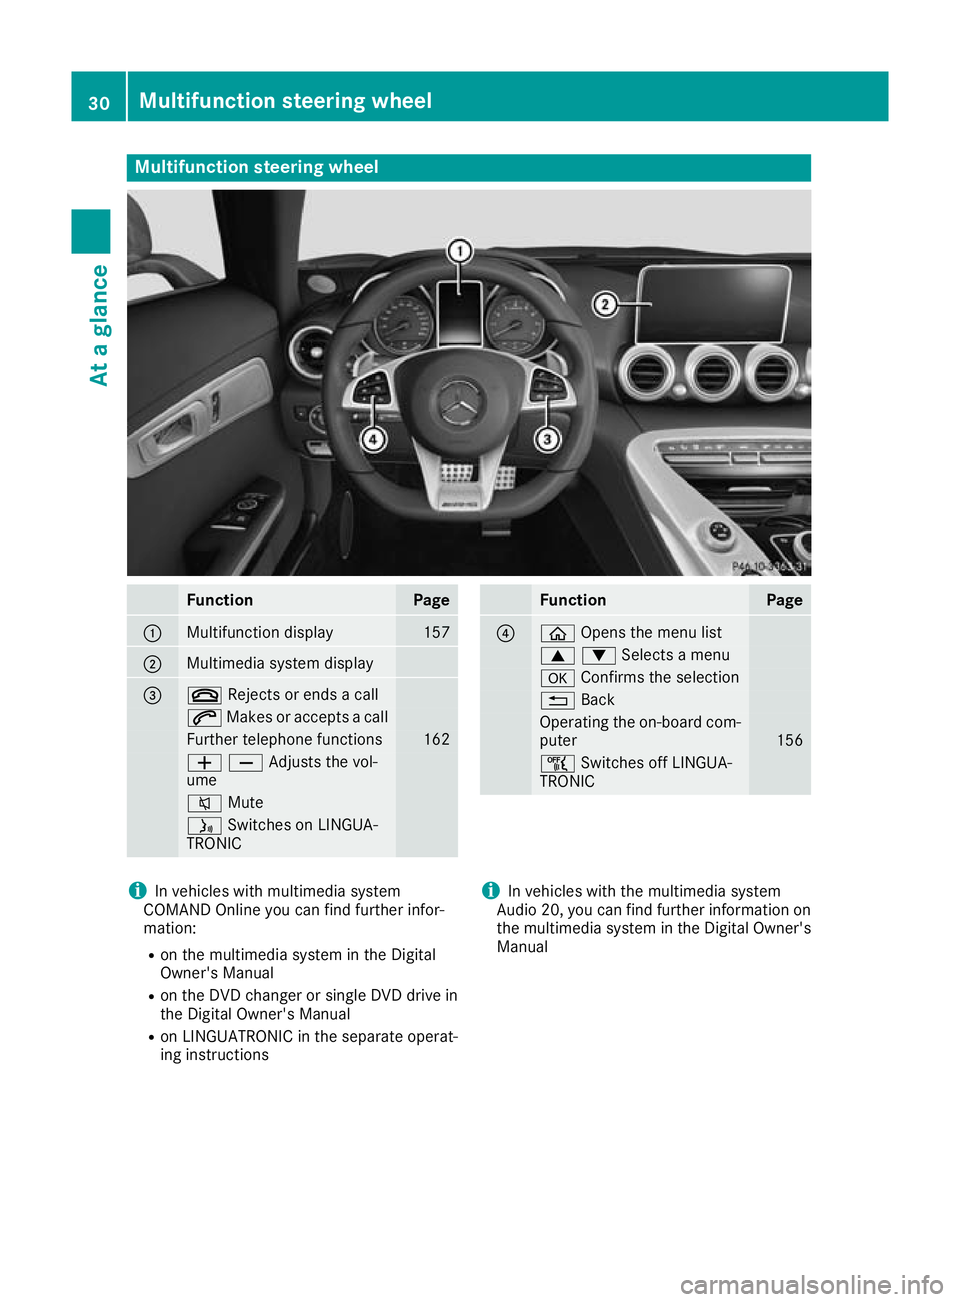
Function Page
:
Multifunction display 157
;
Multimedia system display
=
~
Rejects or ends a call 6
Makes or accepts a call Further telephone functions 162
WXAdjusts the vol-
ume
8
Mute ó
Switches on LINGUA-
TRONIC Function Page
?
ò
Opens the menu list 9:Selects a menu
a
Confirms the selection %
Back Operating the on-board com-
puter 156
ñ
Switches off LINGUA-
TRONIC i
In vehicles with multimedia system
COMAND Online you can find further infor-
mation:
R on the multimedia system in the Digital
Owner's Manual
R on the DVD changer or single DVD drive in
the Digital Owner's Manual
R on LINGUATRONIC in the separate operat-
ing instructions i
In vehicles with the multimedia system
Audio 20, you can find further information on
the multimedia system in the Digital Owner's
Manual 30
Multifunction steering wheelAt a glance
Page 68 of 289
Deactivating and activating
If you do not intend to use the vehicle for an
extended period of time, you can deactivate
KEYLESS-GO. The key will then use very little
power, thereby conserving battery power. For
the purposes of activation or deactivation, the
vehicle does not have to be nearby.
X To deactivate: press the&button on the
key twice in rapid succession.
The battery check lamp of the key flashes
twice briefly and lights up once, then KEY-
LESS-GO is deactivated (Y page 66).
X To activate: press any button on the key.
or X Insert the key into the ignition lock.
KEYLESS-GO and all of its associated features
are available again. KEYLESS-GO start function
General notes Bear in mind that the engine can be started by
any of the vehicle occupants if there is a key in
the vehicle (Y page 104). Changing the settings of the locking
system
You can change the settings of the locking sys-
tem. This means that only the driver's door and
the fuel filler flap are unlocked when the vehicle is unlocked. This is useful if you frequently travel
alone.
X To change the setting: press and hold down
the % and& buttons simultaneously
for about six seconds until the battery indica-
tor lamp flashes twice (Y page 66).
If the setting of the locking system is changed
within the signal range of the vehicle, pressing
the & or% button:
R locks or
R unlocks the vehicle
The key now functions as follows:
X To unlock: press the%button once.
X To unlock centrally: press the%button
twice.
X To lock: press the &button. The KEYLESS-GO functions can be changed as
follows:
X To unlock the driver's door: touch the inner
surface of the door handle on the driver's
door.
X To unlock centrally: touch the inner surface
of the front-passenger door handle.
X To lock centrally: touch the outer sensor
surface on one of the door handles.
X To restore the factory settings: press and
hold down the %and& buttons simul-
taneously for approximately six seconds until
the battery check lamp flashes twice
(Y page 66). Emergency key element
General notes If the vehicle can no longer be unlocked with the
key or KEYLESS-GO, use the emergency key ele-
ment.
If you use the emergency key element to unlock
and open the driver's door, the anti-theft alarm
system will be triggered. Switch off the alarm
(Y page 60).
If you unlock the vehicle using the emergency
key element, the fuel filler flap will not be
unlocked automatically.
X To unlock the fuel filler flap: insert the key
into the ignition lock.
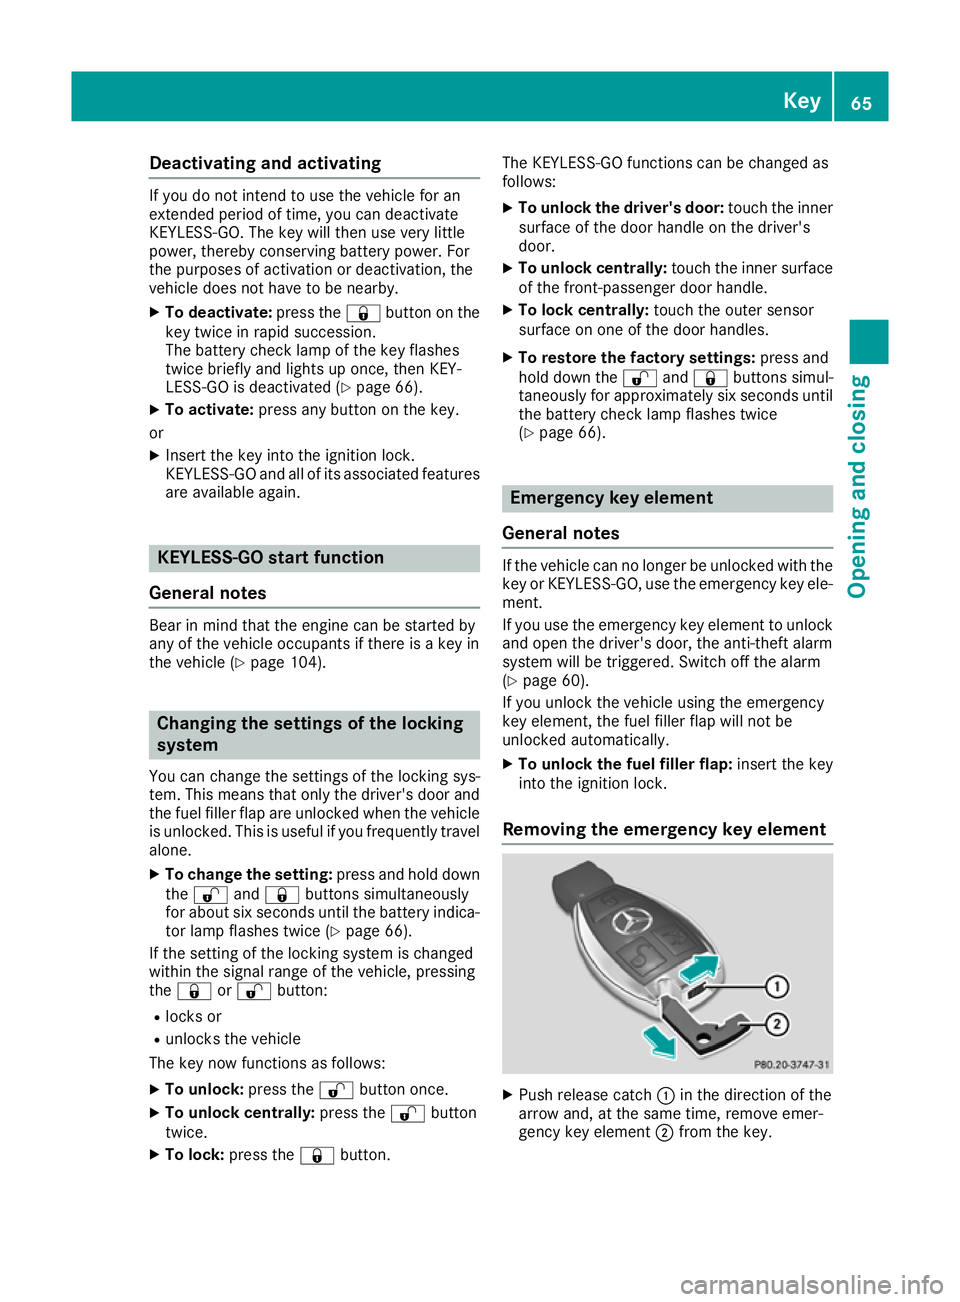
Removing the emergency key element X
Push release catch :in the direction of the
arrow and, at the same time, remove emer-
gency key element ;from the key. Key
65Opening and closing Z
Page 88 of 289
Folding the exterior mirrors in/out elec-
trically X
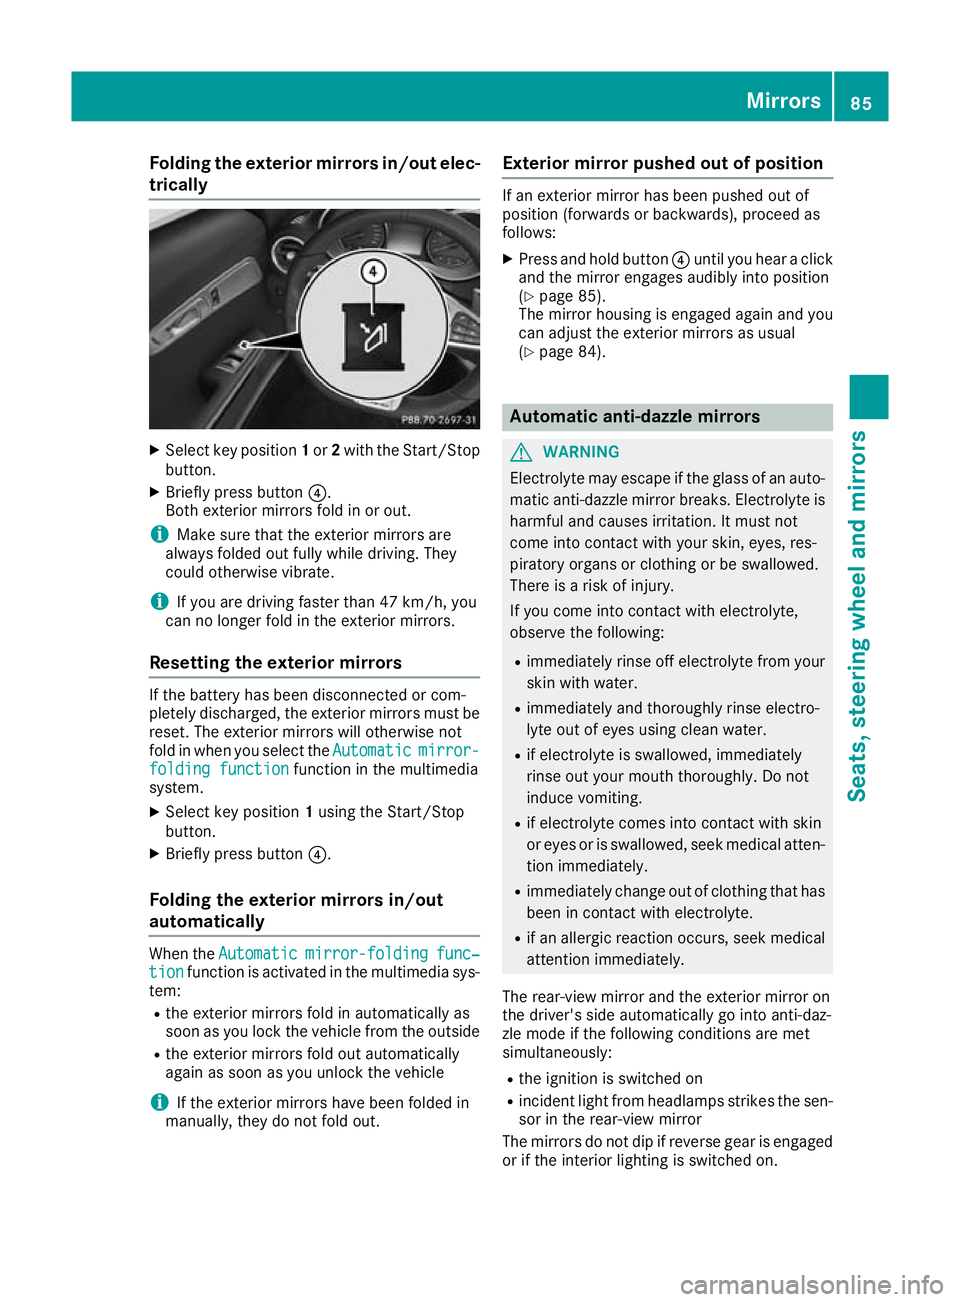
Select key position 1or 2with the Start/Stop
button.
X Briefly press button ?.
Both exterior mirrors fold in or out.
i Make sure that the exterior mirrors are
always folded out fully while driving. They
could otherwise vibrate.
i If you are driving faster than 47 km/h, you
can no longer fold in the exterior mirrors.
Resetting the exterior mirrors If the battery has been disconnected or com-
pletely discharged, the exterior mirrors must be
reset. The exterior mirrors will otherwise not
fold in when you select the Automatic Automaticmirror-
mirror-
folding function
folding function function in the multimedia
system.
X Select key position 1using the Start/Stop
button.
X Briefly press button ?.
Folding the exterior mirrors in/out
automatically When the
Automatic
Automatic mirror-folding
mirror-folding func‐
func‐
tion
tion function is activated in the multimedia sys-
tem:
R the exterior mirrors fold in automatically as
soon as you lock the vehicle from the outside
R the exterior mirrors fold out automatically
again as soon as you unlock the vehicle
i If the exterior mirrors have been folded in
manually, they do not fold out. Exterior mirror pushed out of position If an exterior mirror has been pushed out of
position (forwards or backwards), proceed as
follows:
X Press and hold button ?until you hear a click
and the mirror engages audibly into position
(Y page 85).
The mirror housing is engaged again and you
can adjust the exterior mirrors as usual
(Y page 84). Automatic anti-dazzle mirrors
G
WARNING
Electrolyte may escape if the glass of an auto- matic anti-dazzle mirror breaks. Electrolyte is
harmful and causes irritation. It must not
come into contact with your skin, eyes, res-
piratory organs or clothing or be swallowed.
There is a risk of injury.
If you come into contact with electrolyte,
observe the following:
R immediately rinse off electrolyte from your
skin with water.
R immediately and thoroughly rinse electro-
lyte out of eyes using clean water.
R if electrolyte is swallowed, immediately
rinse out your mouth thoroughly. Do not
induce vomiting.
R if electrolyte comes into contact with skin
or eyes or is swallowed, seek medical atten-
tion immediately.
R immediately change out of clothing that has
been in contact with electrolyte.
R if an allergic reaction occurs, seek medical
attention immediately.
The rear-view mirror and the exterior mirror on
the driver's side automatically go into anti-daz-
zle mode if the following conditions are met
simultaneously:
R the ignition is switched on
R incident light from headlamps strikes the sen-
sor in the rear-view mirror
The mirrors do not dip if reverse gear is engaged or if the interior lighting is switched on. Mirrors
85Seats, steering wheel and mirrors Z
Page 100 of 289
Problems with the "Cooling with air dehumidification" function
Problem
Possible causes/consequences and
M
MSolutions The indicator lamp over
the
¿ rocker switch
flashes three times or
remains off. The cooling
with air dehumidification
function cannot be acti-
vated via the multimedia system any longer
(Y page 209). The cooling with air dehumidification function has been deactivated
due to a malfunction.
X Consult a qualified specialist workshop. Setting climate control to automatic
mode
General notes In automatic mode, the set temperature is main-
tained automatically at a constant level. The
system automatically regulates the temperature of the dispensed air, the airflow and the air dis- tribution.
The "Cooling with air dehumidification" function
is activated automatically in automatic mode.
Automatic control X
Select key position 2with the Start/Stop but-
ton (Y page 103).
X Set the desired temperature using the w
rocker switch.
X To activate: press theÃrocker switch up
or down.
The indicator lamp above the Ãrocker
switch lights up.
X To switch to manual operation:press the
H rocker switch up or down.
or X Press the upper or lower section of the _
rocker switch.
In automatic mode, if you adjust the airflow or
air distribution manually, the indicator lamp
above the Ãrocker switch goes out. The
function which has not been changed manually,
however, continues to be controlled automati-
cally. When the manually set function switches
back to automatic mode, the indicator lamp
above the Ãrocker switch lights up again. Setting the temperature
Different temperatures can be set for the driv-
er's and front-passenger sides.
X Select key position 2with the Start/Stop but-
ton (Y page 103).
X To increase or reduce: press thew
rocker switch up or down.
Only change the temperature setting in small
increments. Start at 22 †. Setting the air distribution
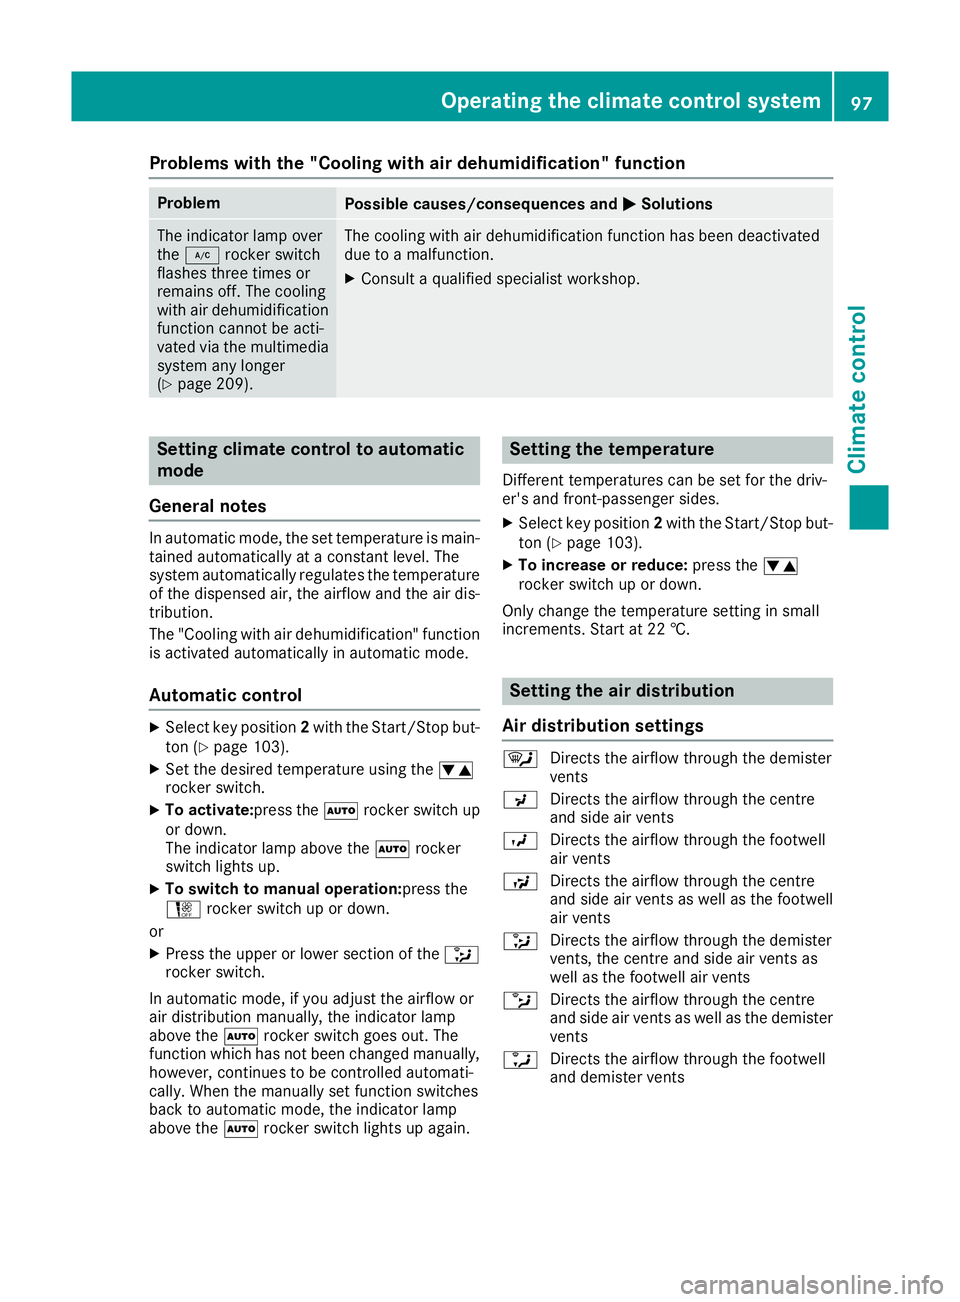
Air distribution settings ¯
Directs the airflow through the demister
vents
P Directs the airflow through the centre
and side air vents
O Directs the airflow through the footwell
air vents
S Directs the airflow through the centre
and side air vents as well as the footwell
air vents
_ Directs the airflow through the demister
vents, the centre and side air vents as
well as the footwell air vents
b Directs the airflow through the centre
and side air vents as well as the demister
vents
a Directs the airflow through the footwell
and demister vents Operating the climate control system
97Climate control
Page 101 of 289
Setting
X
Select key position 2with the Start/Stop but-
ton (Y page 103).
X Press the _rocker switch up or down.
The various air distribution settings appear in
the multimedia system. Setting the airflow
X Select key position 2with the Start/Stop but-
ton (Y page 103).
X To increase or reduce: press theH
rocker switch up or down. Activating/deactivating the synchro-
nisation function
General notes Climate control can be set centrally using the
synchronisation function. The temperature set-
ting is adopted for the front-passenger side.
Activating/deactivating X
Press the 0rocker switch up or down.
The indicator lamp above the 0rocker
switch lights up or goes out.
The synchronisation function is deactivated if
the settings for the front-passenger side are
changed. Demisting the windscreen
General notes You can use this function to defrost the wind-
screen or to demist the inside of the windscreen and the front side windows.
Switch off the windscreen demisting function as
soon as the windscreen is clear again. Switching on/off X
Select key position 2with the Start/Stop but-
ton (Y page 103).
X To switch on:press the ¬rocker switch
up or down.
The indicator lamp above the ¬rocker
switch lights up. The current climate control
settings are deactivated.
The climate control system switches to the
following functions:
R high airflow
R high temperature
R air distribution to the windscreen and front
side windows
R air-recirculation mode off
i If necessary, the "Cooling with air dehumid-
ification" function is activated. In this case,
the indicator lamp above the ¿rocker
switch remains switched off.
X To switch off: press the¬rocker switch
up or down.
The indicator lamp above the ¬rocker
switch goes out. The previous settings are
reactivated. Air-recirculation mode remains
deactivated. Demisting the windows
Windows misted up on the inside X
Activate the "Cooling with air dehumidifica-
tion" function with the ¿rocker switch.
X Switch on automatic mode using the Ã
rocker switch.
X If the windows continue to mist up, activate
the windscreen demisting function using the
¬ rocker switch.
i You should only select this setting until the
windscreen is clear again.
Windows misted up on the outside X
Switch on the windscreen wipers.
X Switch on automatic mode using the Ã
rocker switch.
i If you clean the windows regularly, they do
not mist up so quickly. 98
Operating the climate control systemClimate control