2016 MERCEDES-BENZ AMG GT ROADSTER bonnet
[x] Cancel search: bonnetPage 8 of 289

Hiding a service message .............. 237
Resetting the service interval dis-
play ................................................ 237
Service message ............................ 236
Special service requirements ......... 237
ATA (Anti-Theft Alarm system)
Activating/deactivating ................... 60
Function ........................................... 60
Switching off the alarm .................... 60
ATTENTION ASSIST
Activating/deactivating ................. 165
Display messag e............................ 185
Function/note s............................. 147
Authorised workshop
see Qualified specialist workshop
AUTO lights
Display message ............................ 182
see Lights
Automatic engine start (ECO start/
stop function) .................................... 106
Automatic engine switch-off (ECO
start/stop function) .......................... 105
Automatic front-passenger front
airbag deactivation system
Operation ......................................... 42
Problems ......................................... 45
System self-test ............................... 44
Automatic headlamp mode ................ 88
Automatic transmission
Accelerator pedal position ............. 112
Automatic drive program ............... 114
Changing gear ............................... 112
Display message ............................ 190
Double-clutch function .................. 112
Drive program display .................... 111
Driving tips .................................... 112
Emergency running mode .............. 117
Gliding mod e................................. 112
Kickdown ....................................... 112
Manual drive progra m.................... 114
Manual mod e................................. 115
Oil temperature (on-board com-
puter) ............................................. 167
Overview ........................................ 109
Problem (fault) ............................... 117
Pulling away ................................... 104
Rocking the vehicle free ................ 112
Starting the engine ........................ 104 Steering wheel gearshift paddle
s... 113
Transmission position display ........ 111
Transmission positions .................. 111
Automatic transmission emer-
gency running mode ......................... 117 B
Back button ....................................... 206
BAS (Brake Assist System) ................. 54
Battery (key)
Checking .......................................... 66
Important safety notes .................... 66
Replacing ......................................... 66
Battery (vehicle)
Charging ........................................ 252
Display message ............................ 184
Important safety notes .................. 250
Jump starting ................................. 253
Belt
see Seat belts
Belt tensioner
Activation ......................................... 46
Blind Spot Assist
Activating/deactivating (on-
board computer) ............................ 165
Display message ............................ 186
Notes/function .............................. 151
Bluetooth ®
Connecting a different mobile
phone ............................................ 212
Searching for a mobile phone ........ 211
See also Digital Owner's Manua l... 205
Telephony ...................................... 211
Bonnet
Closing ........................................... 233
Display message ............................ 192
Important safety notes .................. 232
Opening ......................................... 232
Boot load (maximum) ........................ 281
Boot separator ................................... 218
Brake
EBD .................................................. 60
Brake Assist
see BAS (Brake Assist System)
Brake fluid
Display message ............................ 176
Notes ............................................. 279 Index
5
Page 30 of 289

Cockpit
Function Page
:
Combination switch 89
;
Steering wheel gearshift pad-
dles 113
=
Instrument cluster 29
?
Overhead control panel 32
A
Climate control systems 96
B
Horn
C
Adjusts the steering wheel
electrically 83 Function Page
D
Cruise control lever 126
E
Unlocks the tailgate 73
F
Electric parking brake 121
G
Diagnostics connection 25
H
Opens the bonnet 232
I
Rear fog lamp 89
J
Light switch 88Cockpit
27At a glance
Page 31 of 289

Function Page
:
Overhead control panel 32
;
Combination switch 89
=
Steering wheel gearshift pad-
dles 113
?
Instrument cluster 29
A
Rear fog lamp 89
B
Light switch 88
C
Opens the bonnet 232 Function Page
D
Diagnostics connection 25
E
Electric parking brake 121
F
Unlocks the tailgate 73
G
Horn
H
Adjusts the steering wheel
electrically
83
I
Cruise control lever 126
J
Climate control systems 9628
CockpitAt a glance
Page 63 of 289
EBD (electronic brake force distribu-
tion)
General notes EBD monitors and controls the brake pressure
on the rear wheels to improve driving stability
while braking.
Important safety notes i
Observe the "Important safety notes" sec-
tion (Y page 54). G
WARNING
If EBD is malfunctioning, the rear wheels can
lock, e.g. under full braking. This increases the risk of skidding and an accident.
You should therefore adapt your driving style
to the different handling characteristics. Have the brake system checked at a qualified spe-
cialist workshop.
Observe information regarding indicator and
warning lamps (Y page 197) as well as display
messages (Y page 174). ADAPTIVE BRAKE
ADAPTIVE BRAKE enhances braking safety and
offers increased braking comfort. In addition to
the braking function, ADAPTIVE BRAKE also fea-
tures the hill start assist function (Y page 104).Protection against theft
Immobiliser
The immobiliser prevents your vehicle from
being started without the correct key.
X To activate with KEYLESS-GO start func-
tion or KEYLESS-GO: switch the ignition off
and open the driver's door.
X To activate with the key: remove the key
from the ignition lock.
X To deactivate: switch on the ignition.
When leaving the vehicle, always take the key
with you and lock the vehicle. Anyone can start
the engine if a valid key has been left inside the
vehicle. i
The immobiliser is always deactivated when
you start the engine. ATA (Anti-Theft Alarm system)
X
To prime: lock the vehicle with the key or
KEYLESS-GO.
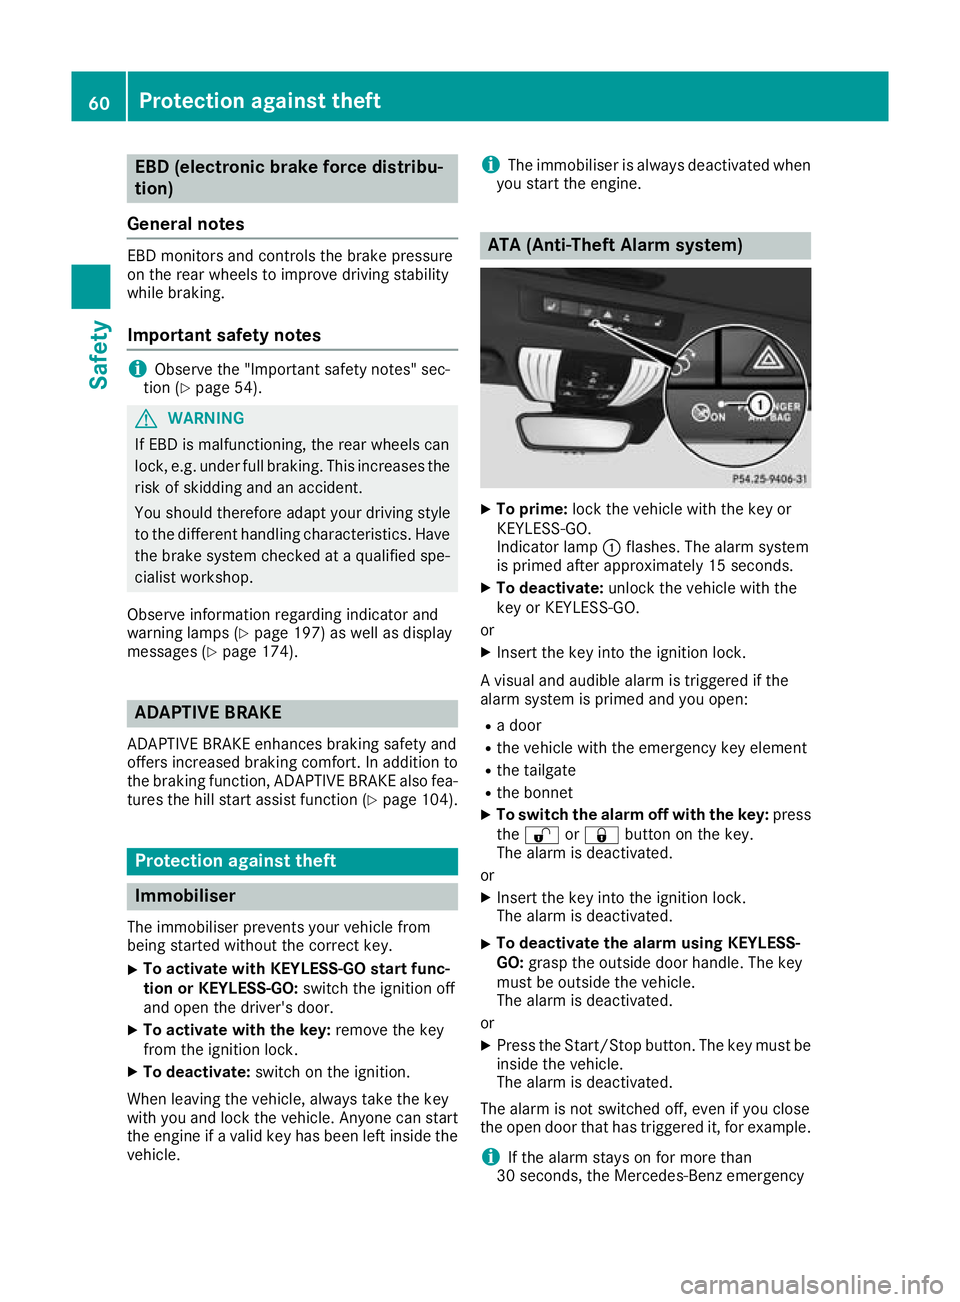
Indicator lamp :flashes. The alarm system
is primed after approximately 15 seconds.
X To deactivate: unlock the vehicle with the
key or KEYLESS-GO.
or X Insert the key into the ignition lock.
A visual and audible alarm is triggered if the
alarm system is primed and you open: R a door
R the vehicle with the emergency key element
R the tailgate
R the bonnet
X To switch the alarm off with the key: press
the % or& button on the key.
The alarm is deactivated.
or X Insert the key into the ignition lock.
The alarm is deactivated.
X To deactivate the alarm using KEYLESS-
GO: grasp the outside door handle. The key
must be outside the vehicle.
The alarm is deactivated.
or X Press the Start/Stop button. The key must be
inside the vehicle.
The alarm is deactivated.
The alarm is not switched off, even if you close
the open door that has triggered it, for example.
i If the alarm stays on for more than
30 seconds, the Mercedes‑ Benz emergency60
Protection against theftSafety
Page 95 of 289
adjusted via the multimedia system (see the
separate operating instructions). Replacing bulbs
The front and rear light clusters of your vehicle
are equipped with LED bulbs. Do not replace the bulbs yourself. Contact a qualified specialist
workshop with the necessary specialist knowl-
edge and tools to carry out the work required.
The light clusters are an important aspect of
vehicle safety. You must therefore make sure
that these function correctly at all times. Have
the headlamp setting checked regularly. Windscreen wipers
Switching the windscreen wipers on/
off
! Do not operate the windscreen wipers when
the windscreen is dry, as this could damage
the wiper blades. Moreover, dust that has col-
lected on the windscreen can scratch the
glass if wiping takes place when the wind-
screen is dry.
If it is necessary to switch on the windscreen wipers in dry weather conditions, always
operate them using washer fluid.
! If the windscreen wipers leave smears on
the windscreen after the vehicle has been
washed in an automatic car wash, this may be
due to wax or other residue. Clean the wind-
screen with washer fluid after an automatic
car wash.
! Intermittent wiping with rain sensor: due to
optical influences and the windscreen becom-
ing dirty in dry weather conditions, the wind-
screen wipers may be activated inadvertently. This could damage the windscreen wiper
blades or scratch the windscreen.
For this reason, you should always switch off
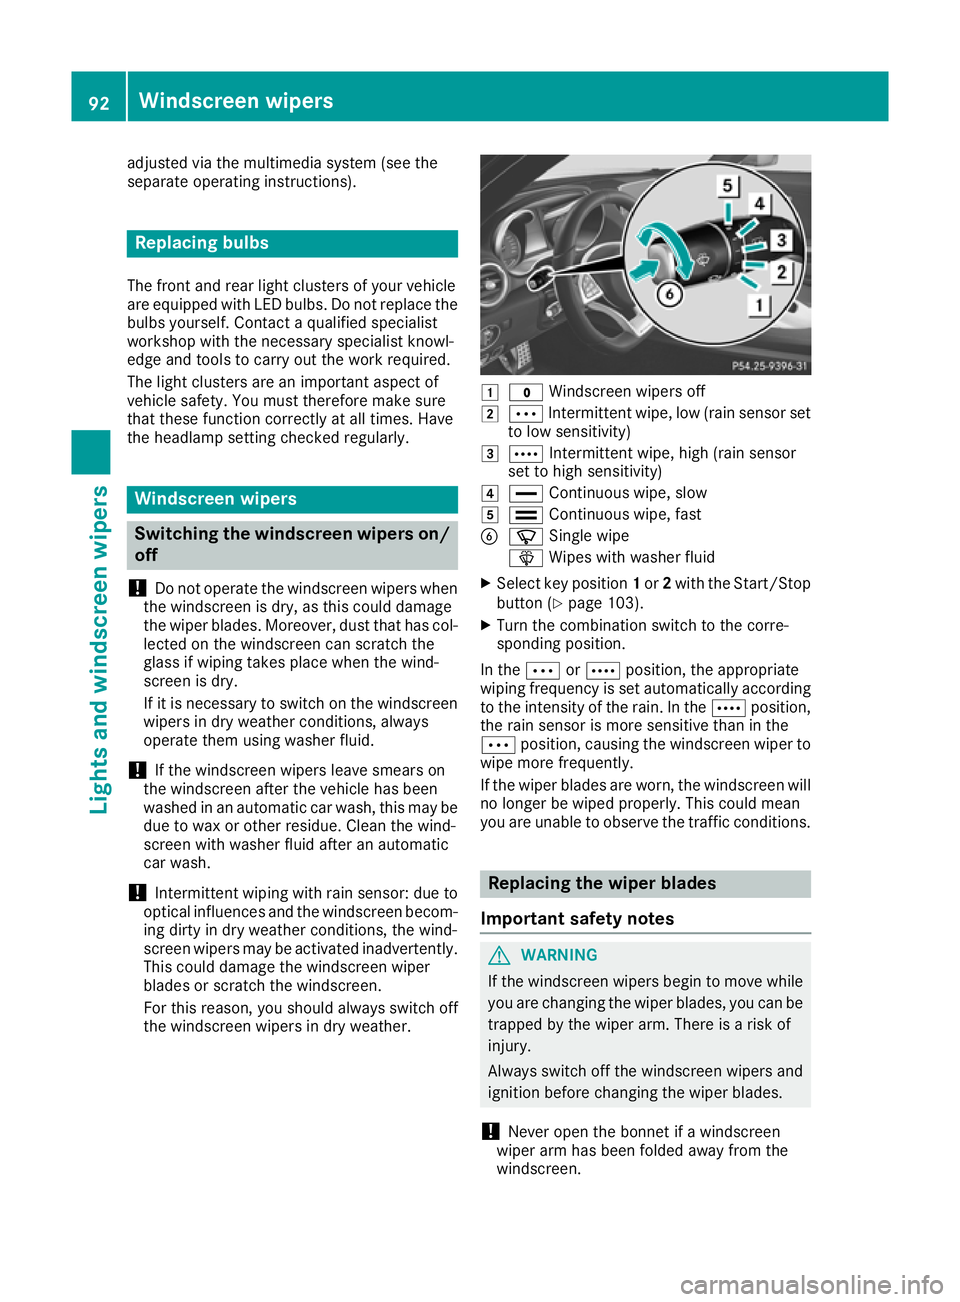
the windscreen wipers in dry weather. 1
$ Windscreen wipers off
2 Ä Intermittent wipe, low (rain sensor set
to low sensitivity)
3 Å Intermittent wipe, high (rain sensor
set to high sensitivity)
4 ° Continuous wipe, slow
5 ¯ Continuous wipe, fast
B í Single wipe
î Wipes with washer fluid
X Select key position 1or 2with the Start/Stop
button (Y page 103).
X Turn the combination switch to the corre-
sponding position.
In the ÄorÅ position, the appropriate
wiping frequency is set automatically according to the intensity of the rain. In the Åposition,
the rain sensor is more sensitive than in the
Ä position, causing the windscreen wiper to
wipe more frequently.
If the wiper blades are worn, the windscreen will no longer be wiped properly. This could mean
you are unable to observe the traffic conditions. Replacing the wiper blades
Important safety notes G
WARNING
If the windscreen wipers begin to move while
you are changing the wiper blades, you can be trapped by the wiper arm. There is a risk of
injury.
Always switch off the windscreen wipers and
ignition before changing the wiper blades.
! Never open the bonnet if a windscreen
wiper arm has been folded away from the
windscreen. 92
Windscreen wipersLights and windscreen wipers
Page 103 of 289
make sure that no one has any parts of the
body within the closing area. G
WARNING
During convenience opening parts of the body could be drawn in or become trapped
between the side window and window frame.
There is a risk of injury.
When opening, make sure that nobody is
touching the side window. If someone
becomes trapped, immediately press
the W switch in the door to stop the move-
ment of the side windows. To continue closing
the side window, pull on the Wswitch.
X Convenience closing feature: press and
hold the grocker switch up or down until
the side windows start to close automatically. The indicator lamp above the grocker
switch lights up. Air-recirculation mode is
activated.
If you open the side windows manually after
closing them using the convenience closing
feature, they will remain in this position when
opened.
If parts of the body are in the closing area during convenience closing, proceed as follows:
X Press the Wbutton to stop the side win-
dows.
The side windows stop.
X To then open the side windows, press the
W button again.
Observe the notes on the automatic reversing
feature for the side windows (Y page 74).
X Convenience opening feature: press and
hold the grocker switch up or down until
the side windows start to open automatically.
The indicator lamp above the grocker
switch goes out. Air-recirculation mode is
deactivated. Air vents
Important safety notes
G
WARNING
Very hot or very cold air can flow from the air vents. This could result in burns or frostbite in the immediate vicinity of the air vents. There
is a risk of injury.
Make sure that all vehicle occupants always
maintain a sufficient distance to the air out-
lets. If necessary, redirect the airflow to
another area of the vehicle interior.
In order to ensure the direct flow of fresh air
through the air vents into the vehicle interior,
please observe the following notes:
R keep the air inlet between the windscreen and
the bonnet free of blockages, such as ice,
snow or leaves
R never cover the vents or ventilation grilles in
the vehicle interior Adjusting the air vents
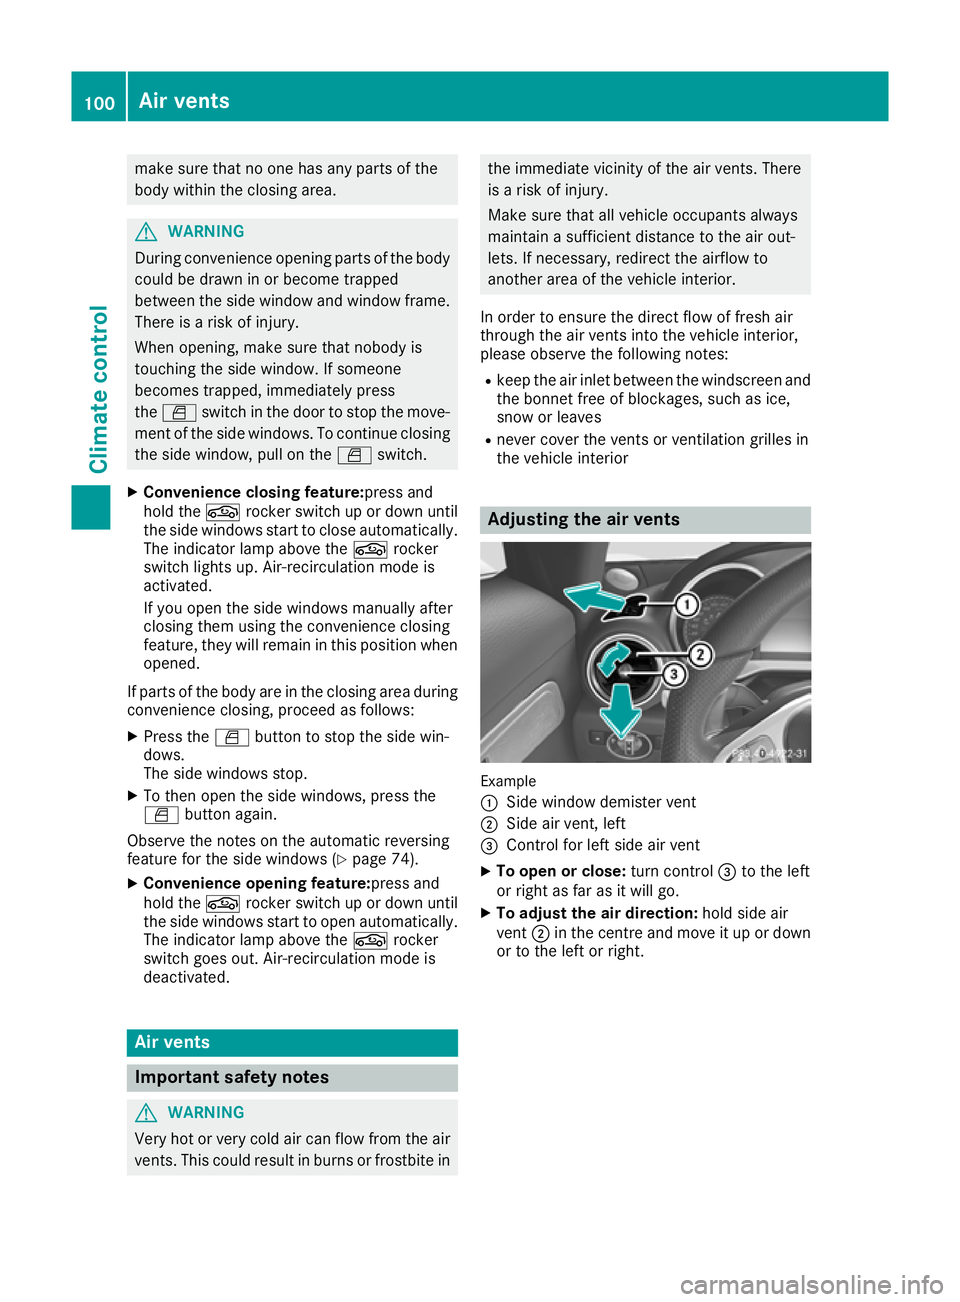
Example
:
Side window demister vent
; Side air vent, left
= Control for left side air vent
X To open or close: turn control=to the left
or right as far as it will go.
X To adjust the air direction: hold side air
vent ;in the centre and move it up or down
or to the left or right. 100
Air ventsClimate control
Page 108 of 289
Hill start assist is not active if:
R you are pulling away on a level road or a
downhill gradient
R the transmission is in position N
R the electric parking brake is applied
R ESP ®
is malfunctioning ECO start/stop function
Introduction The ECO start/stop function switches the
engine off automatically if the vehicle is stopped
under certain conditions.
When the vehicle pulls away again, the engine
starts automatically. The ECO start/stop func-
tion thereby helps you to reduce the fuel con-
sumption and emissions of your vehicle.
Important safety notes G
WARNING
If the engine is switched off automatically and you exit the vehicle, the engine is restarted
automatically. The vehicle may begin moving. There is a risk of accident and injury.
If you wish to exit the vehicle, always turn off
the ignition and secure the vehicle against
rolling away.
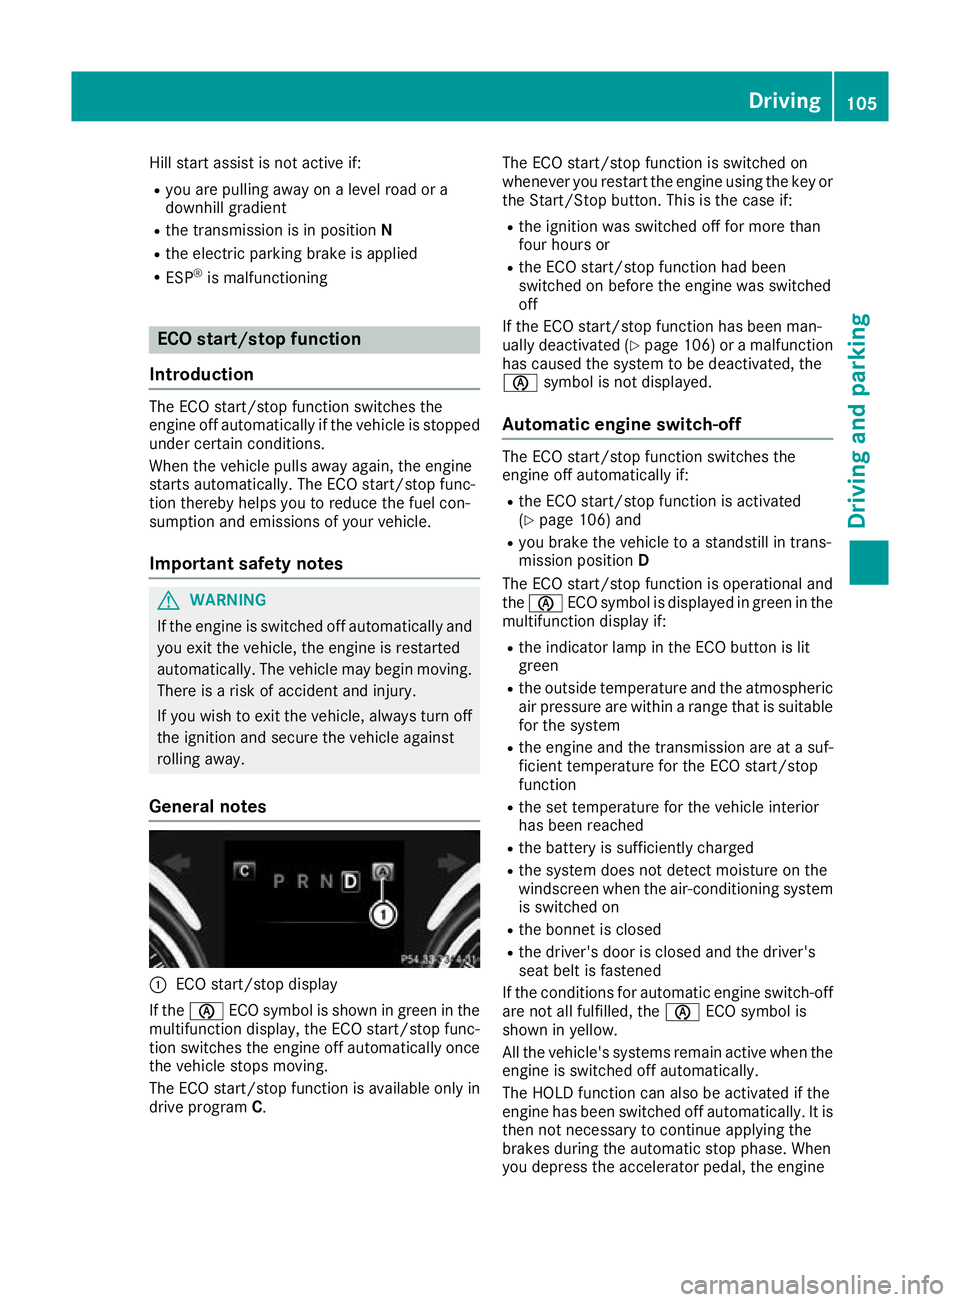
General notes :
ECO start/stop display
If the è ECO symbol is shown in green in the
multifunction display, the ECO start/stop func-
tion switches the engine off automatically once
the vehicle stops moving.
The ECO start/stop function is available only in
drive program C. The ECO start/stop function is switched on
whenever you restart the engine using the key or the Start/Stop button. This is the case if:
R the ignition was switched off for more than
four hours or
R the ECO start/stop function had been
switched on before the engine was switched
off
If the ECO start/stop function has been man-
ually deactivated (Y page 106) or a malfunction
has caused the system to be deactivated, the
è symbol is not displayed.
Automatic engine switch-off The ECO start/stop function switches the
engine off automatically if:
R the ECO start/stop function is activated
(Y page 106) and
R you brake the vehicle to a standstill in trans-
mission position D
The ECO start/stop function is operational and
the è ECO symbol is displayed in green in the
multifunction display if:
R the indicator lamp in the ECO button is lit
green
R the outside temperature and the atmospheric
air pressure are within a range that is suitable for the system
R the engine and the transmission are at a suf-
ficient temperature for the ECO start/stop
function
R the set temperature for the vehicle interior
has been reached
R the battery is sufficiently charged
R the system does not detect moisture on the
windscreen when the air-conditioning system
is switched on
R the bonnet is closed
R the driver's door is closed and the driver's
seat belt is fastened
If the conditions for automatic engine switch-off are not all fulfilled, the èECO symbol is
shown in yellow.
All the vehicle's systems remain active when the
engine is switched off automatically.
The HOLD function can also be activated if the
engine has been switched off automatically. It is then not necessary to continue applying the
brakes during the automatic stop phase. When
you depress the accelerator pedal, the engine Driving
105Driving and parking Z
Page 158 of 289
Important safety notes
G
WARNING
Operating the integrated information systems and communications equipment in the vehicle
while driving will distract you from traffic con-
ditions. You could then lose control of the
vehicle. There is a risk of an accident.
Only operate these devices if road traffic con-
ditions permit. If you are unsure about the
surrounding conditions, pull over to a safe
location and make entries only while the vehi-
cle is stationary.
You must observe the legal requirements for the country in which you are currently driving whenoperating the on-board computer. G
WARNING
If the instrument cluster has failed or mal-
functioned, you may not recognise function
restrictions relevant to safety. The operating
safety of your vehicle may be impaired. There is a risk of an accident.
Drive on carefully. Have the vehicle checked
at a qualified specialist workshop immedi-
ately.
The on-board computer only shows messages or warnings from certain systems in the multifunc-tion display. You should therefore make sure
your vehicle is operating safely at all times.
If the operating safety of your vehicle is
impaired, park the vehicle safely as soon as pos- sible. Contact a qualified specialist workshop.
For an overview, see the instrument cluster illus-
tration (Y page 29). Displays and operation
Speedometer with segments
The segments in the speedometer indicate
which speed range is available:
R Cruise control enabled (Y page 126):
The segments light up from the stored speed to the type-tested maximum speed.
R Variable SPEEDTRONIC enabled
(Y page 128): The segments light up from the start of the
scale to the selected speed limitation.
R DISTRONIC PLUS enabled (Y page 130):
One or two segments in the stored speed
range light up.
R DISTRONIC PLUS detects a vehicle in front
moving more slowly than the stored speed:
The segments between the speed of the vehi-
cle in front and the stored speed light up. Rev counter
! Do not drive in the overrevving range. Doing
so will damage the engine.
The red band in the rev counter indicates the
engine's overrevving range.
The fuel supply is interrupted to protect the
engine when the red band is reached. Outside temperature display
You should pay special attention to road condi-
tions when temperatures are around the freez-
ing point.
Bear in mind that the outside temperature dis-
play indicates the temperature measured and
does not record the road temperature.
The outside temperature display is in the multi-
function display (Y page 157).
Changes in the outside temperature are dis-
played after a short delay. Coolant temperature gauge
G
WARNING
If you open the bonnet while the engine is
overheating or while there is a fire in the
engine compartment, you could come into
contact with hot gases or other leaking ser-
vice products. There is a danger of injury.
Allow an overheating engine to cool down
before opening the bonnet. If there is a fire in the engine compartment, leave the bonnet
closed and notify the fire brigade.
The multifunction display shows the coolant
temperature gauge in the lower section of the
rev counter (Y page 29). Displays and operation
155On-board computer and displays Z