2016 MERCEDES-BENZ AMG GT ROADSTER oil level
[x] Cancel search: oil levelPage 238 of 289
G
WARNING
If engine oil comes into contact with hot com- ponents in the engine compartment, it may
ignite. There is a risk of fire and injury.
Make sure that engine oil does not spill out
over the filler neck. Allow the engine to cool
down and thoroughly clean the components
that have come into contact with engine oil
before you start the engine. H
Environmental note
When topping up the oil, take care not to spill
any. If oil enters the soil or waterways, it is
harmful to the environment.
! Use only engine oils and oil filters that are
approved for vehicles with a service system. A
list of the engine oils and oil filters that have
been tested and approved in accordance with Mercedes-Benz Specifications for Service
Products is available at any Mercedes-Benz
Service Centre.
The following cause engine failure or damage
to the exhaust system:
R Use of engine oils and oil filters that have
not been expressly approved for the service system
R Replacement of engine oil and oil filter after
the replacement interval specified by the
service system has expired
R Use of engine oil additives
! Do not add too much oil. If the oil level is
above the "max" mark on the dipstick, too
much oil has been added. This can lead to
damage to the engine or the catalytic con-
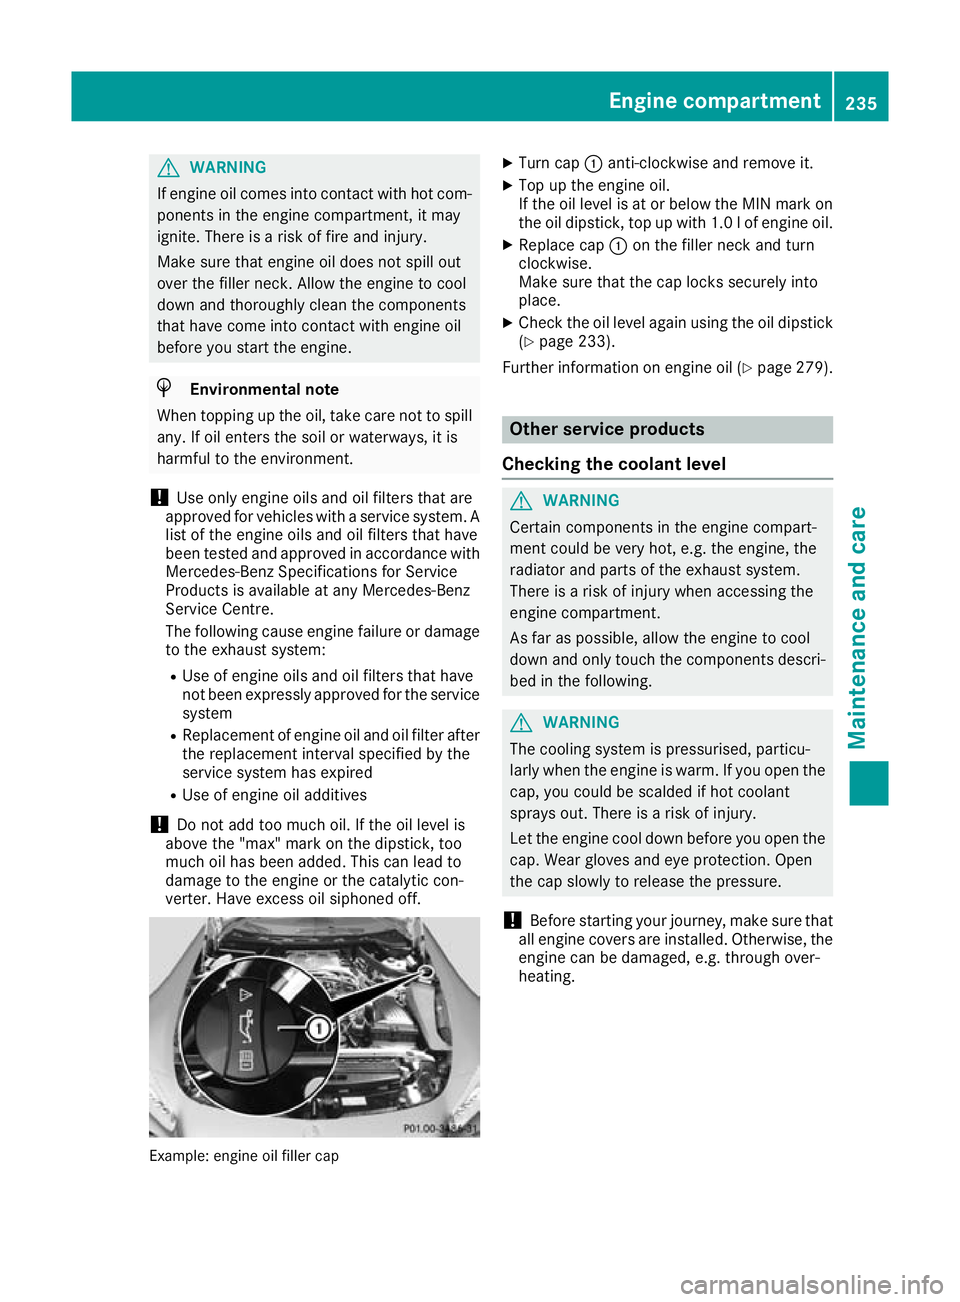
verter. Have excess oil siphoned off. Example: engine oil filler cap X
Turn cap :anti-clockwise and remove it.
X Top up the engine oil.
If the oil level is at or below the MIN mark on
the oil dipstick, top up with 1.0 lof engine oil.
X Replace cap :on the filler neck and turn
clockwise.
Make sure that the cap locks securely into
place.
X Check the oil level again using the oil dipstick
(Y page 233).
Further information on engine oil (Y page 279). Other service products
Checking the coolant level G
WARNING
Certain components in the engine compart-
ment could be very hot, e.g. the engine, the
radiator and parts of the exhaust system.
There is a risk of injury when accessing the
engine compartment.
As far as possible, allow the engine to cool
down and only touch the components descri- bed in the following. G
WARNING
The cooling system is pressurised, particu-
larly when the engine is warm. If you open the cap, you could be scalded if hot coolant
sprays out. There is a risk of injury.
Let the engine cool down before you open the
cap. Wear gloves and eye protection. Open
the cap slowly to release the pressure.
! Before starting your journey, make sure that
all engine covers are installed. Otherwise, the engine can be damaged, e.g. through over-
heating. Engine compartment
235Maintenance and care Z
Page 240 of 289
i
The ASSYST PLUS service interval display
does not show any information on the engine oil level. Observe the notes on the engine oil
level (Y page 233).
The multifunction display shows a service mes-
sage for a few seconds, e.g.:
R Service A in XX days
Service A in XX days
R Service A due
Service A due
R Service A overdue by XX days
Service A overdue by XX days
Depending on the operating conditions of the
vehicle, the remaining time or distance until the
next service due date is displayed.
The letter indicates which service is due. A
A
stands for a minor service and B Bfor a major ser-
vice. A number or another letter may be dis-
played after the letter.
Only for certain countries: the position after the
letter A
A or B Bindicates any necessary additional
maintenance work. If you notify a qualified spe-
cialist workshop of this display, you will receive
a statement on the associated costs.
The ASSYST PLUS service interval display does
not take into account any periods of time during which the battery is disconnected.
Maintaining the time-dependent service sched-
ule:
X Note down the service due date displayed in
the multifunction display before disconnect-
ing the battery.
or
X After reconnecting the battery, subtract the
battery disconnection periods from the ser-
vice date shown on the display. Hiding service messages
X Press the aor% button on the steering
wheel. Displaying service messages
X Switch the ignition on.
X Use ò on the steering wheel to call up the
list of menus. X
Press 9or: on the steering wheel to
select the Service Servicemenu and confirm with
a.
X Press 9or: on the steering wheel to
select the ASSYST PLUS ASSYST PLUS submenu and con-
firm with a.
The service due date appears in the multi-
function display. Information about service
Resetting the ASSYST PLUS service
interval display !
If the ASSYST PLUS service interval display
has been inadvertently reset, this setting can
be corrected at a qualified specialist work-
shop.
Have service work carried out as described in the Service Booklet. This may otherwise lead
to increased wear and damage to the major
assemblies or the vehicle.
A qualified specialist workshop, e.g. a
Mercedes-Benz Service Centre, will reset the
ASSYST PLUS service interval display after the
service work has been carried out. You can also
obtain further information on maintenance
work, for example.
Special service requirements The prescribed service interval is based on nor-
mal operation of the vehicle. Service work will
need to be performed more often if the vehicle is
operated under arduous conditions or increased loads, for example:
R regular city driving with frequent intermediate
stops
R if the vehicle is primarily used to travel short
distances
R for frequent operation in mountainous terrain
or on poor road surfaces
R if the engine is often left idling for long periods
In these or similar operating conditions, have,
for example, the air filter, engine oil and oil filter changed more frequently. The tyres must be
checked more frequently if the vehicle is oper-
ated under increased loads. Further informationcan be obtained at a qualified specialist work-
shop, e.g. a Mercedes-Benz Service Centre. ASSYST PLUS
237Maintenance and care Z
Page 271 of 289
may also be damaged. There is a risk of acci-
dent.
Interchange front and rear wheels only if the
wheels and tyres are of the same dimensions.
! On vehicles fitted with a tyre pressure mon-
itor, electronic components are located in the wheel.
Tyre-fitting tools should not be applied in thearea of the valve, as this could damage the
electronic components.
Only have tyres changed at a qualified spe-
cialist workshop.
Interchanging front and rear wheels of differing
dimensions can render the general operating
permit invalid.
Observe the instructions and safety notes in the "Fitting a wheel" section (Y page 268).
The wear patterns on the front and rear tyres
differ depending on the operating conditions.
Interchange the wheels before a clear wear pat-
tern has formed on the tyres. Front tyres typi-
cally wear more on the shoulders and the rear
tyres in the centre.
On vehicles that have the same size front and
rear wheels, you can interchange the wheels
every 5000 to 10,000 km depending on the
degree of tyre wear. Ensure the direction of
rotation is maintained.
Clean the contact surfaces of the wheel and the brake disc thoroughly every time a wheel is
interchanged. Check the tyre pressure and reac-
tivate the tyre pressure monitor if necessary. Direction of rotation
Tyres with a specified direction of rotation have additional benefits, e.g. if there is a risk of aqua- planing. These advantages can only be gained if
the tyres are fitted corresponding to the direc-
tion of rotation.
An arrow on the sidewall of the tyre indicates its correct direction of rotation. Storing wheels
Store wheels in a cool, dry and preferably dark
place if they are not being used. Protect the
tyres against oil, grease, petrol and diesel. Fitting a wheel
Preparing the vehicle X
Stop the vehicle on solid, non-slippery and
level ground.
X Apply the electric parking brake manually.
X Move the front wheels to the straight-ahead
position.
X Shift the transmission to position P.
X Switch off the engine.
X Pump the tyre to the specified tyre pres-
sure:
open the driver's door.
The on-board electronics now have status 0.
This is the same as the key having been
removed.
or X Remove the key from the ignition lock.
X If included in the vehicle equipment, remove
the tyre-change tool kit from the vehicle.
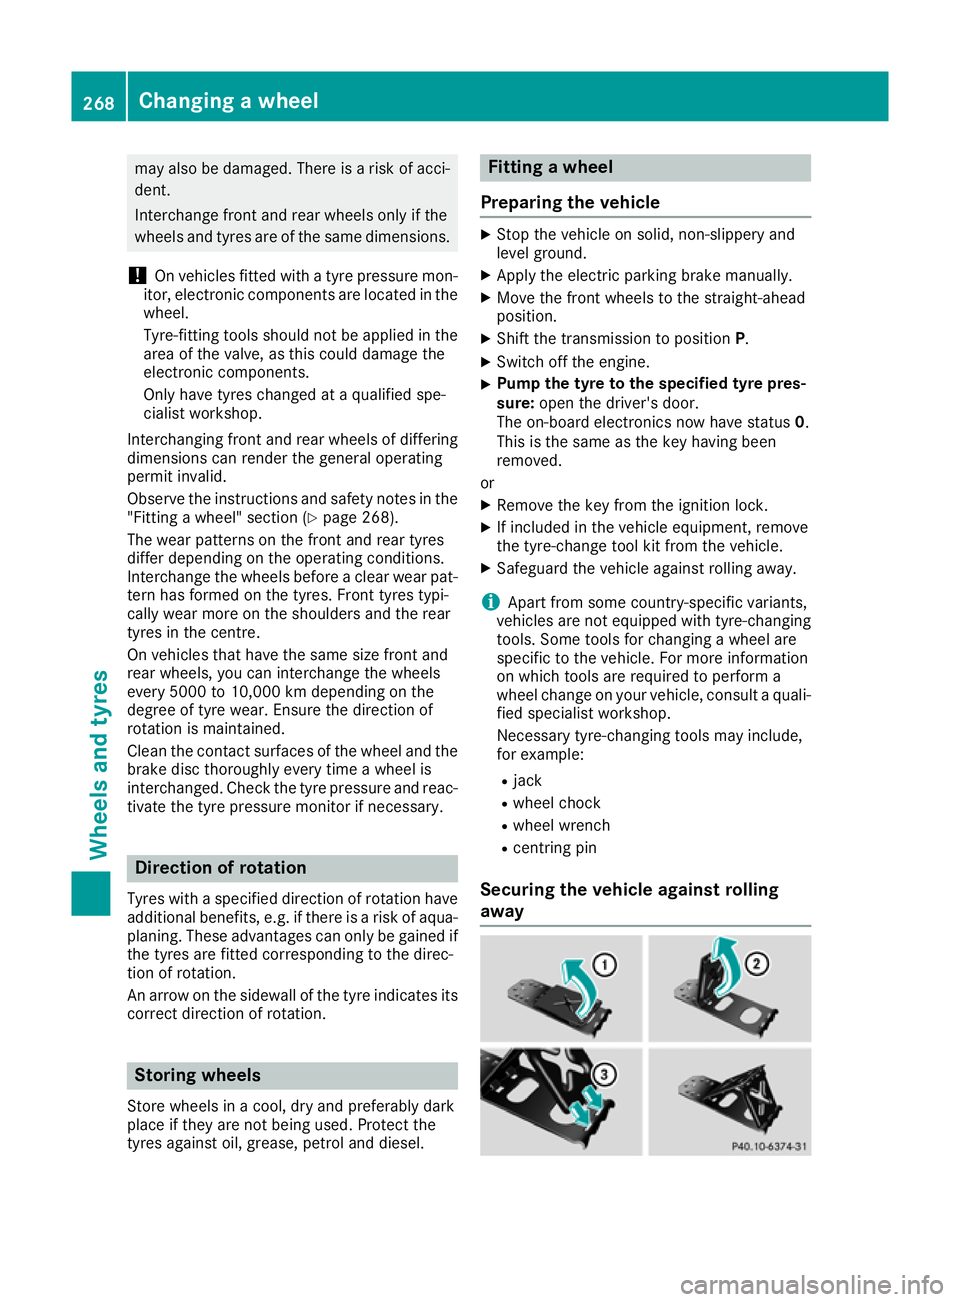
X Safeguard the vehicle against rolling away.
i Apart from some country-specific variants,
vehicles are not equipped with tyre-changing
tools. Some tools for changing a wheel are
specific to the vehicle. For more information
on which tools are required to perform a
wheel change on your vehicle, consult a quali- fied specialist workshop.
Necessary tyre-changing tools may include,
for example:
R jack
R wheel chock
R wheel wrench
R centring pin
Securing the vehicle against rolling
away 268
Changing a wheelWheels and tyres
Page 280 of 289
Vehicle identification number (VIN)
X
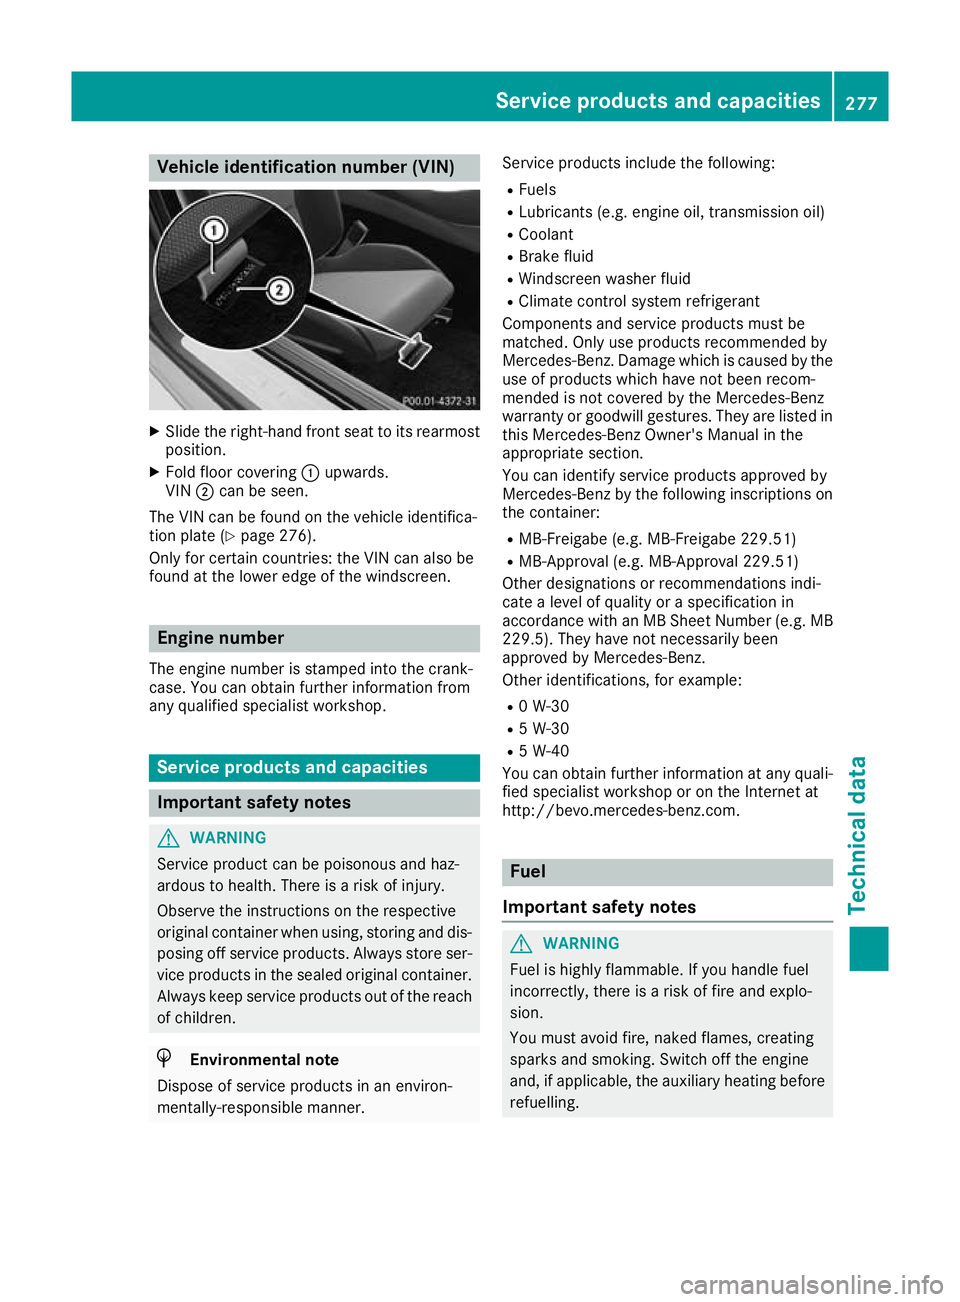
Slide the right-hand front seat to its rearmost
position.
X Fold floor covering :upwards.
VIN ;can be seen.
The VIN can be found on the vehicle identifica-
tion plate (Y page 276).
Only for certain countries: the VIN can also be
found at the lower edge of the windscreen. Engine number
The engine number is stamped into the crank-
case. You can obtain further information from
any qualified specialist workshop. Service products and capacities
Important safety notes
G
WARNING
Service product can be poisonous and haz-
ardous to health. There is a risk of injury.
Observe the instructions on the respective
original container when using, storing and dis- posing off service products. Always store ser-
vice products in the sealed original container. Always keep service products out of the reach
of children. H
Environmental note
Dispose of service products in an environ-
mentally-responsible manner. Service products include the following:
R Fuels
R Lubricants (e.g. engine oil, transmission oil)
R Coolant
R Brake fluid
R Windscreen washer fluid
R Climate control system refrigerant
Components and service products must be
matched. Only use products recommended by
Mercedes-Benz. Damage which is caused by the use of products which have not been recom-
mended is not covered by the Mercedes-Benz
warranty or goodwill gestures. They are listed in this Mercedes-Benz Owner's Manual in the
appropriate section.
You can identify service products approved by
Mercedes-Benz by the following inscriptions on
the container:
R MB-Freigabe (e.g. MB-Freigabe 229.51)
R MB-Approval (e.g. MB-Approval 229.51)
Other designations or recommendations indi-
cate a level of quality or a specification in
accordance with an MB Sheet Number (e.g. MB
229.5). They have not necessarily been
approved by Mercedes-Benz.
Other identifications, for example:
R 0 W-30
R 5 W-30
R 5 W-40
You can obtain further information at any quali-
fied specialist workshop or on the Internet at
http://bevo.mercedes-benz.co m. Fuel
Important safety notes G
WARNING
Fuel is highly flammable. If you handle fuel
incorrectly, there is a risk of fire and explo-
sion.
You must avoid fire, naked flames, creating
sparks and smoking. Switch off the engine
and, if applicable, the auxiliary heating before refuelling. Service products and capacities
277Technical data Z
Page 284 of 289
the exhaust system, it can ignite. There is a
risk of fire and injury.
Make sure the windscreen washer concen-
trate does not come into contact with the filler neck.
! Only use washer fluid that is suitable for
plastic lamp lenses, e.g. MB SummerFit or MB
WinterFit. Unsuitable washer fluid could dam-
age the plastic lenses of the headlamps.
! Only the washer fluids SummerFit and Win-
terFit can be mixed. Otherwise, the spraying
nozzles could become blocked.
Do not use distilled or de-ionised water. Other-
wise, the level sensor may give a false reading.
At temperatures above freezing: X Fill the washer fluid reservoir with a mixture of
water and washer fluid, e.g. MB SummerFit.
Mix 1 part MB SummerFit to 100 parts water.
At temperatures below freezing:
X Fill the washer fluid reservoir with a mixture of
water and washer fluid, e.g. MB WinterFit.
For the correct mixing ratio, refer to the infor- mation on the antifreeze reservoir.
i Add washer fluid concentrate, e.g. MB Sum-
merFit or MB WinterFit, to the washer fluid all
year round. Vehicle data
General notes
Please note that for the specified vehicle data:
R the heights specified may vary as a result of:
- tyres
- load
- condition of the suspension
- optional equipment
R optional equipment reduces the maximum
payload
R vehicle-specific weight information can be
found on the vehicle identification plate
(Y page 276)
R for certain countries only: you can find vehi-
cle-specific vehicle data in the COC docu-
ments (CERTIFICATE OF CONFORMITY). These documents are delivered with your
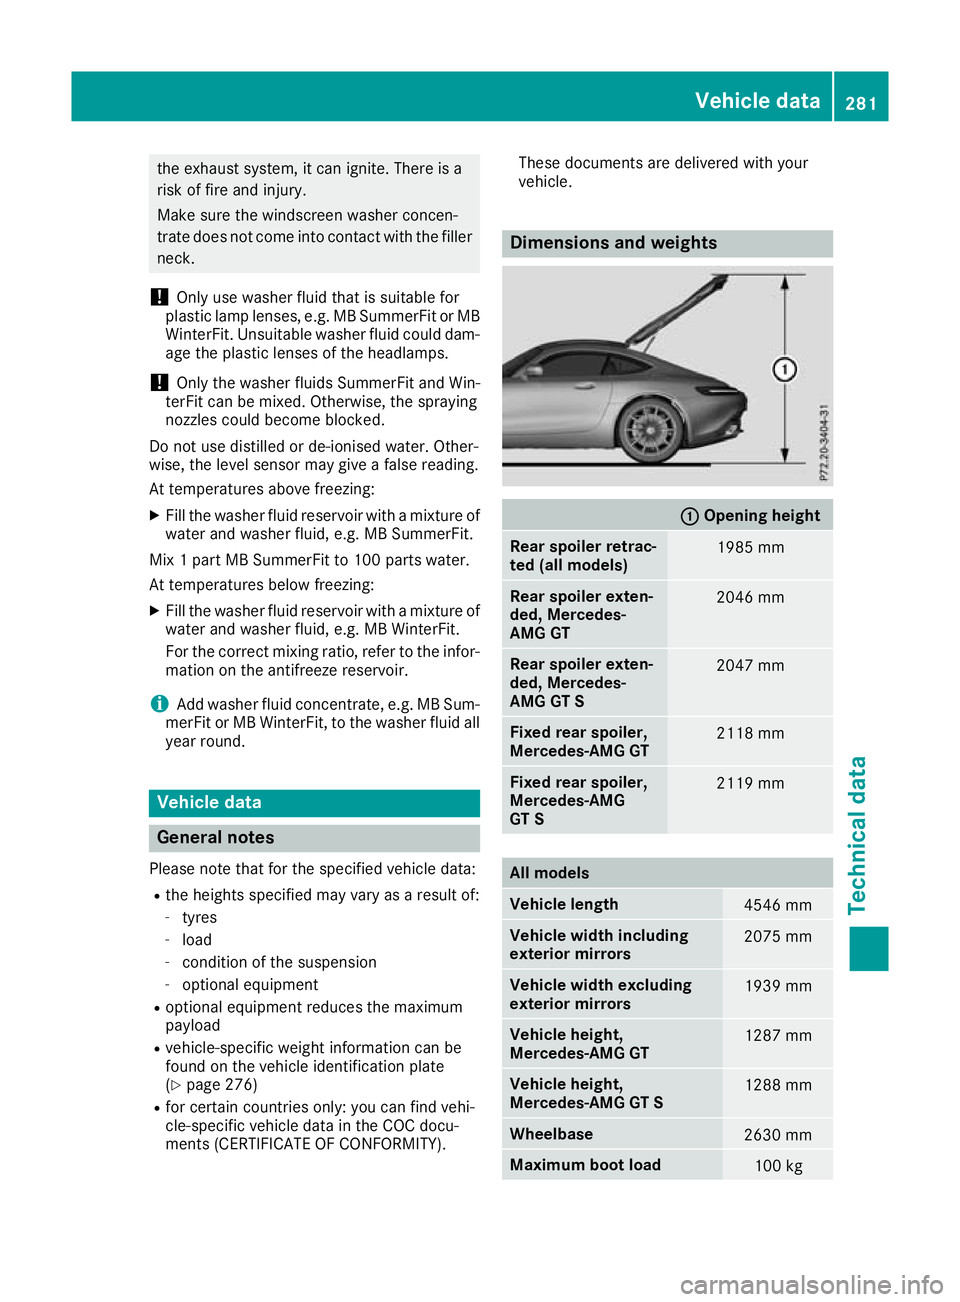
vehicle. Dimensions and weights
: :
Opening height Rear spoiler retrac-
ted (all models)
1985 mm
Rear spoiler exten-
ded, Mercedes-
AMG GT
2046 mm
Rear spoiler exten-
ded, Mercedes-
AMG GT S
2047 mm
Fixed rear spoiler,
Mercedes-AMG GT
2118 mm
Fixed rear spoiler,
Mercedes-AMG
GT S
2119 mm
All models
Vehicle length
4546 mm
Vehicle width including
exterior mirrors
2075 mm
Vehicle width excluding
exterior mirrors
1939 mm
Vehicle height,
Mercedes‑
AMG GT 1287 mm
Vehicle height,
Mercedes‑
AMG GT S 1288 mm
Wheelbase
2630 mm
Maximum boot load
100 kgVehicle data
281Technical data Z