2016 MERCEDES-BENZ AMG GT ROADSTER tow bar
[x] Cancel search: tow barPage 9 of 289

Brake force distribution
see EBD (electronic brake force
distribution)
Brake lamps
Adaptive ........................................... 57
Brakes
ABS .................................................. 54
Adaptive Brake Assist ...................... 56
AMG high-performance and
ceramic brakes .............................. 124
BAS .................................................. 54
Brake fluid (notes) ......................... 279
Display message ............................ 172
Driving tips .................................... 123
Hill start assist ............................... 104
Important safety notes .................. 123
Parking brake ................................ 121
Warning lamp ................................. 196
Breakdown
Where will I find...? ........................ 244
see Flat tyre
see Towing away
Buttons on the steering column ...... 156C
Calling up a fault see Display messages
Calling up the climate control bar
Multimedia system ........................ 209
Calling up the climate control
menu
Multimedia system ........................ 209
Car
see Vehicle
Car wash (care) ................................. 238
Care
Automatic car wash ....................... 238
Carpets .......................................... 243
Display ........................................... 242
Exhaust pipe .................................. 242
Exterior lighting ............................. 241
Gear or selector lever .................... 243
High-pressure cleaner .................... 239
Interior ........................................... 242
Matt paintwork .............................. 240
Note s............................................. 238
Paint .............................................. 239 Plastic trim .................................... 242
Reversing camera .......................... 241
Roof lining ...................................... 243
Seat belt ........................................ 243
Seat cove r..................................... 243
Sensors ......................................... 241
Steering wheel ............................... 243
Trim pieces .................................... 243
Washing by hand ........................... 239
Wheels ........................................... 240
Windows ........................................ 240
Wiper blades .................................. 241
Wooden trim .................................. 243
CD
See also Digital Owner's Manua l... 205
CD player (on-board computer) ........ 161
Central locking
Locking/unlocking (key) .................. 64
Centre console
Overview .......................................... 31
Changing the media source ............. 161
Charge retention
Socket ........................................... 122
Charge-air pressure (on-board
computer) .......................................... 167
Child
Restraint system .............................. 49
Child seat
Forward-facing restraint system ...... 51
On the front-passenger sea t............ 50
Rearward-facing restraint system .... 51
Recommendations ........................... 52
Suitable positions ............................ 51
Children in the vehicle
Important safety notes .................... 49
Cigarette lighter ................................ 222
Cleaning
Mirror turn signal ........................... 241
Climate control
Controlling automaticall y................. 97
Convenience opening/closing
(air-recirculation mode) ................... 99
Cooling with air dehumidification ..... 96
Cooling with air dehumidification
(multimedia system) ...................... 209
Demisting the windows .................... 98
Demisting the windscreen ............... 98
ECO start/stop function .................. 96 6
Index
Page 147 of 289
Reversing camera
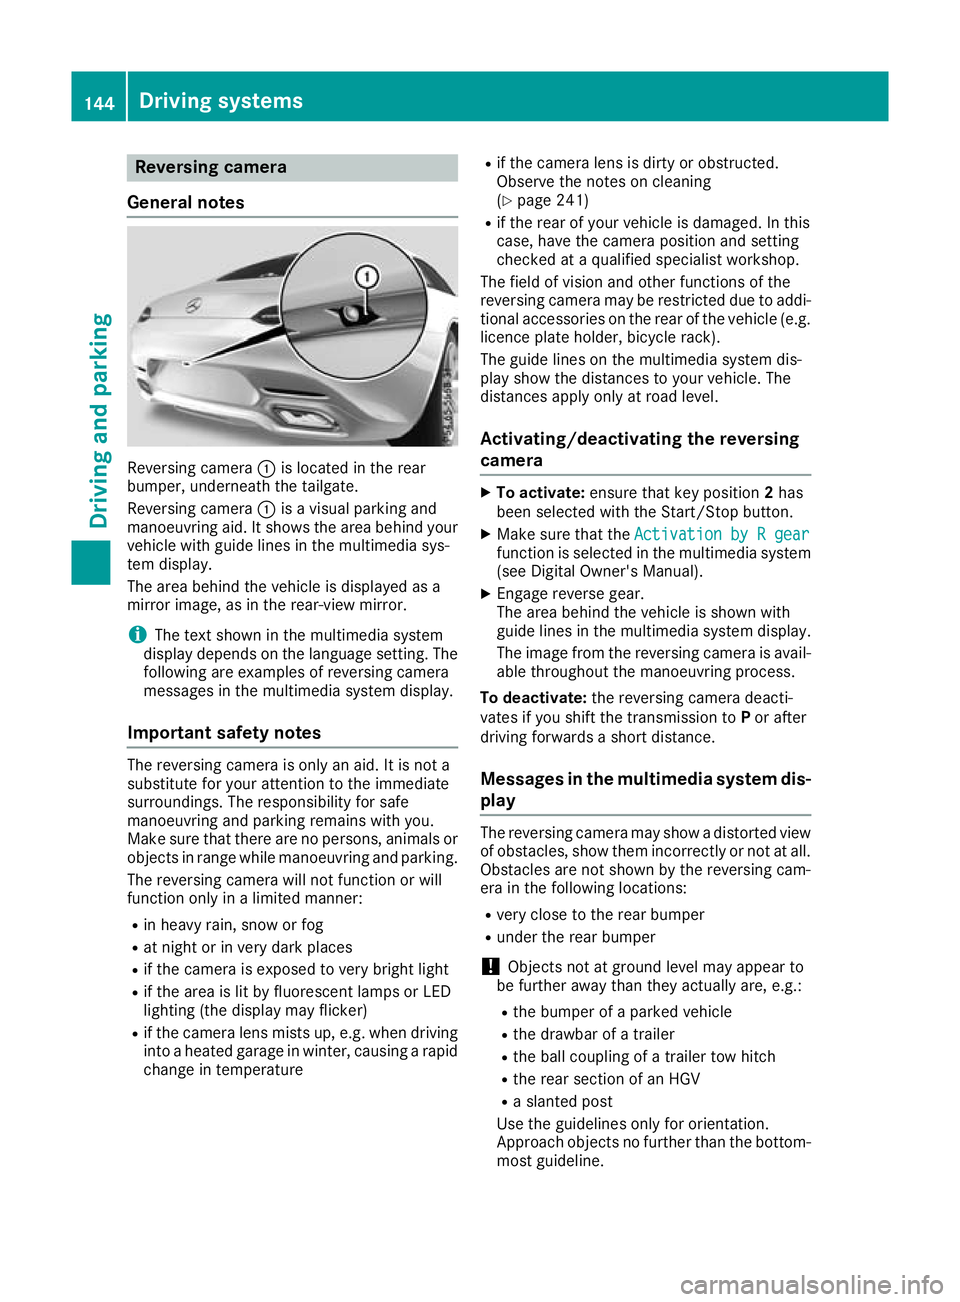
General notes Reversing camera
:is located in the rear
bumper, underneath the tailgate.
Reversing camera :is a visual parking and
manoeuvring aid. It shows the area behind your vehicle with guide lines in the multimedia sys-
tem display.
The area behind the vehicle is displayed as a
mirror image, as in the rear-view mirror.
i The text shown in the multimedia system
display depends on the language setting. The following are examples of reversing camera
messages in the multimedia system display.
Important safety notes The reversing camera is only an aid. It is not a
substitute for your attention to the immediate
surroundings. The responsibility for safe
manoeuvring and parking remains with you.
Make sure that there are no persons, animals or
objects in range while manoeuvring and parking.
The reversing camera will not function or will
function only in a limited manner:
R in heavy rain, snow or fog
R at night or in very dark places
R if the camera is exposed to very bright light
R if the area is lit by fluorescent lamps or LED
lighting (the display may flicker)
R if the camera lens mists up, e.g. when driving
into a heated garage in winter, causing a rapid
change in temperature R
if the camera lens is dirty or obstructed.
Observe the notes on cleaning
(Y page 241)
R if the rear of your vehicle is damaged. In this
case, have the camera position and setting
checked at a qualified specialist workshop.
The field of vision and other functions of the
reversing camera may be restricted due to addi-
tional accessories on the rear of the vehicle (e.g. licence plate holder, bicycle rack).
The guide lines on the multimedia system dis-
play show the distances to your vehicle. The
distances apply only at road level.
Activating/deactivating the reversing
camera X
To activate: ensure that key position 2has
been selected with the Start/Stop button.
X Make sure that the Activation by R gear Activation by R gear
function is selected in the multimedia system (see Digital Owner's Manual).
X Engage reverse gear.
The area behind the vehicle is shown with
guide lines in the multimedia system display.
The image from the reversing camera is avail-
able throughout the manoeuvring process.
To deactivate: the reversing camera deacti-
vates if you shift the transmission to Por after
driving forwards a short distance.
Messages in the multimedia system dis-
play The reversing camera may show a distorted view
of obstacles, show them incorrectly or not at all. Obstacles are not shown by the reversing cam-
era in the following locations:
R very close to the rear bumper
R under the rear bumper
! Objects not at ground level may appear to
be further away than they actually are, e.g.:
R the bumper of a parked vehicle
R the drawbar of a trailer
R the ball coupling of a trailer tow hitch
R the rear section of an HGV
R a slanted post
Use the guidelines only for orientation.
Approach objects no further than the bottom- most guideline. 144
Driving systemsDriving and parking
Page 213 of 289
Synchronising the climate control set-
tings
Use O
O Sync.
Sync. (synchronisation) to select the
climate control setting for all zones together O
or separately ª.
X Call up the climate control menu
(Y page 209).
X Slide 6the controller repeatedly until the
bottom bar is activated.
X To select O OSync.
Sync.: turn and press the con-
troller.
X Switch the synchronisation function on Oor
off ª.
For further information on synchronising cli-
mate control settings, see (Y page 98).Navigation mode
Important safety notes G
WARNING
Operating the integrated information systems and communications equipment in the vehicle
while driving will distract you from traffic con-
ditions. You could then lose control of the
vehicle. There is a risk of an accident.
Only operate these devices if road traffic con-
ditions permit. If you are unsure about the
surrounding conditions, pull over to a safe
location and make entries only while the vehi-
cle is stationary.
You must observe the legal requirements for the country in which you are currently driving whenoperating the navigation system.
General notes Correct functioning of the navigation system
depends, amongst other things, on GPS recep-
tion. In certain situations, GPS reception may be
impaired, there may be interference or there
may be no reception at all, e.g. in tunnels or
multi-storey car parks.
The following descriptions apply to navigation
with COMAND Online. Further information can
be found in the Digital Owner's Manual. Selecting a route type and route options Multimedia system:
X Select Navi NaviQNavigation Navigation.
X Select Options
OptionsQRoute settings Route settings.
i If route guidance is active, first slide
6the
controller and show the menu.
X Select a route type.
Notes for route types:
R Eco route
Eco route
Calculates an economical route.
R Dynamic route Dynamic route
Traffic reports on the route for the route guid-
ance are taken into account.
R Calculate alternative routes Calculate alternative routes
Different routes are being calculated. Instead
of Start Start, select the Continue
Continuemenu item.
X To avoid/use route options: selectAvoid
Avoid
options
options.
X Select a route option.
Notes for route options:
R Use toll roads
Use toll roads
The route calculation includes roads which
require you to pay a usage fee (toll).
R Use vignette roads Use vignette roads (not available in all
countries)
The route calculation includes roads which
require you to pay a time-based fee (vignette).
A vignette allows temporary use of the route
network, e. g. 10 days or 1 year.
Entering an address Multimedia system:
X Select Navi NaviQNavigation Navigation.
X Select Destination
DestinationQAddress entry Address entry.
i If route guidance is active, first slide
6the
controller and show the menu.
Enter an address, e.g. as follows:
R town or postcode, street, house number
R country, town or postcode
R town or postcode, centre
R street, town or postcode, junction
X Select Town
Town.
The town in which the vehicle is currently
located (current vehicle position) is at the top.
Below this, you will see locations for which
route guidance has already been carried out. 210
Operating systemMultimedia system
Page 233 of 289
Africa
Country Radio type approval num-
ber
Frequency range (MHz)
EG (Egypt) W-KLE-17/08 Mar. 06
MHz: 27, 30, 40, 418, 433,
868
RE (Réunion) Article 6 of Directive
1999/5/EC R&TTE 11 July 05
MHz: 27, 40, 433, 868 ZA (South
Africa) 11 October 2005
MHz: 27, 40, 433
America
Country Radio type approval num-
ber
Frequency range (MHz)
BB (Barba-
dos) Registration not required
MHz: 27, 40, 433, 868 CL (Chile) 38447/F-23 No.3.3634
MHz: 40, 433
3943/DFRS05165/F-50
MHz: 280 to 433 GF (French
Guyana) Article 6 of Directive
1999/5/EC R&TTE 10668 13
May 05
MHz: 27, 30, 40, 433, 868 GP (Guade-
loupe) Article 6 of Directive
1999/5/EC R&TTE 10668 13
May 05
MHz: 27, 30, 40, 433, 868 MQ (Martini-
que) Article 6 of Directive
1999/5/EC R&TTE 11 July 05
MHz: 27, 30, 40, 433, 868 MX (Mexico) MHz: 280 to 390 Asia
Country Radio type approval num-
ber
Frequency range (MHz)
AE (United
Arab Emi-
rates) 1623/5/10-2/26/76
MHz: 433
JO (Jordan) TRC/LPD/2005/23
MHz: 27, 30, 40, 433, 868
KW (Kuwait) 5 October 2005
MHz: 27, 30, 40, 418, 433,
868
SA (Saudi
Arabia) 11_02_05/5024-5-6
MHz: 418, 433
SY (Syria) 279/4/14 / 05 March 06
TR (Turkey) National Certification 23 July
07
MHz: 433
Australia
Country Radio type approval num-
ber
Frequency range (MHz)
AU (Aus-
tralia) 28 June 2005
MHz: 27, 30, 40, 433, 868
NZ (New Zea-
land) 20 March 06
MHz: 27, 30, 40, 433
Floormats
G
WARNING
Objects in the driver's footwell may restrict
the clearance around the pedals or block a
depressed pedal. This jeopardises the oper-
ating and road safety of the vehicle. There is a risk of an accident.
Stow all objects securely in the vehicle so that
they do not get into the driver's footwell.
Always fit the floormats securely and as pre-
scribed in order to ensure that there is always sufficient room for the pedals. Do not use 230
FeaturesStowing and featu
res
Page 253 of 289
Therefore, place the filler hose in the plastic
bag which contained the TIREFIT kit.
H
Environmental note
Have the used tyre sealant bottle disposed of professionally, e.g. at a qualified specialist
workshop.
If a tyre pressure of 180 kPa (1.8 bar/26 psi) has been attained after five minutes:
X Switch off the tyre inflation compressor.
X Unscrew the filler hose from the valve of the
faulty tyre.
Leave the tyre sealant bottle attached to the
flange.
X Stow the tyre sealant bottle, the tyre inflation
compressor and the warning triangle.
X Pull away immediately.
X Stop after driving for approximately ten
minutes and check the tyre pressure with the
tyre inflation compressor.
The tyre pressure must now be at least
130 kPa (1.3 bar/19 psi). G
WARNING
If the required tyre pressure is not reached
after driving for a short period, the tyre is too badly damaged. The tyre sealant cannot
repair the tyre in this instance. Damaged tyres and a tyre pressure that is too low can signif-
icantly impair the vehicle's braking and driv-
ing characteristics. There is a risk of accident.
Do not continue driving. Contact a qualified
specialist workshop.
i In your vehicle, you will find a sticker with
the Mercedes-Benz Service24h telephone
number, e.g. on the B-pillar on the driver's
side.
X Correct the tyre pressure if it is still at least
130 kPa (1.3 bar/19 psi). See the tyre pres-
sure table on the fuel filler flap for values.
X To increase the tyre pressure: switch on
the tyre inflation compressor.
X To reduce the tyre pressure: open release
screw C. X
When the tyre pressure is correct, unscrew
the filler hose from the valve of the sealed
tyre.
X Screw the valve cap onto the tyre valve of the
sealed tyre.
X Unscrew the tyre sealant bottle from the tyre
inflation compressor.
X Drive to the nearest qualified specialist work-
shop and have the tyre changed there.
X Have the tyre sealant bottle replaced as soon
as possible at a qualified specialist workshop.
X Have the tyre sealant bottle replaced every
four years at a qualified specialist workshop. Battery (vehicle)
Important safety notes
Work on the battery, e.g. removing or fitting,
requires specialist knowledge and the use of
special tools. Therefore, always have work on
the battery carried out at a qualified specialist
workshop. G
WARNING
Work carried out incorrectly on the battery
can lead, for example, to a short circuit and
thus damage the vehicle electronics. This can lead to function restrictions applying to
safety-relevant systems, e.g the lighting sys-
tem, the ABS (anti-lock braking system) or the
ESP ®
(Electronic Stability Program). The oper-
ating safety of your vehicle may be restricted.
You could lose control of the vehicle, for
example:
R when braking
R in the event of abrupt steering manoeuvres
and/or when the vehicle's speed is not
adapted to the road conditions
There is a risk of an accident.
In the event of a short circuit or a similar inci- dent, contact a qualified specialist workshop
immediately. Do not drive any further. Always have work on the battery carried out at a
qualified specialist workshop.
Further information about ABS (Y page 54) and
ESP ®
(Y page 57). 250
Battery (vehicle)Breakdown assistance
Page 259 of 289
Vehicles with carbon engine cover:
X Replace the jump-starting connection point cover. Make sure all mountings for the fasteners are
positioned precisely behind the corresponding recesses in the cover.
X Press the fasteners into the mountings. Turn the fasteners by Õof a turn to engage.
All vehicles:
X Have the battery checked at a qualified specialist workshop.
Jump-starting is not considered to be a normal operating condition.
i Jump-starting cables and further information regarding jump starting can be obtained at any
qualified specialist workshop. Towing away and tow-starting
Important safety notes
G
WARNING
The rear axle locks when:
R the engine is not running
R the engine stalls while the vehicle is being
towed
R there is a malfunction in the voltage supply
or the vehicle's electrical system
There is a risk of an accident.
In the event of a breakdown, you should
always have the vehicle transported. G
WARNING
If the brake system or power steering is mal-
functioning and your vehicle is then towed
away, significantly more effort may be
required to steer and brake than is normally
required. There is a risk of an accident.
In such cases use a rigid towing bar. Before
towing away, make sure steering moves
freely. G
WARNING
When towing or tow-starting another vehicle
and its weight is greater than the permissible gross weight of your vehicle, the:
R towing eye may be torn off
R car/trailer combination may swerve or
even overturn
There is a risk of an accident. When towing or tow-starting another vehicle,
its weight should not be greater than the per- missible gross weight of your vehicle.
Details on the permissible gross vehicle weight
of your vehicle can be found on the vehicle iden-
tification plate (Y page 276).
! Use the key instead of the Start/Stop but-
ton when towing the vehicle.
Start the engine and keep it running. Turn the key to position 2in the ignition. Set the trans-
mission to Nusing the E-SELECT lever. Make
sure that you then leave the key in position 2.
Check the transmission position in the instru-
ment cluster.
! Make sure that the electric parking brake is
released. If the electric parking brake is faulty,
visit a qualified specialist workshop.
! Secure the tow rope or tow bar to the towing
eye only. The vehicle may otherwise be dam-
aged.
! When Active Brake Assist, Distance Pilot
DISTRONIC or the HOLD function is activated, the vehicle brakes automatically in certain
situations.
To avoid damage to the vehicle, deactivate
these systems in the following or similar sit-
uations:
R when towing away
R in a car wash
! Observe the following points when towing
with a tow rope:
R secure the tow rope on the same side on
both vehicles.
R make sure that the tow rope is not longer
than legally permitted. Mark the tow rope in 256
Towing away and tow-startingBreakdown assistance
Page 260 of 289
the middle, e.g. with a white cloth
(30 x 30 cm). This makes other road users
aware that a vehicle is being towed.
R only secure the tow rope to the towing eye.
R observe the brake lamps of the towing vehi-
cle while driving. Always maintain a dis-
tance so that the tow rope does not sag.
R do not use steel cables or chains to tow
your vehicle. You could otherwise damage
the vehicle.
! Do not use the towing eyes for recovery pur-
poses as this could damage the vehicle. If in
doubt, recover the vehicle with a crane.
! When towing, pull away slowly and
smoothly. If the tractive power is too high, the
vehicles could be damaged.
! Shift the automatic transmission to
Nand
do not open the driver's or front passenger's
door during towing. The automatic transmis-
sion may otherwise shift to position P, which
could damage both vehicles.
! You may tow the vehicle for a maximum of
50km. A towing speed of 50 km/h must not
be exceeded.
For towing distances over 50 km, the entire
vehicle must be lifted up and transported.
! Observe the transmission fluid temperature
(AMG menu) in the on-board computer when
towing. The transmission fluid temperature
must not exceed 120 †. If this occurs, you
must stop towing immediately.
! Tow-starting the vehicle is not permitted.
The transmission may otherwise be damaged.
Also observe the following notes: R Observe the legal requirements in each indi-
vidual country when towing.
R If the engine does not start, try jump-starting
it (Y page 253). Tow-starting the vehicle is not
permitted.
R If it is not possible to jump-start the vehicle,
have it transported to the nearest qualified
specialist workshop, e.g. a Mercedes-Benz
Service Centre.
If the vehicle can no longer be driven because of an accident or breakdown, you have the follow-
ing options:
R transporting the vehicle As a rule, you should have the vehicle trans-
ported.
R towing the vehicle with a tow rope or tow bar
Only tow the vehicle in exceptional cases. The
engine must be running if you tow the vehicle with a tow rope or tow bar.
If the vehicle has suffered transmission damage, have it transported on a transporter or trailer.
Observe the display messages in the instrument
cluster.
The battery must be connected and charged.
Otherwise, you:
R will not be able to switch on the ignition with
the Start/Stop button
R cannot start the engine
R cannot release the electric parking brake
R cannot shift the automatic transmission to
position N
Deactivate the automatic locking feature before
towing the vehicle (Y page 70). You could oth-
erwise be locked out when pushing or towing
the vehicle.
Deactivate tow-away protection before the vehi-
cle is towed away (Y page 61). Fitting/removing the towing eye
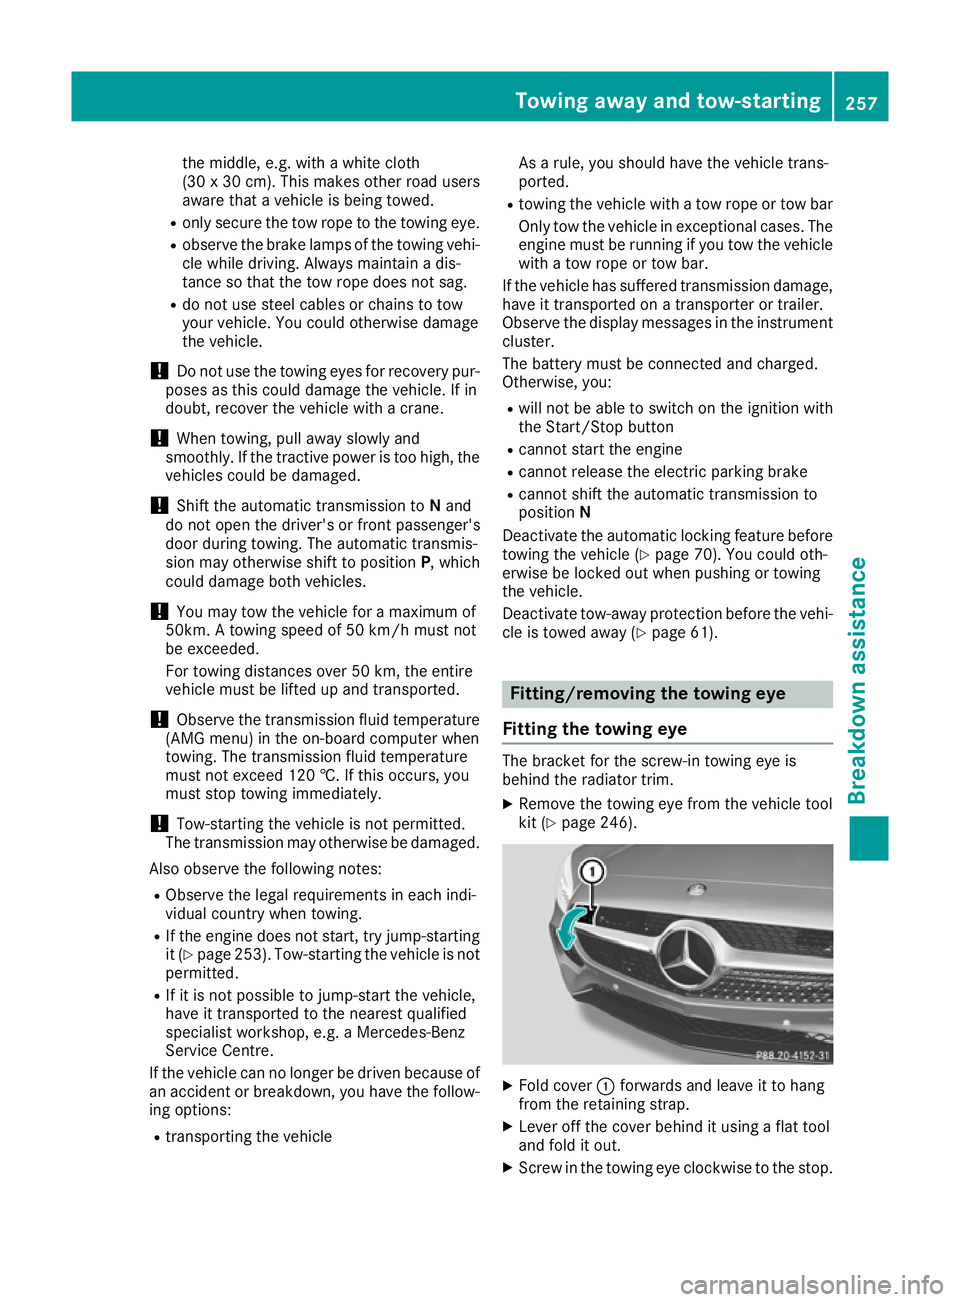
Fitting the towing eye The bracket for the screw-in towing eye is
behind the radiator trim.
X Remove the towing eye from the vehicle tool
kit (Y page 246). X
Fold cover :forwards and leave it to hang
from the retaining strap.
X Lever off the cover behind it using a flat tool
and fold it out.
X Screw in the towing eye clockwise to the stop. Towing away and tow-starting
257Breakdown assistance Z