2016 MERCEDES-BENZ AMG GT ROADSTER fuel
[x] Cancel search: fuelPage 29 of 289
about possible vehicle damage. Damage to
your vehicle that arises from culpable contra-
ventions against these instructions are not
covered either by Mercedes-Benz implied
warranty or by the New or Used-Vehicle War-
ranty. QR code for rescue card
The QR code is secured in the fuel filler flap and
on the opposite side on the B-pillar. In the event of an accident, rescue services can use the QR
code to quickly find the appropriate rescue card
for your vehicle. The current rescue card con-
tains, in a compact form, the most important
information about your vehicle, e.g. the routing
of the electric cables.
You can find more information under
www.mercedes-benz.de/qr-code. Data stored in the vehicle
Many of the electronic components in your vehi- cle can store data.
These data memories temporarily or perma-
nently store technical information about:
R the vehicle's operating state
R events
R faults
In general, this technical information docu-
ments the state of a component, a module, a
system or the surroundings.
This includes, for example:
R operating conditions of system components –
for example, fluid levels
R status messages concerning the vehicle and
its individual components – for example, num- ber of wheel revolutions/speed, decelerationin movement, lateral acceleration, accelera-
tor pedal position
R malfunctions and defects in important system
components – for example, lights, brakes
R vehicle reactions and operating conditions in
special driving situations – for example, air-
bag deployment, intervention of stability con-
trol systems
R ambient conditions – for example, outside
temperature These data are of an exclusively technical nature
and can be used to:
R assist in detecting and rectifying faults and
defects
R analyse vehicle functions, e.g. after an acci-
dent
R optimise vehicle functions
The data cannot be used to trace the vehicle's
movements.
When your vehicle is serviced, technical infor-
mation can be read from the event data memory
and fault data memory.
Services include, for example:
R repair services
R service processes
R warranty events
R quality assurance
The information is read out by employees of the
service network (including the manufacturer)
using special diagnostic testers. You can obtain more information there, if required.
After a fault has been rectified, the information
is deleted from the fault memory or is continu-
ally overwritten.
During vehicle operation, certain situations may
arise in which these technical data – in conjunc-
tion with other information and, if applicable,
after consultation with an approved assessor –
may be linked to an individual person.
Examples include:
R accident reports
R damage to the vehicle
R witness statements
Further additional functions that have been con-
tractually agreed upon with the customer allow
certain vehicle data to be conveyed by the vehi-
cle as well. The additional functions include, for example, vehicle location in the event of an
emergency. Copyright information
General information
Information on licences for free and open-
source software used in your vehicle can be
found on the data carrier in your vehicle docu-
ment wallet and with updates on the following
website:
http://www.mercedes-benz.com/opensource 26
Copyright informationIntroduction
Page 32 of 289
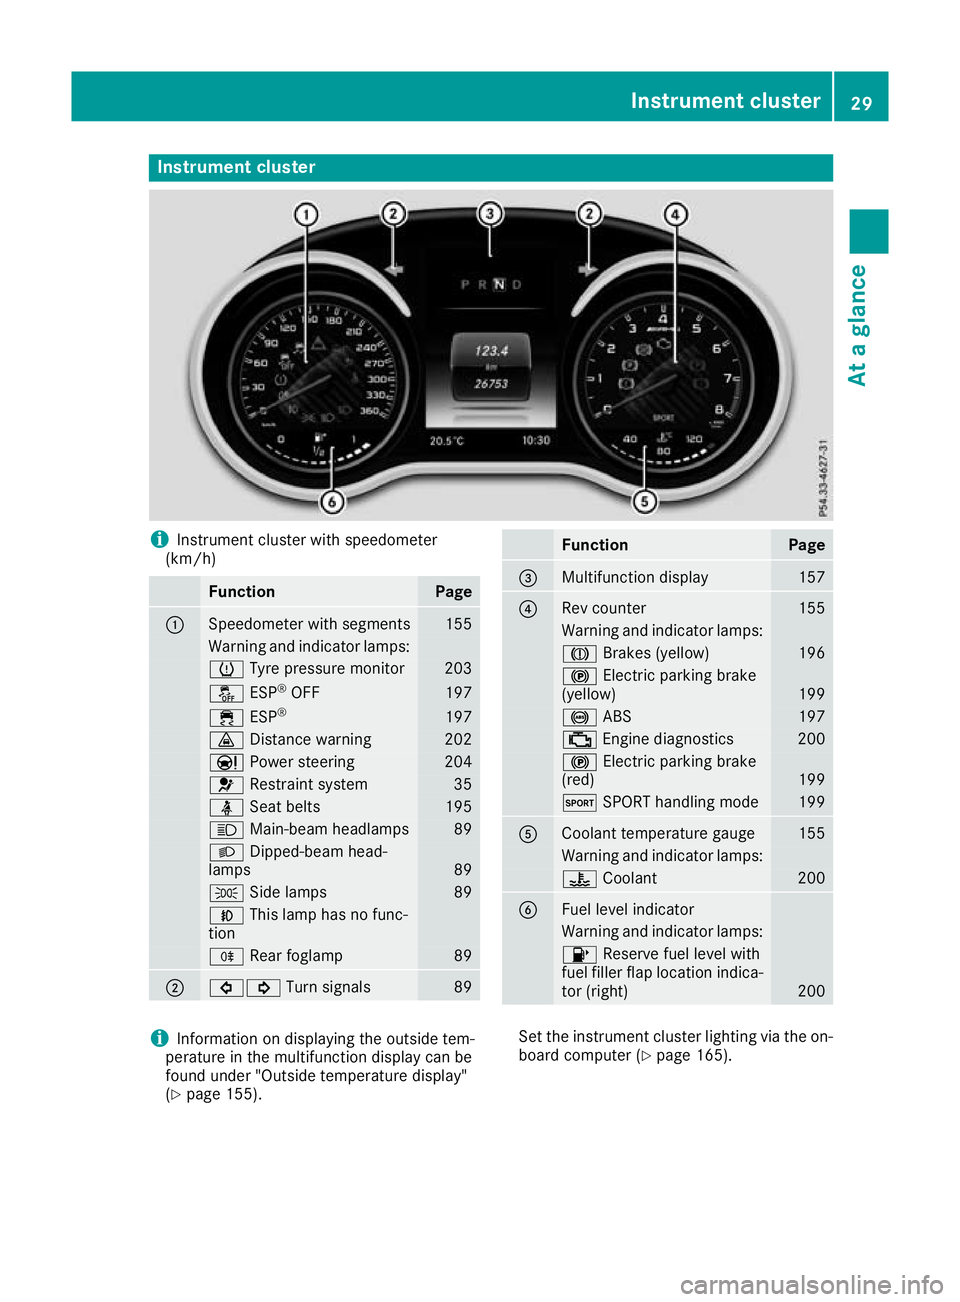
Instrument cluster
i
Instrument cluster with speedometer
(km/h) Function Page
:
Speedometer with segments 155
Warning and indicator lamps:
h
Tyre pressure monitor 203
å
ESP®
OFF 197
÷
ESP® 197
·
Distance warning 202
Ð
Power steering 204
6
Restraint system 35
ü
Seat belts 195
K
Main-beam headlamps 89
L
Dipped-beam head-
lamps 89
T
Side lamps 89
N
This lamp has no func-
tion R
Rear foglamp 89
;
#!
Turn signals 89 Function Page
=
Multifunction display 157
?
Rev counter 155
Warning and indicator lamps:
J
Brakes (yellow) 196
!
Electric parking brake
(yellow) 199
!
ABS 197
;
Engine diagnostics 200
!
Electric parking brake
(red) 199
M
SPORT handling mode 199
A
Coolant temperature gauge 155
Warning and indicator lamps:
?
Coolant 200
B
Fuel level indicator
Warning and indicator lamps:
8
Reserve fuel level with
fuel filler flap location indica-
tor (right) 200
i
Information on displaying the outside tem-
perature in the multifunction display can be
found under "Outside temperature display"
(Y page 155). Set the instrument cluster lighting via the on-
board computer (Y page 165). Instrument cluster
29At a glance
Page 52 of 289
R
the engine is switched off and the fuel supply
is cut off
R vehicles with the Mercedes-Benz emergency
call system: automatic emergency call Children in the vehicle
Important safety notes
If a child younger than twelve years old and
under 1.50 min height is travelling in the vehi-
cle:
R always secure the child in a child restraint
system suitable for Mercedes-Benz vehicles.
The child restraint system must be appropri-
ate to the age, weight and size of the child.
R be sure to observe the instructions and safety
notes in this section in addition to the child
restraint system manufacturer's installation
instructions.
R be sure to observe the instructions and safety
notes on the automatic front-passenger front airbag deactivation system (Y page 41).G
WARNING
If you leave children unattended in the vehi-
cle, they could set the vehicle in motion by, for example:
R releasing the parking brake
R shifting the transmission into neutral
R starting the engine
They could also operate the vehicle's equip-
ment and become trapped. There is a risk of
an accident and injury.
When leaving the vehicle, always take the key with you and lock the vehicle. Never leave
children unattended in the vehicle. G
WARNING
If persons (particularly children) are exposed
to heat or cold for a prolonged period, there is a risk of serious or even fatal injuries. Never
leave persons (particularly children) unatten-
ded in the vehicle. G
WARNING
If the child restraint system is placed in direct sunlight, the parts could become very hot. Children could be suffer burns by touching
these parts, in particular on the metallic parts
of the child restraint system. There is a risk of
injury.
If you and your child leave the vehicle, always make sure that the child restraint system is
not in direct sunlight. Cover it with a blanket,for example. If the child restraint system has
been exposed to direct sunlight, leave it to
cool down before securing the child in it.
Never leave children unattended in the vehi-
cle.
Always ensure that all vehicle occupants have
their seat belts fastened correctly and are sitting properly. Particular attention must be paid to
children.
Observe the safety notes on the seat belt
(Y page 36) and the information on the correct
use of the seat belt (Y page 37). Child restraint system
Observe the instructions for correct use of the
child restraint system (Y page 51).
For safety reasons, Mercedes-Benz recom-
mends that you use only a child restraint system
recommended by Mercedes-Benz
(Y page 52). G
WARNING
If the child restraint system is incorrectly fit-
ted on the seat position suitable for this pur-
pose, it cannot perform its intended protec-
tive function. In the event of an accident,
sharp braking or a sudden change in direction, the child may not be held securely. There is an
increased risk of serious or even fatal injuries.
Observe the manufacturer's installation
instructions and the correct use for the child
restraint system. Make sure that the entire
surface of the child restraint system is resting
on the seat surface. Never place objects
under or behind the child restraint system,
e.g. cushions. Only use child restraint sys-
tems with the original cover designed for
them. Only replace damaged covers with gen- uine covers. Children in the vehicle
49Safety Z
Page 67 of 289
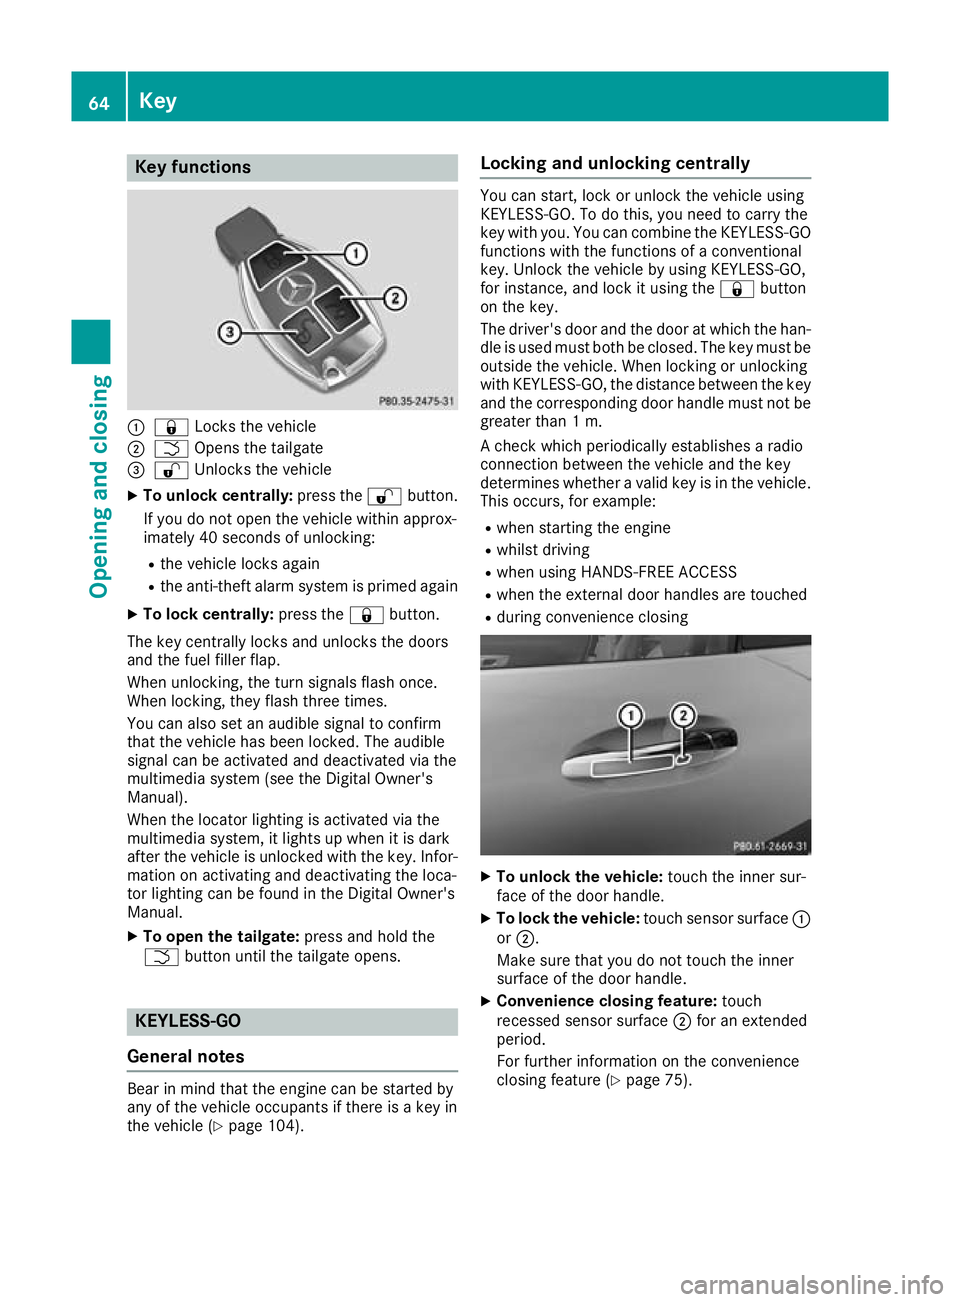
Key functions
:
& Locks the vehicle
; F Opens the tailgate
= % Unlocks the vehicle
X To unlock centrally: press the%button.
If you do not open the vehicle within approx-
imately 40 seconds of unlocking:
R the vehicle locks again
R the anti-theft alarm system is primed again
X To lock centrally: press the&button.
The key centrally locks and unlocks the doors
and the fuel filler flap.
When unlocking, the turn signals flash once.
When locking, they flash three times.
You can also set an audible signal to confirm
that the vehicle has been locked. The audible
signal can be activated and deactivated via the
multimedia system (see the Digital Owner's
Manual).
When the locator lighting is activated via the
multimedia system, it lights up when it is dark
after the vehicle is unlocked with the key. Infor- mation on activating and deactivating the loca-
tor lighting can be found in the Digital Owner's
Manual.
X To open the tailgate: press and hold the
F button until the tailgate opens. KEYLESS-GO
General notes Bear in mind that the engine can be started by
any of the vehicle occupants if there is a key in
the vehicle (Y page 104). Locking and unlocking centrally You can start, lock or unlock the vehicle using
KEYLESS-GO. To do this, you need to carry the
key with you. You can combine the KEYLESS-GO functions with the functions of a conventional
key. Unlock the vehicle by using KEYLESS-GO,
for instance, and lock it using the &button
on the key.
The driver's door and the door at which the han- dle is used must both be closed. The key must be
outside the vehicle. When locking or unlocking
with KEYLESS-GO, the distance between the key and the corresponding door handle must not be greater than 1 m.
A check which periodically establishes a radio
connection between the vehicle and the key
determines whether a valid key is in the vehicle.
This occurs, for example:
R when starting the engine
R whilst driving
R when using HANDS-FREE ACCESS
R when the external door handles are touched
R during convenience closing X
To unlock the vehicle: touch the inner sur-
face of the door handle.
X To lock the vehicle: touch sensor surface :
or ;.
Make sure that you do not touch the inner
surface of the door handle.
X Convenience closing feature: touch
recessed sensor surface ;for an extended
period.
For further information on the convenience
closing feature (Y page 75).64
KeyOpening and closing
Page 68 of 289
Deactivating and activating
If you do not intend to use the vehicle for an
extended period of time, you can deactivate
KEYLESS-GO. The key will then use very little
power, thereby conserving battery power. For
the purposes of activation or deactivation, the
vehicle does not have to be nearby.
X To deactivate: press the&button on the
key twice in rapid succession.
The battery check lamp of the key flashes
twice briefly and lights up once, then KEY-
LESS-GO is deactivated (Y page 66).
X To activate: press any button on the key.
or X Insert the key into the ignition lock.
KEYLESS-GO and all of its associated features
are available again. KEYLESS-GO start function
General notes Bear in mind that the engine can be started by
any of the vehicle occupants if there is a key in
the vehicle (Y page 104). Changing the settings of the locking
system
You can change the settings of the locking sys-
tem. This means that only the driver's door and
the fuel filler flap are unlocked when the vehicle is unlocked. This is useful if you frequently travel
alone.
X To change the setting: press and hold down
the % and& buttons simultaneously
for about six seconds until the battery indica-
tor lamp flashes twice (Y page 66).
If the setting of the locking system is changed
within the signal range of the vehicle, pressing
the & or% button:
R locks or
R unlocks the vehicle
The key now functions as follows:
X To unlock: press the%button once.
X To unlock centrally: press the%button
twice.
X To lock: press the &button. The KEYLESS-GO functions can be changed as
follows:
X To unlock the driver's door: touch the inner
surface of the door handle on the driver's
door.
X To unlock centrally: touch the inner surface
of the front-passenger door handle.
X To lock centrally: touch the outer sensor
surface on one of the door handles.
X To restore the factory settings: press and
hold down the %and& buttons simul-
taneously for approximately six seconds until
the battery check lamp flashes twice
(Y page 66). Emergency key element
General notes If the vehicle can no longer be unlocked with the
key or KEYLESS-GO, use the emergency key ele-
ment.
If you use the emergency key element to unlock
and open the driver's door, the anti-theft alarm
system will be triggered. Switch off the alarm
(Y page 60).
If you unlock the vehicle using the emergency
key element, the fuel filler flap will not be
unlocked automatically.
X To unlock the fuel filler flap: insert the key
into the ignition lock.
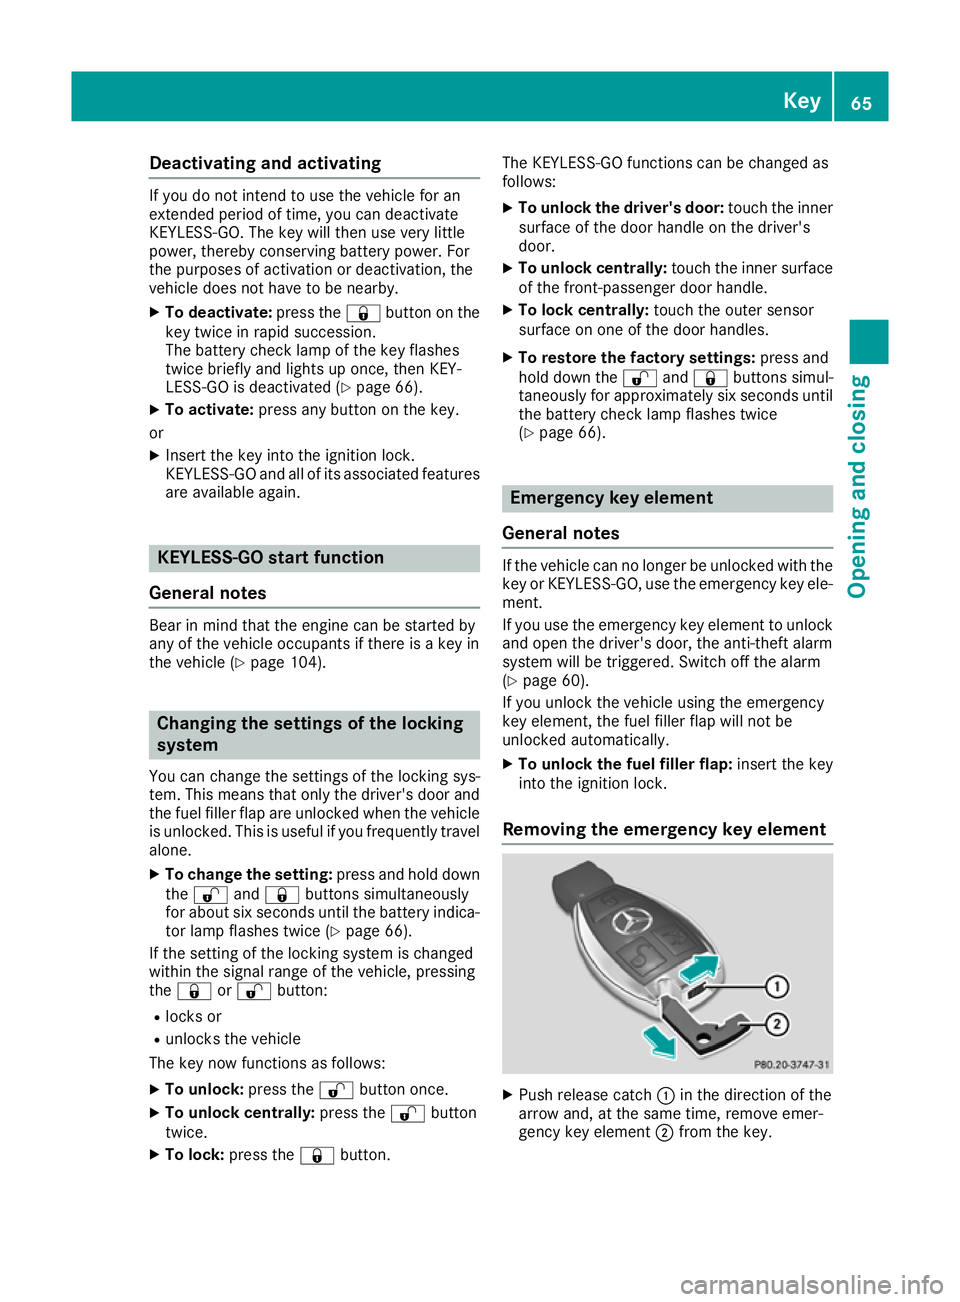
Removing the emergency key element X
Push release catch :in the direction of the
arrow and, at the same time, remove emer-
gency key element ;from the key. Key
65Opening and closing Z
Page 73 of 289
Centrally locking and unlocking the
vehicle from the inside
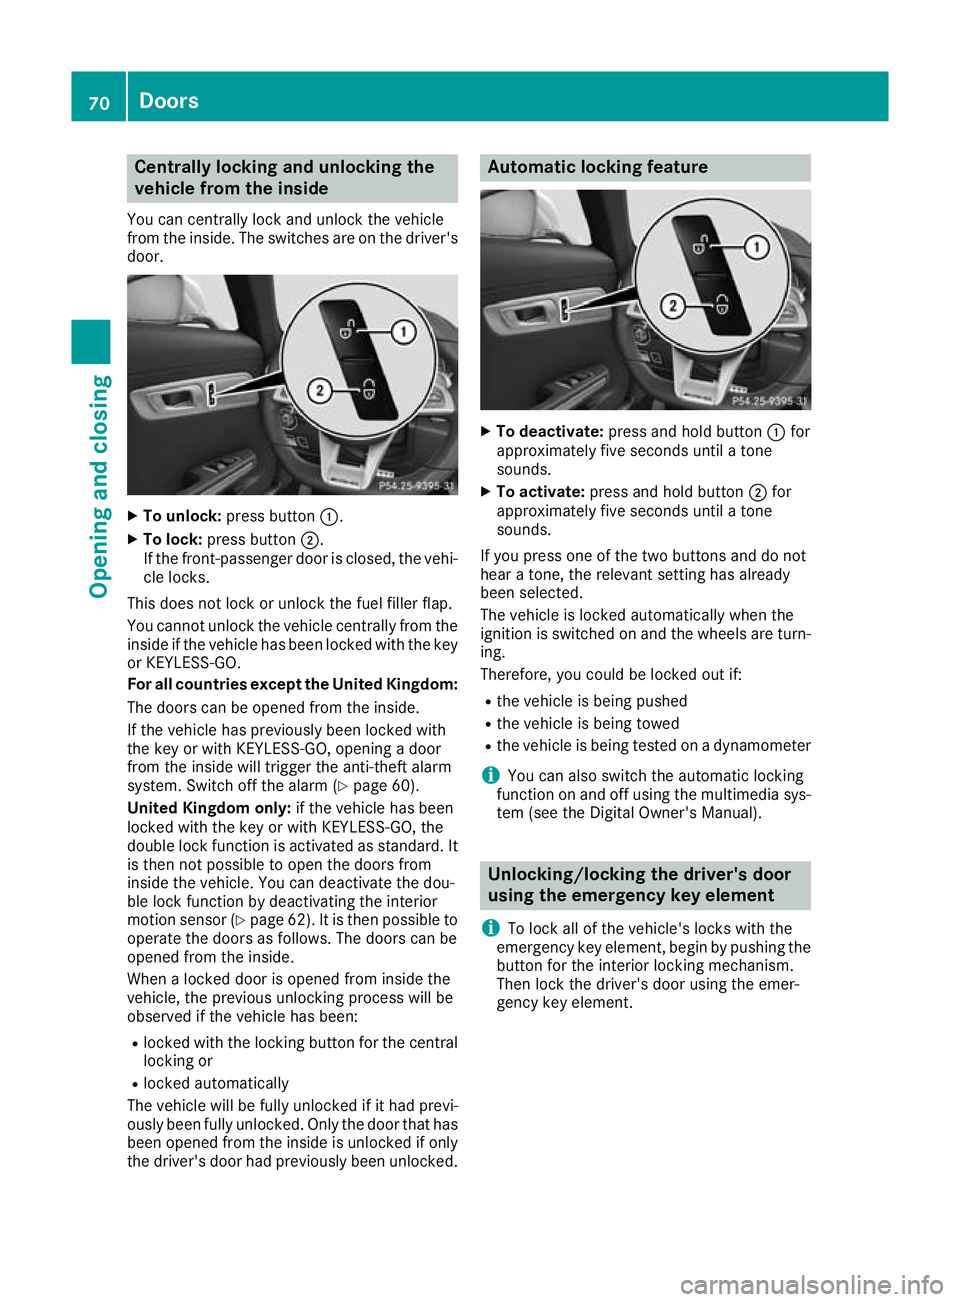
You can centrally lock and unlock the vehicle
from the inside. The switches are on the driver's door. X
To unlock: press button :.
X To lock: press button ;.
If the front-passenger door is closed, the vehi-
cle locks.
This does not lock or unlock the fuel filler flap.
You cannot unlock the vehicle centrally from the
inside if the vehicle has been locked with the key or KEYLESS-GO.
For all countries except the United Kingdom:
The doors can be opened from the inside.
If the vehicle has previously been locked with
the key or with KEYLESS-GO, opening a door
from the inside will trigger the anti-theft alarm
system. Switch off the alarm (Y page 60).
United Kingdom only: if the vehicle has been
locked with the key or with KEYLESS-GO, the
double lock function is activated as standard. It is then not possible to open the doors from
inside the vehicle. You can deactivate the dou-
ble lock function by deactivating the interior
motion sensor (Y page 62). It is then possible to
operate the doors as follows. The doors can be
opened from the inside.
When a locked door is opened from inside the
vehicle, the previous unlocking process will be
observed if the vehicle has been:
R locked with the locking button for the central
locking or
R locked automatically
The vehicle will be fully unlocked if it had previ-
ously been fully unlocked. Only the door that has been opened from the inside is unlocked if only
the driver's door had previously been unlocked. Automatic locking feature
X
To deactivate: press and hold button :for
approximately five seconds until a tone
sounds.
X To activate: press and hold button ;for
approximately five seconds until a tone
sounds.
If you press one of the two buttons and do not
hear a tone, the relevant setting has already
been selected.
The vehicle is locked automatically when the
ignition is switched on and the wheels are turn-
ing.
Therefore, you could be locked out if:
R the vehicle is being pushed
R the vehicle is being towed
R the vehicle is being tested on a dynamometer
i You can also switch the automatic locking
function on and off using the multimedia sys-
tem (see the Digital Owner's Manual). Unlocking/locking the driver's door
using the emergency key element
i To lock all of the vehicle's locks with the
emergency key element, begin by pushing the
button for the interior locking mechanism.
Then lock the driver's door using the emer-
gency key element. 70
DoorsOpening and closing
Page 108 of 289
Hill start assist is not active if:
R you are pulling away on a level road or a
downhill gradient
R the transmission is in position N
R the electric parking brake is applied
R ESP ®
is malfunctioning ECO start/stop function
Introduction The ECO start/stop function switches the
engine off automatically if the vehicle is stopped
under certain conditions.
When the vehicle pulls away again, the engine
starts automatically. The ECO start/stop func-
tion thereby helps you to reduce the fuel con-
sumption and emissions of your vehicle.
Important safety notes G
WARNING
If the engine is switched off automatically and you exit the vehicle, the engine is restarted
automatically. The vehicle may begin moving. There is a risk of accident and injury.
If you wish to exit the vehicle, always turn off
the ignition and secure the vehicle against
rolling away.
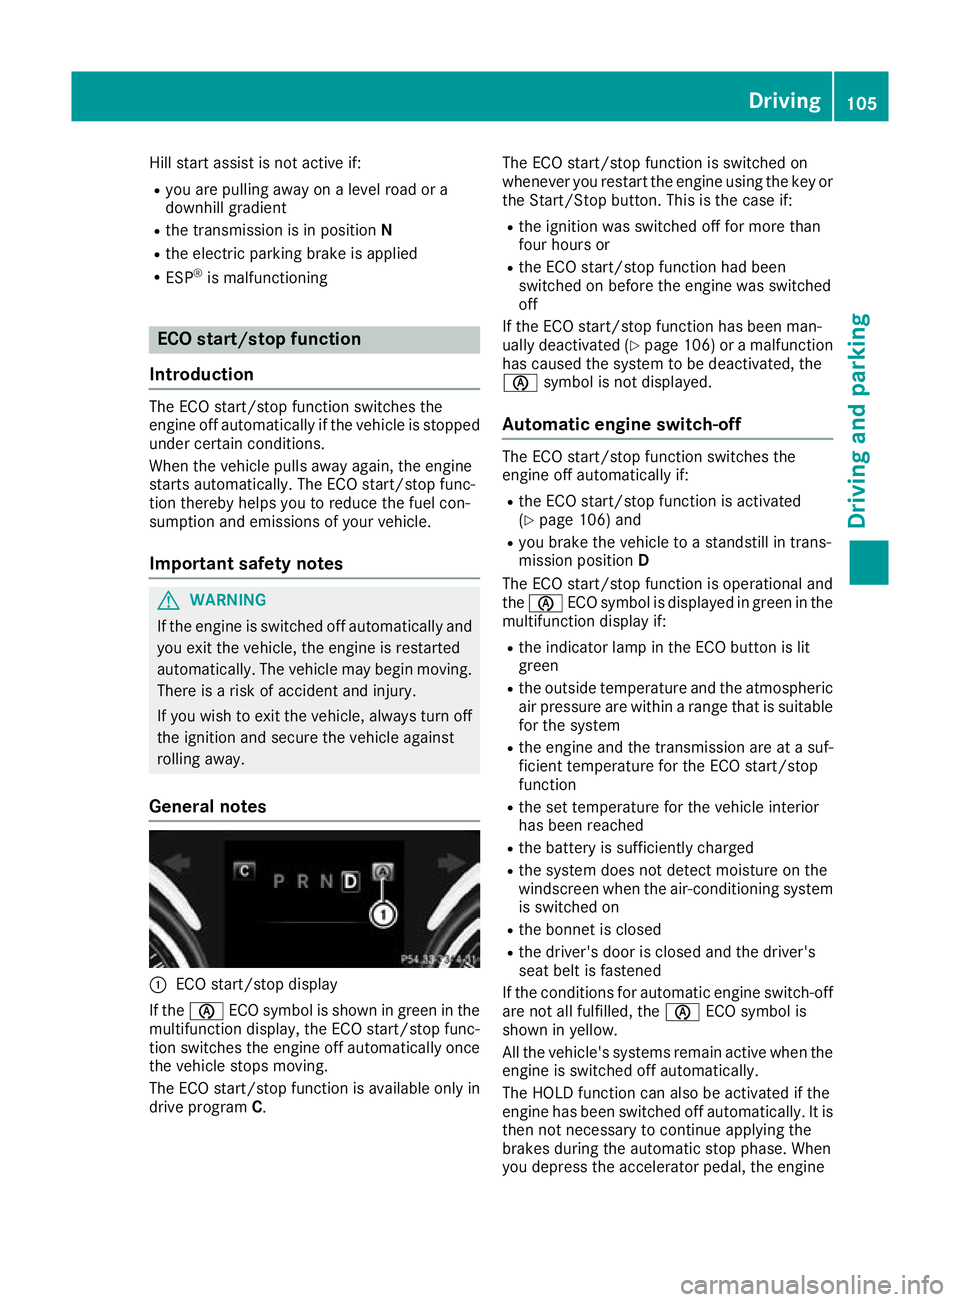
General notes :
ECO start/stop display
If the è ECO symbol is shown in green in the
multifunction display, the ECO start/stop func-
tion switches the engine off automatically once
the vehicle stops moving.
The ECO start/stop function is available only in
drive program C. The ECO start/stop function is switched on
whenever you restart the engine using the key or the Start/Stop button. This is the case if:
R the ignition was switched off for more than
four hours or
R the ECO start/stop function had been
switched on before the engine was switched
off
If the ECO start/stop function has been man-
ually deactivated (Y page 106) or a malfunction
has caused the system to be deactivated, the
è symbol is not displayed.
Automatic engine switch-off The ECO start/stop function switches the
engine off automatically if:
R the ECO start/stop function is activated
(Y page 106) and
R you brake the vehicle to a standstill in trans-
mission position D
The ECO start/stop function is operational and
the è ECO symbol is displayed in green in the
multifunction display if:
R the indicator lamp in the ECO button is lit
green
R the outside temperature and the atmospheric
air pressure are within a range that is suitable for the system
R the engine and the transmission are at a suf-
ficient temperature for the ECO start/stop
function
R the set temperature for the vehicle interior
has been reached
R the battery is sufficiently charged
R the system does not detect moisture on the
windscreen when the air-conditioning system
is switched on
R the bonnet is closed
R the driver's door is closed and the driver's
seat belt is fastened
If the conditions for automatic engine switch-off are not all fulfilled, the èECO symbol is
shown in yellow.
All the vehicle's systems remain active when the
engine is switched off automatically.
The HOLD function can also be activated if the
engine has been switched off automatically. It is then not necessary to continue applying the
brakes during the automatic stop phase. When
you depress the accelerator pedal, the engine Driving
105Driving and parking Z
Page 110 of 289

Setting the volume:
X Press button :.
If you select the loudest setting, indicator
lamp ;lights up. You can also adjust the position of the exhaust
flap using the:
R DYNAMIC SELECT controller (Y page 108)
R Multimedia system Problems with the engine
Problem
Possible causes/consequences and
M MSolutions The engine does not
start. The HOLD function or DISTRONIC PLUS is activated.
X Deactivate the HOLD function (Y page 138) or DISTRONIC PLUS
(Y page 130).
X Start the engine again (Y page 103).The engine does not
start. The starter motor
can be heard. R
The engine electronics are malfunctioning.
R The fuel supply is malfunctioning.
Before attempting to restart the engine:
X Press the Start/Stop button repeatedly until all indicator lamps on
the instrument cluster go out.
or X Turn the key back to position 0in the ignition lock.
X Restart the engine (Y page 103). Avoid excessively long and fre-
quent attempts to start the engine, as this will drain the battery.
If the engine does not start after several attempts: X Consult a qualified specialist workshop. The engine does not
start. The starter motor
can be heard. The
reserve fuel warning
lamp is lit and the fuel
gauge display is at the
reserve level. The fuel tank is empty.
X Refuel the vehicle. The engine does not
start. You cannot hear
the starter motor. The on-board voltage is too low because the battery is too weak or
discharged.
X Jump-start the vehicle (Y page 253).
If the engine does not start despite attempts to jump-start it:
X Consult a qualified specialist workshop. The starter motor was exposed to excessively high thermal load.
X Start the engine again (Y page 103).
If the engine still does not start: X Consult a qualified specialist workshop. Driving
107Driving and parking Z