2016 MERCEDES-BENZ AMG GT ROADSTER fuel cap
[x] Cancel search: fuel capPage 13 of 289
Checking the oil level using the
dipstick .......................................... 233
Checking the oil level using the
on-board computer ........................ 234
Display message ............................ 184
Filling capacity .............................. .279
Notes about oil grades ................... 279
Notes on oil level/consumption .... 233
Temperature (on-board com-
puter) ............................................. 167
Topping up ..................................... 234
Entering an address
See also Digital Owner's Manual ... 205
Environmental protection
Returning an end-of-life vehicle ....... 22
ESP ®
(Electronic Stability Pro-
gram)
AMG menu (on-board computer) ... 168
Characteristics ................................. 58
Deactivating/activating ................... 58
Display message ............................ 172
Function/notes ................................ 57
General notes .................................. 57
Important safety guidelines ............. 58
Warning lamp ................................. 197
ETS/4ETS (Electronic Traction Sys-
tem) ...................................................... 58
Exhaust pipe (cleaning instruc-
tions) ................................................. .242
Exterior lighting
Cleaning ......................................... 241
see Lights
Exterior mirrors
Adjusting ......................................... 84
Anti-dazzle mode (automatic) .......... 85
Folding in/out (automatically) ......... 85
Folding in/out (electrically) ............. 85
Out of position (troubleshooting) ..... 85
Parking position ............................... 86
Resetting ......................................... 85
Storing settings (memory func-
tion) ................................................. 87 F
Fault message see Display messages Favourites
Overview ........................................ 208
Features ............................................. 220
Filler cap
see Fuel filler flap
Fire extinguisher ............................... 245
First-aid kit ......................................... 245
Fitting a wheel
Fitting a wheel ............................... 271
Lowering the vehicle ...................... 272
Preparing the vehicle ..................... 268
Raising the vehicle ......................... 269
Removing a whee l.......................... 270
Securing the vehicle against roll-
ing away ........................................ 268
Flat tyre
Changing a wheel/fitting the
spare whee l................................... 267
Preparing the vehicle ..................... 247
TIREFIT kit ...................................... 247
see Emergency spare wheel
Floormat ............................................. 230
Frequencies
Garage door opener ....................... 228
Mobile phone ................................. 275
Two-way radio ................................ 275
Front-passenger front airbag deac-
tivation system
Operation ......................................... 42
Problems ......................................... 45
System self-test ............................... 44
Fuel
Additives ........................................ 279
Consumption statistics .................. 158
Displaying the current consump-
tion ................................................ 158
Displaying the range ...................... 158
Driving tip s.................................... 123
E10 ................................................ 278
Fuel gauge ....................................... 29
Grade (petrol) ................................ 278
Important safety notes .................. 277
Problem (malfunction) ................... 119
Refuelling ....................................... 117
Tank content/reserve fue l............. 278
Fuel filler flap
Closing ........................................... 118
General information ....................... 118 10
Index
Page 14 of 289
Opening ......................................... 118
Problem (malfunction) ...................1
19
Fuel level
Calling up the range (on-board
computer) ...................................... 158
Gauge .............................................. 29
Fuel tank
Capacity ........................................ 278
Problem (malfunction) ................... 119
Fuses
Allocation chart ............................ .260
Before changing ............................ .259
Fuse box in the front-passenger
footwell .......................................... 259
Fuse box in the luggage compart-
ment .............................................. 260
Important safety notes .................. 259 G
G-Meter (on-board computer) .......... 167
Garage door opener
Clearing the memory ..................... 227
Frequencies ................................... 228
General notes ................................ 225
Important safety notes .................. 226
Opening/closing the garage door .. 227
Problems when programming ....... .227
Programming (button in the rear-
view mirror) ................................... 226
Synchronising the rolling code ....... 226
Gear indicator (on-board com-
puter) ................................................. .167
Gearshift paddles
see Steering wheel gearshift paddles
Gearshift program
SETUP (on-board computer) .......... 168
Genuine Mercedes-Benz parts ........... 22
Glove compartment .......................... 218
Google™ Local Search
See also Digital Owner's Manual ... 205 H
Handwriting recognition Switching text reader function
on/off ............................................ 207
Touchpad ....................................... 207 Hazard warning lamps
........................ 90
Head restraints
Adjusting ......................................... 80
Headlamp
Cleaning system (notes) ................ 280
Headlamp flasher ................................ 89
Headlamps
Misting up ........................................ 91
see Automatic headlamp mode
Heating
see Climate control
High-pressure cleaners .................... 239
Hill start assist .................................. 104
HOLD function
Activating ....................................... 138
Deactivating ................................... 138
Display message ............................ 187
Function/notes ............................ .138
Home address
See also Digital Owner's Manual ... 205
Horn ...................................................... 27 I
Ignition lock see Key positions
Immobiliser .......................................... 60
Indicator and warning lamp
Restraint system ............................ 199
Indicator and warning lamps
COLLISION PREVENTION ASSIST
PLUS .............................................. 202
Coolant .......................................... 200
Engine diagnostics ......................... 200
SPORT handling mode ................... 199
Indicator lamps
Display message ............................ 182
see Warning and indicator lamps
Indicators
see Turn signals
Instrument cluster
Overview .......................................... 29
Warning and indicator lamps ........... 29
Instrument cluster lighting .............. 165
Interior lighting
Automatic control system ................ 91
General notes .................................. 91
Overview .......................................... 91 Index
11
Page 121 of 289
Further information on fuel and fuel quality
(Y page 277). Refuelling
General notes Observe the important safety notes
(Y
page 117).
If you unlock/lock the vehicle from the outside,
the fuel filler flap also unlocks/locks.
The position of the 8fuel filler cap is dis-
played in the instrument cluster. The arrow next to the filling pump indicates the side of the vehi-
cle.
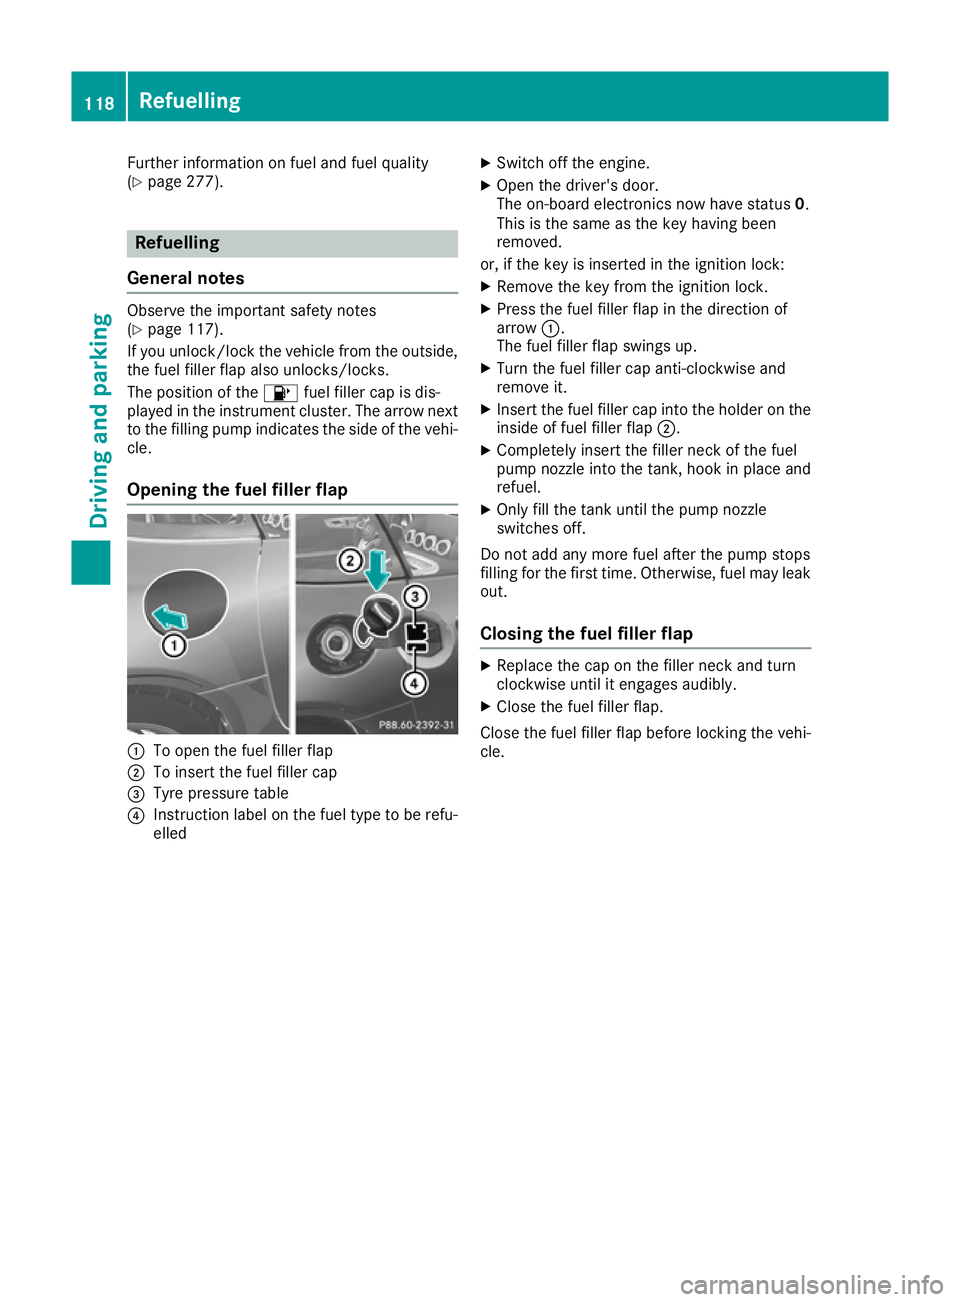
Opening the fuel filler flap :
To open the fuel filler flap
; To insert the fuel filler cap
= Tyre pressure table
? Instruction label on the fuel type to be refu-
elled X
Switch off the engine.
X Open the driver's door.
The on-board electronics now have status 0.
This is the same as the key having been
removed.
or, if the key is inserted in the ignition lock: X Remove the key from the ignition lock.
X Press the fuel filler flap in the direction of
arrow :.
The fuel filler flap swings up.
X Turn the fuel filler cap anti-clockwise and
remove it.
X Insert the fuel filler cap into the holder on the
inside of fuel filler flap ;.
X Completely insert the filler neck of the fuel
pump nozzle into the tank, hook in place and
refuel.
X Only fill the tank until the pump nozzle
switches off.
Do not add any more fuel after the pump stops
filling for the first time. Otherwise, fuel may leak out.
Closing the fuel filler flap X
Replace the cap on the filler neck and turn
clockwise until it engages audibly.
X Close the fuel filler flap.
Close the fuel filler flap before locking the vehi-
cle. 118
RefuellingDriving and parking
Page 253 of 289
Therefore, place the filler hose in the plastic
bag which contained the TIREFIT kit.
H
Environmental note
Have the used tyre sealant bottle disposed of professionally, e.g. at a qualified specialist
workshop.
If a tyre pressure of 180 kPa (1.8 bar/26 psi) has been attained after five minutes:
X Switch off the tyre inflation compressor.
X Unscrew the filler hose from the valve of the
faulty tyre.
Leave the tyre sealant bottle attached to the
flange.
X Stow the tyre sealant bottle, the tyre inflation
compressor and the warning triangle.
X Pull away immediately.
X Stop after driving for approximately ten
minutes and check the tyre pressure with the
tyre inflation compressor.
The tyre pressure must now be at least
130 kPa (1.3 bar/19 psi). G
WARNING
If the required tyre pressure is not reached
after driving for a short period, the tyre is too badly damaged. The tyre sealant cannot
repair the tyre in this instance. Damaged tyres and a tyre pressure that is too low can signif-
icantly impair the vehicle's braking and driv-
ing characteristics. There is a risk of accident.
Do not continue driving. Contact a qualified
specialist workshop.
i In your vehicle, you will find a sticker with
the Mercedes-Benz Service24h telephone
number, e.g. on the B-pillar on the driver's
side.
X Correct the tyre pressure if it is still at least
130 kPa (1.3 bar/19 psi). See the tyre pres-
sure table on the fuel filler flap for values.
X To increase the tyre pressure: switch on
the tyre inflation compressor.
X To reduce the tyre pressure: open release
screw C. X
When the tyre pressure is correct, unscrew
the filler hose from the valve of the sealed
tyre.
X Screw the valve cap onto the tyre valve of the
sealed tyre.
X Unscrew the tyre sealant bottle from the tyre
inflation compressor.
X Drive to the nearest qualified specialist work-
shop and have the tyre changed there.
X Have the tyre sealant bottle replaced as soon
as possible at a qualified specialist workshop.
X Have the tyre sealant bottle replaced every
four years at a qualified specialist workshop. Battery (vehicle)
Important safety notes
Work on the battery, e.g. removing or fitting,
requires specialist knowledge and the use of
special tools. Therefore, always have work on
the battery carried out at a qualified specialist
workshop. G
WARNING
Work carried out incorrectly on the battery
can lead, for example, to a short circuit and
thus damage the vehicle electronics. This can lead to function restrictions applying to
safety-relevant systems, e.g the lighting sys-
tem, the ABS (anti-lock braking system) or the
ESP ®
(Electronic Stability Program). The oper-
ating safety of your vehicle may be restricted.
You could lose control of the vehicle, for
example:
R when braking
R in the event of abrupt steering manoeuvres
and/or when the vehicle's speed is not
adapted to the road conditions
There is a risk of an accident.
In the event of a short circuit or a similar inci- dent, contact a qualified specialist workshop
immediately. Do not drive any further. Always have work on the battery carried out at a
qualified specialist workshop.
Further information about ABS (Y page 54) and
ESP ®
(Y page 57). 250
Battery (vehicle)Breakdown assistance
Page 257 of 289
R
It is important that you observe the described order of the battery terminals when connecting
and disconnecting a battery.
R When jump-starting, make sure that the battery poles with identical polarity are connected.
R It is particularly important to observe the described order when connecting and disconnecting
the jump leads.
R Never connect or disconnect the battery terminals while the engine is running. G
WARNING
A discharged battery can freeze at temperatures below freezing point. When jump-starting the
vehicle or charging the battery, gases can escape from the battery. There is a risk of an explosion.
Allow the frozen battery to thaw out before charging it or jump-starting.
If the indicator/warning lamps do not light up at low temperatures, it is very likely that the dis-
charged battery has frozen. In this case you may neither jump-start the vehicle nor charge the
battery. The service life of a battery that has been thawed may be reduced. The starting charac-
teristics may be impaired, especially at low temperatures. Have the thawed battery checked at a
qualified specialist workshop.
All vehicles:
! Avoid repeated and lengthy starting attempts. Otherwise, the catalytic converter could be
damaged by the non-combusted fuel.
Do not use a rapid charging device to start the vehicle. If your vehicle's battery is discharged, the
engine can be jump-started from another vehicle or from a second battery using jump leads.
Observe the following points:
R The battery is not accessible in all vehicles. If the other vehicle's battery is not accessible, jump-
start the vehicle using a second battery or a jump-starting device.
R You may only jump-start the vehicle when the engine and exhaust system are cold.
R All vehicles except vehicles with a lithium-ion battery: do not start the engine if the battery
is frozen. Let the battery thaw first.
R Jump-starting may only be performed using batteries with a nominal voltage of 12 V.
R Only use jump leads that have a sufficient cross-section and insulated terminal clamps.
R If the battery is fully discharged, leave the battery that is being used to jump-start connected for
a few minutes before attempting to start. This charges the empty battery a little.
R Make sure that the two vehicles do not touch.
Make sure that:
R The jump leads are not damaged.
R Non-insulated parts of the terminal clamps do not come into contact with other metal parts while
the jump leads are connected to the battery.
R the jump leads cannot come into contact with parts which can move when the engine is running,
such as the V-belt pulley or the fan.
X Secure the vehicle by applying the electric parking brake.
X Shift the transmission to position P.
X Make sure that the ignition is switched off . All indicator lamps in the instrument cluster must be
off. When using the key, turn the key to position 0in the ignition lock and remove it (Y page 103).
X Switch off all electrical consumers, e.g. rear window heating, lighting etc.
X Open the bonnet.
Vehicles with carbon engine cover: 254
Jump-startingBreakdown assistance
Page 267 of 289
cause damage to the vehicle or the tyres.
There is a risk of an accident.
To avoid hazardous situations:
R never fit snow chains on the front wheels
R fit snow chains to the rear wheels in pairs.
For safety reasons, Mercedes-Benz recom-
mends that you only use snow chains that have been specifically approved for your vehicle by
Mercedes-Benz, or that are of a corresponding
standard of quality. For more information,
please contact a qualified specialist workshop.
If you intend to fit snow chains, please bear the
following points in mind:
R snow chains cannot be fitted to all wheel-tyre
combinations. Permissible wheel-tyre combi-
nations (Y page 272).
R only use snow chains if the road surface is
completely snow-covered. Remove the snow
chains as soon as possible when you come to
a road that is not snow-covered.
R local regulations may restrict the use of snow
chains. Observe the appropriate regulations if you wish to fit snow chains.
R do not exceed the maximum permissible
speed of 50 km/h.
When pulling away with snow chains fitted, you can deactivate ESP ®
(Y page 58). This way you
can allow the wheels to spin in a controlled
manner, achieving increased driving force (cut-
ting action).
Information about driving with an emergency
spare wheel (Y page 273). Tyre pressure
Tyre pressure specifications
G
WARNING
Underinflated or overinflated tyres pose the
following risks:
R the tyres may burst, especially as the load
and vehicle speed increase.
R the tyres may wear excessively and/or
unevenly, which may greatly impair tyre
traction.
R the driving characteristics, as well as steer-
ing and braking, may be greatly impaired. There is a risk of an accident.
Observe the recommended tyre pressure and
check the tyre pressure of all the tyres includ-
ing the spare wheel:
R at least every two weeks
R when the load changes
R before embarking on a longer journey
R for changed operating conditions, e.g. off-
road driving
If necessary, correct the tyre pressure. G
WARNING
If you fit unsuitable accessories onto tyre
valves, the tyre valves may be overloaded and malfunction, which can cause tyre pressure
loss. Due to their design, retrofitted tyre pres-
sure monitors keep the tyre valve open. This
can also result in tyre pressure loss. There is a risk of accident.
Only screw standard valve caps or valve caps
specifically provided by Mercedes-Benz for
your vehicle onto the tyre valve. G
WARNING
If the tyre pressure drops repeatedly, the
wheel, valve or tyre may be damaged. Tyre
pressure that is too low may result in a tyre
blow-out. There is a risk of accident.
R Check the tyre for foreign objects.
R Check whether the wheel is losing air or the
valve is leaking.
If you are unable to rectify the damage, con-
tact a qualified specialist workshop. H
Environmental note
Check the tyre pressure regularly, at least
every 14 days.
The recommended tyre pressures for various
operating conditions can be found in the tyre
pressure table on the fuel filler flap
(Y page 118).
Operation with an emergency spare wheel:
information on operation with an emergency
spare wheel can be found in the general notes in 264
Tyre pressureWheels and tyres
Page 280 of 289
Vehicle identification number (VIN)
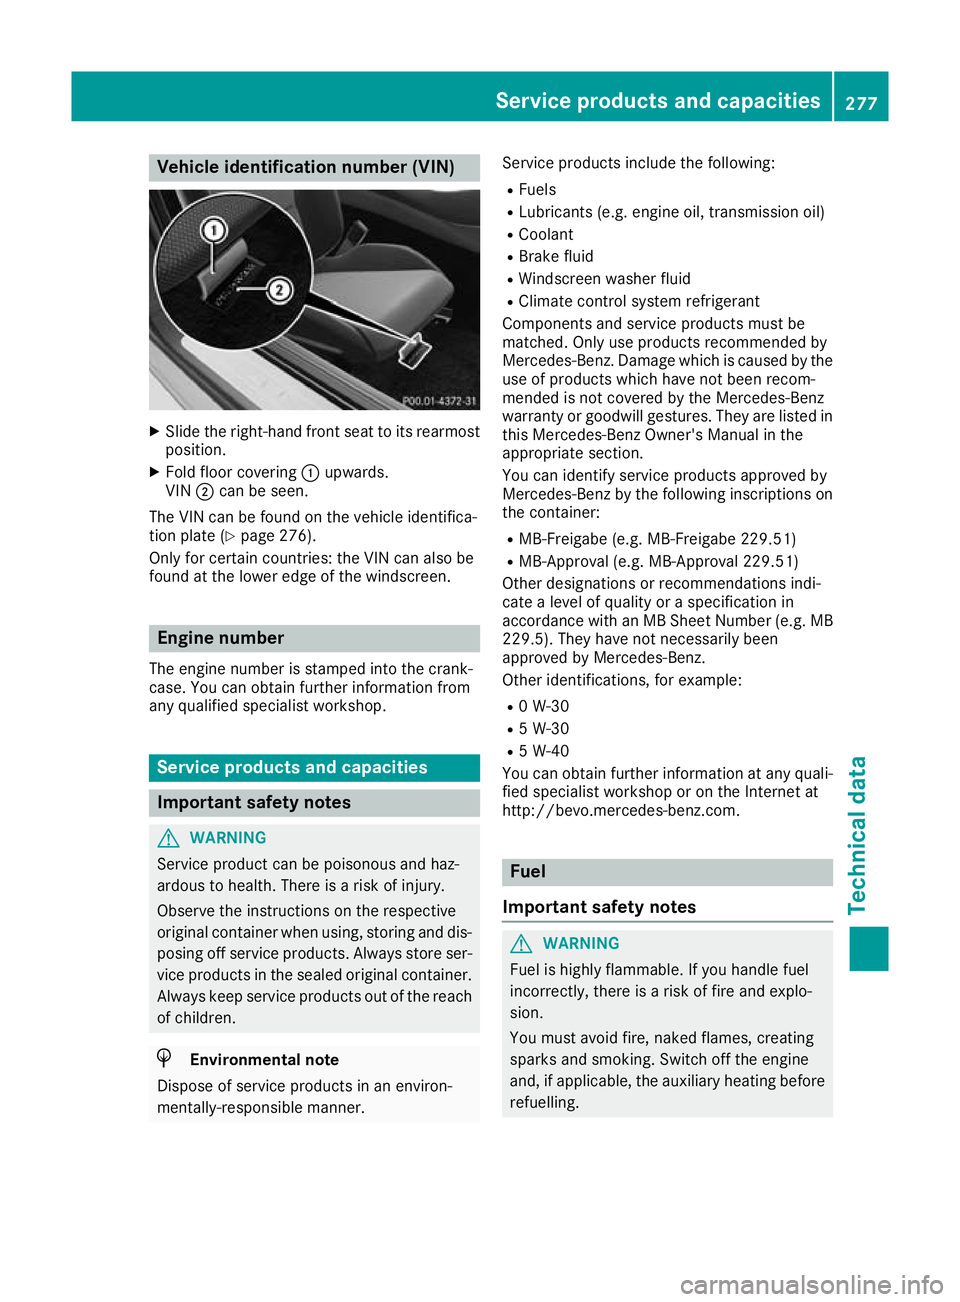
X
Slide the right-hand front seat to its rearmost
position.
X Fold floor covering :upwards.
VIN ;can be seen.
The VIN can be found on the vehicle identifica-
tion plate (Y page 276).
Only for certain countries: the VIN can also be
found at the lower edge of the windscreen. Engine number
The engine number is stamped into the crank-
case. You can obtain further information from
any qualified specialist workshop. Service products and capacities
Important safety notes
G
WARNING
Service product can be poisonous and haz-
ardous to health. There is a risk of injury.
Observe the instructions on the respective
original container when using, storing and dis- posing off service products. Always store ser-
vice products in the sealed original container. Always keep service products out of the reach
of children. H
Environmental note
Dispose of service products in an environ-
mentally-responsible manner. Service products include the following:
R Fuels
R Lubricants (e.g. engine oil, transmission oil)
R Coolant
R Brake fluid
R Windscreen washer fluid
R Climate control system refrigerant
Components and service products must be
matched. Only use products recommended by
Mercedes-Benz. Damage which is caused by the use of products which have not been recom-
mended is not covered by the Mercedes-Benz
warranty or goodwill gestures. They are listed in this Mercedes-Benz Owner's Manual in the
appropriate section.
You can identify service products approved by
Mercedes-Benz by the following inscriptions on
the container:
R MB-Freigabe (e.g. MB-Freigabe 229.51)
R MB-Approval (e.g. MB-Approval 229.51)
Other designations or recommendations indi-
cate a level of quality or a specification in
accordance with an MB Sheet Number (e.g. MB
229.5). They have not necessarily been
approved by Mercedes-Benz.
Other identifications, for example:
R 0 W-30
R 5 W-30
R 5 W-40
You can obtain further information at any quali-
fied specialist workshop or on the Internet at
http://bevo.mercedes-benz.co m. Fuel
Important safety notes G
WARNING
Fuel is highly flammable. If you handle fuel
incorrectly, there is a risk of fire and explo-
sion.
You must avoid fire, naked flames, creating
sparks and smoking. Switch off the engine
and, if applicable, the auxiliary heating before refuelling. Service products and capacities
277Technical data Z
Page 281 of 289
G
WARNING
Fuels are poisonous and hazardous to health. There is a danger of injury.
Do not swallow fuel or let it come into contact
with skin, eyes or clothing. Do not inhale fuel
vapours. Keep fuels out of the reach of chil-
dren.
If you or others come into contact with fuel,
observe the following:
R Wash the fuel off any affected areas of skin
with water and soap immediately.
R If you get fuel in your eyes, rinse them thor-
oughly with clean water immediately. Seek immediate medical attention.
R If fuel is swallowed, seek immediate medi-
cal attention. Do not induce vomiting.
R Change any clothing that has come into
contact with fuel immediately.
Tank capacity Model Total capacity
All models
65.0 l
Model Of which
reserve fuel All models
10.0 l
Petrol
Fuel grade
! Do not use diesel to refuel vehicles with a
petrol engine. Do not switch on the ignition if
you accidentally refuel with the wrong fuel.
Otherwise, the fuel will enter the fuel system. Even small amounts of the wrong fuel can
result in damage to the fuel system and the
engine. Notify a qualified specialist workshop
and have the fuel tank and fuel lines drained
completely.
! Only refuel using super unleaded petrol with
at least 98 ROZ, that conforms to European
standard EN 228 or an equivalent specifica-
tion.
You can otherwise impair engine output or
damage the engine. Fuel of this specification may contain up to
10% ethanol. Your vehicle is suitable for use
with E10 fuel. You may refuel your vehicle
using E10 fuel.
! Only use the fuel recommended. Operating
the vehicle with other fuels can lead to dam-
age to the fuel system, engine and exhaust
system.
! Do not use the following:
R E85 (petrol with 85% ethanol)
R E100 (100% ethanol)
R M15 (petrol with 15% methanol)
R M30 (petrol with 30% methanol)
R M85 (petrol with 85% methanol)
R M100 (100% methanol)
R petrol with additives containing metal
R diesel
Do not mix such fuels with the fuel recom-
mended for your vehicle.
! As a temporary measure, if the recommen-
ded fuel is not available, you may also use
unleaded petrol with an octane rating of
95 RON. This may reduce engine perform-
ance and increase fuel consumption. As much
as possible, avoid driving at full throttle.
! As a temporary measure, if the recommen-
ded fuel is not available, you may also use
unleaded petrol in emergencies with an
octane rating of 91 RON.
Doing so results in noticeably higher fuel con-
sumption, and the engine power output is
noticeably reduced. Avoid driving at full throt- tle.
If no fuel other than petrol with 91 RON or a
lower grade is available, you should have the
vehicle adapted to run on this fuel at a quali-
fied specialist workshop.
You will usually find information about the fuel
quality on the pump. If you cannot find the label
on the fuel pump, ask the filling station staff.
i In some countries, the petrol available may
not be sufficiently low in sulphur. This fuel can temporarily produce unpleasant odours,
especially on short journeys. As soon as sul-
phur-free fuel (sulphur content < 10 ppm) is
used for refuelling, the odours are reduced.
Information on refuelling (Y page 118).278
Service products and capacitiesTechnical data