2016 MERCEDES-BENZ AMG GT ROADSTER climate settings
[x] Cancel search: climate settingsPage 10 of 289

Indicator lamp .................................. 97
Information on using
THERMOTRONIC automatic cli-
mate control .................................... 96
Overview ........................................ 209
Overview of systems ........................ 95
Problem with the rear window
heating .............................................99
Problems with cooling with air
dehumidification .............................. 97
Setting the air distribution ............... 97
Setting the air vents ...................... 100
Setting the airflow ........................... 98
Setting the climate mode (multi-
media system) ............................... 209
Setting the temperature .................. 97
Switching air-recirculation mode
on/of f.............................................. 99
Switching on/of f.............................. 96
Switching the rear window heat-
ing on/of f........................................ 99
Switching the synchronisation
function on and off .......................... 98
Synchronisation function (multi-
media system) ............................... 210
THERMOTRONIC (2-zone) auto-
matic climate control ....................... 95
Climate control settings
Multimedia system ........................ 208
Cockpit
Overview .......................................... 27
Collapsible emergency spare
wheel
see Emergency spare wheel
COLLISION PREVENTION ASSIST
PLUS
Activating/deactivating ................. 164
Display message ............................ 177
Operation/note s.............................. 55
COMAND display
Cleaning ......................................... 242
Combination switch ............................ 89
Connecting a USB device
See also Digital Owner's Manua l... 205
Consumption statistics (on-board
computer) .......................................... 158
Controller ........................................... 206
Convenience closing feature .............. 75Convenience opening feature
............ 75
Convenience opening/closing (air-
recirculation mode) ............................. 99
Coolant (engine)
Checking the level ......................... 235
Display message ............................ 183
Important safety notes .................. 280
Temperature display in the instru-
ment cluster .................................. 155
Warning lamp ................................. 200
Cooling
see Climate control
Copyright ............................................. 26
Cornering light function
Display message ............................ 182
Cruise control
Cruise control lever ....................... 126
Deactivating ................................... 127
Display message ............................ 188
Driving system ............................... 126
LIM indicator lamp ......................... 126
Selecting ........................................ 126
Setting a speed .............................. 127
Storing and maintaining current
speed ............................................. 126
Cup holder
Centre console .............................. 220
Important safety notes .................. 220 D
Data see Technical data
Data carrier
Selecting ........................................ 161
Data modem mode
Telephone with Bluetooth ®
(SAP
profile) ........................................... 214
Daytime driving lights
Display message ............................ 182
Function/note s................................ 88
Dealership
see Qualified specialist workshop
Declarations of conformity ................. 24
Diagnostics connection ...................... 25
Digital Owner's Manual
Help ................................................. 21
Introduction ..................................... 21 Index
7
Page 21 of 289

Connecting a Mobile phone (gen-
eral information) ............................ 211
Display message ............................ 193
Introduction ..................................
.162
Menu (on-board computer) ............ 162
Number from the phone book ....... .163
Redialling ....................................... 163
Rejecting/ending a call ................. 163
See also Digital Owner's Manual ... 205
Switching between mobile
phones .......................................... .212
Telephone compartment ................ 218
Telephone module with Bluetooth ®
(SAP profile) Activating and connecting the
module .......................................... .213
Charging a mobile phone .............. .215
Connecting the mobile phone ....... .214
Connecting the module via a USB
cable .............................................. 213
Data modem mode ........................ 214
Installing the module ..................... 213
Introduction ................................... 212
Saving/deleting the PIN for the
SIM card ........................................ 214
Settings ......................................... 214
SIM card mode .............................. 213
Text messages ............................... 215
Transferring the phone book .......... 214
Temperature
Coolant (display in the instrument
cluster) .......................................... 155
Engine oil (on-board computer) ...... 167
Outside temperature ..................... .155
Setting (climate control) .................. 97
Transmission oil (on-board com-
puter) ............................................. 167
TEMPOMAT
Function/notes ............................ .126
Text messages
Telephone module with Blue-
tooth ®
(SAP profile) ....................... 215
Timing (RACETIMER) ......................... 168
TIREFIT kit .......................................... 247
Important safety notes .................. 247
Storage location ............................ 246
Tyre pressure not reached ............. 249 Tyre pressure reached ................... 249
Total distance recorder .................... 157
Touchpad
Changing the station/music
track .............................................. 208
Character suggestions ................... 207
Deleting characters ....................... 207
Entering a space ............................ 207
Entering characters ....................... 207
Gesture control .............................. 206
Handwriting recognition ................ 207
Operating the touchpad ................. 206
Overview ........................................ 206
Quick access for audio .................. 208
Switching ....................................... 206
Switching input line ....................... 207
Tow-away protection
Activating ......................................... 61
Deactivating ..................................... 61
Function .......................................... .61
Tow-starting
Emergency engine starting ............ 259
Towing
Important safety notes .................. 256
Transporting the vehicle ................ 258
Towing away
Fitting the towing eye .................... 257
Removing the towing eye ............... 258
With both axles on the ground ....... 258
Towing eye ......................................... 246
Traffic Sign Assist
Activating/deactivating the warn-ing function .................................... 164
Display message ............................ 186
Function/note s............................. 148
Important safety notes .................. 149
Instrument cluster display ............. 149
Trailer towing
Lights display message .................. 182
Transmission
Driving tips .................................... 112
Selector lever ................................ 109
see Automatic transmission
Transmission position display ......... 111
Transmission positions .................... 111
Transporting the vehicle .................. 25818
Index
Page 98 of 289
Overview of climate control systems
General notes
Observe the settings recommended on the fol-
lowing pages. The windows could otherwise
mist up.
To prevent the windows from misting up:
R switch off climate control only briefly
R switch on air-recirculation mode only briefly
R switch on the cooling with air dehumidifica-
tion function
R switch on the windscreen demisting function
briefly, if required
Climate control regulates the temperature and
air humidity in the vehicle interior. The interior
filter cleans the air, thus improving the interior
climate.
The cooling with air dehumidification function is
only available when the engine is running. Opti- mum climate control is only achieved with the
side windows closed.
i Ventilate the vehicle for a brief period during
warm weather, e.g. using the convenience opening feature (Y
page 75). This will speed
up the cooling process and the desired inte-
rior temperature will be reached more
quickly.
i The integrated filter filters out most parti-
cles of dust and soot and completely filters
out pollen. It also reduces gaseous pollutants and odours. A clogged filter reduces the
amount of air supplied to the vehicle interior.
For this reason, you should always observe
the interval for replacing the filter, which is
specified in the Service Booklet. As this
depends on environmental conditions, e.g.
heavy air pollution, the interval may be
shorter than stated in the Service Booklet.
i It is possible that the blower may be activa-
ted automatically 60 minutes after the engine
has been switched off depending on various
factors, e.g. the outside temperature. The
vehicle is then ventilated for 30 minutes to dry the automatic climate control. Control panel for THERMOTRONIC automatic climate control (2-zone)
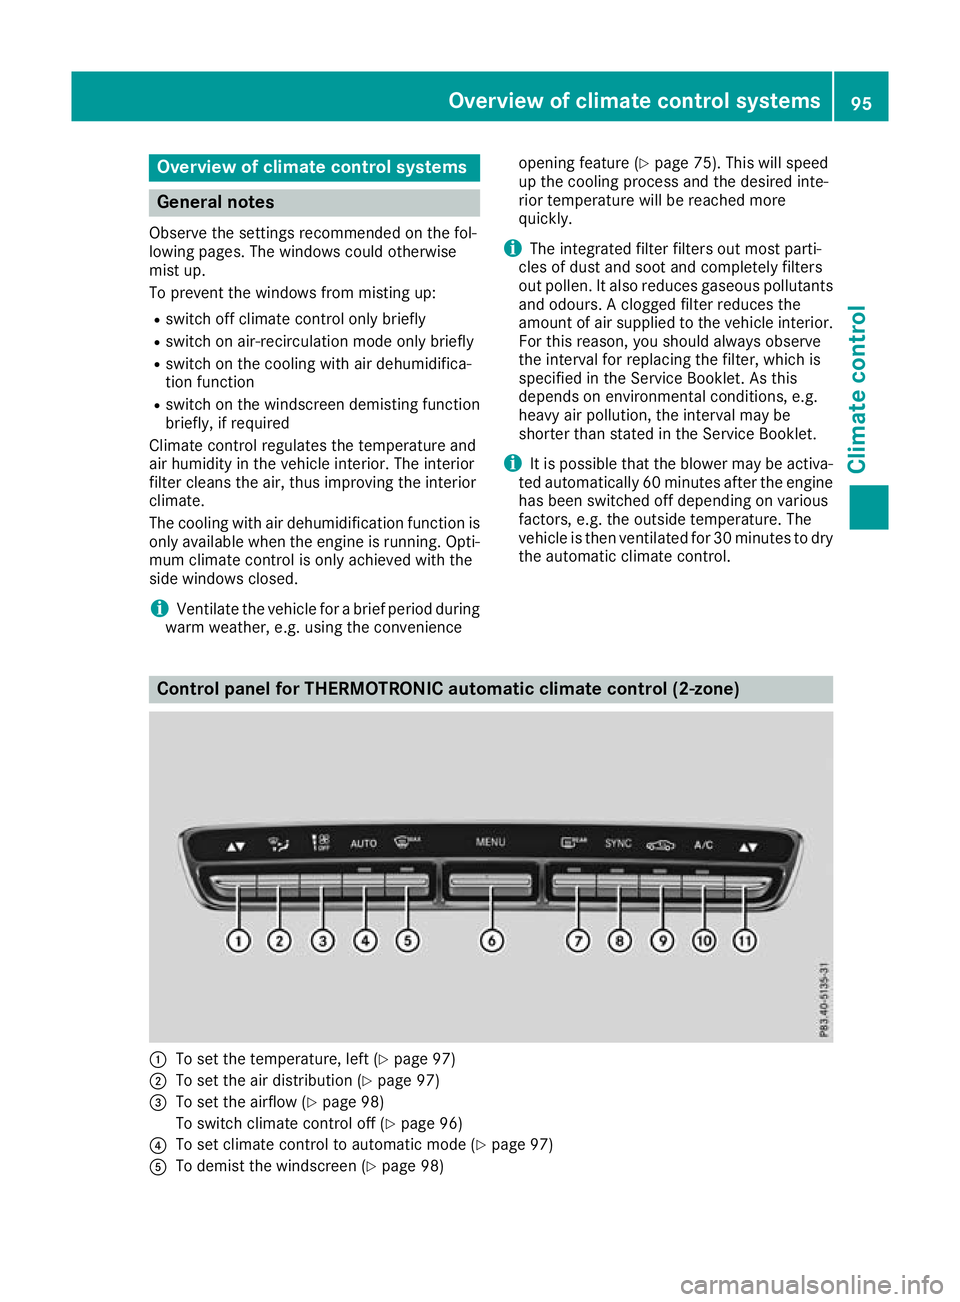
:
To set the temperature, left (Y page 97)
; To set the air distribution (Y page 97)
= To set the airflow (Y page 98)
To switch climate control off (Y page 96)
? To set climate control to automatic mode (Y page 97)
A To demist the windscreen (Y page 98) Overview of climate control systems
95Climate control
Page 100 of 289
Problems with the "Cooling with air dehumidification" function
Problem
Possible causes/consequences and
M
MSolutions The indicator lamp over
the
¿ rocker switch
flashes three times or
remains off. The cooling
with air dehumidification
function cannot be acti-
vated via the multimedia system any longer
(Y page 209). The cooling with air dehumidification function has been deactivated
due to a malfunction.
X Consult a qualified specialist workshop. Setting climate control to automatic
mode
General notes In automatic mode, the set temperature is main-
tained automatically at a constant level. The
system automatically regulates the temperature of the dispensed air, the airflow and the air dis- tribution.
The "Cooling with air dehumidification" function
is activated automatically in automatic mode.
Automatic control X
Select key position 2with the Start/Stop but-
ton (Y page 103).
X Set the desired temperature using the w
rocker switch.
X To activate: press theÃrocker switch up
or down.
The indicator lamp above the Ãrocker
switch lights up.
X To switch to manual operation:press the
H rocker switch up or down.
or X Press the upper or lower section of the _
rocker switch.
In automatic mode, if you adjust the airflow or
air distribution manually, the indicator lamp
above the Ãrocker switch goes out. The
function which has not been changed manually,
however, continues to be controlled automati-
cally. When the manually set function switches
back to automatic mode, the indicator lamp
above the Ãrocker switch lights up again. Setting the temperature
Different temperatures can be set for the driv-
er's and front-passenger sides.
X Select key position 2with the Start/Stop but-
ton (Y page 103).
X To increase or reduce: press thew
rocker switch up or down.
Only change the temperature setting in small
increments. Start at 22 †. Setting the air distribution
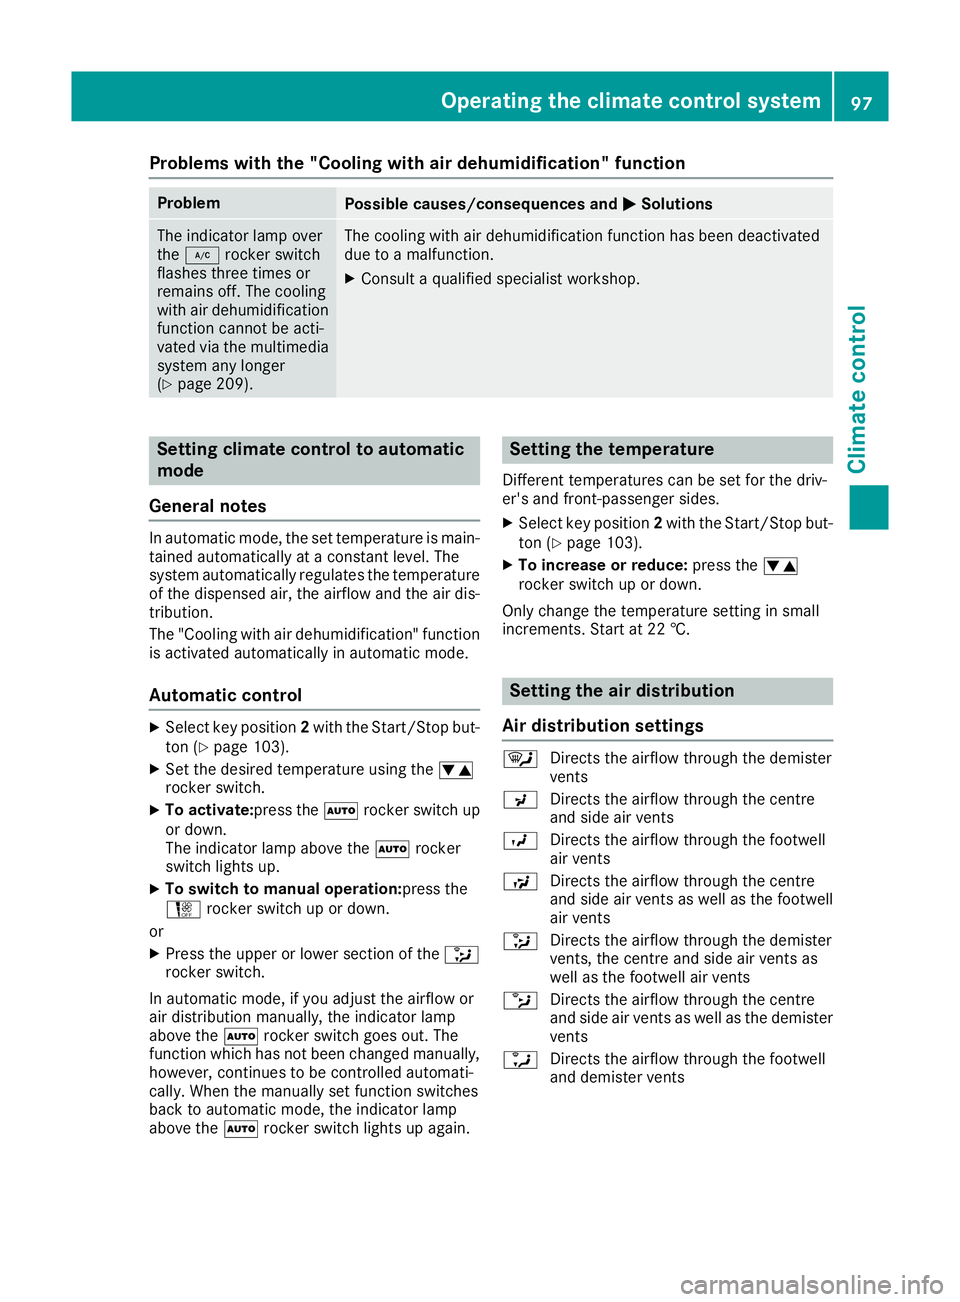
Air distribution settings ¯
Directs the airflow through the demister
vents
P Directs the airflow through the centre
and side air vents
O Directs the airflow through the footwell
air vents
S Directs the airflow through the centre
and side air vents as well as the footwell
air vents
_ Directs the airflow through the demister
vents, the centre and side air vents as
well as the footwell air vents
b Directs the airflow through the centre
and side air vents as well as the demister
vents
a Directs the airflow through the footwell
and demister vents Operating the climate control system
97Climate control
Page 101 of 289
Setting
X
Select key position 2with the Start/Stop but-
ton (Y page 103).
X Press the _rocker switch up or down.
The various air distribution settings appear in
the multimedia system. Setting the airflow
X Select key position 2with the Start/Stop but-
ton (Y page 103).
X To increase or reduce: press theH
rocker switch up or down. Activating/deactivating the synchro-
nisation function
General notes Climate control can be set centrally using the
synchronisation function. The temperature set-
ting is adopted for the front-passenger side.
Activating/deactivating X
Press the 0rocker switch up or down.
The indicator lamp above the 0rocker
switch lights up or goes out.
The synchronisation function is deactivated if
the settings for the front-passenger side are
changed. Demisting the windscreen
General notes You can use this function to defrost the wind-
screen or to demist the inside of the windscreen and the front side windows.
Switch off the windscreen demisting function as
soon as the windscreen is clear again. Switching on/off X
Select key position 2with the Start/Stop but-
ton (Y page 103).
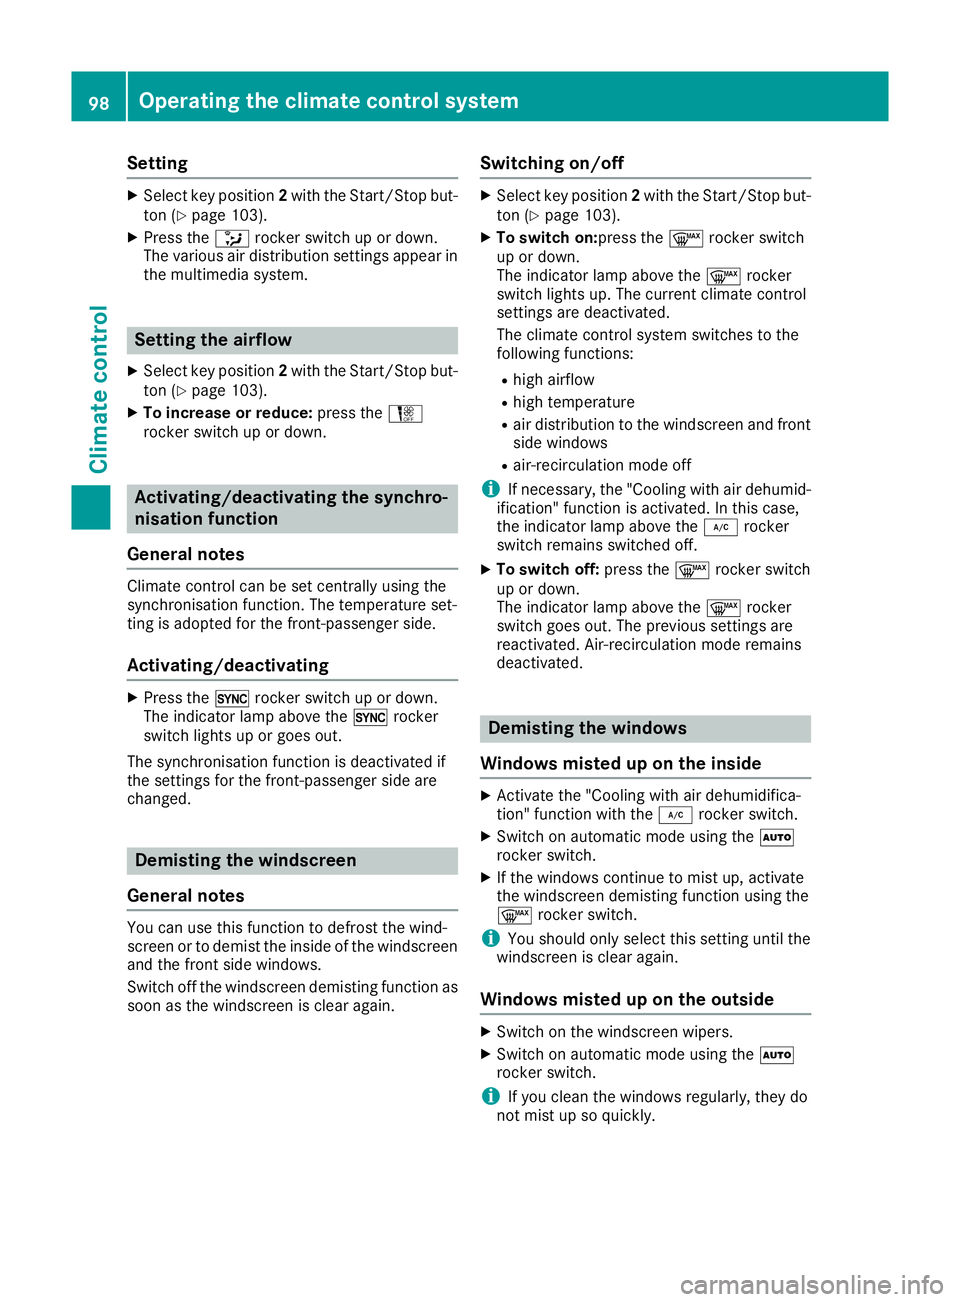
X To switch on:press the ¬rocker switch
up or down.
The indicator lamp above the ¬rocker
switch lights up. The current climate control
settings are deactivated.
The climate control system switches to the
following functions:
R high airflow
R high temperature
R air distribution to the windscreen and front
side windows
R air-recirculation mode off
i If necessary, the "Cooling with air dehumid-
ification" function is activated. In this case,
the indicator lamp above the ¿rocker
switch remains switched off.
X To switch off: press the¬rocker switch
up or down.
The indicator lamp above the ¬rocker
switch goes out. The previous settings are
reactivated. Air-recirculation mode remains
deactivated. Demisting the windows
Windows misted up on the inside X
Activate the "Cooling with air dehumidifica-
tion" function with the ¿rocker switch.
X Switch on automatic mode using the Ã
rocker switch.
X If the windows continue to mist up, activate
the windscreen demisting function using the
¬ rocker switch.
i You should only select this setting until the
windscreen is clear again.
Windows misted up on the outside X
Switch on the windscreen wipers.
X Switch on automatic mode using the Ã
rocker switch.
i If you clean the windows regularly, they do
not mist up so quickly. 98
Operating the climate control systemClimate control
Page 211 of 289
Quick access for audio
Changing the station/music track
Depending on the audio source that is currently
activated, you can use this function to select thenext station or music track.
X Swipe upwards with two fingers on the touch-
pad.
The current audio source is displayed.
X To select the previous or next station/
music track:
swipe to the left or right.
The selected station/music track is played.
Switching the character entry between
touchpad and controller Requirement: an input line for text, numbers or
characters has been selected.
X To switch to the controller: press the con-
troller.
Character entry using the controller is active.
X To switch to the touchpad: press the touch-
pad with your finger.
Handwriting recognition on the touchpad is
active. Favourites
Calling up and exiting favourites X
To call up: press thegbutton on the con-
troller or on the touchpad.
X Select a favourite, e. g. Vehicle
Vehicle.
The favourites are displayed.
X To exit: press the gbutton again. Adding favourites Adding a predefined favourite
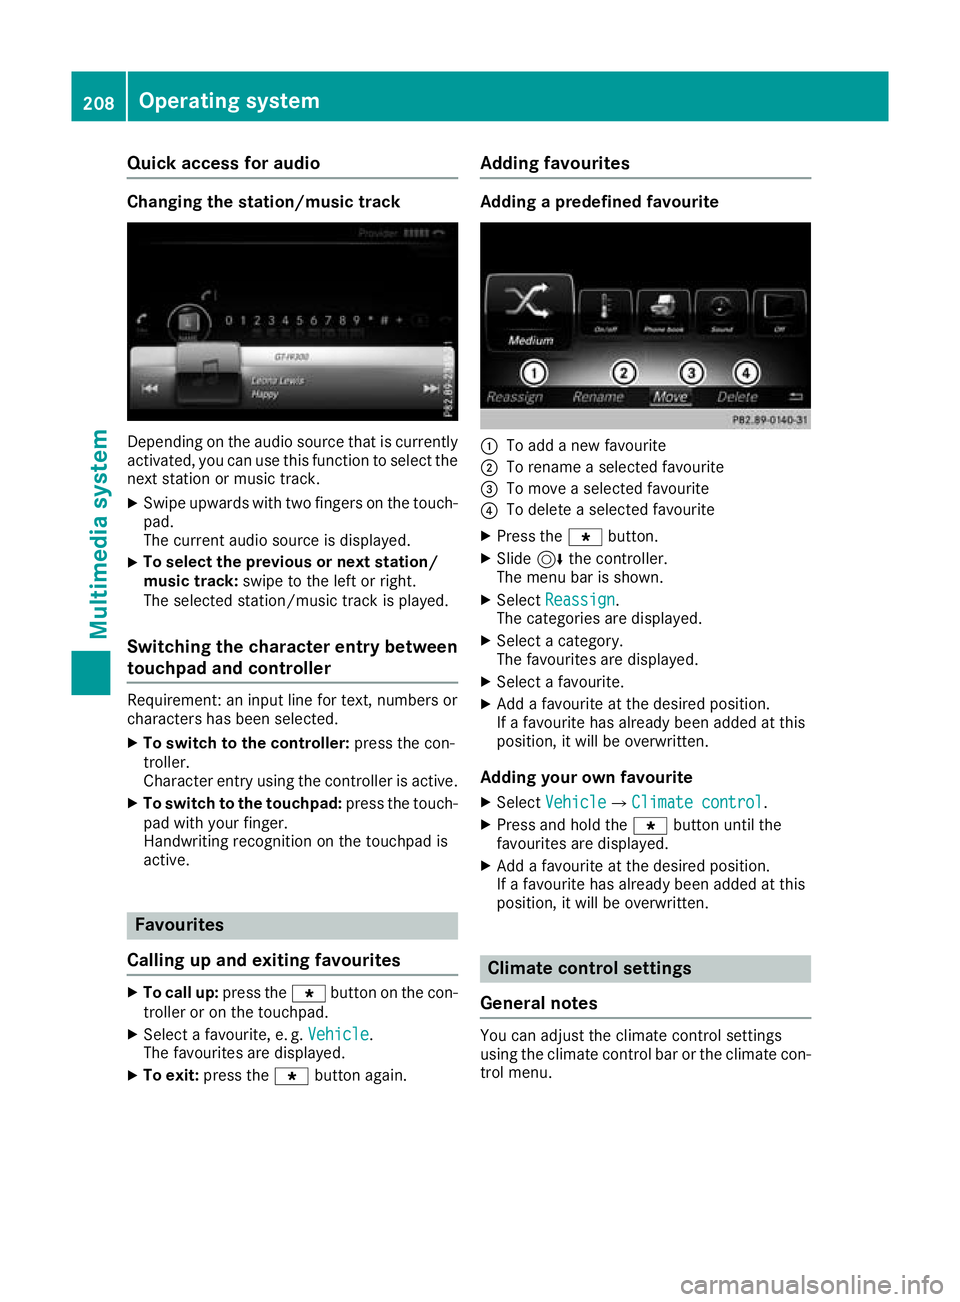
:
To add a new favourite
; To rename a selected favourite
= To move a selected favourite
? To delete a selected favourite
X Press the gbutton.
X Slide 6the controller.
The menu bar is shown.
X Select Reassign
Reassign .
The categories are displayed.
X Select a category.
The favourites are displayed.
X Select a favourite.
X Add a favourite at the desired position.
If a favourite has already been added at this
position, it will be overwritten.
Adding your own favourite
X Select Vehicle VehicleQ Climate control
Climate control.
X Press and hold the gbutton until the
favourites are displayed.
X Add a favourite at the desired position.
If a favourite has already been added at this
position, it will be overwritten. Climate control settings
General notes You can adjust the climate control settings
using the climate control bar or the climate con-
trol menu. 208
Operating systemMultimedia system
Page 212 of 289
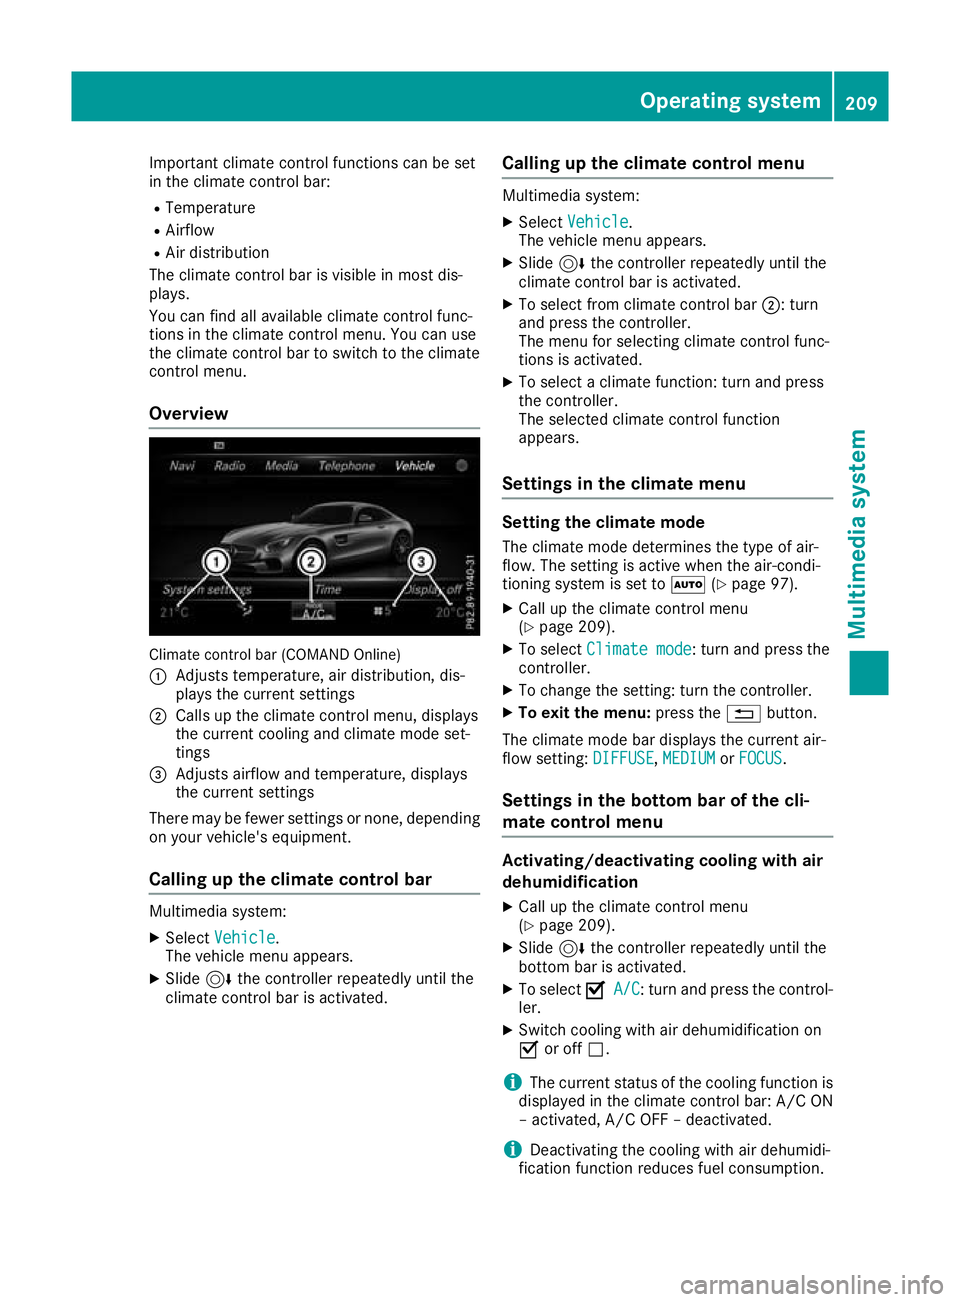
Important climate control functions can be set
in the climate control bar:
R Temperature
R Airflow
R Air distribution
The climate control bar is visible in most dis-
plays.
You can find all available climate control func-
tions in the climate control menu. You can use
the climate control bar to switch to the climate
control menu.
Overview Climate control bar (COMAND Online)
: Adjusts temperature, air distribution, dis-
plays the current settings
; Calls up the climate control menu, displays
the current cooling and climate mode set-
tings
= Adjusts airflow and temperature, displays
the current settings
There may be fewer settings or none, depending
on your vehicle's equipment.
Calling up the climate control bar Multimedia system:
X Select Vehicle Vehicle.
The vehicle menu appears.
X Slide 6the controller repeatedly until the
climate control bar is activated. Calling up the climate control menu Multimedia system:
X Select Vehicle
Vehicle.
The vehicle menu appears.
X Slide 6the controller repeatedly until the
climate control bar is activated.
X To select from climate control bar ;: turn
and press the controller.
The menu for selecting climate control func-
tions is activated.
X To select a climate function: turn and press
the controller.
The selected climate control function
appears.
Settings in the climate menu Setting the climate mode
The climate mode determines the type of air-
flow. The setting is active when the air-condi-
tioning system is set to Ã(Ypage 97).
X Call up the climate control menu
(Y page 209).
X To select Climate mode Climate mode: turn and press the
controller.
X To change the setting: turn the controller.
X To exit the menu: press the%button.
The climate mode bar displays the current air-
flow setting: DIFFUSE
DIFFUSE, MEDIUM MEDIUMorFOCUS
FOCUS.
Settings in the bottom bar of the cli-
mate control menu Activating/deactivating cooling with air
dehumidification
X Call up the climate control menu
(Y page 209).
X Slide 6the controller repeatedly until the
bottom bar is activated.
X To select O OA/C
A/C: turn and press the control-
ler.
X Switch cooling with air dehumidification on
O or off ª.
i The current status of the cooling function is
displayed in the climate control bar: A/C ON
– activated, A/C OFF – deactivated.
i Deactivating the cooling with air dehumidi-
fication function reduces fuel consumption. Operating system
209Multimedia system Z
Page 213 of 289
Synchronising the climate control set-
tings
Use O
O Sync.
Sync. (synchronisation) to select the
climate control setting for all zones together O
or separately ª.
X Call up the climate control menu
(Y page 209).
X Slide 6the controller repeatedly until the
bottom bar is activated.
X To select O OSync.
Sync.: turn and press the con-
troller.
X Switch the synchronisation function on Oor
off ª.
For further information on synchronising cli-
mate control settings, see (Y page 98).Navigation mode
Important safety notes G
WARNING
Operating the integrated information systems and communications equipment in the vehicle
while driving will distract you from traffic con-
ditions. You could then lose control of the
vehicle. There is a risk of an accident.
Only operate these devices if road traffic con-
ditions permit. If you are unsure about the
surrounding conditions, pull over to a safe
location and make entries only while the vehi-
cle is stationary.
You must observe the legal requirements for the country in which you are currently driving whenoperating the navigation system.
General notes Correct functioning of the navigation system
depends, amongst other things, on GPS recep-
tion. In certain situations, GPS reception may be
impaired, there may be interference or there
may be no reception at all, e.g. in tunnels or
multi-storey car parks.
The following descriptions apply to navigation
with COMAND Online. Further information can
be found in the Digital Owner's Manual. Selecting a route type and route options Multimedia system:
X Select Navi NaviQNavigation Navigation.
X Select Options
OptionsQRoute settings Route settings.
i If route guidance is active, first slide
6the
controller and show the menu.
X Select a route type.
Notes for route types:
R Eco route
Eco route
Calculates an economical route.
R Dynamic route Dynamic route
Traffic reports on the route for the route guid-
ance are taken into account.
R Calculate alternative routes Calculate alternative routes
Different routes are being calculated. Instead
of Start Start, select the Continue
Continuemenu item.
X To avoid/use route options: selectAvoid
Avoid
options
options.
X Select a route option.
Notes for route options:
R Use toll roads
Use toll roads
The route calculation includes roads which
require you to pay a usage fee (toll).
R Use vignette roads Use vignette roads (not available in all
countries)
The route calculation includes roads which
require you to pay a time-based fee (vignette).
A vignette allows temporary use of the route
network, e. g. 10 days or 1 year.
Entering an address Multimedia system:
X Select Navi NaviQNavigation Navigation.
X Select Destination
DestinationQAddress entry Address entry.
i If route guidance is active, first slide
6the
controller and show the menu.
Enter an address, e.g. as follows:
R town or postcode, street, house number
R country, town or postcode
R town or postcode, centre
R street, town or postcode, junction
X Select Town
Town.
The town in which the vehicle is currently
located (current vehicle position) is at the top.
Below this, you will see locations for which
route guidance has already been carried out. 210
Operating systemMultimedia system