2016 MERCEDES-BENZ AMG GT ROADSTER USB port
[x] Cancel search: USB portPage 10 of 289

Indicator lamp .................................. 97
Information on using
THERMOTRONIC automatic cli-
mate control .................................... 96
Overview ........................................ 209
Overview of systems ........................ 95
Problem with the rear window
heating .............................................99
Problems with cooling with air
dehumidification .............................. 97
Setting the air distribution ............... 97
Setting the air vents ...................... 100
Setting the airflow ........................... 98
Setting the climate mode (multi-
media system) ............................... 209
Setting the temperature .................. 97
Switching air-recirculation mode
on/of f.............................................. 99
Switching on/of f.............................. 96
Switching the rear window heat-
ing on/of f........................................ 99
Switching the synchronisation
function on and off .......................... 98
Synchronisation function (multi-
media system) ............................... 210
THERMOTRONIC (2-zone) auto-
matic climate control ....................... 95
Climate control settings
Multimedia system ........................ 208
Cockpit
Overview .......................................... 27
Collapsible emergency spare
wheel
see Emergency spare wheel
COLLISION PREVENTION ASSIST
PLUS
Activating/deactivating ................. 164
Display message ............................ 177
Operation/note s.............................. 55
COMAND display
Cleaning ......................................... 242
Combination switch ............................ 89
Connecting a USB device
See also Digital Owner's Manua l... 205
Consumption statistics (on-board
computer) .......................................... 158
Controller ........................................... 206
Convenience closing feature .............. 75Convenience opening feature
............ 75
Convenience opening/closing (air-
recirculation mode) ............................. 99
Coolant (engine)
Checking the level ......................... 235
Display message ............................ 183
Important safety notes .................. 280
Temperature display in the instru-
ment cluster .................................. 155
Warning lamp ................................. 200
Cooling
see Climate control
Copyright ............................................. 26
Cornering light function
Display message ............................ 182
Cruise control
Cruise control lever ....................... 126
Deactivating ................................... 127
Display message ............................ 188
Driving system ............................... 126
LIM indicator lamp ......................... 126
Selecting ........................................ 126
Setting a speed .............................. 127
Storing and maintaining current
speed ............................................. 126
Cup holder
Centre console .............................. 220
Important safety notes .................. 220 D
Data see Technical data
Data carrier
Selecting ........................................ 161
Data modem mode
Telephone with Bluetooth ®
(SAP
profile) ........................................... 214
Daytime driving lights
Display message ............................ 182
Function/note s................................ 88
Dealership
see Qualified specialist workshop
Declarations of conformity ................. 24
Diagnostics connection ...................... 25
Digital Owner's Manual
Help ................................................. 21
Introduction ..................................... 21 Index
7
Page 21 of 289

Connecting a Mobile phone (gen-
eral information) ............................ 211
Display message ............................ 193
Introduction ..................................
.162
Menu (on-board computer) ............ 162
Number from the phone book ....... .163
Redialling ....................................... 163
Rejecting/ending a call ................. 163
See also Digital Owner's Manual ... 205
Switching between mobile
phones .......................................... .212
Telephone compartment ................ 218
Telephone module with Bluetooth ®
(SAP profile) Activating and connecting the
module .......................................... .213
Charging a mobile phone .............. .215
Connecting the mobile phone ....... .214
Connecting the module via a USB
cable .............................................. 213
Data modem mode ........................ 214
Installing the module ..................... 213
Introduction ................................... 212
Saving/deleting the PIN for the
SIM card ........................................ 214
Settings ......................................... 214
SIM card mode .............................. 213
Text messages ............................... 215
Transferring the phone book .......... 214
Temperature
Coolant (display in the instrument
cluster) .......................................... 155
Engine oil (on-board computer) ...... 167
Outside temperature ..................... .155
Setting (climate control) .................. 97
Transmission oil (on-board com-
puter) ............................................. 167
TEMPOMAT
Function/notes ............................ .126
Text messages
Telephone module with Blue-
tooth ®
(SAP profile) ....................... 215
Timing (RACETIMER) ......................... 168
TIREFIT kit .......................................... 247
Important safety notes .................. 247
Storage location ............................ 246
Tyre pressure not reached ............. 249 Tyre pressure reached ................... 249
Total distance recorder .................... 157
Touchpad
Changing the station/music
track .............................................. 208
Character suggestions ................... 207
Deleting characters ....................... 207
Entering a space ............................ 207
Entering characters ....................... 207
Gesture control .............................. 206
Handwriting recognition ................ 207
Operating the touchpad ................. 206
Overview ........................................ 206
Quick access for audio .................. 208
Switching ....................................... 206
Switching input line ....................... 207
Tow-away protection
Activating ......................................... 61
Deactivating ..................................... 61
Function .......................................... .61
Tow-starting
Emergency engine starting ............ 259
Towing
Important safety notes .................. 256
Transporting the vehicle ................ 258
Towing away
Fitting the towing eye .................... 257
Removing the towing eye ............... 258
With both axles on the ground ....... 258
Towing eye ......................................... 246
Traffic Sign Assist
Activating/deactivating the warn-ing function .................................... 164
Display message ............................ 186
Function/note s............................. 148
Important safety notes .................. 149
Instrument cluster display ............. 149
Trailer towing
Lights display message .................. 182
Transmission
Driving tips .................................... 112
Selector lever ................................ 109
see Automatic transmission
Transmission position display ......... 111
Transmission positions .................... 111
Transporting the vehicle .................. 25818
Index
Page 22 of 289
Trim pieces (cleaning instruc-
tions)
.................................................. 243
Trip computer (on-board com-
puter) .................................................. 158
Trip meter
Calling up ....................................... 157
Resetting (on-board computer) ...... 158
Turn signals
Switching on/off .............................. 89
Two-way radio
Frequencies ................................... 275
Installation ..................................... 275
Transmission output (maximum) .... 275
Type identification plate
see Vehicle identification plate
Tyre changing tool kit ....................... 246
Tyre inflation compressor
see TIREFIT kit
Tyre pressure
Calling up (on-board computer) ..... 265
Display message ............................ 189
Not reached (TIREFIT) .................... 249
Reached (TIREFIT) .......................... 249
Recommended ............................... 264
Tyre pressure monitor
Checking the tyre pressure elec-
tronically ........................................ 266
Function/note s............................. 265
General notes ................................ 265
Important safety notes .................. 266
Restarting ...................................... 267
Warning lamp ................................. 203
Warning message .......................... 267
Tyres
Changing a whee l.......................... 267
Checking ........................................ 262
Direction of rotation ...................... 268
Display message ............................ 189
Important safety notes .................. 261
Information on driving .................... 261
Replacing ....................................... 267
Service life ..................................... 262
Storing ........................................... 268
Summer tyres in winter ................. 263
Tyre size (data ).............................. 272
Tyre tread ...................................... 262
Wheel and tyre combinations ........ 272
see Flat tyre U
Unlocking Emergency unlocking ....................... 70
From inside the vehicle (central
unlocking button) ............................. 70
USB devices
Connecting to the Media Inter-
face ............................................... 216 V
Vanity mirror (in sun visor) .............. 221
Vehicle
Correct use ...................................... 25
Data acquisition ............................... 26
Display message ............................ 190
Electronics ..................................... 275
Equipment ....................................... 23
Implied warranty .............................. 25
Individual settings .......................... 164
Leaving parked up ......................... 122
Locking (in an emergency) ............... 70
Locking (key) ................................... 64
Lowering ........................................ 272
Operating safety .............................. 23
Parking .......................................... 119
Pulling away ................................... 104
Raising ........................................... 269
Registration ..................................... 25
Securing from rolling away ............ 268
Towing away .................................. 256
Transporting .................................. 258
Unlocking (in an emergency) ........... 70
Unlocking (key) ................................ 64
Vehicle data ................................... 281
Vehicle data
Boot load (maximum) ..................... 281
Vehicle dimensions ........................... 281
Vehicle emergency locking ................ 70
Vehicle identification number
see VIN
Vehicle identification plate .............. 276
Vehicle tool kit .................................. 246
Video
Operating the DVD ......................... 162
See also Digital Owner's Manua l... 205 Index
19
Page 164 of 289

position is displayed along with station
;only if
this has been stored.
You can store stations ;in the multimedia sys-
tem.
X Switch on the multimedia system; see sepa-
rate operating instructions.
X Press òon the steering wheel to open the
menu list.
X Press :or9 on the steering wheel to
select the Radio
Radio menu.
X Confirm by pressing aon the steering
wheel.
Currently set station ;appears in the multi-
function display.
X To open the station list: press:or9
briefly.
X To select a station in the station list:
press :or9 briefly.
X To select a station in the station list using
rapid scroll: press and hold :or9.
X To select the frequency range or station
memory: pressabriefly.
X Press :or9 to select the frequency
range or station memory.
X Press ato confirm your selection.
i DAB radio mode (Digital
AudioBroadcast-
ing) is an optimised digital transmission
standard designed for the mobile reception of
radio transmissions. Media menu
Changing the media source You can change the media source and playback
mode (audio or video) at any time in the Media Media
menu.
X Switch on the multimedia system (see sepa-
rate operating instructions).
X Press òon the steering wheel to open the
menu list.
X Press :or9 on the steering wheel to
select the Media
Media menu.
X Confirm by pressing aon the steering
wheel.
X To open/close the media sources
list:
press abriefly.
The list shows the following media sources,
for example: R
disc (CD/DVD) (DVD COMAND Online
only)
R SD card (COMAND Online)
R Media Register (COMAND Online)
R USB storage device
R Bluetooth ®
capable audio device
Please observe further information on media
support and media operation in the multimedia
system (see separate operating instructions).
Operating the audio player or audio
media :
Media source, e.g. name of USB memory
stick
; Current track
= Name of artist
? Name of album
A Folder name
Audio files from various audio players or media
can be played, depending on the equipment fit- ted in the vehicle.
X Switch on the multimedia system (see sepa-
rate operating instructions).
X Use ò on the steering wheel to call up the
list of menus.
X Press :or9 on the steering wheel to
select the Media Mediamenu.
X Confirm by pressing aon the steering
wheel.
X To select audio player or data carrier: press
a briefly, to open the list of media sour-
ces.
X Press :or9 to select the correspond-
ing audio player or media.
X Press ato confirm.
X To open the track list: press:or9
briefly. Menus and submenus
161On-board computer and displays Z
Page 216 of 289
R
accessing the phone book of the mobile
phone (Y page 214)
R charging a mobile phone via the USB connec-
tion (Y page 215)
A list of compatible mobile phones can be found at:
http://www.mercedes-benz.com/connect
i The module is not available in all vehicles,
depending on the equipment.
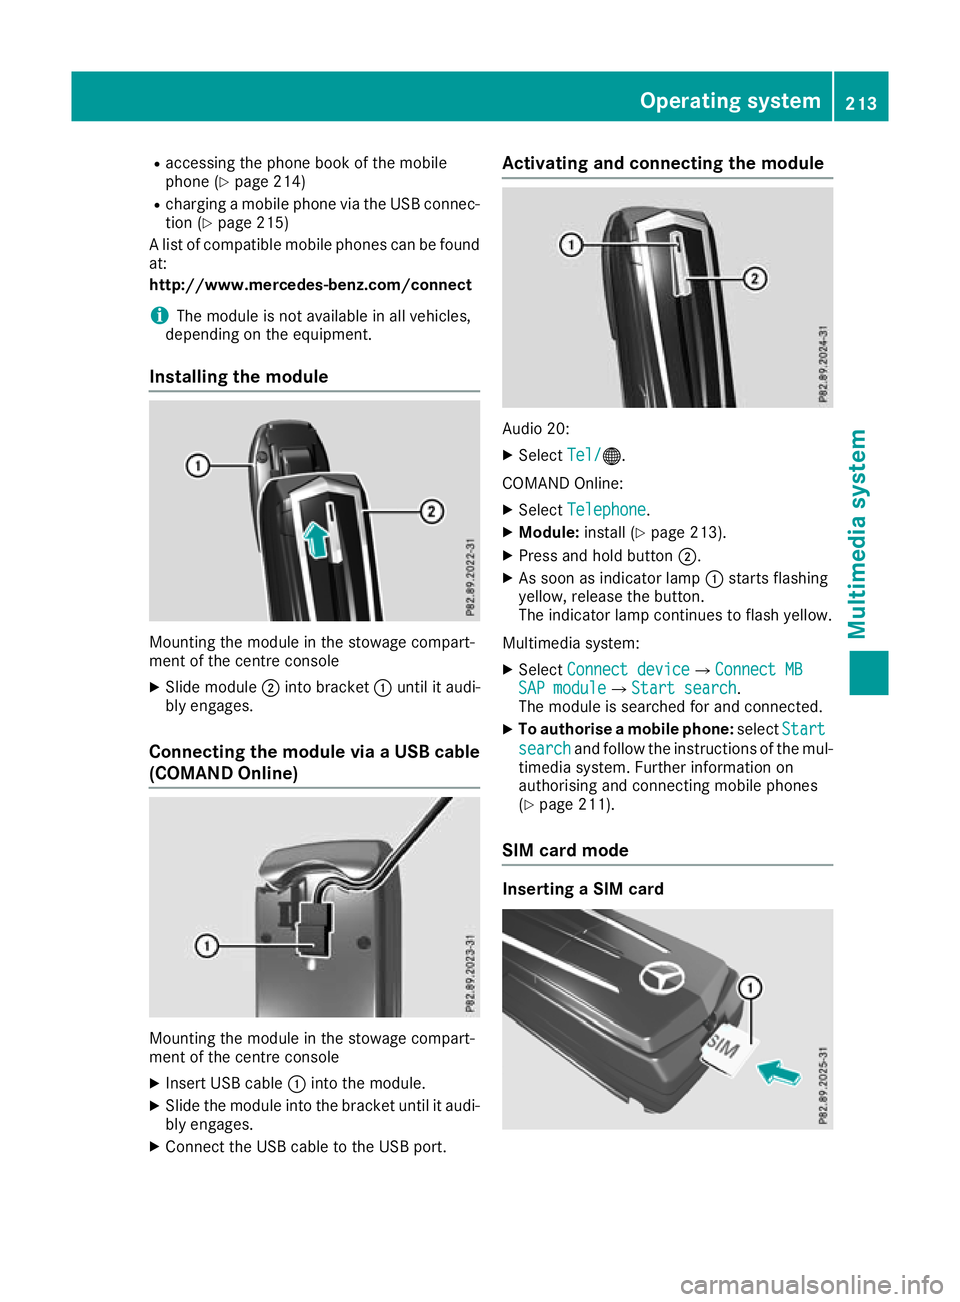
Installing the module Mounting the module in the stowage compart-
ment of the centre console
X Slide module ;into bracket :until it audi-
bly engages.
Connecting the module via a USB cable
(COMAND Online) Mounting the module in the stowage compart-
ment of the centre console
X Insert USB cable :into the module.
X Slide the module into the bracket until it audi-
bly engages.
X Connect the USB cable to the USB port. Activating and connecting the module
Audio 20:
X Select Tel/ Tel/®.
COMAND Online:
X Select Telephone
Telephone .
X Module: install (Y page 213).
X Press and hold button ;.
X As soon as indicator lamp :starts flashing
yellow, release the button.
The indicator lamp continues to flash yellow.
Multimedia system: X Select Connect device Connect device QConnect MBConnect MB
SAP module
SAP module QStart searchStart search .
The module is searched for and connected.
X To authorise a mobile phone: selectStart
Start
search
search and follow the instructions of the mul-
timedia system. Further information on
authorising and connecting mobile phones
(Y page 211).
SIM card mode Inserting a SIM card Operating system
213Multimedia system Z
Page 218 of 289
The transfer of data may take up to ten minutes.
Transmission occurs automatically after a Blue-
tooth ®
connection is automatically established.
Text messages Requirements
The module is connected with the mobile phone
(Y page 214) or is being used in the SIM card
mode (Y page 213).
Activating/deactivating text message
downloading from the mobile phone Dial number Function
00080 Text message down-
loading is deactiva-
ted.
00081 Text message down-
loading is activated.
For further information on receiving text mes-
sages when using the telephone module; see
Digital Owner's Manual.
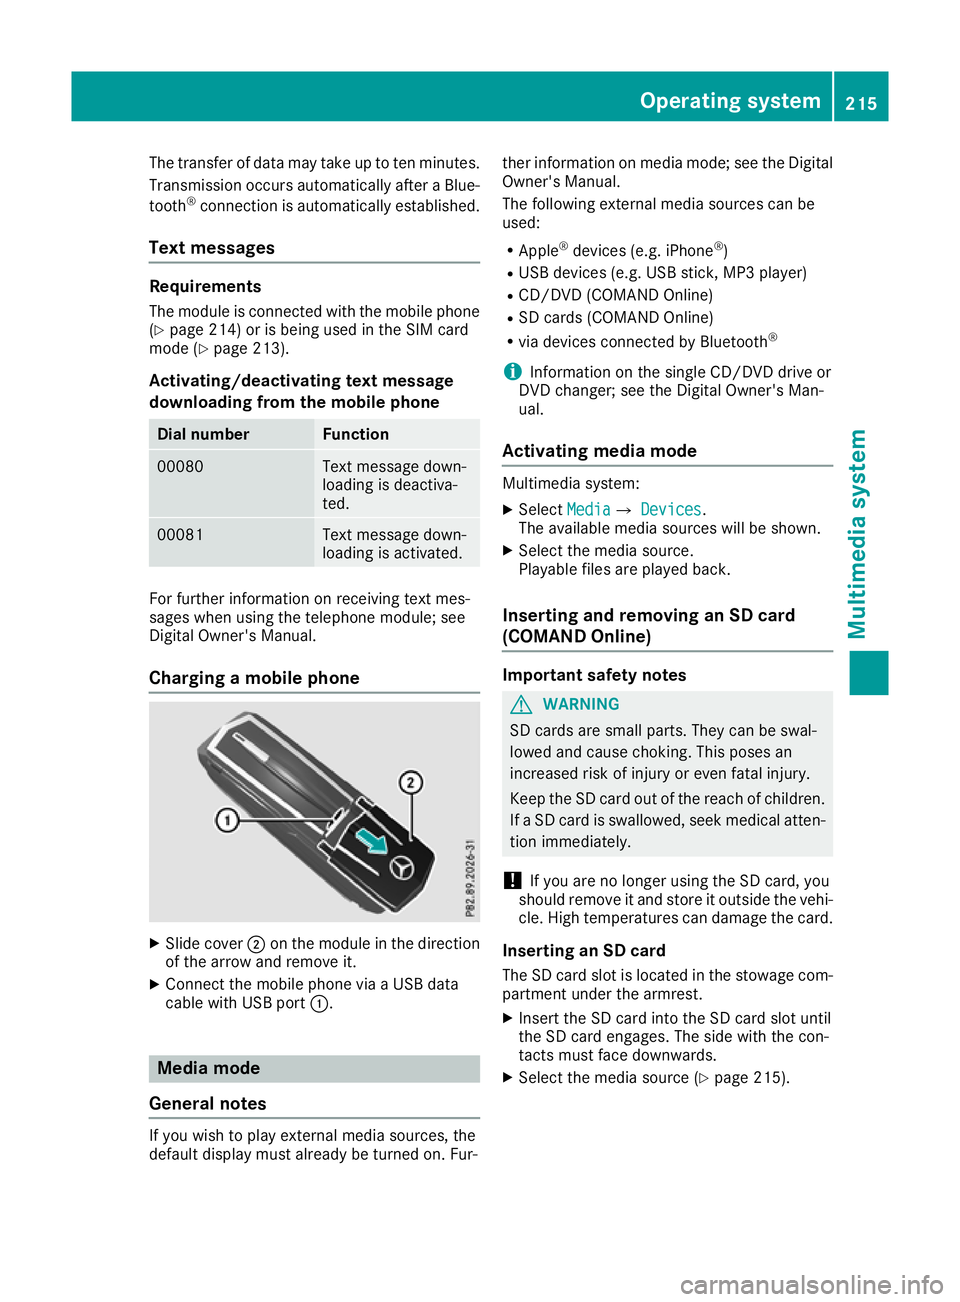
Charging a mobile phone X
Slide cover ;on the module in the direction
of the arrow and remove it.
X Connect the mobile phone via a USB data
cable with USB port :. Media mode
General notes If you wish to play external media sources, the
default display must already be turned on. Fur- ther information on media mode; see the Digital
Owner's Manual.
The following external media sources can be
used:
R Apple ®
devices (e.g. iPhone ®
)
R USB devices (e.g. USB stick, MP3 player)
R CD/DVD (COMAND Online)
R SD cards (COMAND Online)
R via devices connected by Bluetooth ®
i Information on the single CD/DVD drive or
DVD changer; see the Digital Owner's Man-
ual.
Activating media mode Multimedia system:
X Select Media MediaQ Devices
Devices.
The available media sources will be shown.
X Select the media source.
Playable files are played back.
Inserting and removing an SD card
(COMAND Online) Important safety notes
G
WARNING
SD cards are small parts. They can be swal-
lowed and cause choking. This poses an
increased risk of injury or even fatal injury.
Keep the SD card out of the reach of children. If a SD card is swallowed, seek medical atten-
tion immediately.
! If you are no longer using the SD card, you
should remove it and store it outside the vehi-
cle. High temperatures can damage the card.
Inserting an SD card
The SD card slot is located in the stowage com- partment under the armrest.
X Insert the SD card into the SD card slot until
the SD card engages. The side with the con-
tacts must face downwards.
X Select the media source (Y page 215). Operating system
215Multimedia system Z
Page 219 of 289
Removing an SD card
X Press the SD card.
The SD card is ejected.
X Remove the SD card.
Connecting USB devices There are two USB ports in the stowage space
under the armrest.
X Connect the USB device to the USB port.
X Select the media source (Y page 215).216
Operating systemMultimedia system
Page 221 of 289
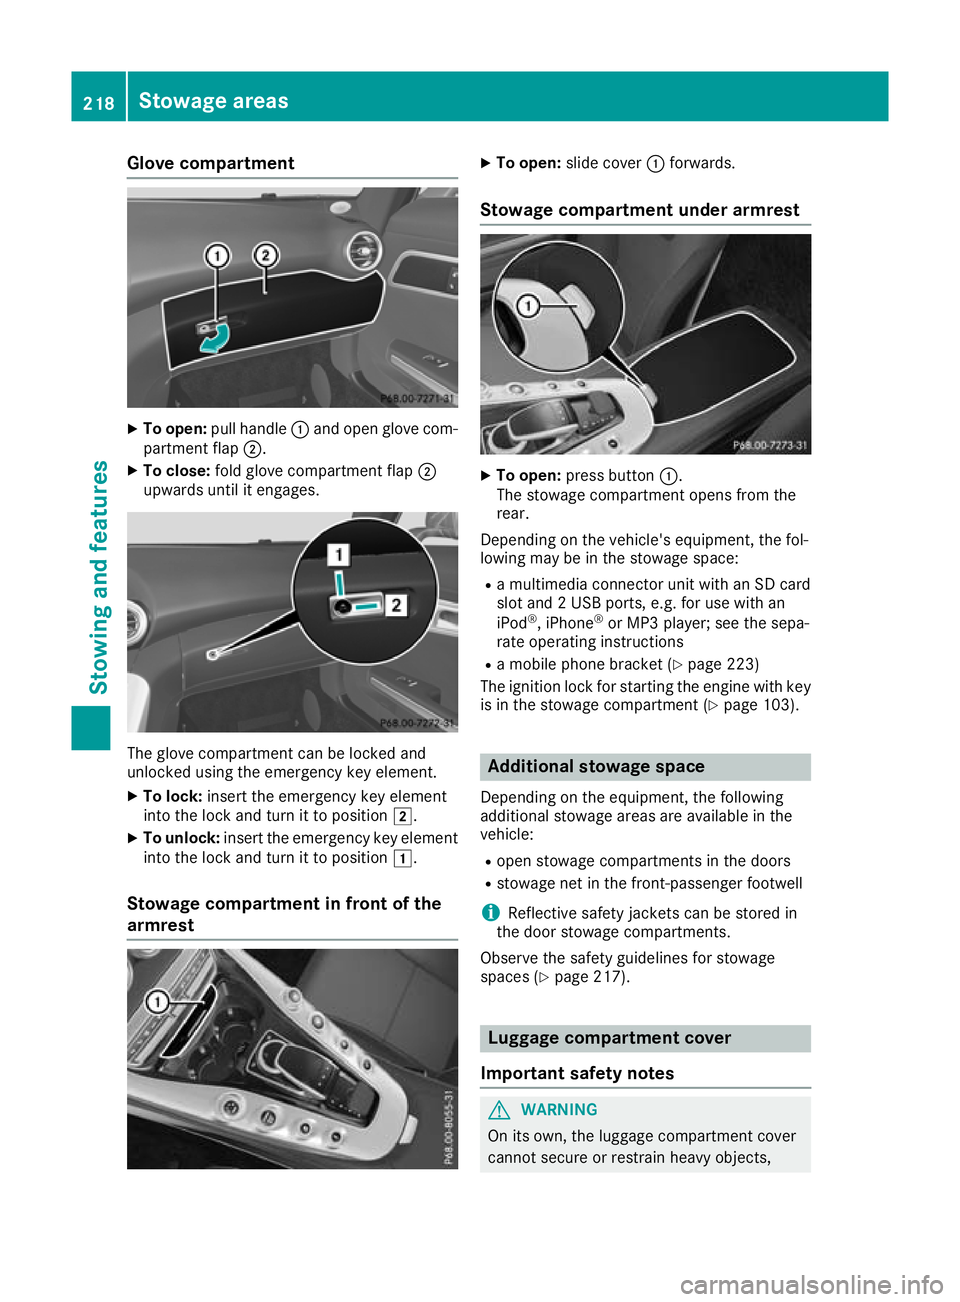
Glove compartment
X
To open: pull handle :and open glove com-
partment flap ;.
X To close: fold glove compartment flap ;
upwards until it engages. The glove compartment can be locked and
unlocked using the emergency key element.
X To lock: insert the emergency key element
into the lock and turn it to position 2.
X To unlock: insert the emergency key element
into the lock and turn it to position 1.
Stowage compartment in front of the
armrest X
To open: slide cover :forwards.
Stowage compartment under armrest X
To open: press button :.
The stowage compartment opens from the
rear.
Depending on the vehicle's equipment, the fol-
lowing may be in the stowage space:
R a multimedia connector unit with an SD card
slot and 2 USB ports, e.g. for use with an
iPod ®
, iPhone ®
or MP3 player; see the sepa-
rate operating instructions
R a mobile phone bracket (Y page 223)
The ignition lock for starting the engine with key
is in the stowage compartment (Y page 103). Additional stowage space
Depending on the equipment, the following
additional stowage areas are available in the
vehicle:
R open stowage compartments in the doors
R stowage net in the front-passenger footwell
i Reflective safety jackets can be stored in
the door stowage compartments.
Observe the safety guidelines for stowage
spaces (Y page 217). Luggage compartment cover
Important safety notes G
WARNING
On its own, the luggage compartment cover
cannot secure or restrain heavy objects, 218
Stowage areasStowing and features