2016 MERCEDES-BENZ AMG GT ROADSTER clock
[x] Cancel search: clockPage 74 of 289
X
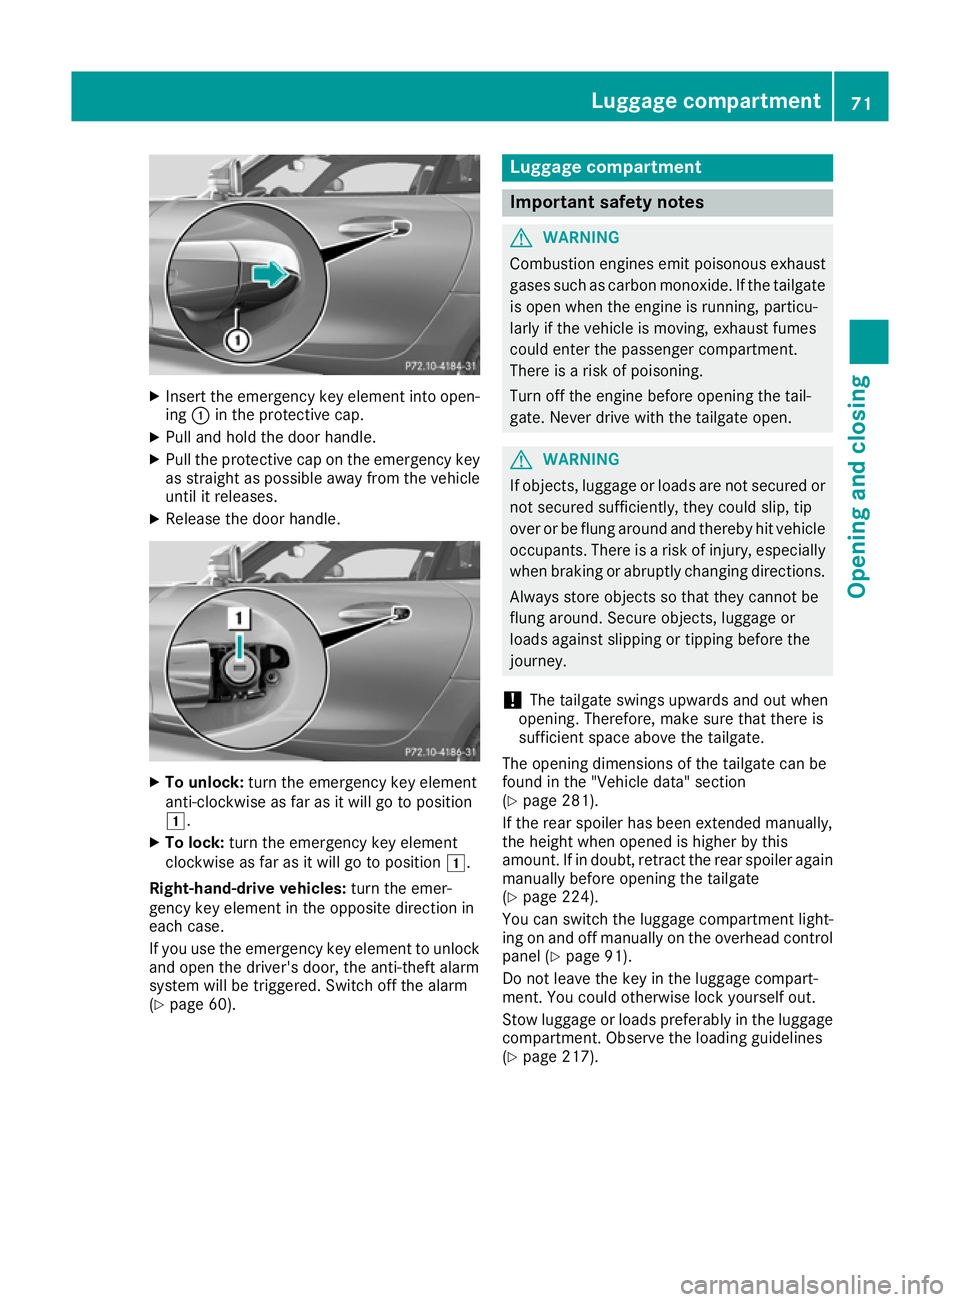
Insert the emergency key element into open-
ing :in the protective cap.
X Pull and hold the door handle.
X Pull the protective cap on the emergency key
as straight as possible away from the vehicle until it releases.
X Release the door handle. X
To unlock: turn the emergency key element
anti-clockwise as far as it will go to position
1.
X To lock: turn the emergency key element
clockwise as far as it will go to position 1.
Right-hand-drive vehicles: turn the emer-
gency key element in the opposite direction in
each case.
If you use the emergency key element to unlock
and open the driver's door, the anti-theft alarm
system will be triggered. Switch off the alarm
(Y page 60). Luggage compartment
Important safety notes
G
WARNING
Combustion engines emit poisonous exhaust
gases such as carbon monoxide. If the tailgate is open when the engine is running, particu-
larly if the vehicle is moving, exhaust fumes
could enter the passenger compartment.
There is a risk of poisoning.
Turn off the engine before opening the tail-
gate. Never drive with the tailgate open. G
WARNING
If objects, luggage or loads are not secured or not secured sufficiently, they could slip, tip
over or be flung around and thereby hit vehicle
occupants. There is a risk of injury, especially when braking or abruptly changing directions.
Always store objects so that they cannot be
flung around. Secure objects, luggage or
loads against slipping or tipping before the
journey.
! The tailgate swings upwards and out when
opening. Therefore, make sure that there is
sufficient space above the tailgate.
The opening dimensions of the tailgate can be
found in the "Vehicle data" section
(Y page 281).
If the rear spoiler has been extended manually,
the height when opened is higher by this
amount. If in doubt, retract the rear spoiler again manually before opening the tailgate
(Y page 224).
You can switch the luggage compartment light-
ing on and off manually on the overhead control
panel (Y page 91).
Do not leave the key in the luggage compart-
ment. You could otherwise lock yourself out.
Stow luggage or loads preferably in the luggage compartment. Observe the loading guidelines
(Y page 217). Luggage compartment
71Opening and closing Z
Page 121 of 289
Further information on fuel and fuel quality
(Y page 277). Refuelling
General notes Observe the important safety notes
(Y
page 117).
If you unlock/lock the vehicle from the outside,
the fuel filler flap also unlocks/locks.
The position of the 8fuel filler cap is dis-
played in the instrument cluster. The arrow next to the filling pump indicates the side of the vehi-
cle.
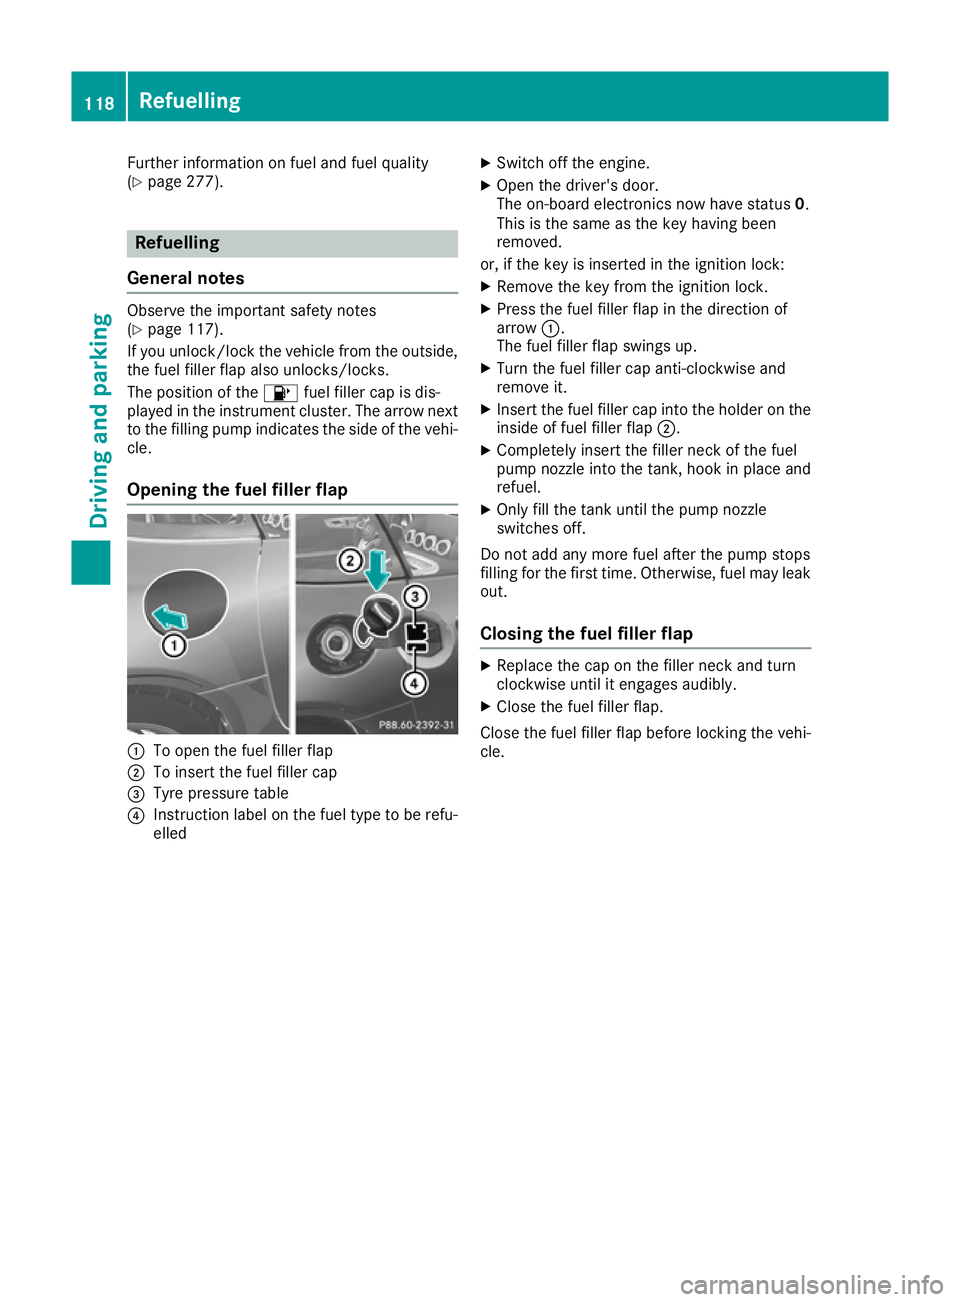
Opening the fuel filler flap :
To open the fuel filler flap
; To insert the fuel filler cap
= Tyre pressure table
? Instruction label on the fuel type to be refu-
elled X
Switch off the engine.
X Open the driver's door.
The on-board electronics now have status 0.
This is the same as the key having been
removed.
or, if the key is inserted in the ignition lock: X Remove the key from the ignition lock.
X Press the fuel filler flap in the direction of
arrow :.
The fuel filler flap swings up.
X Turn the fuel filler cap anti-clockwise and
remove it.
X Insert the fuel filler cap into the holder on the
inside of fuel filler flap ;.
X Completely insert the filler neck of the fuel
pump nozzle into the tank, hook in place and
refuel.
X Only fill the tank until the pump nozzle
switches off.
Do not add any more fuel after the pump stops
filling for the first time. Otherwise, fuel may leak out.
Closing the fuel filler flap X
Replace the cap on the filler neck and turn
clockwise until it engages audibly.
X Close the fuel filler flap.
Close the fuel filler flap before locking the vehi-
cle. 118
RefuellingDriving and parking
Page 210 of 289
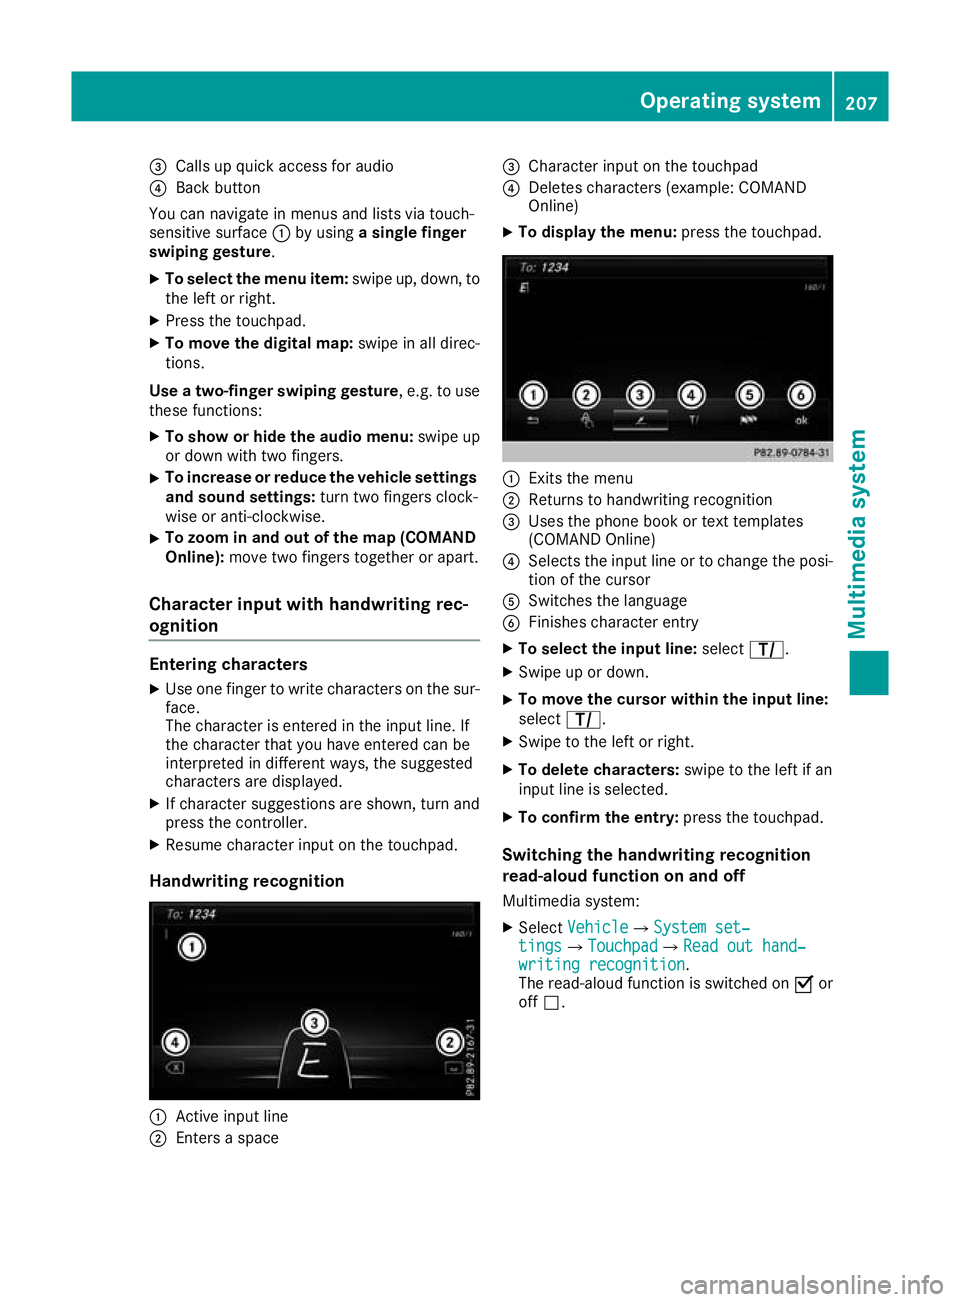
=
Calls up quick access for audio
? Back button
You can navigate in menus and lists via touch-
sensitive surface :by using a single finger
swiping gesture.
X To select the menu item: swipe up, down, to
the left or right.
X Press the touchpad.
X To move the digital map: swipe in all direc-
tions.
Use a two-finger swiping gesture, e.g. to use
these functions:
X To show or hide the audio menu: swipe up
or down with two fingers.
X To increase or reduce the vehicle settings
and sound settings: turn two fingers clock-
wise or anti-clockwise.
X To zoom in and out of the map (COMAND
Online): move two fingers together or apart.
Character input with handwriting rec-
ognition Entering characters
X Use one finger to write characters on the sur-
face.
The character is entered in the input line. If
the character that you have entered can be
interpreted in different ways, the suggested
characters are displayed.
X If character suggestions are shown, turn and
press the controller.
X Resume character input on the touchpad.
Handwriting recognition :
Active input line
; Enters a space =
Character input on the touchpad
? Deletes characters (example: COMAND
Online)
X To display the menu: press the touchpad. :
Exits the menu
; Returns to handwriting recognition
= Uses the phone book or text templates
(COMAND Online)
? Selects the input line or to change the posi-
tion of the cursor
A Switches the language
B Finishes character entry
X To select the input line: selectp.
X Swipe up or down.
X To move the cursor within the input line:
select
p.
X Swipe to the left or right.
X To delete characters: swipe to the left if an
input line is selected.
X To confirm the entry: press the touchpad.
Switching the handwriting recognition
read-aloud function on and off
Multimedia system:
X Select Vehicle
VehicleQSystem set‐ System set‐
tings tingsQ Touchpad
TouchpadQ Read out hand‐
Read out hand‐
writing recognition
writing recognition.
The read-aloud function is switched on Oor
off ª. Operating system
207Multimedia system Z
Page 238 of 289
G
WARNING
If engine oil comes into contact with hot com- ponents in the engine compartment, it may
ignite. There is a risk of fire and injury.
Make sure that engine oil does not spill out
over the filler neck. Allow the engine to cool
down and thoroughly clean the components
that have come into contact with engine oil
before you start the engine. H
Environmental note
When topping up the oil, take care not to spill
any. If oil enters the soil or waterways, it is
harmful to the environment.
! Use only engine oils and oil filters that are
approved for vehicles with a service system. A
list of the engine oils and oil filters that have
been tested and approved in accordance with Mercedes-Benz Specifications for Service
Products is available at any Mercedes-Benz
Service Centre.
The following cause engine failure or damage
to the exhaust system:
R Use of engine oils and oil filters that have
not been expressly approved for the service system
R Replacement of engine oil and oil filter after
the replacement interval specified by the
service system has expired
R Use of engine oil additives
! Do not add too much oil. If the oil level is
above the "max" mark on the dipstick, too
much oil has been added. This can lead to
damage to the engine or the catalytic con-
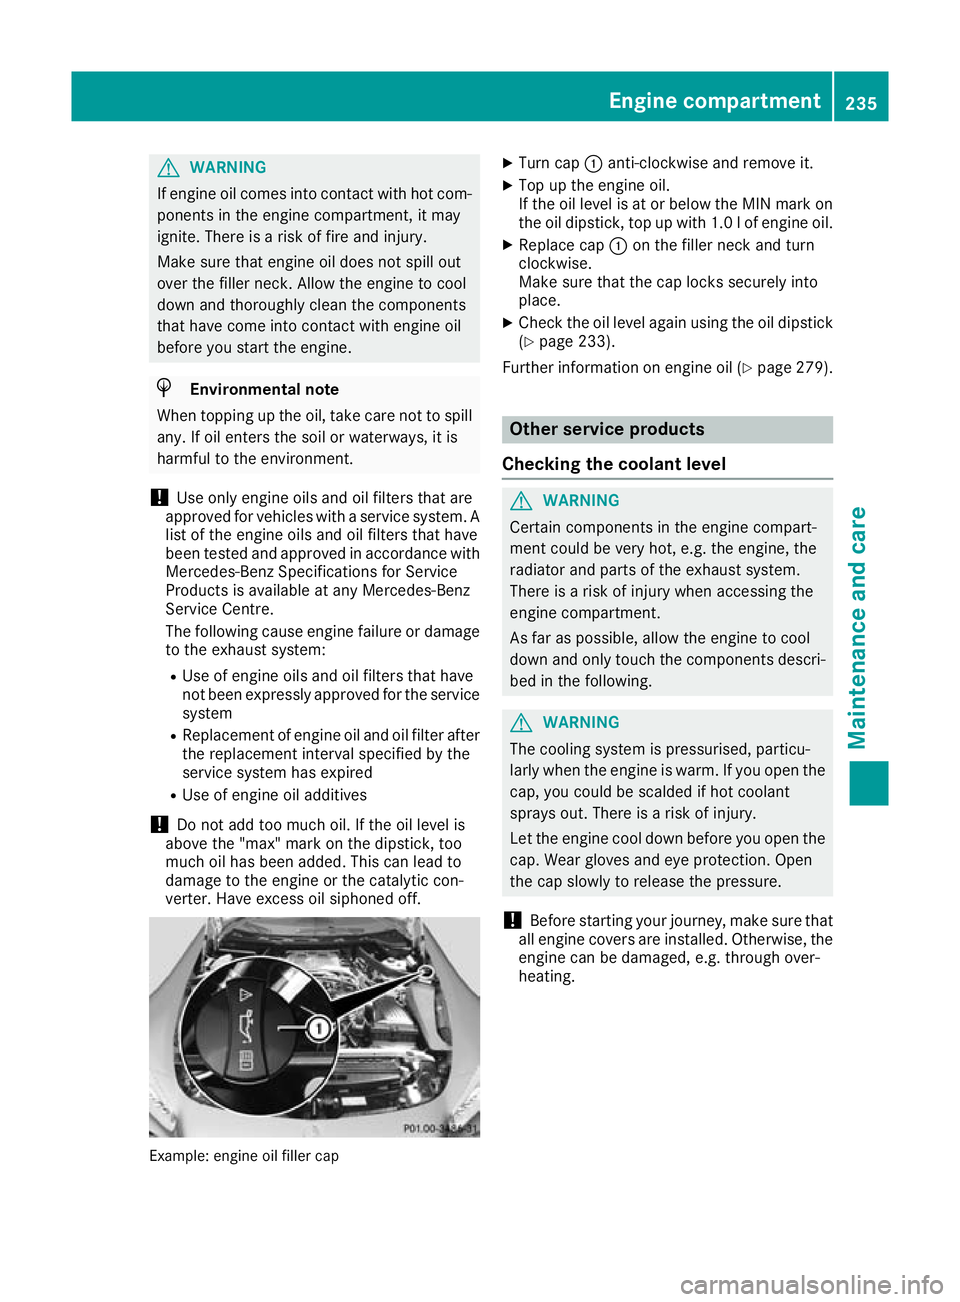
verter. Have excess oil siphoned off. Example: engine oil filler cap X
Turn cap :anti-clockwise and remove it.
X Top up the engine oil.
If the oil level is at or below the MIN mark on
the oil dipstick, top up with 1.0 lof engine oil.
X Replace cap :on the filler neck and turn
clockwise.
Make sure that the cap locks securely into
place.
X Check the oil level again using the oil dipstick
(Y page 233).
Further information on engine oil (Y page 279). Other service products
Checking the coolant level G
WARNING
Certain components in the engine compart-
ment could be very hot, e.g. the engine, the
radiator and parts of the exhaust system.
There is a risk of injury when accessing the
engine compartment.
As far as possible, allow the engine to cool
down and only touch the components descri- bed in the following. G
WARNING
The cooling system is pressurised, particu-
larly when the engine is warm. If you open the cap, you could be scalded if hot coolant
sprays out. There is a risk of injury.
Let the engine cool down before you open the
cap. Wear gloves and eye protection. Open
the cap slowly to release the pressure.
! Before starting your journey, make sure that
all engine covers are installed. Otherwise, the engine can be damaged, e.g. through over-
heating. Engine compartment
235Maintenance and care Z
Page 239 of 289
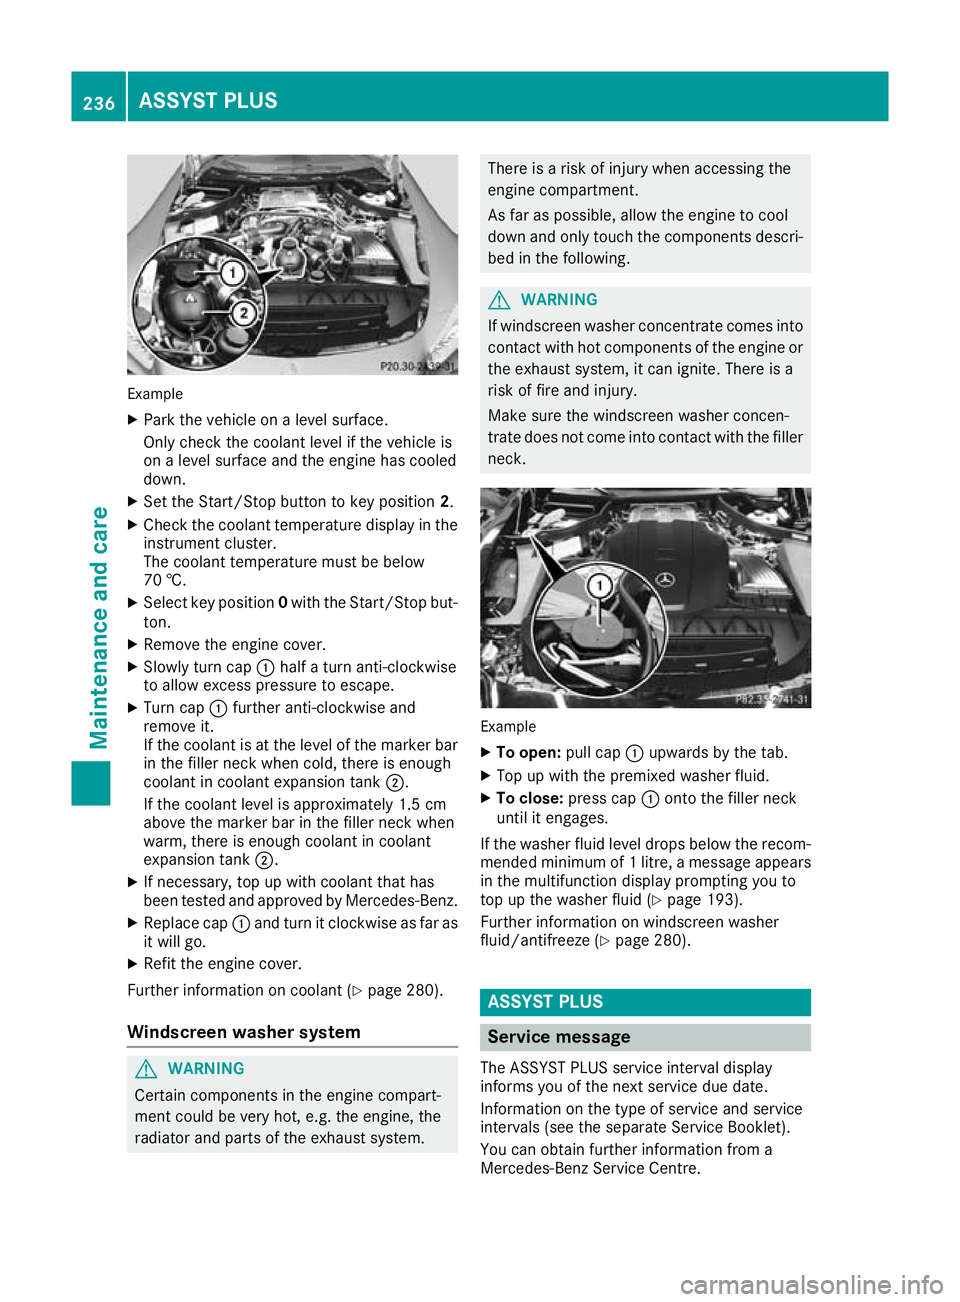
Example
X Park the vehicle on a level surface.
Only check the coolant level if the vehicle is
on a level surface and the engine has cooled
down.
X Set the Start/Stop button to key position 2.
X Check the coolant temperature display in the
instrument cluster.
The coolant temperature must be below
70 †.
X Select key position 0with the Start/Stop but-
ton.
X Remove the engine cover.
X Slowly turn cap :half a turn anti-clockwise
to allow excess pressure to escape.
X Turn cap :further anti-clockwise and
remove it.
If the coolant is at the level of the marker bar
in the filler neck when cold, there is enough
coolant in coolant expansion tank ;.
If the coolant level is approximately 1.5 cm
above the marker bar in the filler neck when
warm, there is enough coolant in coolant
expansion tank ;.
X If necessary, top up with coolant that has
been tested and approved by Mercedes-Benz.
X Replace cap :and turn it clockwise as far as
it will go.
X Refit the engine cover.
Further information on coolant (Y page 280).
Windscreen washer system G
WARNING
Certain components in the engine compart-
ment could be very hot, e.g. the engine, the
radiator and parts of the exhaust system. There is a risk of injury when accessing the
engine compartment.
As far as possible, allow the engine to cool
down and only touch the components descri- bed in the following. G
WARNING
If windscreen washer concentrate comes into contact with hot components of the engine or
the exhaust system, it can ignite. There is a
risk of fire and injury.
Make sure the windscreen washer concen-
trate does not come into contact with the filler neck. Example
X To open: pull cap:upwards by the tab.
X Top up with the premixed washer fluid.
X To close: press cap :onto the filler neck
until it engages.
If the washer fluid level drops below the recom- mended minimum of 1 litre, a message appears
in the multifunction display prompting you to
top up the washer fluid (Y page 193).
Further information on windscreen washer
fluid/antifreeze (Y page 280). ASSYST PLUS
Service message
The ASSYST PLUS service interval display
informs you of the next service due date.
Information on the type of service and service
intervals (see the separate Service Booklet).
You can obtain further information from a
Mercedes-Benz Service Centre. 236
ASSYST PLUSMaintenance and care
Page 260 of 289
the middle, e.g. with a white cloth
(30 x 30 cm). This makes other road users
aware that a vehicle is being towed.
R only secure the tow rope to the towing eye.
R observe the brake lamps of the towing vehi-
cle while driving. Always maintain a dis-
tance so that the tow rope does not sag.
R do not use steel cables or chains to tow
your vehicle. You could otherwise damage
the vehicle.
! Do not use the towing eyes for recovery pur-
poses as this could damage the vehicle. If in
doubt, recover the vehicle with a crane.
! When towing, pull away slowly and
smoothly. If the tractive power is too high, the
vehicles could be damaged.
! Shift the automatic transmission to
Nand
do not open the driver's or front passenger's
door during towing. The automatic transmis-
sion may otherwise shift to position P, which
could damage both vehicles.
! You may tow the vehicle for a maximum of
50km. A towing speed of 50 km/h must not
be exceeded.
For towing distances over 50 km, the entire
vehicle must be lifted up and transported.
! Observe the transmission fluid temperature
(AMG menu) in the on-board computer when
towing. The transmission fluid temperature
must not exceed 120 †. If this occurs, you
must stop towing immediately.
! Tow-starting the vehicle is not permitted.
The transmission may otherwise be damaged.
Also observe the following notes: R Observe the legal requirements in each indi-
vidual country when towing.
R If the engine does not start, try jump-starting
it (Y page 253). Tow-starting the vehicle is not
permitted.
R If it is not possible to jump-start the vehicle,
have it transported to the nearest qualified
specialist workshop, e.g. a Mercedes-Benz
Service Centre.
If the vehicle can no longer be driven because of an accident or breakdown, you have the follow-
ing options:
R transporting the vehicle As a rule, you should have the vehicle trans-
ported.
R towing the vehicle with a tow rope or tow bar
Only tow the vehicle in exceptional cases. The
engine must be running if you tow the vehicle with a tow rope or tow bar.
If the vehicle has suffered transmission damage, have it transported on a transporter or trailer.
Observe the display messages in the instrument
cluster.
The battery must be connected and charged.
Otherwise, you:
R will not be able to switch on the ignition with
the Start/Stop button
R cannot start the engine
R cannot release the electric parking brake
R cannot shift the automatic transmission to
position N
Deactivate the automatic locking feature before
towing the vehicle (Y page 70). You could oth-
erwise be locked out when pushing or towing
the vehicle.
Deactivate tow-away protection before the vehi-
cle is towed away (Y page 61). Fitting/removing the towing eye
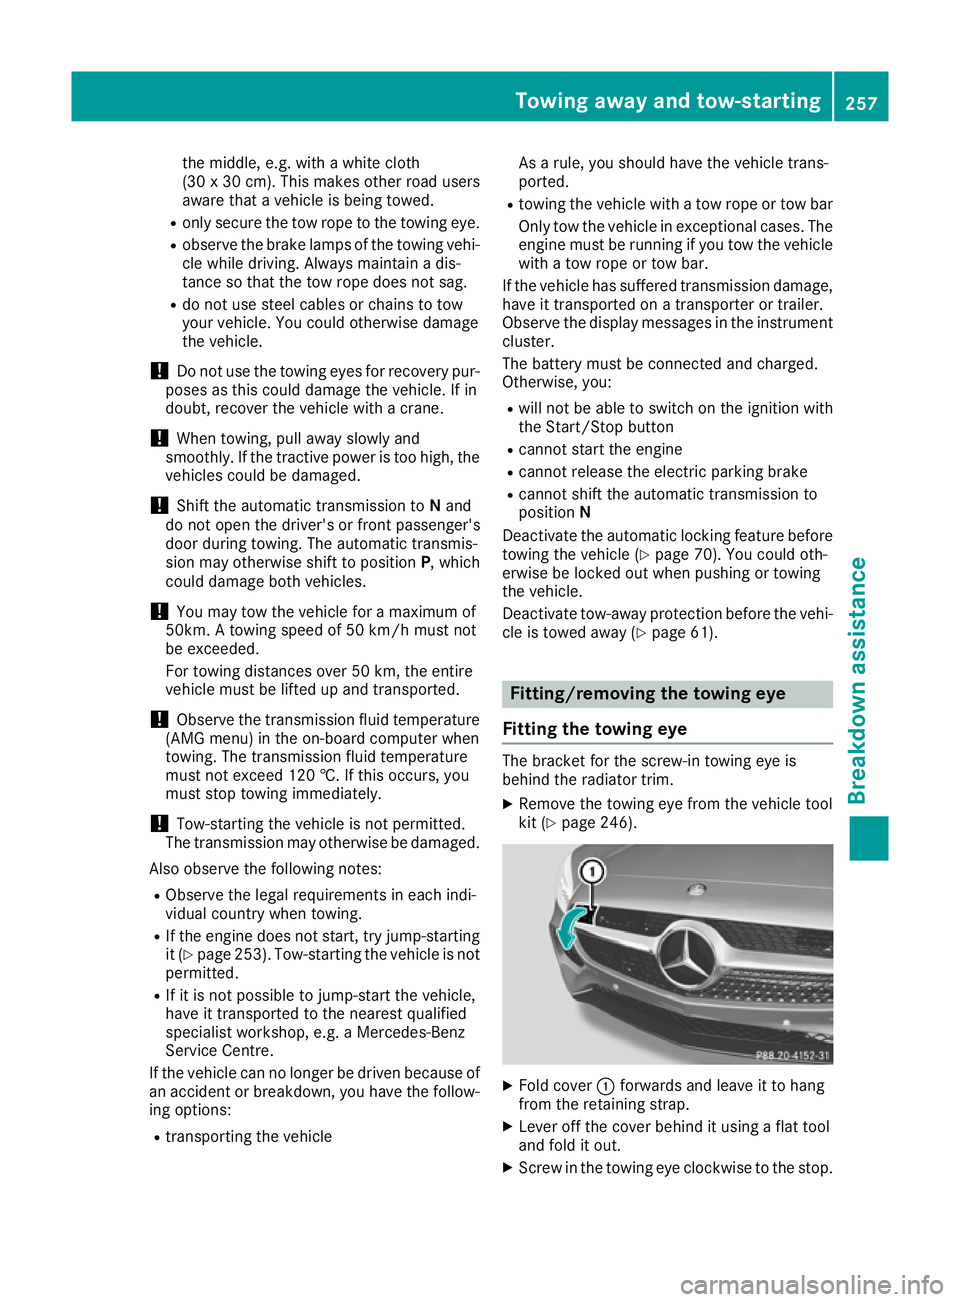
Fitting the towing eye The bracket for the screw-in towing eye is
behind the radiator trim.
X Remove the towing eye from the vehicle tool
kit (Y page 246). X
Fold cover :forwards and leave it to hang
from the retaining strap.
X Lever off the cover behind it using a flat tool
and fold it out.
X Screw in the towing eye clockwise to the stop. Towing away and tow-starting
257Breakdown assistance Z
Page 272 of 289
If your vehicle is equipped with a wheel chock, it
can be found in the tyre-change tool kit
(Y page 246).
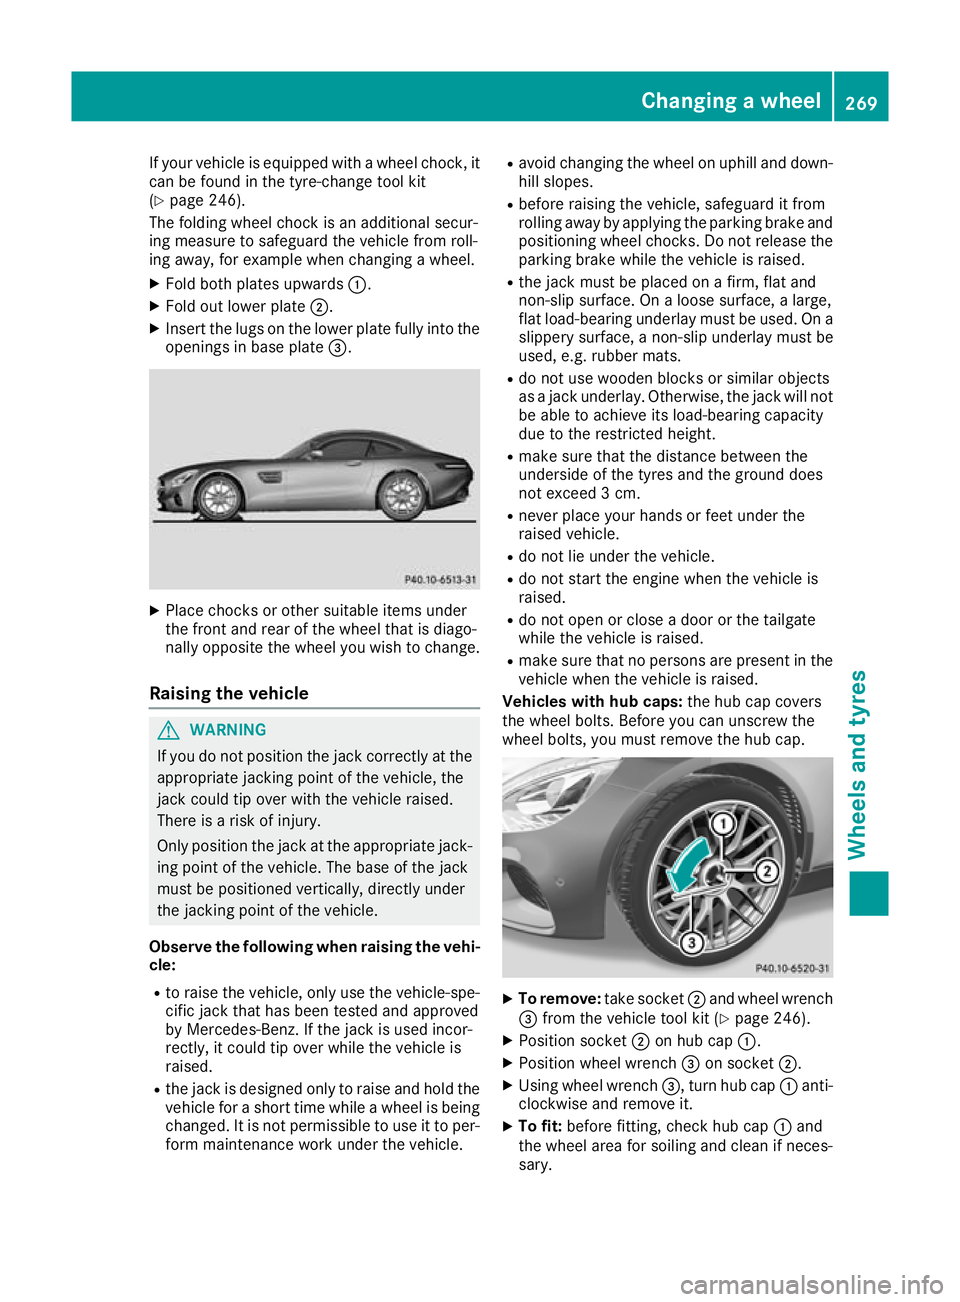
The folding wheel chock is an additional secur-
ing measure to safeguard the vehicle from roll-
ing away, for example when changing a wheel.
X Fold both plates upwards :.
X Fold out lower plate ;.
X Insert the lugs on the lower plate fully into the
openings in base plate =.X
Place chocks or other suitable items under
the front and rear of the wheel that is diago-
nally opposite the wheel you wish to change.
Raising the vehicle G
WARNING
If you do not position the jack correctly at the appropriate jacking point of the vehicle, the
jack could tip over with the vehicle raised.
There is a risk of injury.
Only position the jack at the appropriate jack-
ing point of the vehicle. The base of the jack
must be positioned vertically, directly under
the jacking point of the vehicle.
Observe the following when raising the vehi- cle:
R to raise the vehicle, only use the vehicle-spe-
cific jack that has been tested and approved
by Mercedes-Benz. If the jack is used incor-
rectly, it could tip over while the vehicle is
raised.
R the jack is designed only to raise and hold the
vehicle for a short time while a wheel is being
changed. It is not permissible to use it to per- form maintenance work under the vehicle. R
avoid changing the wheel on uphill and down-
hill slopes.
R before raising the vehicle, safeguard it from
rolling away by applying the parking brake and
positioning wheel chocks. Do not release theparking brake while the vehicle is raised.
R the jack must be placed on a firm, flat and
non-slip surface. On a loose surface, a large,
flat load-bearing underlay must be used. On a
slippery surface, a non-slip underlay must be
used, e.g. rubber mats.
R do not use wooden blocks or similar objects
as a jack underlay. Otherwise, the jack will not
be able to achieve its load-bearing capacity
due to the restricted height.
R make sure that the distance between the
underside of the tyres and the ground does
not exceed 3 cm.
R never place your hands or feet under the
raised vehicle.
R do not lie under the vehicle.
R do not start the engine when the vehicle is
raised.
R do not open or close a door or the tailgate
while the vehicle is raised.
R make sure that no persons are present in the
vehicle when the vehicle is raised.
Vehicles with hub caps: the hub cap covers
the wheel bolts. Before you can unscrew the
wheel bolts, you must remove the hub cap. X
To remove: take socket;and wheel wrench
= from the vehicle tool kit (Y page 246).
X Position socket ;on hub cap :.
X Position wheel wrench =on socket ;.
X Using wheel wrench =, turn hub cap:anti-
clockwise and remove it.
X To fit: before fitting, check hub cap :and
the wheel area for soiling and clean if neces-
sary. Changing a wheel
269Wheels and tyres Z
Page 273 of 289
X
Put hub cap :in position and turn until it is in
the right position.
X Position socket ;on hub cap :.
X Attach wheel wrench =to socket ;and
tighten hub cap :.
The tightening torque must be 25 Nm.
i Note
that the hub cap should be tightened
to the specified torque of 25 Nm. Mercedes-
Benz recommends that you have the hub cap
fitted at a qualified specialist workshop. X
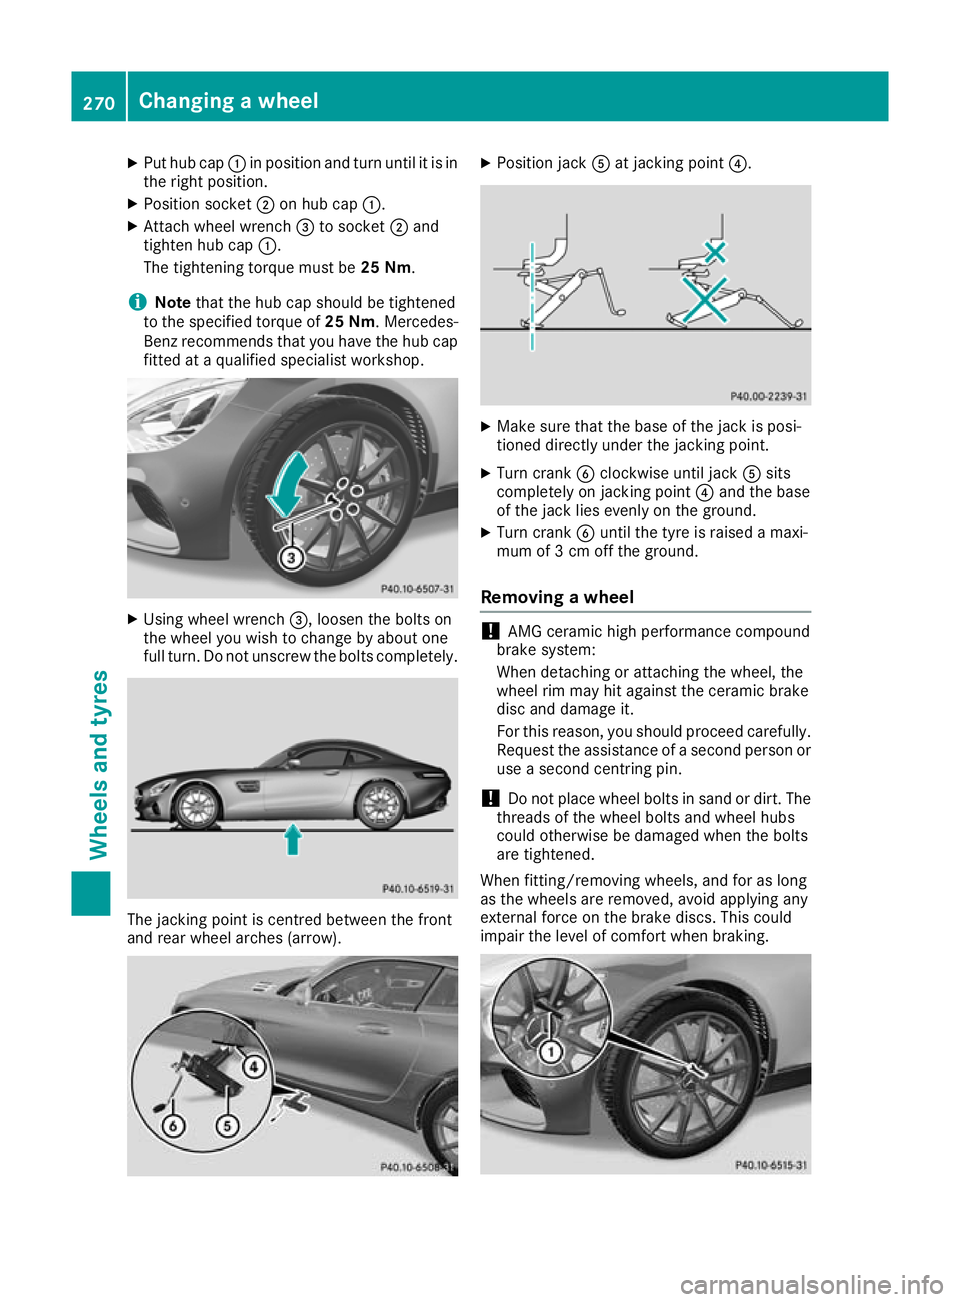
Using wheel wrench =, loosen the bolts on
the wheel you wish to change by about one
full turn. Do not unscrew the bolts completely. The jacking point is centred between the front
and rear wheel arches (arrow). X
Position jack Aat jacking point ?. X
Make sure that the base of the jack is posi-
tioned directly under the jacking point.
X Turn crank Bclockwise until jack Asits
completely on jacking point ?and the base
of the jack lies evenly on the ground.
X Turn crank Buntil the tyre is raised a maxi-
mum of 3 cm off the ground.
Removing a wheel !
AMG ceramic high performance compound
brake system:
When detaching or attaching the wheel, the
wheel rim may hit against the ceramic brake
disc and damage it.
For this reason, you should proceed carefully. Request the assistance of a second person or
use a second centring pin.
! Do not place wheel bolts in sand or dirt. The
threads of the wheel bolts and wheel hubs
could otherwise be damaged when the bolts
are tightened.
When fitting/removing wheels, and for as long
as the wheels are removed, avoid applying any
external force on the brake discs. This could
impair the level of comfort when braking. 270
Changing a wheelWheels and tyres