2016 Hyundai Santa Fe engine
[x] Cancel search: enginePage 571 of 699
615
What to do in an emergency
✽NOTICE
If any of the below happens, we rec-
ommend that the system be checked
by a HYUNDAI authorised repairer.
1.The low tyre pressure telltale/
TPMS malfunction indicator does
not illuminate for 3 seconds when
Engine Start/Stop button is turned
to the ON or engine is running.
2. The TPMS malfunction indicator
remains illuminated after blinking
for approximately 1 minute.
3. The Low tyre pressure position
telltale remains illuminated.
Low tyre pressure
telltale
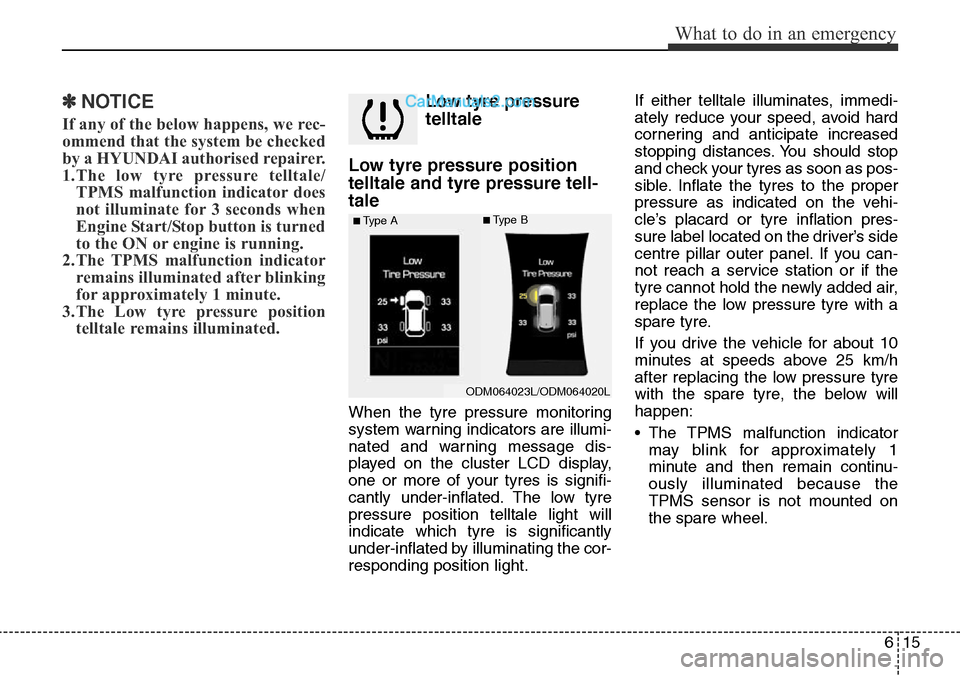
Low tyre pressure position
telltale and tyre pressure tell-
tale
When the tyre pressure monitoring
system warning indicators are illumi-
nated and warning message dis-
played on the cluster LCD display,
one or more of your tyres is signifi-
cantly under-inflated. The low tyre
pressure position telltale light will
indicate which tyre is significantly
under-inflated by illuminating the cor-
responding position light.If either telltale illuminates, immedi-
ately reduce your speed, avoid hard
cornering and anticipate increased
stopping distances. You should stop
and check your tyres as soon as pos-
sible. Inflate the tyres to the proper
pressure as indicated on the vehi-
cle’s placard or tyre inflation pres-
sure label located on the driver’s side
centre pillar outer panel. If you can-
not reach a service station or if the
tyre cannot hold the newly added air,
replace the low pressure tyre with a
spare tyre.
If you drive the vehicle for about 10
minutes at speeds above 25 km/h
after replacing the low pressure tyre
with the spare tyre, the below will
happen:
• The TPMS malfunction indicator
may blink for approximately 1
minute and then remain continu-
ously illuminated because the
TPMS sensor is not mounted on
the spare wheel.
ODM064023L/ODM064020L
■Type A■Type B
Page 577 of 699
621
What to do in an emergency
Removing and storing the
spare tyre
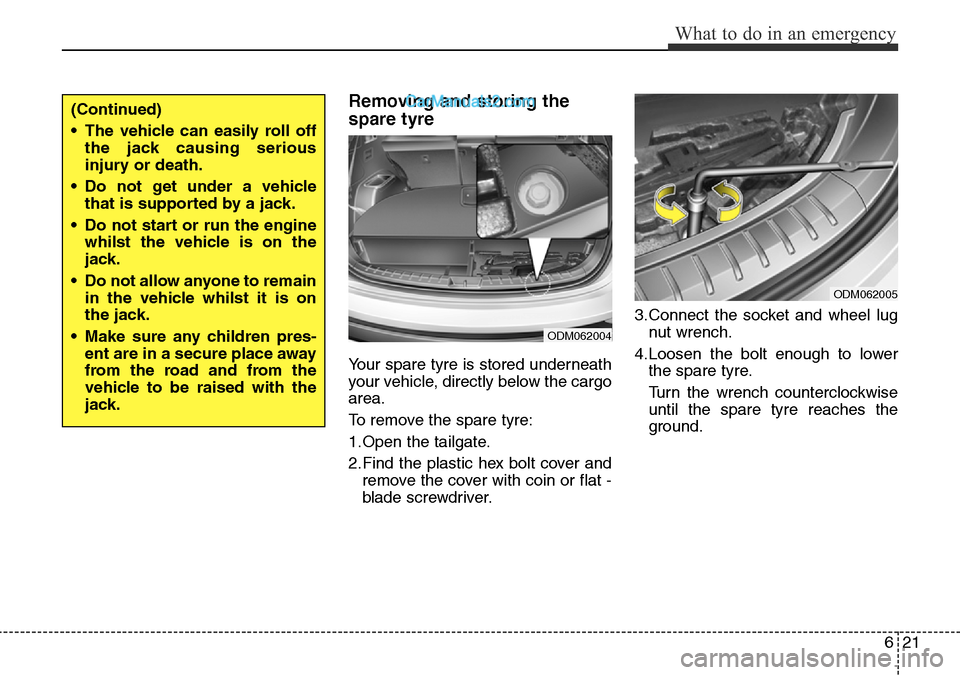
Your spare tyre is stored underneath
your vehicle, directly below the cargo
area.
To remove the spare tyre:
1.Open the tailgate.
2.Find the plastic hex bolt cover and
remove the cover with coin or flat -
blade screwdriver.3.Connect the socket and wheel lug
nut wrench.
4.Loosen the bolt enough to lower
the spare tyre.
Turn the wrench counterclockwise
until the spare tyre reaches the
ground.
ODM062004
(Continued)
• The vehicle can easily roll off
the jack causing serious
injury or death.
• Do not get under a vehicle
that is supported by a jack.
• Do not start or run the engine
whilst the vehicle is on the
jack.
• Do not allow anyone to remain
in the vehicle whilst it is on
the jack.
• Make sure any children pres-
ent are in a secure place away
from the road and from the
vehicle to be raised with the
jack.
ODM062005
Page 585 of 699
629
What to do in an emergency
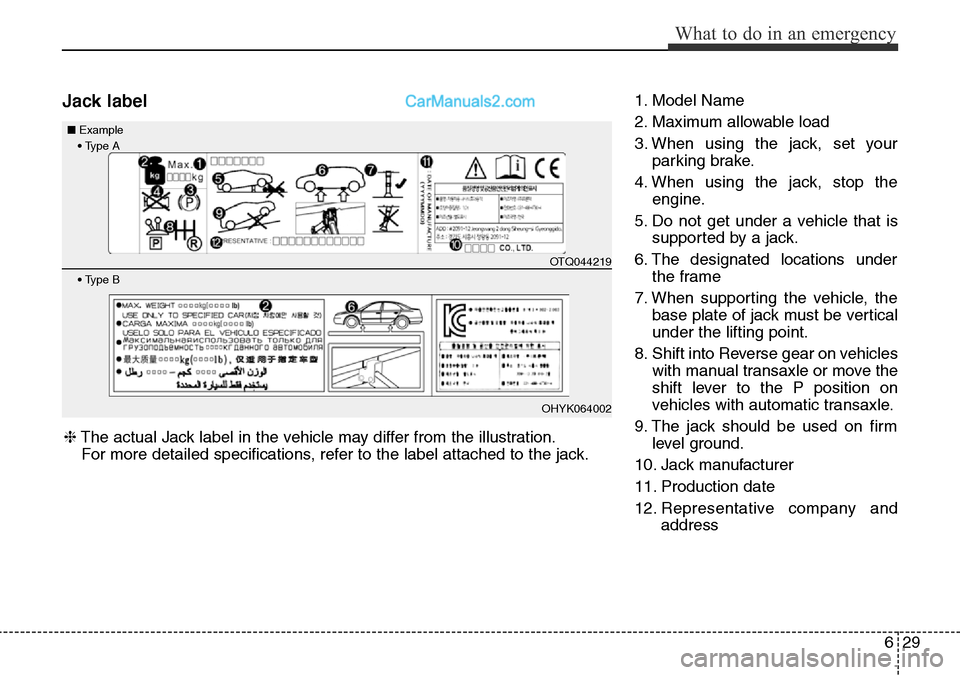
Jack label1. Model Name
2. Maximum allowable load
3. When using the jack, set your
parking brake.
4. When using the jack, stop the
engine.
5. Do not get under a vehicle that is
supported by a jack.
6. The designated locations under
the frame
7. When supporting the vehicle, the
base plate of jack must be vertical
under the lifting point.
8. Shift into Reverse gear on vehicles
with manual transaxle or move the
shift lever to the P position on
vehicles with automatic transaxle.
9. The jack should be used on firm
level ground.
10. Jack manufacturer
11. Production date
12. Representative company and
address ❈The actual Jack label in the vehicle may differ from the illustration.
For more detailed specifications, refer to the label attached to the jack.
• Type A ■Example
• Type B
OTQ044219
OHYK064002
Page 590 of 699
What to do in an emergency
34 6
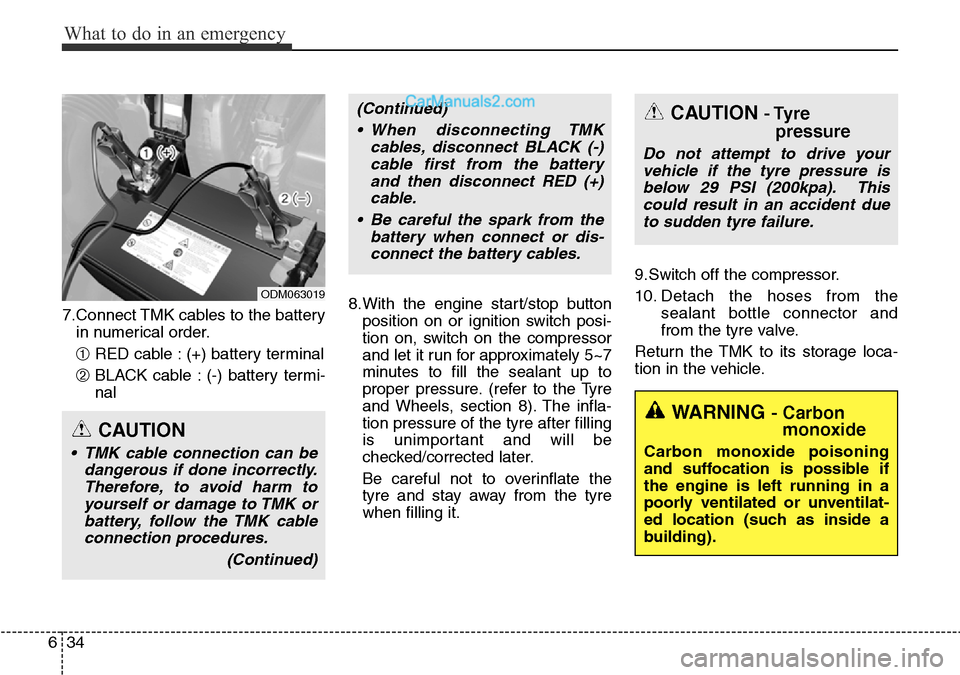
7.Connect TMK cables to the battery
in numerical order.
➀RED cable : (+) battery terminal
➁BLACK cable : (-) battery termi-
nal8.With the engine start/stop button
position on or ignition switch posi-
tion on, switch on the compressor
and let it run for approximately 5~7
minutes to fill the sealant up to
proper pressure. (refer to the Tyre
and Wheels, section 8). The infla-
tion pressure of the tyre after filling
is unimportant and will be
checked/corrected later.
Be careful not to overinflate the
tyre and stay away from the tyre
when filling it.9.Switch off the compressor.
10. Detach the hoses from the
sealant bottle connector and
from the tyre valve.
Return the TMK to its storage loca-
tion in the vehicle.
WARNING - Carbon
monoxide
Carbon monoxide poisoning
and suffocation is possible if
the engine is left running in a
poorly ventilated or unventilat-
ed location (such as inside a
building).
CAUTION - Tyre
pressure
Do not attempt to drive your
vehicle if the tyre pressure is
below 29 PSI (200kpa). This
could result in an accident due
to sudden tyre failure.
CAUTION
• TMK cable connection can be
dangerous if done incorrectly.
Therefore, to avoid harm to
yourself or damage to TMK or
battery, follow the TMK cable
connection procedures.
(Continued)
ODM063019
(Continued)
• When disconnecting TMK
cables, disconnect BLACK (-)
cable first from the battery
and then disconnect RED (+)
cable.
• Be careful the spark from the
battery when connect or dis-
connect the battery cables.
Page 592 of 699
What to do in an emergency
36 6
Notes on the safe use of the
Tyre Mobility Kit
• Park your car at the side of the
road so that you can work with the
TMK away from moving traffic.
Place your warning triangle in a
prominent place to make passing
vehicles aware of your location.
• To be sure your vehicle will not
move, even when you're on fairly
level ground, always set your park-
ing brake.
• Only use the TMK for sealing/infla-
tion passenger car tyres. Do not
use on motorcycles, bicycles or
any other type of tyres.
• Do not remove any foreign objects-
such as nails or screws -that have
penetrated the tyre.
• Before using the TMK, read the
precautionary advice printed on
the sealant bottle!
• Provided the car is outdoors, leave
the engine running. Otherwise
operating the compressor may
eventually drain the car battery.• Never leave the TMK unattended
whilst it is being used.
• Do not leave the compressor run-
ning for more than 10 min. at a time
or it may overheat.
• Do not use the TMK if the ambient
temperature is below -30°C (-
22°F).
• When both the tyre and wheel are
damaged, do not use Tyre Mobility
Kit for your safety.
Technical Data
System voltage: DC 15 V
Working voltage: DC 10 - 15 V
Amperage rating: max. 20 A
Suitable for use at temperatures:
-30 ~ +70°C (-22 ~ +158°F)
Max. working pressure:
6 bar (87 psi)
Size
Compressor: 220 x 130 x 80 mm
(8.7 x 5.1 x 3.1 in.)
Sealant bottle:165 x 85.5 ø mm
(6.5 x 3.4 ø in.)
Compressor weight:
1.8 kg (3.97 lbs)
Sealant volume:
620 ml (37.8 cu. in.)
❈Sealant and spare parts can be
obtained and replaced at an
authorized vehicle or tyre dealer.
Empty sealant bottles may be dis-
posed of at home. Liquid residue
from the sealant should be dis-
posed of by your vehicle or tyre
dealer or in accordance with local
waste disposal regulations.
Page 598 of 699
Maintenance
7
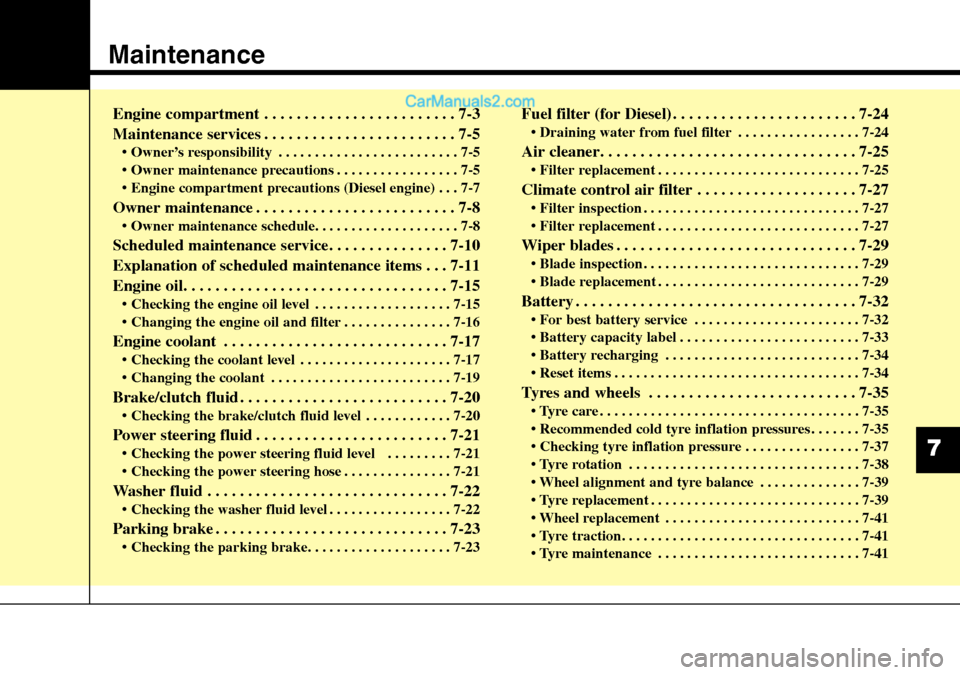
Engine compartment . . . . . . . . . . . . . . . . . . . . . . . . 7-3
Maintenance services . . . . . . . . . . . . . . . . . . . . . . . . 7-5
• Owner’s responsibility . . . . . . . . . . . . . . . . . . . . . . . . . 7-5
• Owner maintenance precautions . . . . . . . . . . . . . . . . . 7-5
• Engine compartment precautions (Diesel engine) . . . 7-7
Owner maintenance . . . . . . . . . . . . . . . . . . . . . . . . . 7-8
• Owner maintenance schedule. . . . . . . . . . . . . . . . . . . . 7-8
Scheduled maintenance service. . . . . . . . . . . . . . . 7-10
Explanation of scheduled maintenance items . . . 7-11
Engine oil. . . . . . . . . . . . . . . . . . . . . . . . . . . . . . . . . 7-15
• Checking the engine oil level . . . . . . . . . . . . . . . . . . . 7-15
• Changing the engine oil and filter . . . . . . . . . . . . . . . 7-16
Engine coolant . . . . . . . . . . . . . . . . . . . . . . . . . . . . 7-17
• Checking the coolant level . . . . . . . . . . . . . . . . . . . . . 7-17
• Changing the coolant . . . . . . . . . . . . . . . . . . . . . . . . . 7-19
Brake/clutch fluid . . . . . . . . . . . . . . . . . . . . . . . . . . 7-20
• Checking the brake/clutch fluid level . . . . . . . . . . . . 7-20
Power steering fluid . . . . . . . . . . . . . . . . . . . . . . . . 7-21
• Checking the power steering fluid level . . . . . . . . . 7-21
• Checking the power steering hose . . . . . . . . . . . . . . . 7-21
Washer fluid . . . . . . . . . . . . . . . . . . . . . . . . . . . . . . 7-22
• Checking the washer fluid level . . . . . . . . . . . . . . . . . 7-22
Parking brake . . . . . . . . . . . . . . . . . . . . . . . . . . . . . 7-23
• Checking the parking brake. . . . . . . . . . . . . . . . . . . . 7-23
Fuel filter (for Diesel) . . . . . . . . . . . . . . . . . . . . . . . 7-24
• Draining water from fuel filter . . . . . . . . . . . . . . . . . 7-24
Air cleaner. . . . . . . . . . . . . . . . . . . . . . . . . . . . . . . . 7-25
• Filter replacement . . . . . . . . . . . . . . . . . . . . . . . . . . . . 7-25
Climate control air filter . . . . . . . . . . . . . . . . . . . . 7-27
• Filter inspection . . . . . . . . . . . . . . . . . . . . . . . . . . . . . . 7-27
• Filter replacement . . . . . . . . . . . . . . . . . . . . . . . . . . . . 7-27
Wiper blades . . . . . . . . . . . . . . . . . . . . . . . . . . . . . . 7-29
• Blade inspection . . . . . . . . . . . . . . . . . . . . . . . . . . . . . . 7-29
• Blade replacement . . . . . . . . . . . . . . . . . . . . . . . . . . . . 7-29
Battery . . . . . . . . . . . . . . . . . . . . . . . . . . . . . . . . . . . 7-32
• For best battery service . . . . . . . . . . . . . . . . . . . . . . . 7-32
• Battery capacity label . . . . . . . . . . . . . . . . . . . . . . . . . 7-33
• Battery recharging . . . . . . . . . . . . . . . . . . . . . . . . . . . 7-34
• Reset items . . . . . . . . . . . . . . . . . . . . . . . . . . . . . . . . . . 7-34
Tyres and wheels . . . . . . . . . . . . . . . . . . . . . . . . . . 7-35
• Tyre care . . . . . . . . . . . . . . . . . . . . . . . . . . . . . . . . . . . . 7-35
• Recommended cold tyre inflation pressures . . . . . . . 7-35
• Checking tyre inflation pressure . . . . . . . . . . . . . . . . 7-37
• Tyre rotation . . . . . . . . . . . . . . . . . . . . . . . . . . . . . . . . 7-38
• Wheel alignment and tyre balance . . . . . . . . . . . . . . 7-39
• Tyre replacement . . . . . . . . . . . . . . . . . . . . . . . . . . . . . 7-39
• Wheel replacement . . . . . . . . . . . . . . . . . . . . . . . . . . . 7-41
• Tyre traction. . . . . . . . . . . . . . . . . . . . . . . . . . . . . . . . . 7-41
• Tyre maintenance . . . . . . . . . . . . . . . . . . . . . . . . . . . . 7-41
Page 600 of 699
73
Maintenance
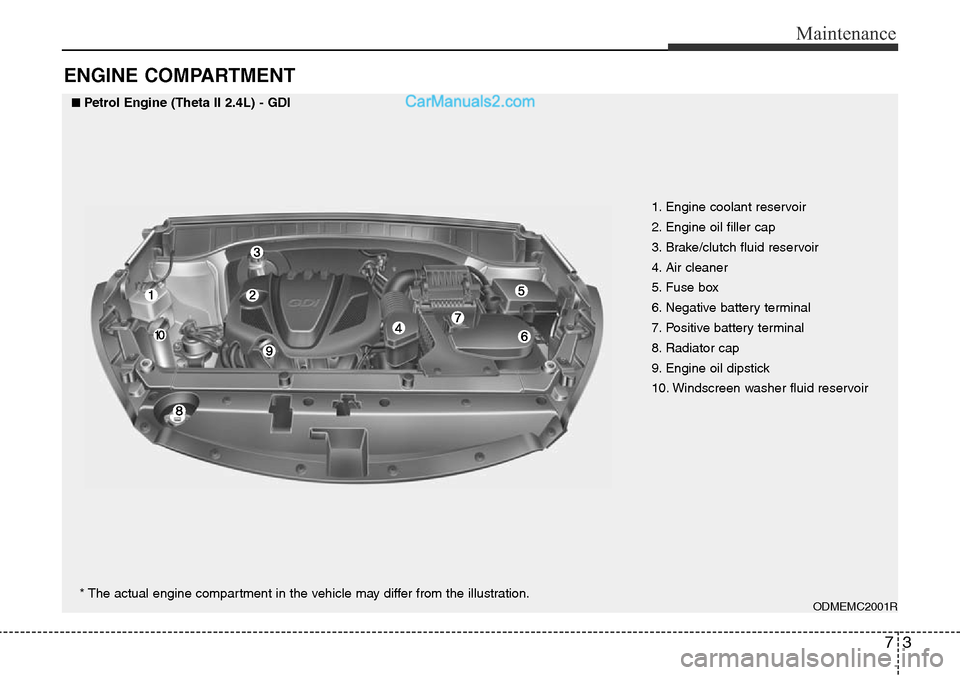
ENGINE COMPARTMENT
1. Engine coolant reservoir
2. Engine oil filler cap
3. Brake/clutch fluid reservoir
4. Air cleaner
5. Fuse box
6. Negative battery terminal
7. Positive battery terminal
8. Radiator cap
9. Engine oil dipstick
10. Windscreen washer fluid reservoir
ODMEMC2001R
■Petrol Engine (Theta II 2.4L) - GDI
* The actual engine compartment in the vehicle may differ from the illustration.
Page 601 of 699
Maintenance
4 7
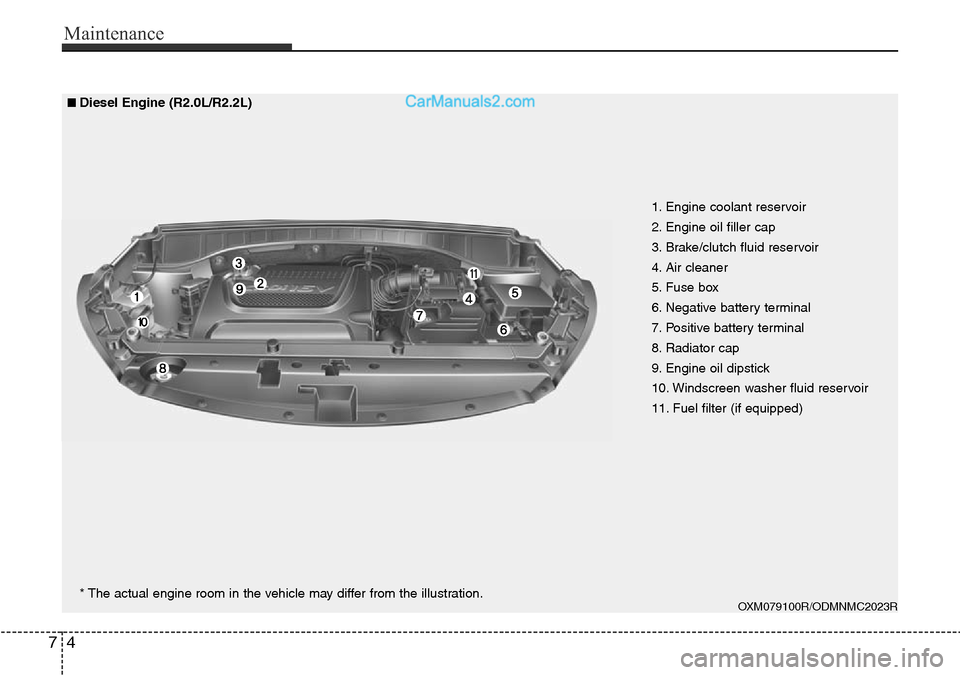
1. Engine coolant reservoir
2. Engine oil filler cap
3. Brake/clutch fluid reservoir
4. Air cleaner
5. Fuse box
6. Negative battery terminal
7. Positive battery terminal
8. Radiator cap
9. Engine oil dipstick
10. Windscreen washer fluid reservoir
11. Fuel filter (if equipped)
OXM079100R/ODMNMC2023R
■Diesel Engine (R2.0L/R2.2L)
* The actual engine room in the vehicle may differ from the illustration.