Page 630 of 699

733
Maintenance
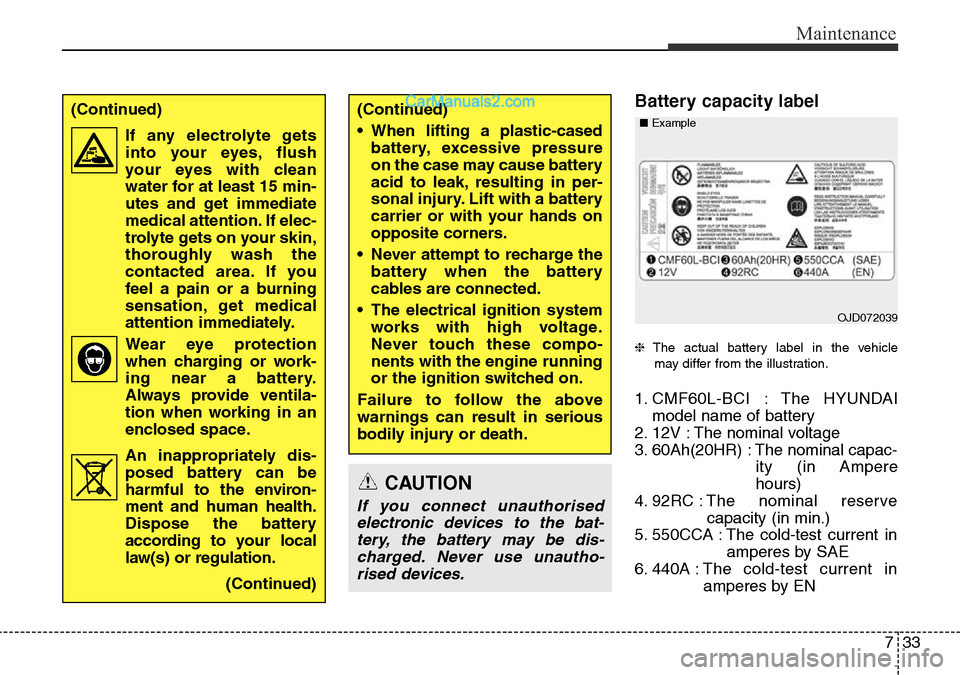
Battery capacity label
❈The actual battery label in the vehicle
may differ from the illustration.
1. CMF60L-BCI : The HYUNDAI
model name of battery
2. 12V : The nominal voltage
3. 60Ah(20HR) : The nominal capac-
ity (in Ampere
hours)
4. 92RC :The nominal reserve
capacity (in min.)
5. 550CCA : The cold-test current in
amperes by SAE
6. 440A :The cold-test current in
amperes by EN
(Continued)
• When lifting a plastic-cased
battery, excessive pressure
on the case may cause battery
acid to leak, resulting in per-
sonal injury. Lift with a battery
carrier or with your hands on
opposite corners.
• Never attempt to recharge the
battery when the battery
cables are connected.
• The electrical ignition system
works with high voltage.
Never touch these compo-
nents with the engine running
or the ignition switched on.
Failure to follow the above
warnings can result in serious
bodily injury or death.
CAUTION
If you connect unauthorised
electronic devices to the bat-
tery, the battery may be dis-
charged. Never use unautho-
rised devices.
OJD072039 ■Example
(Continued)
If any electrolyte gets
into your eyes, flush
your eyes with clean
water for at least 15 min-
utes and get immediate
medical attention. If elec-
trolyte gets on your skin,
thoroughly wash the
contacted area. If you
feel a pain or a burning
sensation, get medical
attention immediately.
Wear eye protection
when charging or work-
ing near a battery.
Always provide ventila-
tion when working in an
enclosed space.
An inappropriately dis-
posed battery can be
harmful to the environ-
ment and human health.
Dispose the battery
according to your local
law(s) or regulation.
(Continued)
Page 631 of 699

Maintenance
34 7
Battery recharging
Your vehicle has a maintenance-free,
calcium-based battery.
• If the battery becomes discharged
in a short time (because, for exam-
ple, the headlights or interior lights
were left on whilst the vehicle was
not in use), recharge it by slow
charging (trickle) for 10 hours.
• If the battery gradually discharges
because of high electric load whilst
the vehicle is being used, recharge
it at 20-30A for two hours.
Reset items
Items should be reset after the bat-
tery has been discharged or the bat-
tery has been disconnected.
• Auto up/down window
(See section 4)
• Sunroof (See section 4)
• Trip computer (See section 4)
• Climate control system
(See section 4)
• Clock (See section 4)
• Audio (See section 4)
(Continued)
• Watch the battery during
charging, and stop or reduce
the charging rate if the battery
cells begin gassing (boiling)
violently or if the temperature
of the electrolyte of any cell
exceeds 49°C (120°F).
• Wear eye protection when
checking the battery during
charging.
• Disconnect the battery charg-
er in the following order.
1. Turn off the battery charger
main switch.
2. Unhook the negative clamp
from the negative battery
terminal.
3. Unhook the positive clamp
from the positive battery
terminal.
(Continued)
WARNING- Recharging
battery
When recharging the battery,
observe the following precau-
tions:
• The battery must be removed
from the vehicle and placed in
an area with good ventilation.
• Do not allow cigarettes,
sparks, or flame near the bat-
tery.
(Continued)
(Continued)
• Before performing mainte-
nance or recharging the bat-
tery, turn off all accessories
and stop the engine.
• The negative battery cable
must be removed first and
installed last when the battery
is disconnected.
Page 644 of 699

747
Maintenance
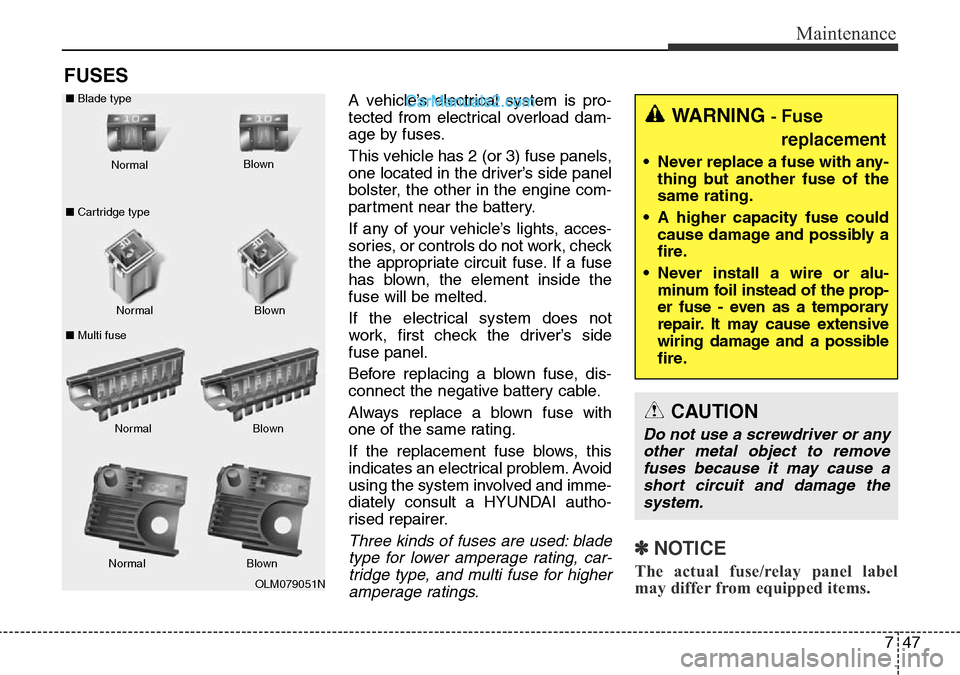
FUSES
A vehicle’s electrical system is pro-
tected from electrical overload dam-
age by fuses.
This vehicle has 2 (or 3) fuse panels,
one located in the driver’s side panel
bolster, the other in the engine com-
partment near the battery.
If any of your vehicle’s lights, acces-
sories, or controls do not work, check
the appropriate circuit fuse. If a fuse
has blown, the element inside the
fuse will be melted.
If the electrical system does not
work, first check the driver’s side
fuse panel.
Before replacing a blown fuse, dis-
connect the negative battery cable.
Always replace a blown fuse with
one of the same rating.
If the replacement fuse blows, this
indicates an electrical problem. Avoid
using the system involved and imme-
diately consult a HYUNDAI autho-
rised repairer.
Three kinds of fuses are used: blade
type for lower amperage rating, car-
tridge type, and multi fuse for higher
amperage ratings.✽NOTICE
The actual fuse/relay panel label
may differ from equipped items.
WARNING - Fuse
replacement
• Never replace a fuse with any-
thing but another fuse of the
same rating.
• A higher capacity fuse could
cause damage and possibly a
fire.
• Never install a wire or alu-
minum foil instead of the prop-
er fuse - even as a temporary
repair. It may cause extensive
wiring damage and a possible
fire.
CAUTION
Do not use a screwdriver or any
other metal object to remove
fuses because it may cause a
short circuit and damage the
system.
OLM079051N Normal Normal ■Blade type
■Cartridge type
■Multi fuseBlown
Blown
Normal Blown
Normal Blown
Page 645 of 699

Maintenance
48 7
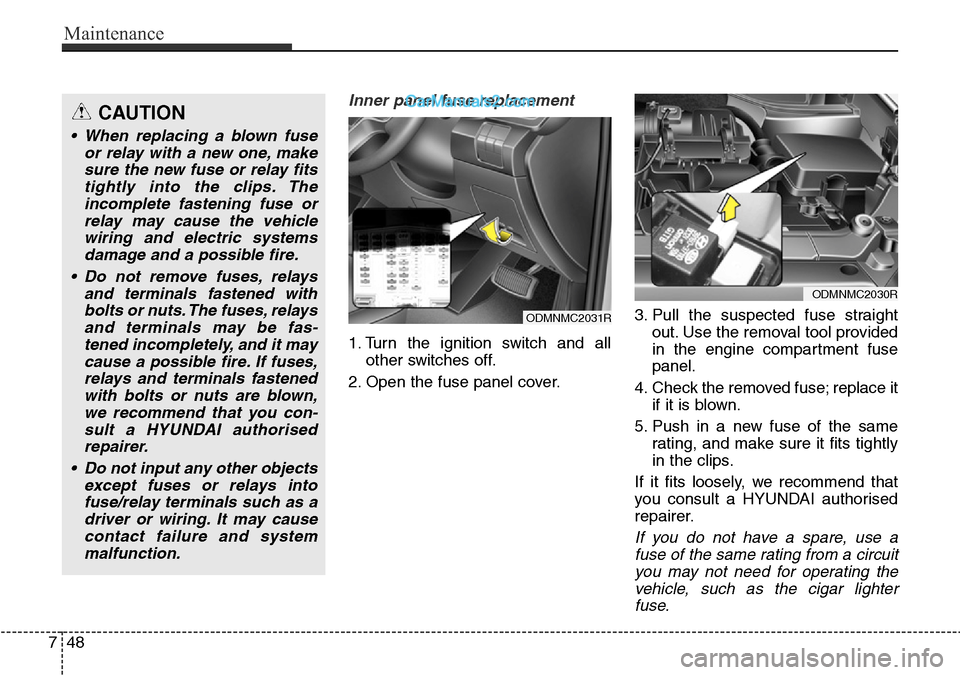
Inner panel fuse replacement
1. Turn the ignition switch and all
other switches off.
2. Open the fuse panel cover.3. Pull the suspected fuse straight
out. Use the removal tool provided
in the engine compartment fuse
panel.
4. Check the removed fuse; replace it
if it is blown.
5. Push in a new fuse of the same
rating, and make sure it fits tightly
in the clips.
If it fits loosely, we recommend that
you consult a HYUNDAI authorised
repairer.
If you do not have a spare, use a
fuse of the same rating from a circuit
you may not need for operating the
vehicle, such as the cigar lighter
fuse.
ODMNMC2031R
ODMNMC2030R
CAUTION
• When replacing a blown fuse
or relay with a new one, make
sure the new fuse or relay fits
tightly into the clips. The
incomplete fastening fuse or
relay may cause the vehicle
wiring and electric systems
damage and a possible fire.
• Do not remove fuses, relays
and terminals fastened with
bolts or nuts. The fuses, relays
and terminals may be fas-
tened incompletely, and it may
cause a possible fire. If fuses,
relays and terminals fastened
with bolts or nuts are blown,
we recommend that you con-
sult a HYUNDAI authorised
repairer.
• Do not input any other objects
except fuses or relays into
fuse/relay terminals such as a
driver or wiring. It may cause
contact failure and system
malfunction.
Page 646 of 699
749
Maintenance
If the headlights or other electrical
components do not work and the
fuses are OK, check the fuse block in
the engine compartment. If a fuse is
blown, it must be replaced.Fuse switch
Always, put the fuse switch at the ON
position.
If you move the switch to the OFF
position, some items such as audio
and digital clock must be reset and
transmitter (or smart key) may not
work properly.
Engine compartment panel fuse
replacement
1. Turn the ignition switch and all
other switches off.
2. Remove the fuse box cover by
pressing the tap and pulling up.
ODMNMC2029R
CAUTION
Always place the fuse switch in
the ON position whilst driving
the vehicle.
ODMNMC2032R
ODM072028
Diesel only
Page 647 of 699
Maintenance
50 7
3. Check the removed fuse; replace it
if it is blown. To remove or insert
the fuse, use the fuse puller in the
engine compartment fuse panel.
4. Push in a new fuse of the same
rating, and make sure it fits tightly
in the clips. If it fits loosely, we rec-
ommend that you consult a
HYUNDAI authorised repairer.Multi fuse
If the multi fuse is blown, it must be
removed as follows:
1. Disconnect the negative battery
cable.
2. Remove the bolts shown in the
picture above.
3. Replace the fuse with a new one
of the same rating.
4. Reinstall in the reverse order of
removal.
✽NOTICE
If the multi fuse is blown, we recom-
mend that you consult a HYUNDAI
authorised repairer.
CAUTION
After checking the fuse box in
the engine compartment,
securely install the fuse box
cover. If not, electrical failures
may occur from water leaking
in.ODM072047
Page 653 of 699
Maintenance
56 7
Engine compartment fuse panel
ODMEMC2015
ODMNMC2036R
Page 657 of 699
Maintenance
60 7
DescriptionSymbol Fuse ratingProtected Component
FUSE
TRAILER 115ATrailer Lamp & Power Outlet
WIPER10ABCM, PCM/ECM
WIPER FRT25ARLY. 5 (Wiper (LO) Relay), Front Wiper Motor
B/UP LAMP10AM/T - Back-Up Lamp Switch, A/T - Rear Combination Lamp (IN) LH/RH,
Electro Chromic Mirror, Trailer Lamp & Power Outlet, Audio, A/V & Navigation
Head Unit
ABS37.5AABS Control Module, ESC Control Module
SENSOR57.5APCM/ECM, Mass Air Flow Sensor
TCU15ATCM (DSL), Transaxle Range Switch
F/PUMP15AFuel Pump Relay
ECU115AG4KE/G4KJ/G6DF : PCM
D4HA/D4HB (VGT Regular Engine Pack) : TCM (A/T)
ECU210AD4HA/D4HB : Electronic VGT Actuator
SENSOR310A
G4KE : Injector #1/#2/#3/#4
G6DF : PCM, Injector #1/#2/#3/#4/#5/#6, Fuel Pump Relay
D4HA/D4HB (VGT Regular Engine Pack) : Lambda Sensor, Stop Lamp Switch
D4HA (VGT Low Power Engine Pack) : Lambda Sensor