2016 Hyundai Santa Fe engine
[x] Cancel search: enginePage 552 of 699
Driving your vehicle
94 5
When you are ready to leave after
parking on a hill
1.With the manual transaxle in
Neutral or automatic transaxle in P
(Park), apply your brakes and hold
the brake pedal down whilst you:
• Start your engine;
• Shift into gear; and
• Release the parking brake.
2.Slowly remove your foot from the
brake pedal.
3.Drive slowly until the trailer is clear
of the chocks.
4.Stop and have someone pick up
and store the chocks.
Maintenance when trailer tow-
ing
Your vehicle will need service more
often when you regularly pull a trail-
er. Important items to pay particular
attention to include engine oil, auto-
matic transaxle fluid, axle lubricant
and cooling system fluid. Brake con-
dition is another important item to
frequently check. Each item is cov-
ered in this manual, and the Index
will help you find them quickly. If
you’re trailering, it is a good idea to
review these sections before you
start your trip.
Do not forget to also maintain your
trailer and towbar. Follow the mainte-
nance schedule that accompanied
your trailer and check it periodically.
Preferably, conduct the check at the
start of each day’s driving. Most
importantly, all towbar nuts and bolts
should be tight.
CAUTION
• Due to higher load during
trailer usage, overheating
might occur in hot days or
during uphill driving. If the
coolant gauge indicates over-
heating, switch off the air con-
ditioner and stop the vehicle
in a safe area to cool down the
engine.
• When towing check transaxle
fluid more frequently.
WARNING- Parking
brake
It can be dangerous to get out
of your vehicle if the parking
brake is not firmly set.
If you have left the engine run-
ning, the vehicle can move sud-
denly. You or others could be
seriously or fatally injured.
Page 553 of 699
595
Driving your vehicle
If you do decide to pull a trail-
er
Here are some important points if
you decide to pull a trailer:
• Consider using a sway control. You
can ask a towbar dealer about
sway control.
• Do not do any towing with your car
during its first 1,200 miles (2,000
km) in order to allow the engine to
properly break in. Failure to heed
this caution may result in serious
engine or transaxle damage.
• When towing a trailer, we recom-
mend that you consult a HYUNDAI
authorised repairer on additional
requirements such as a towing kit,
etc.
• Always drive your vehicle at a mod-
erate speed (less than 60 mph
(100 km/h)).
• On a long uphill grade, do not
exceed 45 mph (70 km/h) or the
posted towing speed limit,
whichever is lower.
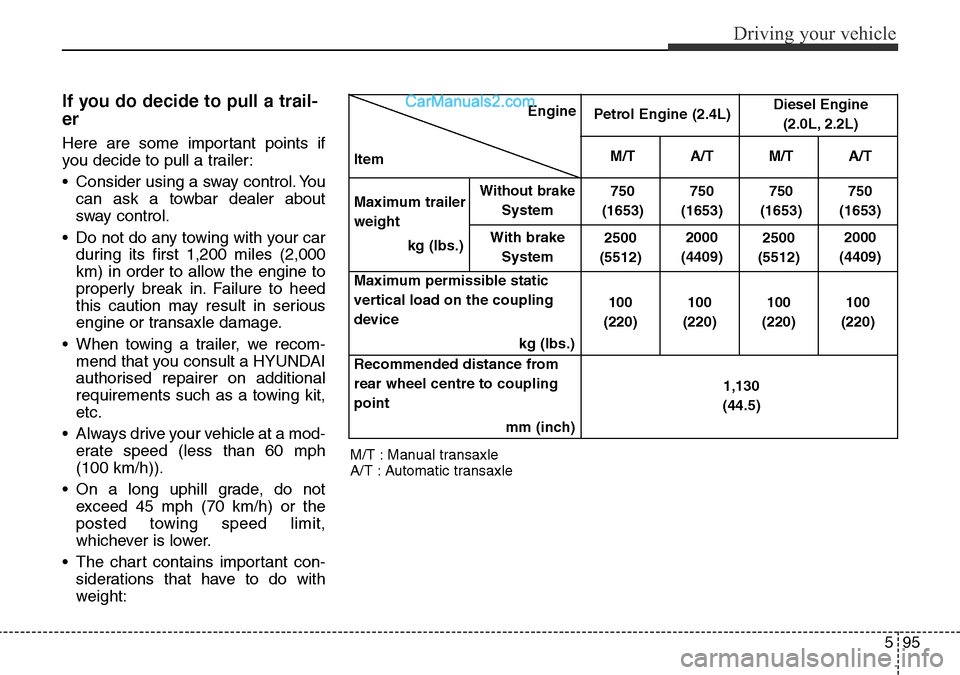
• The chart contains important con-
siderations that have to do with
weight:
M/T : Manual transaxle
A/T : Automatic transaxleEngine
ItemPetrol Engine (2.4L)Diesel Engine
(2.0L, 2.2L)
M/T A/T M/T A/T
Maximum trailer
weight
kg (Ibs.)
Without brake
System750
(1653)750
(1653)750
(1653)750
(1653)
With brake
System2500
(5512)2000
(4409)2500
(5512)2000
(4409)
Maximum permissible static
vertical load on the coupling
device
kg (Ibs.)100
(220)100
(220)100
(220)100
(220)
Recommended distance from
rear wheel centre to coupling
point
mm (inch)1,130
(44.5)
Page 557 of 699
What to do in an emergency
Road warning . . . . . . . . . . . . . . . . . . . . . . . . . . . . . . 6-2
• Hazard warning flasher . . . . . . . . . . . . . . . . . . . . . . . . 6-2
In case of an emergency whilst driving . . . . . . . . . 6-3
• If the engine stalls at a crossroad or crossing. . . . . . . 6-3
• If you have a flat tyre whilst driving . . . . . . . . . . . . . . 6-3
• If engine stalls whilst driving . . . . . . . . . . . . . . . . . . . . 6-3
If the engine does not start . . . . . . . . . . . . . . . . . . . 6-4
• If engine doesn’t turn over or turns over
slowly . . . . . . . . . . . . . . . . . . . . . . . . . . . . . . . . . . . . . . 6-4
• If engine turns over normally but does not
start . . . . . . . . . . . . . . . . . . . . . . . . . . . . . . . . . . . . . . . . 6-4
Emergency starting . . . . . . . . . . . . . . . . . . . . . . . . . 6-5
• Jump starting . . . . . . . . . . . . . . . . . . . . . . . . . . . . . . . . . 6-5
• Push-starting . . . . . . . . . . . . . . . . . . . . . . . . . . . . . . . . . 6-6
If the engine overheats . . . . . . . . . . . . . . . . . . . . . . . 6-7
Tyre Pressure Monitoring System (TPMS)
- Type A . . . . . . . . . . . . . . . . . . . . . . . . . . . . . . . . . . . 6-8
• Low tyre pressure (position) telltale . . . . . . . . . . . . . . 6-9
• TPMS (Tyre Pressure Monitoring System)
malfunction indicator . . . . . . . . . . . . . . . . . . . . . . . . 6-11
• Changing a tyre with TPMS. . . . . . . . . . . . . . . . . . . . 6-11
Tyre Pressure Monitoring System (TPMS)
- Type B . . . . . . . . . . . . . . . . . . . . . . . . . . . . . . . . . . 6-13
• Check tyre pressure. . . . . . . . . . . . . . . . . . . . . . . . . . . 6-13
• Tyre pressure monitoring system. . . . . . . . . . . . . . . . 6-14• Low tyre pressure telltale . . . . . . . . . . . . . . . . . . . . . . 6-15
• Low tyre pressure position telltale and
tyre pressure telltale. . . . . . . . . . . . . . . . . . . . . . . . . 6-15
• TPMS (Tyre Pressure Monitoring System)
malfunction indicator . . . . . . . . . . . . . . . . . . . . . . . 6-16
• Changing a tyre with TPMS. . . . . . . . . . . . . . . . . . . . 6-17
If you have a flat tyre (with spare tyre) . . . . . . . . 6-20
• Jack and tools . . . . . . . . . . . . . . . . . . . . . . . . . . . . . . . 6-20
• Removing and storing the spare tyre . . . . . . . . . . . . 6-21
• Changing tyres . . . . . . . . . . . . . . . . . . . . . . . . . . . . . . . 6-23
• Wheel nut tightening torque. . . . . . . . . . . . . . . . . . . . 6-26
• Jack label . . . . . . . . . . . . . . . . . . . . . . . . . . . . . . . . . . . 6-29
• EC Declaration of Conformity for Jack . . . . . . . . . . 6-30
If you have a flat tyre (with Tyre Mobility Kit) . 6-31
• Introduction . . . . . . . . . . . . . . . . . . . . . . . . . . . . . . . . . 6-31
• Components of the Tyre Mobility Kit . . . . . . . . . . . . 6-32
• Using the Tyre Mobility Kit . . . . . . . . . . . . . . . . . . . . 6-33
• Distributing the sealant. . . . . . . . . . . . . . . . . . . . . . . . 6-35
• Checking the tyre inflation pressure . . . . . . . . . . . . . 6-35
• Notes on the safe use of
the Tyre Mobility Kit . . . . . . . . . . . . . . . . . . . . . . . . 6-36
• Technical Data . . . . . . . . . . . . . . . . . . . . . . . . . . . . . . . 6-36
Towing . . . . . . . . . . . . . . . . . . . . . . . . . . . . . . . . . . . 6-37
• Towing service . . . . . . . . . . . . . . . . . . . . . . . . . . . . . . . 6-37
• Removable towing hook . . . . . . . . . . . . . . . . . . . . . . . 6-38
• Emergency towing . . . . . . . . . . . . . . . . . . . . . . . . . . . . 6-39
6
Page 559 of 699
63
What to do in an emergency
IN CASE OF AN EMERGENCY WHILST DRIVING
If the engine stalls at a cross-
road or crossing
• If the engine stalls at a crossroad
or crossing, set the shift lever in the
N (Neutral) position and then push
the vehicle to a safe place.
• If your vehicle has a manual
transaxle not equipped with a igni-
tion lock switch, the vehicle can
move forward by shifting to the
2(second) or 3(third) gear and then
turning the starter without depress-
ing the clutch pedal.
If you have a flat tyre whilst
driving
If a tyre goes flat whilst you are driv-
ing:
1.Take your foot off the accelerator
pedal and let the vehicle slow
down whilst driving straight ahead.
Do not apply the brakes immedi-
ately or attempt to pull off the road
as this may cause a loss of control.
When the vehicle has slowed to
such a speed that it is safe to do
so, brake carefully and pull off the
road. Drive off the road as far as
possible and park on firm, level
ground. If you are on a divided
highway, do not park in the median
area between the two traffic lanes.
2.When the vehicle is stopped, turn
on your emergency hazard flash-
ers, set the parking brake and put
the transaxle in P (automatic
transaxle) or reverse (manual
transaxle).
3.Have all passengers get out of the
vehicle. Be sure they all get out on
the side of the vehicle that is away
from traffic.4.When changing a flat tyre, follow
the instruction provided later in this
section.
If engine stalls whilst driving
1.Reduce your speed gradually,
keeping a straight line. Move cau-
tiously off the road to a safe place.
2.Turn on your emergency flashers.
3.Try to start the engine again. If your
vehicle does not start, we recom-
mend that you consult a HYUNDAI
authorised repairer.
Page 560 of 699
What to do in an emergency
4 6
IF THE ENGINE WILL NOT START
If engine doesn't turn over or
turns over slowly
1.If your vehicle has an automatic
transaxle, be sure the shift lever is
in N (Neutral) or P (Park) and the
emergency brake is set.
2.Check the battery connections to
be sure they are clean and tight.
3.Turn on the interior light. If the light
dims or goes out when you operate
the starter, the battery is dis-
charged.
4.Check the starter connections to
be sure they are securely tight-
ened.
5.Do not push or pull the vehicle to
start it. See instructions for "Jump
starting".
If engine turns over normally
but does not start
1.Check fuel level.
2.With the ignition switch in the
LOCK/OFF position, check all con-
nectors at ignition, coil and spark
plugs. Reconnect any that may be
disconnected or loose.
3.Check the fuel line in the engine
compartment.
4.If the engine still does not start, we
recommend that you call a
HYUNDAI authorised repairer.
WARNING
If the engine will not start, do
not push or pull the vehicle to
start it. This could result in a
collision or cause other dam-
age. In addition, push or pull
starting may cause the catalytic
converter to be overloaded and
create a fire hazard.
Page 562 of 699
What to do in an emergency
6 6
Jump starting procedure
1.Make sure the booster battery is
12-volt and that its negative termi-
nal is grounded.
2.If the booster battery is in another
vehicle, do not allow the vehicles to
touch.
3.Turn off all unnecessary electrical
loads.
4.Connect the jumper cables in the
exact sequence shown in the illus-
tration. First connect one end of a
jumper cable to the positive termi-
nal of the discharged battery (1),
then connect the other end to the
positive terminal on the booster
battery (2). Proceed to connect
one end of the other jumper cable
to the negative terminal of the
booster battery (3), then the other
end to a solid, stationary, metallic
point (for example, the engine lift-
ing bracket) away from the battery
(4). Do not connect it to or near any
part that moves when the engine is
cranked.Do not allow the jumper cables to
contact anything except the correct
battery terminals or the correct
ground. Do not lean over the bat-
tery when making connections.
5.Start the engine of the vehicle with
the booster battery and let it run at
2,000 rpm, then start the engine of
the vehicle with the discharged
battery.
If the cause of your battery discharg-
ing is not apparent, we recommend
that the system be checked by a
HYUNDAI authorised repairer.
Push-starting
Your manual transaxle-equipped
vehicle should not be push-started
because it might damage the emis-
sion control system.
Vehicles equipped with automatic
transaxle cannot be push-started.
Follow the directions in this section
for jump-starting.
WARNING
Never tow a vehicle to start it
because the sudden surge for-
ward when the engine starts
could cause a collision with the
tow vehicle.
CAUTION - Battery
cables
Do not connect the jumper
cable from the negative terminal
of the booster battery to the
negative terminal of the dis-
charged battery. This can cause
the discharged battery to over-
heat and crack, releasing bat-
tery acid.
Page 563 of 699
67
What to do in an emergency
IF THE ENGINE OVERHEATS
If your temperature gauge indicates
overheating, you will experience a
loss of power, or hear loud pinging or
knocking, the engine is probably too
hot. If this happens, you should:
1.Pull off the road and stop as soon
as it is safe to do so.
2.Place the shift lever in P (automat-
ic transaxle) or neutral (manual
transaxle) and set the parking
brake. If the air conditioning is on,
turn it off.
3.If engine coolant is running out
under the vehicle or steam is com-
ing out from the bonnet, stop the
engine. Do not open the bonnet
until the coolant has stopped run-
ning or the steaming has stopped.
If there is no visible loss of engine
coolant and no steam, leave the
engine running and check to be
sure the engine cooling fan is oper-
ating. If the fan is not running, turn
the engine off.4. Check to see if the water pump
drive belt is missing. If it is not
missing, check to see that it is
tight. If the drive belt seems to be
satisfactory, check for coolant
leaking from the radiator, hoses or
under the vehicle. (If the air condi-
tioning had been in use, it is nor-
mal for cold water to be draining
from it when you stop).
5. If the water pump drive belt is bro-
ken or engine coolant is leaking
out, stop the engine immediately
and we recommend that you call a
HYUNDAI authorised repairer.6.If you cannot find the cause of the
overheating, wait until the engine
temperature has returned to nor-
mal. Then, if coolant has been lost,
carefully add coolant to the reser-
voir to bring the fluid level in the
reservoir up to the halfway mark.
7.Proceed with caution, keeping
alert for further signs of overheat-
ing. If overheating happens again,
we recommend that you call a
HYUNDAI authorised repairer.
CAUTION
• Serious loss of coolant indi-
cates there is a leak in the
cooling system and we recom-
mend that the system be
checked by a HYUNDAI autho-
rised repairer.
• When the engine overheats
from low engine coolant, sud-
denly adding engine coolant
may cause cracks in the
engine. To prevent damage,
add engine coolant slowly in
small quantities.
WARNING
Whilst the engine is running,
keep hair, hands and clothing
away from moving parts such
as the fan and drive belts to pre-
vent injury.
WARNING
Do not remove the radiator cap
when the engine is hot. This can
allow coolant to blow out of the
opening and cause serious burns.
Page 565 of 699
69
What to do in an emergency
Always check the TPMS malfunction
telltale after replacing one or more
tyres or wheels on your vehicle to
ensure that the replacement or alter-
nate tyres and wheels allow the
TPMS to continue to function proper-
ly.
✽NOTICE
If any of the below happens, we rec-
ommend that the system be checked
by a HYUNDAI authorised repairer.
1.The low tyre pressure telltale/
TPMS malfunction indicator do
not illuminate for 3 seconds when
the ignition switch is turned to the
ON position or engine is running.
2. The TPMS malfunction indicator
remains illuminated after blinking
for approximately 1 minute.
3. The Low tyre pressure position
telltale remains illuminated.
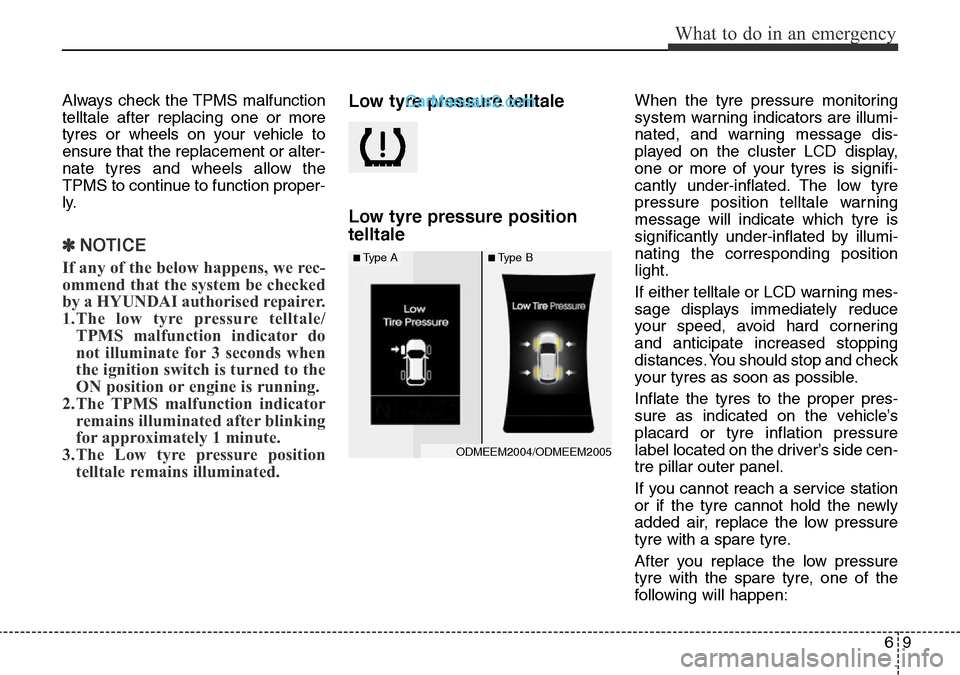
Low tyre pressure telltale
Low tyre pressure position
telltaleWhen the tyre pressure monitoring
system warning indicators are illumi-
nated, and warning message dis-
played on the cluster LCD display,
one or more of your tyres is signifi-
cantly under-inflated. The low tyre
pressure position telltale warning
message will indicate which tyre is
significantly under-inflated by illumi-
nating the corresponding position
light.
If either telltale or LCD warning mes-
sage displays immediately reduce
your speed, avoid hard cornering
and anticipate increased stopping
distances. You should stop and check
your tyres as soon as possible.
Inflate the tyres to the proper pres-
sure as indicated on the vehicle’s
placard or tyre inflation pressure
label located on the driver’s side cen-
tre pillar outer panel.
If you cannot reach a service station
or if the tyre cannot hold the newly
added air, replace the low pressure
tyre with a spare tyre.
After you replace the low pressure
tyre with the spare tyre, one of the
following will happen:
ODMEEM2004/ODMEEM2005
■Type A■Type B