Page 128 of 590

128 2-1. Driving procedures
CAUTION
■When taking a nap in the vehicle
Always turn the engine off. Otherwise, you may accidentally move the shift
lever or depress the accelerator pedal, which could cause an accident or fire
due to engine overheating. Additionally, if the vehicle is parked in a poorly
ventilated area, exhaust gases may collect and enter the vehicle, leadin\
g to
death or a serious health hazard.
■ When braking the vehicle
●When the brakes are wet, drive more cautiously.
Braking distance increases when the brakes are wet, and may cause one
side of the vehicle to brake differently than the other side. Also the parking
brake may not securely hold the vehicle.
● If the power brake assist function does not operate, do not follow other
vehicles closely and avoid hills or sharp turns that require braking.
In this case, braking is still possible, but the brake pedal should be
depressed more firmly than usual. Also, the braking distance will increase.
Have your brakes fixed immediately.
● Do not pump the brake pedal if the engine stalls.
Each push on the brake pedal uses up the reserve for the power-assisted
brakes.
● The brake system consists of 2 individual hydraulic systems: If one of the
systems fails, the other will still operate. In this case, the brake pedal
should be depressed more firmly than usual and braking distance
becomes longer.
Have your brakes fixed immediately.
Page 144 of 590
144
2-1. Driving procedures
Hor n
■After adjusting the steering wheel
Make sure that the steering wheel is securely locked.
The horn may not sound if the steering wheel is not securely locked.
(P. 63)
To sound the horn, press on or
close to the mark.
Page 149 of 590

149
2-2. Gauges and meters
2
When driving
■
Indicators
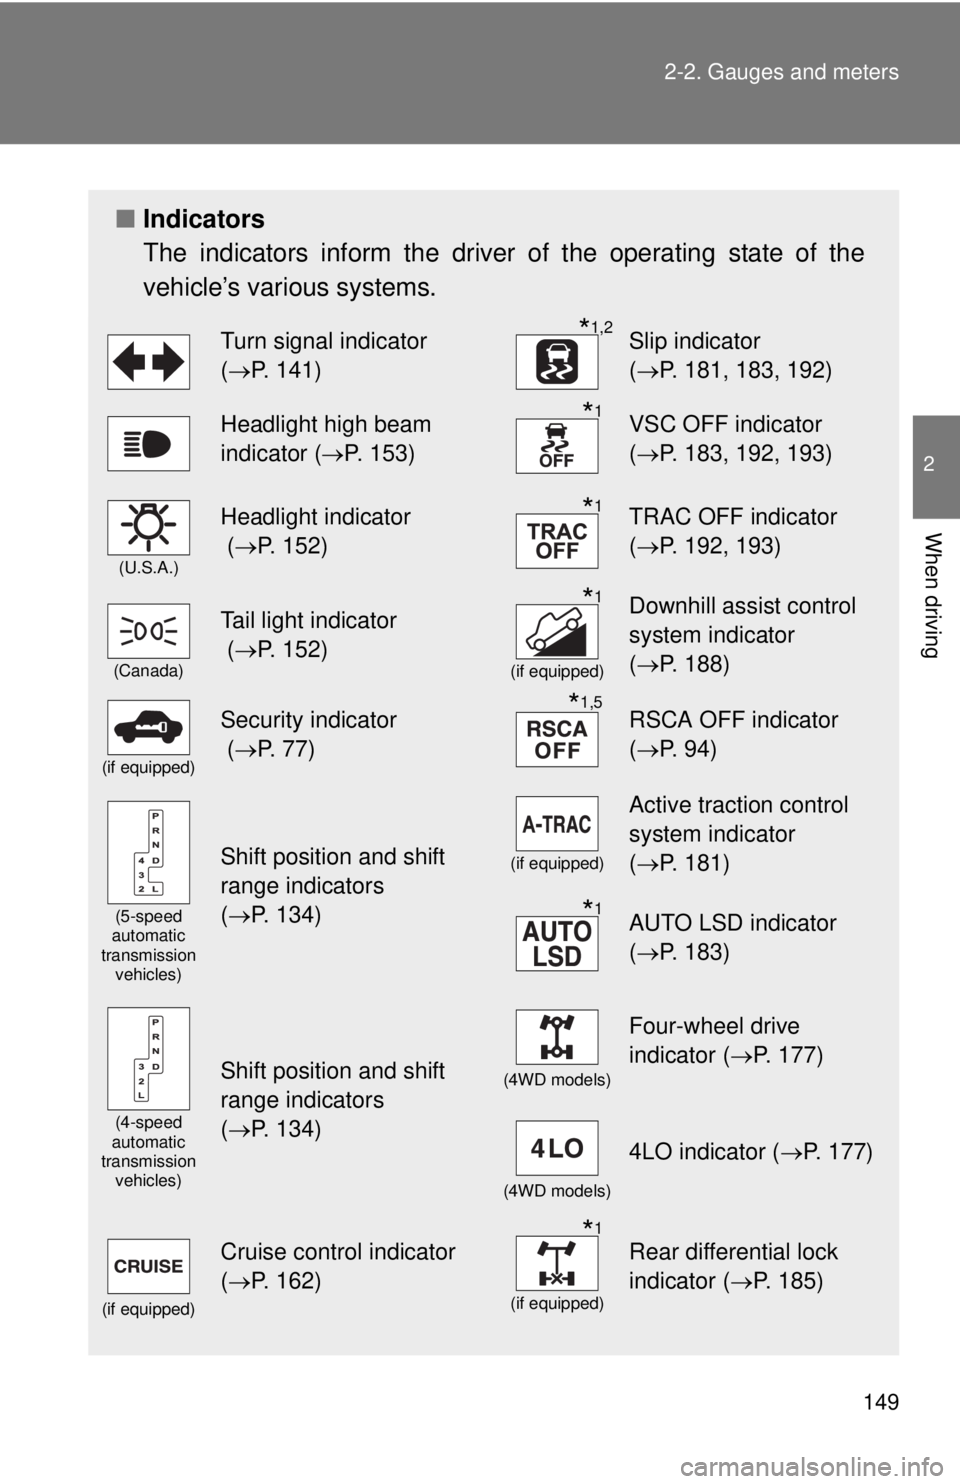
The indicators inform the driver of the operating state of the
vehicle’s various systems.
Turn signal indicator
(P. 141)*1,2Slip indicator
( P. 181, 183, 192)
Headlight high beam
indicator ( P. 153)*1VSC OFF indicator
(P. 183, 192, 193)
(U.S.A.)
Headlight indicator
( P. 152)*1TRAC OFF indicator
(P. 192, 193)
(Canada)
Tail light indicator
( P. 152)*1
(if equipped)
Downhill assist control
system indicator
(P. 188)
(if equipped)
Security indicator
( P. 77)*1,5RSCA OFF indicator
(P. 94)
(5-speed
automatic
transmission
vehicles)
Shift position and shift
range indicators
(P. 134)(if equipped)
Active traction control
system indicator
( P. 181)
*1AUTO LSD indicator
(P. 183)
(4-speed
automatic
transmission vehicles)
Shift position and shift
range indicators
(P. 134)(4WD models)
Four-wheel drive
indicator ( P. 177)
(4WD models)
4LO indicator ( P. 177)
(if equipped)
Cruise control indicator
(P. 162)*1
(if equipped)
Rear differential lock
indicator ( P. 185)
Page 179 of 590

179
2-4. Using other
driving systems
2
When driving
■Shifting between H2 and H4
●Shifting from H2 to H4
Reduce the vehicle speed to less than 62 mph (100 km/h) and turn the
front-wheel drive control switch fully clockwise.
● Shifting from H4 to H2
Turn the front-wheel drive control switch fully counterclockwise.
This can be done at any speed. You need not depress the clutch pedal.
(manual transmission)
■ If the four-wheel drive indicator li ght or the 4LO indicator light blinks
● Shifting from H2 to H4
• If the four-wheel drive indicator continues to blink, drive straight ahead
while accelerating or decelerating.
• If the four-wheel drive indicator continues to blink and the buzzer sounds, stop the vehicle or reduce the vehicle speed to less than 62
mph (100 km/h). Operate the switch again.
● Shifting from H4 to H2
If the four-wheel drive indicator continues to blink, drive straight ahead
while accelerating or decelerating, or drive forward or backward in a short
distance.
● Shifting to H4 or L4
Automatic transmission
If the 4LO indicator continues to blink when you operate the front-wheel
drive control switch to the H4 or L4 position, drive forward or backward in a
short distance, then stop the vehicle completely, shift the shift lever
securely to N and operate the switch again. Manual transmission
If the 4LO indicator continues to blink when you operate the front-wheel
drive control switch to the H4 or L4 position, drive forward or backward in a
short distance, then stop the vehicle completely, depress the clutch pedal
and operate the switch again.
If the indicator light continues to blink even if doing so, contact your Toyota
dealer as soon as possible. There may be a trouble in the four-wheel drive
system.
Page 202 of 590

202
2-5. Driving information
Cargo and luggage
CAUTION
■When you secure cargo with the deck rails
Be sure to follow the instructions below in order to avoid the cargo com-
ing loose.
●Do not install accessories (tie-down cleats, storage boxes, etc.) at
more than the following number of locations per deck rail.
• Side rail:Short deck—Max. 3 locations
Long deck—Max. 4 locations
• Headboard rail: Max 3 locations
Take notice of the following information about storage precau-
tions, cargo capacity and load.
● Stow cargo and luggage in the rear deck whenever possible.
● Be sure all items are secured in place.
● Be careful to keep the vehicle level. Placing the weight as far for-
ward as possible helps maintain vehicle balance.
● For better fuel economy, do no t carry unnecessary weight.
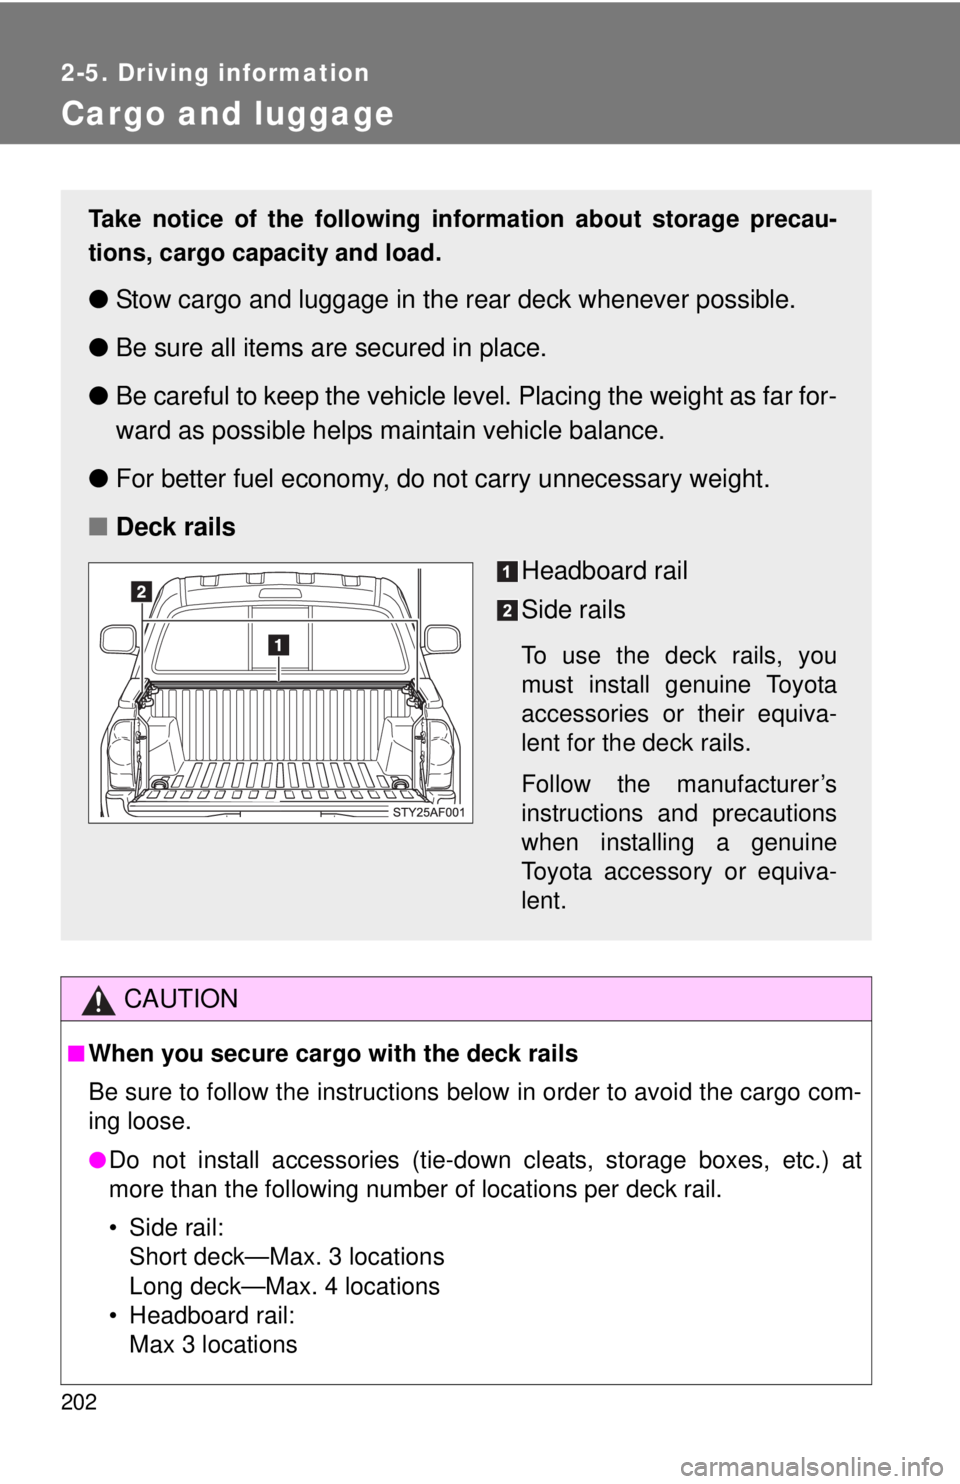
■ Deck rails
Headboard rail
Side rails
To use the deck rails, you
must install genuine Toyota
accessories or their equiva-
lent for the deck rails.
Follow the manufacturer’s
instructions and precautions
when installing a genuine
Toyota accessory or equiva-
lent.
Page 203 of 590

203
2-5. Driving information
2
When driving
Capacity and distribution
Cargo capacity depends on the total weight of the occupants.
(Cargo capacity) = (Total load capacity) (Total weight of occupants)
Steps for Determining Correct Load Limit—
(1) Locate the statement “The co mbined weight of occupants and
cargo should never exceed XXX kg or XXX lbs.” on your vehicle’s
placard.
(2) Determine the combined weight of the driver and passengers that will be riding in your vehicle.
(3) Subtract the combined weight of the driver and passengers from XXX kg or XXX lbs.
(4) The resulting figure equals the av ailable amount of cargo and lug-
gage load capacity.
For example, if the “XXX” amount equals 1400 lbs. and there will
be five 150 lb passengers in your vehicle, the amount of available
cargo and luggage load capacity is 650 lbs. (1400 750 (5 150)
= 650 lbs.)
(5) Determine the combined weight of luggage and cargo being loaded on the vehicle. That weight may not safely exceed the
available cargo and luggage load capacity calculated in Step 4.
CAUTION
■When you secure cargo with the deck rails
●Spread out tie-down/support locations evenly along the length of the
rails.
●Do not exceed a total tensile load of 440 lb. (200 kg) per deck rail.
●To prevent luggage or cargo from sliding forward during braking, make
sure the deck rail accessories su ch as storage box are securely
attached on the deck rails.
Page 205 of 590

205
2-5. Driving information
2
When driving
As shown in the above example,
if the number of occupants
increases, the cargo and luggage load will be reduced by an amount
that equals the increased weight du e to the additional occupants. In
other words, if an increase in th e number of occupants causes an
excess of the total load capacity (combined weight of occupants plus
cargo and luggage load), you must reduce the cargo and luggage on
your vehicle.
CAUTION
■Things that must not be carried in the luggage compartment
The following things may cause a fire if loaded in the luggage compart-
ment.
●Receptacles containing gasoline
●Aerosol cans
■Storage precautions
Observe the following precautions.
Failing to do so may result in death or serious injury.
●Do not stack anything behind the front seats higher than the seat-
backs.
Such items may be thrown about and possibly injure people in the
vehicle during sudden braking or in an accident.
●Do not place cargo or luggage in or on the following locations as the
item may get under the clutch, brake or accelerator pedal and prevent
the pedals from being depressed properly, block the driver’s vision, or
hit the driver or passengers, causing an accident.
• Driver’s feet
• Front passenger or rear seats (when stacking items)
• Instrument panel
• Dashboard
• Auxiliary box or tray that has no lid
●Secure all items in the occupant compartment, as they may shift and
injure someone during sudden braking, sudden swerving or an acci-
dent.
Page 228 of 590

228 2-5. Driving information
Release the parking brake (and also the brake pedal on vehi-
cles with an automatic transmission), and slowly pull or back
away from the wheel blocks. Stop and apply the brakes.
Have someone retrieve the blocks.
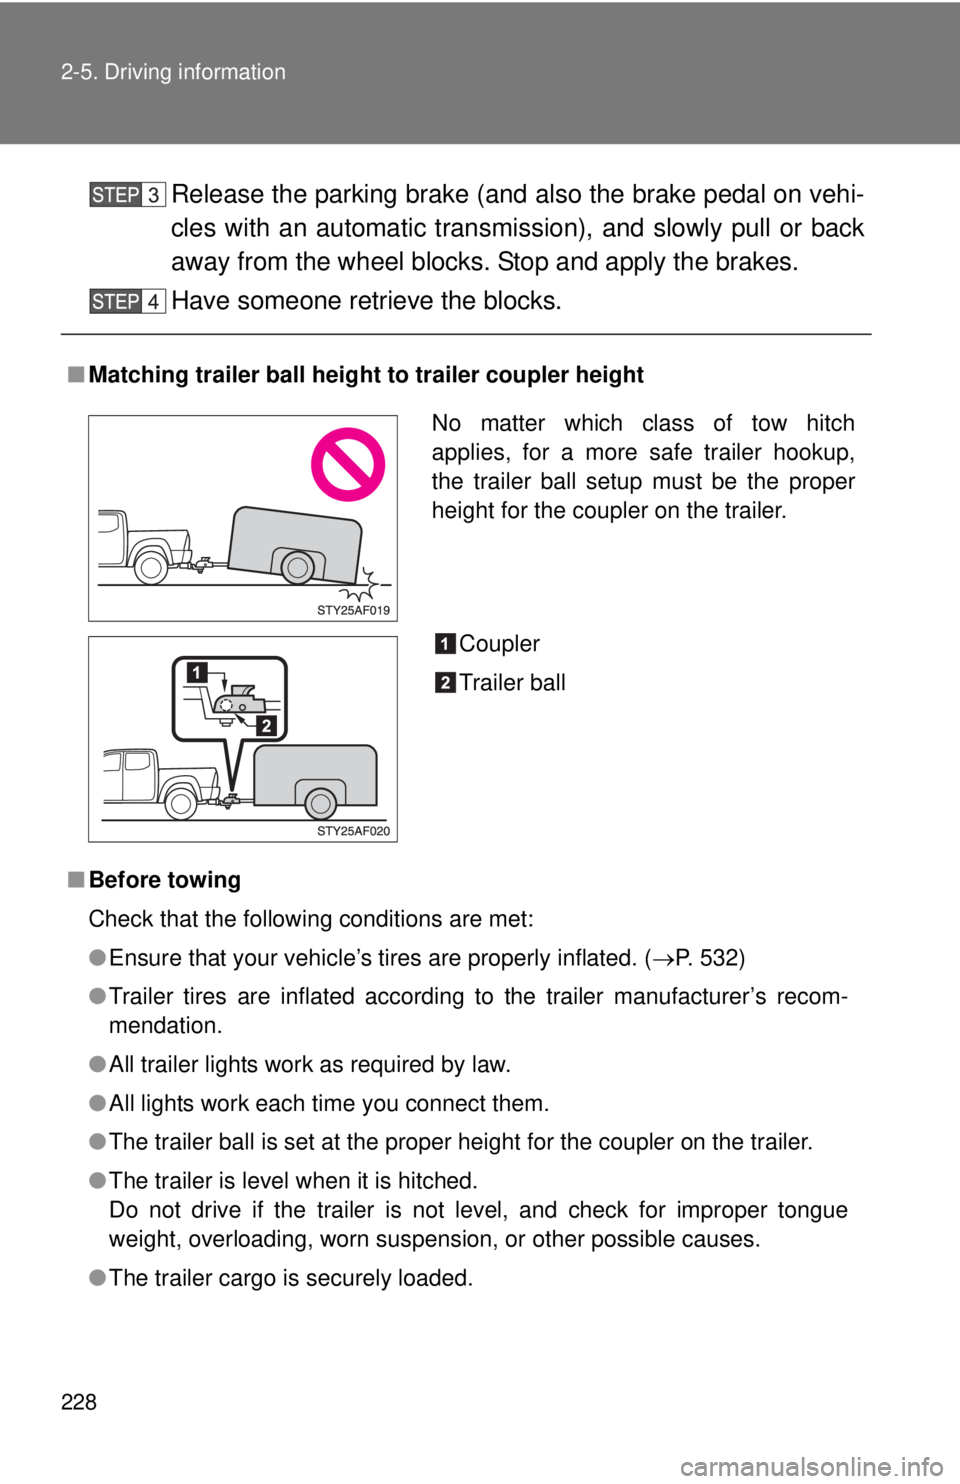
■ Matching trailer ball height to trailer coupler height
■ Before towing
Check that the following conditions are met:
●Ensure that your vehicle’s tires are properly inflated. ( P. 532)
● Trailer tires are inflated according to the trailer manufacturer’s recom-
mendation.
● All trailer lights work as required by law.
● All lights work each time you connect them.
● The trailer ball is set at the proper height for the coupler on the trai\
ler.
● The trailer is level when it is hitched.
Do not drive if the trailer is not level, and check for improper tongue
weight, overloading, worn suspension, or other possible causes.
● The trailer cargo is securely loaded.
No matter which class of tow hitch
applies, for a more safe trailer hookup,
the trailer ball setup must be the proper
height for the coupler on the trailer.
Coupler
Trailer ball