Page 49 of 164

Headlight High BeamsPush the left-hand steering column lever away
from you. To cancel, pull the lever toward you.
If Model S is equipped with Driver Assistance
features, you can set the headlights to
automatically switch to low beam when there is light detected in front of Model S. To turn
this feature on, touch Controls > Auto High
Beam .
Note: Your chosen setting is retained until you
manually change it. It can also be saved in
your driver profile.
In situations where high beams are turned off
because Auto High Beam is turned on and
light is detected in front of Model S, you can temporarily turn high beams on by pulling the
lever all the way toward you.
The following indicator lights are visible on
the instrument panel when high beams are turned on:
High beams are turned on, and
either the vehicle is not equipped
with Auto High Beam, or Auto High- Beam is turned off.High beams are currently turned on, and Auto High Beam is ready to turn
off the high beams if light is
detected in front of Model S.High beams are temporarily turned
off because Auto High Beam is on
and is detecting light in front of
Model S. When light is no longer
detected, the high beams
automatically turn back on.
To flash the headlight high beams, pull the
lever fully toward you and release.
Warning: Auto High Beam is an aid only
and is subject to limitations and system
issues. It is the driver's responsibility to make sure that the headlights are alwaysadjusted as appropriate for the weather
conditions and driving circumstances.
Lights
Driving49
Page 50 of 164

Headlights After ExitWhen you stop driving and park Model S in
low lighting conditions, the exterior lights
automatically turn on. They automatically turn
off after two minutes or when you lock Model S.
You can turn this feature on and off using the
touchscreen. Touch Controls > Settings >
Vehicle > Headlights After Exit .
Cornering Lights
If Model S is equipped with the optional tech package, LED cornering lights broaden the
beam of the headlights when you drive
through a corner.Turn Signals
Move the left-hand steering column lever up(before turning right) or down (before turning
left).
The turn signals stop operating when
canceled by the steering wheel, or when you return the lever to the central position.
The corresponding turn signal
indicator lights up on the instrument
panel when a turn signal is
operating. You also hear a clicking
sound.Warning: If Model S is equipped with both
Autopilot and the Tech Package option, engaging a turn signal can cause Model S
to accelerate when using Traffic-Aware
Cruise Control in specific situations. See Overtake Acceleration on page 63.
Lane Change Flash
To indicate a lane change, quickly press the
lever up or down against the spring pressure, then release. The corresponding turn signalflashes three times.
Hazard Warning Flashers
To turn on the hazard warning flashers, press
the button located on the side of the
touchscreen closest to the steering wheel. All turn signals flash. Press again to turn off.
Note: Hazard warning flashers operate even
without a Model S key nearby.
Lights
50Model S Owner's Manual
Page 51 of 164

WipersTo wipe the windshield, rotate the end of the
left-hand steering column lever away from
you. You can choose from four levels:
• 1st: Auto with low rain sensitivity.*
• 2nd: Auto with high rain sensitivity.*
• 3rd: Continuous, slow.
• 4th: Continuous, fast.
For a single wipe, press and release the end of the lever.
If the wipers are set to Auto and the sensor
detects no water, the wipers do not wipe.
When you operate the wipers, headlights automatically turn on (if they are not onalready).
*Model S has a rain sensor located on the
inside of the windshield at the base of the interior mirror. When wipers are set to Auto,
the frequency at which they wipe depends on
how much water the sensor detects. When
wipers are set to the 2nd level, the sensor is
more sensitive.
To extend the life of wiper blades, remove ice from the windshield before turning wipers on.
Ice has sharp edges that can damage the
rubber on the blades.
Periodically check and clean the edge of the
wiper blade. If damaged, replace the blade
immediately. For details on checking and
replacing wiper blades, see Wiper Blades and
Washer Jets on page 121.
Caution:
In harsh climates, ensure that the
wiper blades are not frozen or adhered to
the windshield.De-icing Wipers
To make wiper blades easy to access so you
can remove any ice and snow, shift Model S
into Park, then use the touchscreen to move
them to the service position. Touch Controls >
Settings > Service & Reset > Service Mode >
ON . When parking in cold outdoor climates, it
is helpful to leave Model S with the wipers in
the service position. In this position, they are
closer to the defrost vent, allowing you to thaw them by directing air from the climatecontrol system towards the windshield.
Note: Wipers automatically return to their
normal position when you shift Model S out of
Park.
If Model S is equipped with the cold weather
option, you can de-ice wipers by touching Controls > Cold Weather > Heated Wipers .
The heated wipers automatically turn off after
heating the wipers for 15 minutes.
Washers
Press the button on the end of the left
steering column lever to spray washer fluid onto the windshield. You can press this buttonat two levels. Press partially for a single wipe,
without any washer fluid. Press fully for both
wipe and wash. When washing the windshield,
the wipers will perform two wipes after you
release the button, then a third wipe a few seconds later.
Periodically top up washer fluid (see Topping
Up Washer Fluid on page 125).
De-icing Washer Nozzles
If Model S is equipped with the cold weather
option, washer nozzles have de-icers that turn on whenever the ambient temperature nearsfreezing, or when you turn on the heatedwipers ( Controls > Cold Weather > Heated
Wipers ). The washer de-icers turn off when
the heated wipers turn off (after 15 minutes),
provided the temperature is warm enough to
prevent freezing.
Wipers and Washers
Driving51
Page 52 of 164
 that prevents the wheels from locking
when you apply maximum brake pressure. This improves steering control during heavy
braking in most ro")
Braking SystemsModel S has an anti-lock braking system
(ABS) that prevents the wheels from locking
when you apply maximum brake pressure. This improves steering control during heavy
braking in most road conditions.
During emergency braking conditions, the
ABS constantly monitors the speed of each
wheel and varies the brake pressure according
to the grip available.
The alteration of brake pressure can be felt as
a pulsing sensation through the brake pedal.
This demonstrates that the ABS is operating
and is not a cause for concern. Keep firm and
steady pressure on the brake pedal while
experiencing the pulsing.The ABS indicator flashes briefly on
the instrument panel when you first
start Model S. If this indicator lights
up at any other time, an ABS fault
has occurred and the ABS is not
operating. Contact Tesla. The
braking system remains fully
operational and is not affected by an
ABS failure. However, braking
distances may increase.If the instrument panel displays this
indicator at any time other than
displaying briefly when you first start
Model S, a brake system fault is
detected or the brake fluid level is
low. Contact Tesla immediately.Emergency Braking
In an emergency, fully press the brake pedal
and maintain firm pressure, even on low
traction surfaces. The ABS varies the braking pressure to each wheel according to the
amount of traction available. This prevents wheels from locking and ensures that you
stop as safely as possible.Warning: Do not pump the brake pedal.
Doing so interrupts operation of the ABS
and can increase braking distance.Warning: Always maintain a safe distance
from the vehicle in front of you and be aware of hazardous driving conditions.
While the ABS can improve stopping
distance, it cannot overcome the laws of physics. It also does not prevent the
danger of hydroplaning (where a layer of
water prevents direct contact between
the tires and the road).
Brake Wear
Model S brake pads are equipped with wearindicators. A wear indicator is a thin metalstrip attached to the brake pad that squeals as
it rubs against the rotor when the pad wears
down. This squealing sound indicates that the
brake pads have reached the end of their
service life and require replacement. To stop
the squealing, contact Tesla Service.
Warning: Neglecting to replace worn
brake pads results in damage to the
braking system and can create a braking
hazard.
Brakes
52Model S Owner's Manual
Page 53 of 164

Regenerative Braking
Whenever Model S is moving and your foot is off the accelerator, regenerative braking slows
down Model S and feeds any surplus energy
back to the Battery.
By anticipating your stops and simply removing your foot from the accelerator to
slow down, you can take advantage of
regenerative braking to increase driving range. Of course, this is no substitute for
regular braking when needed for safety.
Note: If regenerative braking is aggressively
slowing Model S, such as on a steep descent,
brake lights turn on to alert other road users
that you are slowing down.
The power meter on the instrument panel displays real-time feedback on the amount of
energy being gained by regenerative braking.
The amount of energy fed back to the Battery
using regenerative braking can depend on the current state of the Battery and the charge
level setting that you are using. If regenerative braking is limited, a dashed yellow line
displays on the power meter. For example,
regenerative braking may be limited if the
Battery is already fully charged or if the
ambient temperature is low.
To Set the Regenerative Braking Level
You can use the touchscreen to change thelevel of regenerative braking:
1. Touch Controls > Driving > Regenerative
Braking .
2. Choose from two levels:
•
Standard . Provides the maximum
amount of regenerative braking. When you release the accelerator,
Model S slows down faster, reducing
the need to use the brakes.
• Low . Limits the amount of
regenerative braking. When you
release the accelerator, Model S takes longer to slow down and coastsfurther.
Parking Brake The parking brake automatically engages
whenever you shift Model S into Park, and
releases whenever you shift into any other
gear.
Note: The parking brake operates on the rear
wheels only, and is independent of the foot-
operated brake system.
Use the touchscreen to manually release the parking brake (which also shifts Model S intoNeutral):
1. Touch Controls > E-Brake & Power Off .
2. Press the brake pedal, then touch Parking
Brake. If Model S was previously in Park, it
shifts into Neutral.
The parking brake indicator lights up on the instrument panel whenever
you use the touchscreen to manually
apply the parking brake.If an electrical issue occurs with the
parking brake, an amber parking
brake fault message displays at the
top center of the touchscreen.Caution: In the unlikely event that
Model S loses electrical power, you
cannot release the parking brake.
Brakes
Driving53
Page 54 of 164

How It WorksThe traction control system constantly
monitors the difference in speed between the
front and rear wheels. If Model S experiences a
loss of traction, the system minimizes wheel
spin by controlling brake pressure and motor
power. By default, the traction control system
is always active. Under normal conditions, it should remain active to ensure maximum
safety.
On standard Model S vehicles, traction control can be turned off at any time. Turn it off only
in circumstances where you deliberately want
the wheels to spin, such as when Model S is
stuck in snow or mud.
On a dual motor Model S, you can enable slip
start to allow the wheels to spin at a limited speed. Slip start can be enabled only whenModel S is moving 20 mph (32 km/h) or
slower. Slip start automatically disables when the speed exceeds 40 mph (64 km/h).This indicator displays on the
instrument panel whenever the
traction control system is actively
controlling brake pressure and
motor power to minimize wheel spin.Warning: Traction control can not
prevent accidents caused by driving dangerously or turning too sharply at
high speeds.
Allowing Wheel Slip
Under normal conditions, the traction control
system should remain enabled. Disable it only in circumstances where you deliberately want
the wheels to spin, such as:
• Starting on a loose surface, such as gravel or snow.
• Driving in deep snow, sand or mud.
• Rocking out of a hole or deep rut.
To allow the wheels to spin on a standard single motor Model S, touch Controls >
Driving > Traction Control > Off .
To allow the wheels to spin on a dual motor
Model S, touch Controls > Driving > Traction
Control > Slip Start .
This indicator displays at the top
center of the touchscreen whenever
the wheels are allowed to spin (i.e.
when the traction control system on
a standard single-motor Model S is
turned off, or when Slip start on a
dual-motor Model S is enabled.
Although the traction control system automatically reactivates the next time you
start Model S, it is strongly recommended that you enable it immediately after thecircumstances that required you to disable it
have passed.
Traction Control
54Model S Owner's Manual
Page 55 of 164

How Speed Assist Works
If Model S is equipped with Driver Assistance
features, a camera mounted on the windshield behind the interior rear view mirror detectsspeed limit signs. The signs are then analyzed
and compared against GPS data to determine
the speed limit at your current driving
location. For routes where no signs are present, speed limits are determined using
GPS data (if available). Instead of determining the speed limit based on signs and GPS data,you can also manually enter an arbitrary
speed limit.
When you turn on Speed Assist, the
speedometer displays a gray line to indicate
the speed limit. Warnings (described below) take effect when you exceed this limit.
In situations where the system does not have
confidence in the acquired speed limit, the speedometer displays a dashed line instead,
and warnings do not take effect. The system
may be uncertain about a speed limit if a
speed, although initially detected, is no longer known or may no longer apply. In some cases,the dashed line displays at the originallydetected speed, whereas in other cases itdisplays at 0 mph.
If you set the speed limit warning to Display
(see Controlling Speed Assist below), a speed
limit sign displays in the center of the
instrumental panel whenever you exceed the speed limit and the speedometer displays the
excess speed in gray.
Note: A speed limit sign also displays in the
center of the instrumental panel when an
automatically detected speed limit changes.
If you set the speed limit warning to Chime
(see Controlling Speed Assist) and exceed the speed limit, the speedometer displays excessspeed in gray, and you also hear a warningchime.
Note: Speed limit warnings go away
automatically after 10 seconds, or when Model
S slows down below the specified limit.
Warning: Do not rely on Speed Assist to
determine the appropriate speed limit.
Speed Assist
Driving55
Page 56 of 164

Always drive at a safe speed based on
traffic and road conditions.Caution: If your Model S is equipped with
Speed Assist, you must take your vehicle to Tesla Service if a windshield
replacement is needed. Failure to do so
can cause Speed Assist to malfunction.
Controlling Speed Assist
To turn Speed Assist on or off, and control
how it works, touch Controls > Settings >
Driver Assistance > Speed Assist , then choose
one of these options:
• Off. The speed limit is not displayed.
• Display . Speed limit information visually
displays on the speedometer and when you exceed the limit, a speed limit sign
displays in the center of the instrument panel, and the speedometer displays theexcess speed in gray.
• Chime . In addition to the visual display, an
audible chime sounds whenever you
exceed the speed limit.
You can also specify how the speed limit is
determined:
• Relative . The speed limit is determined
automatically based on detected traffic
signs and GPS data. If desired, you can set
a speed limit offset (+ or -) if you want to
be alerted only when you exceed the
speed limit by a specified amount. For example, you would increase the offset to+10 mph if you only want to be alerted
when you exceed the speed limit by 10 mph.
• Absolute . Manually specify any speed limit
between 20 and 140 mph (30 and
240 km/h).
Note: GPS data is not always accurate. The
GPS can misjudge the road's location and
provide the speed limit for a directly adjacent
road that may have a different speed limit. For example, The GPS can assume Model S is on a
freeway when it’s actually on a nearby surface
street, and vice versa.
Limitations and Inaccuracies Speed Assist may not be fully functional or
may provide inaccurate information in these
situations:
• Visibility is poor and speed limit signs are not clearly visible (due to heavy rain,
snow, fog, etc.).
• Bright light (oncoming headlights or direct sunlight) is interfering with thecamera's view.
• Model S is being driven very close to a vehicle in front of it which is blocking the
camera's view.
• The windshield area in the camera's field of view is obstructed (fogged over, dirty,
covered by a sticker, etc.).
• Speed limit signs are concealed by objects.
• The speed limits stored in the GPS database are incorrect or outdated.
• Model S is being driven in an area where GPS data is not available.
• Traffic signs do not conform to standard recognizable formats.
• A road or a speed limit has recently changed.
Speed Assist
56Model S Owner's Manual
 1
1 2
2 3
3 4
4 5
5 6
6 7
7 8
8 9
9 10
10 11
11 12
12 13
13 14
14 15
15 16
16 17
17 18
18 19
19 20
20 21
21 22
22 23
23 24
24 25
25 26
26 27
27 28
28 29
29 30
30 31
31 32
32 33
33 34
34 35
35 36
36 37
37 38
38 39
39 40
40 41
41 42
42 43
43 44
44 45
45 46
46 47
47 48
48 49
49 50
50 51
51 52
52 53
53 54
54 55
55 56
56 57
57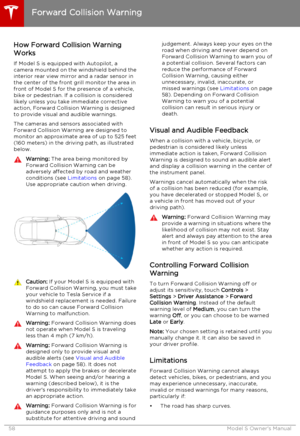 58
58 59
59 60
60 61
61 62
62 63
63 64
64 65
65 66
66 67
67 68
68 69
69 70
70 71
71 72
72 73
73 74
74 75
75 76
76 77
77 78
78 79
79 80
80 81
81 82
82 83
83 84
84 85
85 86
86 87
87 88
88 89
89 90
90 91
91 92
92 93
93 94
94 95
95 96
96 97
97 98
98 99
99 100
100 101
101 102
102 103
103 104
104 105
105 106
106 107
107 108
108 109
109 110
110 111
111 112
112 113
113 114
114 115
115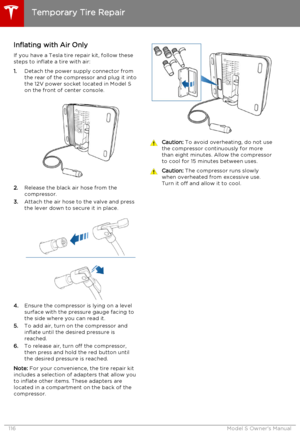 116
116 117
117 118
118 119
119 120
120 121
121 122
122 123
123 124
124 125
125 126
126 127
127 128
128 129
129 130
130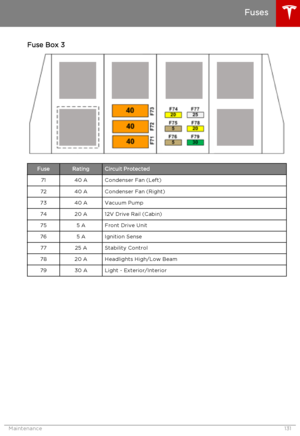 131
131 132
132 133
133 134
134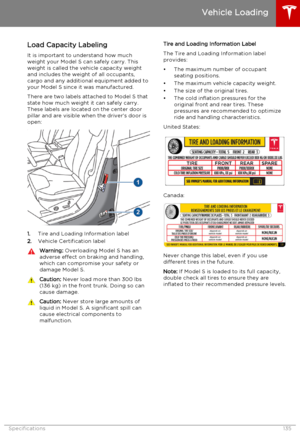 135
135 136
136 137
137 138
138 139
139 140
140 141
141 142
142 143
143 144
144 145
145 146
146 147
147 148
148 149
149 150
150 151
151 152
152 153
153 154
154 155
155 156
156 157
157 158
158 159
159 160
160 161
161 162
162 163
163