Page 25 of 164

Seating Larger ChildrenIf a child is too large to fit into a child safety
seat, but too small to safely fit into the standard seat belts, use a booster seat
appropriate for the child’s age and size. Carefully follow the manufacturer’sinstructions to secure the booster seat usingthe seat belts. Do not use the LATCH systemto secure booster seats, even in situationswhere the booster seat is equipped with the
LATCH system.
Installing Child Safety Seats There are two general methods used to install
child safety seats:
• Seat belt retained - these seats are secured using the vehicle’s seat belts (see
Installing Seat Belt Retained Child Seats on page 25).
• LATCH retained - these seats can attach to anchor bars built into the vehicle’s rear
seats (see Installing LATCH Child Seats on
page 26).
Check the child safety seat manufacturer’s
instructions and the table on Child Safety
Seats on page 23 to determine which
installation method to use. Some child safety
seats can be installed using either method.
Always follow the child safety seat
manufacturer’s instructions.
Installing Seat Belt Retained Child Seats
First, make sure that the child falls into the
correct weight range for the seat.
Avoid dressing the child in bulky clothing anddo not place any objects between the childand the restraint system.
Adjust harnesses for every child, every trip.To securely hold child safety seats, all
passenger seating positions are equipped with an automatic locking retractor (ALR) that, by
pulling the seat belt beyond the length
needed for a typical adult occupant, locks the belt into place until the seat belt is unbuckled
and the webbing is fully retracted. The ALR mechanism operates as a ratchet, winding in
slack and preventing the seat belt from
extending any further until it has been
completely rewound. When installing a child
safety seat, engage the belt's automatic locking retractor by pulling the seat belt
webbing until it is fully extended. The ALR
system engages only when the seat belt is at
its maximum extension point.
Note: An automatic locking retractor
disengages only when the seat belt is
unbuckled and fully retracted. The belt can
then be worn as a normal belt, sliding freely in
and out and locking tight only in an
emergency. Once disengaged, the belt must
be fully extended to re-engage the locking
mechanism whenever you install a child safety seat.
Always follow the detailed instructions provided by the child safety seat
manufacturer. General guidelines are provided
below.
1. Place the child safety seat in Model S, and
fully extend the seat belt. Route and
buckle the seat belt in accordance with the child safety seat manufacturer’s
instructions.
2. Allow the seat belt to retract, and remove
all slack in the seat belt while firmly
pushing the child safety seat into the Model S seat.
3. If the seat belt retained child safety seat
has an upper tether, attach it to the back of the seat (see Attaching Upper Tether
Straps on page 26).
Child Safety Seats
Seating and Safety Restraints25
Page 26 of 164

Installing LATCH Child SeatsLower LATCH anchor positions are providedin the second-row outboard seating positions
and are located between the seat's back rest
and rear cushion. The exact location of each
anchor is identified by a child safety seat
identification button, illustrated below. The button is located on the seat back, directlyabove its associated anchor.
Install LATCH seats in the outboard seating
positions only. Use only a seat belt retained
seat in the center position.
To install a LATCH retained child safety seat,
slide the safety seat latches onto the anchorbars until they click into place. Carefully read
and follow the instructions provided by the child safety seat manufacturer.
Once installed, test the security of the
installation before seating a child. Attempt to
twist the child safety seat from side to side and try to pull it away from the seat, then
check that the anchors are still securely in place.
Attaching Upper Tether Straps
If an upper tether strap is provided, attach its
hook to the anchor point located on the back
of the rear seats. Always position single-strap
tethers so that it runs over the center of the
Model S head support. Tighten dual-strap
tethers to run on each side of the head
support. Tighten according to the child safety
seat manufacturer’s instructions.
Note: To prevent single-strap tethers from
moving from side to side, the top of the head
support deforms.
Child Safety Seats
26Model S Owner's Manual
Page 27 of 164

Testing a Child Safety SeatBefore seating a child, always make sure thechild safety seat is not loose:
1. Hold the child safety seat by the belt path
and try to slide the safety seat from side
to side and front to back.
2. If the seat moves more than one inch
(2.5 cm), it is too loose. Tighten the belt
or reconnect the LATCH retained child
safety seat.
3. If you are unable to reduce slack, try a
different seat location or try another child
safety seat.
Warnings - Child Safety SeatsWarning: Extreme hazard! Do not seat a
child on the front passenger seat even if
you are using a child safety seat. This seat has an airbag in front of it. Although this
airbag is disabled when Model S detects a lightweight passenger, do not rely on
technology to protect your child.Warning: Do not use a forward facing
child safety seat until your child weighs
over 20 lbs (9 kg) and can sit
independently. Up to the age of two, a child's spine and neck are not sufficientlydeveloped to avoid injury in a frontal
impact.Warning: Do not allow a baby or infant to
be held on a lap. All children should be
restrained in an appropriate child safety
seat at all times.Warning: To ensure children are safely
seated, follow all instructions provided in this document and by the manufacturerof the child safety seat.Warning: Children should ride in a rear
facing child safety seat using the seat’s
integrated 5-point harness for as long as
possible.Warning: Do not use seat belt extenders
when installing a child safety seat or booster seat.Warning: When seating larger children,
make sure the child's head is supported and the child’s seat belt is properlyadjusted and fastened. The shoulder
portion of the belt must be away from the face and neck, and the lap portion mustnot be over the stomach.Warning: Never attach two child safety
seats to one anchor point. In a collision,one anchor point may be incapable of
securing both seats.Warning: Child restraint anchorages are
designed to withstand only those loads imposed by correctly fitted child
restraints. Under no circumstances are
they to be used for adult seatbelts,
harnesses, or for attaching other items or equipment to the vehicle.Warning: Always check harnesses and
tether straps for damage and wear.Warning: Do not use seat belt extenders
on a seat belt that is being used to install
a child safety seat or booster seat.Warning: Never leave a child unattended,
even if the child is secured in a child
safety seat.Warning: Never use a child safety seat
that has been involved in an accident.
Have the seat inspected or replaced as a
described in the child safety seat
manufacturer’s instructions.
Child Safety Seats
Seating and Safety Restraints27
Page 28 of 164
 tall
and weighing between 35 and 77 lbs (16.2 to")
Usage Restrictions
The optional Tesla built-in rear facing child
seats are child restraint systems and must
only be used for children over 37" (94 cm) tall
and weighing between 35 and 77 lbs (16.2 to
35.2 kg).
Always ensure the top of the child’s head
cannot contact the vehicle and that the child
is seated comfortably with the seat belts positioned and latched correctly. The child’spelvis must be held securely in place by thelap belt. Follow all instructions provided anddo not use supplemental child safety seats inthese seats.
Note: Whenever a child is seated in the Tesla
built-in rear facing child seats, it is
recommended that you set the climate control
system to draw outside air into Model S
instead of recirculating the air. This draws
more air into the rear seating areas.
Opening 1. Remove the cover from the trunk floor
and pull the strap to lift the seat assembly
upward.
2. Push the seat assembly into position.
3.Undo the Velcro strap.
4.Pull the handle to release the head
supports from the seat back, then pull the
head supports toward you to unfold them.
5. Raise the seat back to the upright position
and push until it locks into position.
Visually check to ensure that the retaining catches are engaged.
6. Check that the seat back and seat base
are securely retained in the upright
position by trying to pull the seat back toward you.
Folding
Caution: Before folding the seats, fasten
the seat belts to prevent them from
getting trapped in the seat mechanism and being damaged.
1. Pull the handle to release the seat back
and pull the seat back fully forward.
Tesla Built-In Rear Facing Child Seats
28Model S Owner's Manual
Page 29 of 164
2.Push the lever to release the head
supports from the seat back, then fold
back onto the seat.
3. Secure the Velcro strap.
4.Pull the strap at the rear of the seat to
fold the seat assembly into the trunk floor.
5. Replace the cover on the trunk floor.
Tesla Built-In Rear Facing Child Seats
Seating and Safety Restraints29
Page 30 of 164
 tall and
weighing between 35 and 77 lbs (16.2 to 35.2
kg).
Alwa")
Seating a ChildThe Tesla built-in rear facing child seats arechild restraint systems and must only be used
for children over 37" (94 cm) tall and
weighing between 35 and 77 lbs (16.2 to 35.2
kg).
Always ensure the top of the child’s head
cannot contact the vehicle and that the child
is seated comfortably with the seat belts positioned and latched correctly. The child’spelvis must be held securely in place by thelap belt. Follow all instructions provided anddo not use supplemental child safety seats inthese seats.
Note: Whenever a child is seated in the Tesla
built-in rear facing child seats, it is
recommended that you set the climate control
system to draw outside air into Model S
instead of recirculating the air. This draws
more air into the rear seating areas.
1. Position the child in the seat with arms
through the loops of the seat belts.
2. Connect the two halves of the seat belt
tongue.
3. Insert the seat belt tongue into the buckle
and ensure it is securely fastened.
4. Adjust the shoulder belts so they run over
the top of the child’s shoulders and away
from the face.
5. Connect the chest clip and adjust it to be
as high as possible without causing the
shoulder belts to touch the child’s neck.
6. Pull the lower straps until the child is
securely held in the seat.
7. Slide the shoulder clips into place to
ensure the upper portion of the belts
remain positioned over the child’s
shoulders.
To release, press the button on the buckle,
release the chest clip, and separate the two
halves of the seat restraint.
Warnings - Tesla Child Seats
Warning: The Tesla built-in rear facing
seats are child restraint systems and must
only be used for children over 37"
Tesla Built-In Rear Facing Child Seats
30Model S Owner's Manual
Page 31 of 164
 tall and weighing between 35and 77 lbs (16.2 to 35.2 kg).Warning: Do not use supplemental child
restraint systems, including booster seats,
in the Tesla built-in rear facing child seats.Warni")
(94 cm) tall and weighing between 35and 77 lbs (16.2 to 35.2 kg).Warning: Do not use supplemental child
restraint systems, including booster seats,
in the Tesla built-in rear facing child seats.Warning: Always ensure that the top of
the child’s head cannot touch the vehicle and that the child is seated comfortablywith the seat belts correctly fastened.Warning: Follow all instructions and heed
all warnings related to the Tesla built-in
rear facing child seats. Failure to do so
can compromise occupant safety.Warning: Read all safety warnings and
labels attached to the seats.Warning: Do not leave children
unattended in Model S, even if the child is secured in a child safety seat or a Tesla
built-in rear facing child seat. In hot
weather, the interior temperature can reach dangerous levels that can result in
dehydration, serious injury or death.Warning: Do not remove or replace the
fabric on a Tesla built-in rear facing child
seat. The covers are an integral part of the restraint’s performance and shouldnot be removed or replaced with any
other type than those supplied by Tesla.Warning: If the Tesla built-in rear facing
child seats have been worn in an
accident, they must be inspected or
replaced by Tesla, even if damage is not
obvious.Warning: Before allowing a child to ride in
the Tesla built-in rear facing child seats, check that the seat is securely held in theupright position by trying to pull the seat
back toward you.Warning: Do not remove the built-in rear
facing child seats for any reason,
including cleaning. To ensure safety of
occupants, removal and installation must
be performed by qualified Tesla service
technicians.Warning: Do not make modifications or
additions that can interfere with the
operation of the Tesla built-in rear facing
child seats.Warning: To prevent injury, ensure all
loose items (bags, luggage, etc.) are
secured. In an accident, or during hard
braking and sharp turns, loose items
could cause injury.
Tesla Built-In Rear Facing Child Seats
Seating and Safety Restraints31
Page 32 of 164
Location of Airbags
Airbags are located in the approximate areas shown here. Airbag warning information is printed
on the sun visors.
1. Passenger knee airbag
2. Passenger front airbag
3. Side airbags
4. Curtain airbags
5. Driver’s knee airbag
6. Driver’s front airbag
Airbags
32Model S Owner's Manual
 1
1 2
2 3
3 4
4 5
5 6
6 7
7 8
8 9
9 10
10 11
11 12
12 13
13 14
14 15
15 16
16 17
17 18
18 19
19 20
20 21
21 22
22 23
23 24
24 25
25 26
26 27
27 28
28 29
29 30
30 31
31 32
32 33
33 34
34 35
35 36
36 37
37 38
38 39
39 40
40 41
41 42
42 43
43 44
44 45
45 46
46 47
47 48
48 49
49 50
50 51
51 52
52 53
53 54
54 55
55 56
56 57
57 58
58 59
59 60
60 61
61 62
62 63
63 64
64 65
65 66
66 67
67 68
68 69
69 70
70 71
71 72
72 73
73 74
74 75
75 76
76 77
77 78
78 79
79 80
80 81
81 82
82 83
83 84
84 85
85 86
86 87
87 88
88 89
89 90
90 91
91 92
92 93
93 94
94 95
95 96
96 97
97 98
98 99
99 100
100 101
101 102
102 103
103 104
104 105
105 106
106 107
107 108
108 109
109 110
110 111
111 112
112 113
113 114
114 115
115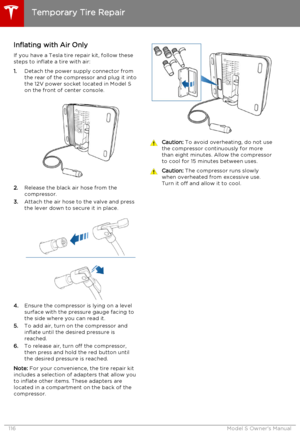 116
116 117
117 118
118 119
119 120
120 121
121 122
122 123
123 124
124 125
125 126
126 127
127 128
128 129
129 130
130 131
131 132
132 133
133 134
134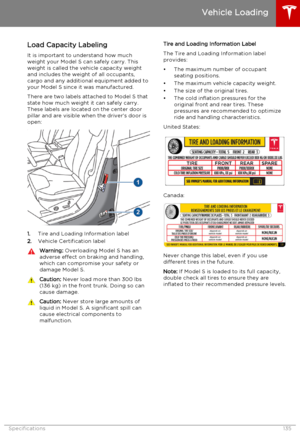 135
135 136
136 137
137 138
138 139
139 140
140 141
141 142
142 143
143 144
144 145
145 146
146 147
147 148
148 149
149 150
150 151
151 152
152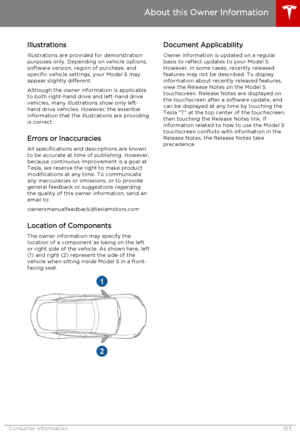 153
153 154
154 155
155 156
156 157
157 158
158 159
159 160
160 161
161 162
162 163
163
