Page 105 of 164

During ChargingDuring charging, the charge port pulses green
and charging status displays on the instrument panel. The frequency at which thecharge port’s light pulses slows down as thecharge level approaches full. When charging iscomplete, the light stops pulsing and is solid
green.
Note: If Model S is locked, the light around the
charge port does not light up.
If the light around the charge port lights up
red while charging, a fault is detected. Check
the instrument panel or touchscreen for a
message describing the fault. A fault can
occur due to something as common as a
power outage. If a power outage occurs,
charging resumes automatically when power
is restored.
Note: When charging, particularly at high
currents, the refrigerant compressor and the
fan operate as needed to keep the Battery cool. Therefore, it is normal to hear sounds
during charging.
Stopping Charging You can stop charging at any time by
disconnecting the charge cable or touching
Stop Charging on the touchscreen.
To disconnect the charge cable:
1. Press and hold the button on a Tesla
connector to release the latch.
2. Pull the connector from the charge port.
3. Push the charge port door closed.
Note: To prevent unauthorized unplugging of
the charge cable, Model S must be unlocked
or able to recognize a key before you can
disconnect the charge cable.
Note: Model S stops charging whenever you
double-click the key. If you do not unplug
within 60 seconds, charging resumes.Caution: Tesla strongly recommends
leaving Model S plugged in when not in
use. This maintains the Battery at the optimum level of charge.Charge Port LightWhiteThe charge port door is open and
Model S is ready to charge. The
connector either hasn't been
inserted yet, or the latch is
released and the connector is
ready to be removed.Solid
GreenCharging is complete.Blinkin
g
GreenCharging is in progress. As Model S approaches a full charge, the
frequency of the blinking is slower.BlueModel S detects that a connector has been plugged in, but charging
has not started. Either Model S is
preparing to charge, or a charging
session is scheduled to begin at a
specified future time.Solid
AmberThe connector is not fully plugged
in. Realign the connector to the
charge port and insert fully.Blinkin
g
AmberModel S is charging at a reduced
current (AC charging only).RedA fault is detected and charging
has stopped. Check the instrument
panel or touchscreen for a
message describing the fault.
Charging Model S
Charging105
Page 106 of 164

Changing Charge SettingsThe charge settings screen displays on the
touchscreen whenever the charge port door is
open.
To display charge settings at any time, touch
the Battery icon on the top of the
touchscreen, or touch Controls > Charging
(located in the upper right portion of the
Controls screen).
Note: The following illustration is provided for
demonstration purposes only and may vary
slightly depending on the software version
and market region of your Model S.
1. Charge status messages (such as
Charging Scheduled, Charging In
Progress) display here.
2. To adjust the charge limit, touch Set
Charge Limit , then drag the slider bar. You
can charge to any level from 50% to 100%
based on your driving needs. The setting
you choose applies to both immediate
and scheduled charging sessions.
3. Location-specific schedule. With Model S
in Park, set a specific time when you want
Model S to begin charging at the current
location. If, at the scheduled time, Model S
is not plugged in at the location, it will
start charging as soon as you plug it in as
long as you are plugging it in within six hours of the scheduled time. If you plug in
after six hours, Model S does not start
charging until the scheduled time on the next day. To override this setting, touch
Start Charging or Stop Charging (see
item 4). When you set a scheduled
charging time, Model S displays the set time on the instrument panel and the
touchscreen.
4. Touch to open the charge port door or to
start (or stop) charging.
5. The current automatically sets to the
maximum current available from the
attached charge cable, unless it was
previously reduced to a lower level.
If needed, touch the up/down arrows to change the current (for example, you may
want to reduce the current if you are
concerned about overloading a domestic
wiring circuit shared by other equipment).
It is not possible to set the charging
current to a level that exceeds the maximum available from the attached
charge cable.
When you change the current, Model S
remembers the location. So if you
subsequently charge at the same location, you do not need to change it again.
Note: If Model S automatically reduced a
charging location's current because of
fluctuations in input power (see the note
in Charging Status on page 107), Tesla
recommends charging at the lower
current until the underlying problem is
resolved and the charging location can provide consistent power.
Charging Model S
106Model S Owner's Manual
Page 107 of 164

Charging StatusThe following illustration is provided for demonstration purposes only and may vary slightlydepending on the software version and market region of your Model S.1. Charging rate per hour.
2. Total estimated driving distance (or
energy) available. Instead of driving distance as shown here, you can display
the percentage of battery energy
remaining. To do so, touch Controls >
Settings > Units & Format > Energy &
Charging .
Note: A portion of the battery image may
appear blue. This indicates that a small
portion of the energy stored in the battery
is not available on your drive because the battery is cold. This is normal and no
reason for concern. When the battery warms up, the blue portion is no longer
displayed.
3. Current being supplied/Total current
available from the connected power
supply (see Changing Charge Settings on
page 106).
4. Estimated increase in driving distance (or
energy) achieved so far in this charging session. Instead of driving distance as
illustrated above, you can change settings
to display the amount of energy achieved.
To do so, touch Controls > Settings >
Units & Format > Energy & Charging .
5. Charging status information displays here.
For example, if Model S is charging, it displays the time remaining until fully
charged at the currently selected charge
level. When scheduled charging is set fora location, it displays when charging will
start.
6. Voltage being supplied by the charge
cable.
Note: If Model S is charging and detects
unexpected fluctuations in the input power, it automatically reduces the charging current by25%. For example, a 40 amp current isreduced to 30 amps. This automatic currentreduction increases robustness and safety in
situations when a problem exists outside of
Model S or its charging electronics. For
example, a home wiring system, receptacle,
adapter or cord is unable to meet its rated
current capacity. When Model S automatically
reduces a location's charging current, it
retains the reduced current for that location
as a precaution. Although you can manually
increase it, Tesla recommends charging at the
lower current until the underlying problem is
resolved and the charging location can
provide consistent power.
Charging Model S
Charging107
Page 108 of 164
,
maintain the correct tire pressures,")
Service Intervals
Regular maintenance is the key to ensuring
the continued reliability and efficiency of your
Model S.
Rotate the tires every 5000 miles (8000 km),
maintain the correct tire pressures, and take Model S to Tesla at the regularly scheduledmaintenance intervals of every 12 months, orevery 12,500 miles (20,000 km), whichever
comes first. It is also important to perform the
daily and monthly checks described below.
Model S must be serviced by Tesla-certified
technicians. Damages or failures caused by
maintenance or repairs performed by non-
Tesla certified technicians are not covered by
the warranty.
Daily Checks • Check the Battery’s charge level, displayed on the instrument panel.
• Check that all exterior lights, horn, turn signals, and wipers and washers are
working.
• Check the operation of the brakes, including the parking brake.
• Check the operation of the seat belts (see Seat Belts on page 20).
• Look for fluid deposits underneath Model S that might indicate a leak. It is
normal for a small pool of water to form
(caused by the air conditioning system’s dehumidifying process).
Monthly Checks • Check the mileage to determine if the tires need to be rotated (every
5000 miles/8000 km), and check the
condition and pressure of each tire (see
Tire Care and Maintenance on page 109).
• Check washer fluid level and top up if necessary (see Topping Up Washer Fluid
on page 125).
• Check that the air conditioning system is operating (see Climate Controls on page
80).Warning: Contact Tesla immediately if
you notice any significant or sudden drop in fluid levels or uneven tire wear.Fluid Replacement Intervals
Do not change or top up Battery coolant and
brake fluid yourself. Tesla service technicians replace fluids at the regularly scheduled
service intervals:
• Brake fluid. Every 2 years or 25,000 miles (40,000 km), whichever comes first.
• Battery coolant. Every 5 years or 62,500 miles (100,000 km), whichever
comes first.
Note: Any damage from opening the Battery
coolant reservoir is excluded from the warranty.
High Voltage Safety Your Model S has been designed and built
with safety as a priority. However, be aware of these precautions to protect yourself from the
risk of injury inherent in all high-voltage
systems:
• Read and follow all instructions provided on the labels that are attached to Model S.These labels are there for your safety.
• The high voltage system has no user- serviceable parts. Do not disassemble,
remove or replace high voltage components, cables or connectors. High
voltage cables are colored orange for
easy identification.
• If an accident occurs, do not touch any high voltage wiring, connectors, or
components connected to the wiring.
• In the unlikely event that a fire occurs, immediately contact your local fire
emergency responders.Warning: Always disconnect the charge
cable before working underneath Model S, even if charging is not in
progress.Warning: Keep your hands and clothing
away from cooling fans. Some fans
operate even when Model S is powered
off.Caution: Some fluids (battery acid,
Battery coolant, brake fluid, windshield
washer additives, etc.) used in motor
vehicles are poisonous and should not be
inhaled, swallowed, or brought into contact with open wounds. For your
safety, always read and follow
instructions printed on fluid containers.
Maintenance Schedule
108Model S Owner's Manual
Page 109 of 164

Maintaining Tire PressuresKeep tires inflated to the pressures shown onthe Tire and Loading Information label, even ifit differs from the pressure printed on the tire
itself. The Tire and Loading Information label is located on the center door pillar and isvisible when the driver’s door is open.The Tire Pressure indicator light on
the instrument panel alerts you if
one or more tires is under- or over-
inflated.
The Tire Pressure indicator light does not
immediately turn off when you adjust tire
pressure. After inflating the tire to the
recommended pressure, you must drive over
25 mph (40 km/h) for more than 10 minutes to activate the Tire Pressure MonitoringSystem (TPMS), which turns off the TirePressure indicator light.
If the indicator light flashes for one minute whenever you power on Model S, a fault with
the Tire Pressure Monitoring System (TPMS) is detected (see TPMS Malfunction on page
113).
Checking and Adjusting Tire Pressures
Follow these steps when tires are cold and
Model S has been stationary for over three
hours:
1. Remove the valve cap.
2. Firmly press an accurate tire pressure
gauge onto the valve to measure
pressure.
3. If required, add air to reach the
recommended pressure.
4. Re-check pressure by removing and re-
attaching the tire gauge.
5. If you added too much air, release air by
pressing the metal stem in the center of
the valve.
6. Recheck the pressure with the tire gauge
and adjust if necessary.
7. Replace the valve cap to prevent dirt from
entering. Periodically check the valve for damage and leaks.Warning: Under-inflation is the most
common cause of tire failures and can
cause a tire to overheat, resulting in
severe tire cracking, tread separation, or
blowout, which causes unexpected loss of vehicle control and increased risk ofinjury. Under-inflation also reduces
Battery range and tire tread life.Warning: Check tire pressures using an
accurate pressure gauge when tires are
cold. It takes only about one mile (1.6 km) of driving to warm up the tires sufficiently
to affect tire pressures. Parking the
vehicle in direct sunlight or in hot
weather can also affect tire pressures. If you must check warm tires, expectincreased pressures. Do not let air out of
warm tires in an attempt to match
recommended cold tire pressures. A hot tire at or below the recommended coldtire inflation pressure is dangerously
under-inflated.Warning: Do not use any tire sealant
other than the type provided in a Tesla tire repair kit. Other types can cause tire
pressure sensors to malfunction. If your Model S did not include a tire repair kit,
you can purchase one from Tesla Motors.
Tire Care and Maintenance
Maintenance109
Page 110 of 164
, cuts or wear.Warning: Do not drive Model S if a tire is
damaged, excessively worn, or")
Inspecting and Maintaining Tires
Regularly inspect the tread and side walls for
any sign of distortion (bulges), cuts or wear.Warning: Do not drive Model S if a tire is
damaged, excessively worn, or inflated to
an incorrect pressure. Check tires
regularly for wear, and ensure there are
no cuts, bulges or exposure of the ply/
cord structure.
Tire Wear
Adequate tread depth is important for proper tire performance. Tires with a tread depth less
than 4/32” (3 mm) are more likely tohydroplane in wet conditions and should notbe used. Tires with a tread depth less than5/32” (4 mm) do not perform well in snow
and slush and should not be used when
driving in winter conditions.
Model S is originally fitted with tires that have
wear indicators molded into the tread pattern.
When the tread has been worn down to 2/32”
(1.6 mm), the indicators start to appear at the surface of the tread pattern, producing the
effect of a continuous band of rubber across
the width of the tire. For optimal performance and safety, Tesla recommends replacing tires
before the wear indicators are visible.
Tire Rotation, Balance, and Wheel Alignment
Tesla recommends rotating the tires every 5000 miles (8000 km).
Unbalanced wheels (sometimes noticeable as
vibration through the steering wheel) affect
vehicle handling and tire life. Even with
regular use, wheels can get out of balance.
Therefore, they should be balanced as
required.
If tire wear is uneven (on one side of the tire
only) or becomes abnormally excessive, check
the alignment of wheels.
Note: When replacing only two tires, always
install the new tires on the rear.
Punctured Tires
A puncture eventually causes the tire to lose
pressure, which is why it is important to check tire pressures frequently. Permanently repair
or replace punctured or damaged tires as
soon as possible. Do not drive with a
punctured tire, even if the puncture has not caused the tire to deflate. A punctured tire
can deflate suddenly at any time.
Your tubeless tires may not leak when
penetrated, provided the object remains in the
tire. If, however, you feel a sudden vibration or
ride disturbance while driving, or you suspect
a tire is damaged, immediately reduce your
speed. Drive slowly, while avoiding heavy
braking or sharp steering and, when safe to do
so, stop the vehicle. Arrange to have Model S
transported to a Tesla service center, or to a
nearby tire repair center.
Note: In some cases, you can temporarily
repair small tire punctures (under 1/4”/6 mm)
using an optional tire repair kit available from
Tesla. This allows you to slowly drive Model S to Tesla or to a nearby tire repair facility.Warning: Do not drive Model S with a
punctured tire. Even if the punctured tire has not deflated, it can suddenly deflate
at any time.
Flat Spots
If Model S is stationary for a long period in
high temperatures, tires can form flat spots. When Model S is driven, these flat spots causea vibration which gradually disappears as thetires warm up and regain their original shape.
To minimize the flat spots during storage,
inflate tires to the maximum pressure
indicated on the tire wall. Then, before driving, release air to adjust tire pressure to the
recommended levels.
Improving Tire Mileage
To improve the mileage you get from your
tires, maintain tires at the recommended tire
pressures, observe speed limits and advisory
speeds, and avoid:
• Pulling away quickly, or hard acceleration.
• Fast turns and heavy braking. • Potholes and objects in the road.
• Hitting curbs when parking.
• Contaminating tires with fluids that can cause damage.
Tire Care and Maintenance
110Model S Owner's Manual
Page 111 of 164

Replacing Tires and Wheels
Tires degrade over time due to the effects of
ultraviolet light, extreme temperatures, high loads, and environmental conditions. It isrecommended that tires are replaced everysix years, or sooner if required.
Wheel rims and tires are matched to suit the
handling characteristics of the vehicle. Replacement tires must comply with the
original specification. If tires other than those
specified are used, ensure that the load and speed ratings marked on the tire equal orexceed those of the original specification.
Ideally, you should replace all four tires at the
same time. If this is not possible, replace the
tires in pairs (both front or both rear). When
replacing tires, always re-balance and check
the alignment of wheels.
If you replace a wheel, the TPMS (Tire
Pressure Monitoring System) sensors need to
be reset to ensure they provide accurate
warnings when tires are under- or over-
inflated (see Resetting the TPMS Sensors on
page 113).Warning: For your safety, use only tires
and wheels that match the original
specification (see Wheels and Tires on
page 143). Tires that do not match the original specification can affect the
operation of the Tire Pressure Monitoring System (TPMS).Warning: Never exceed the speed rating
of your vehicle's tires. The speed rating is
shown on the sidewall of your tires (see
Understanding Tire Markings on page
145).Asymmetric Tires
Model S tires are asymmetric and must be mounted on the wheel with the correctsidewall facing outward. The sidewall of thetire is marked with the word OUTSIDE. When
new tires are installed, make sure that the tires
are correctly mounted on the wheels.Warning: Road holding is seriously
impaired if the tires are incorrectly
installed on the wheels.
Tire Types
Summer Tires
Your Model S may be originally equipped with high performance summer tires. These tires
are designed for maximum dry and wet road performance. Summer tires do not performwell in winter conditions. Tesla recommendsusing winter tires if driving in cold
temperatures or on roads where snow or ice
may be present. Contact Tesla for winter tire recommendations.
Warning: In cold temperatures or on
snow or ice, summer tires do not provide
adequate traction. Selecting and installing the appropriate tires for winter conditionsis important to ensure the safety andoptimum performance of your Model S,
even when equipped with dual motors.
All-Season Tires
Your Model S may be originally equipped with all-season tires. These tires are designed to
provide adequate traction in most conditions
year-round, but may not provide the same
level of traction as winter tires in snowy or icy
conditions. All-season tires can be identified by “ALL SEASON" and/or "M+S” (mud and
snow) on the tire sidewall.
Tire Care and Maintenance
Maintenance111
Page 112 of 164

Winter Tires
Your Model S is not originally equipped with
winter tires. In snowy and icy conditions, consider installing winter tires. Winter tires are
designed to increase traction in snowy or icy
conditions. When installing winter tires, always install a complete set of four tires at the sametime. Winter tires must be the same size,brand, construction and tread pattern on allfour wheels. Contact Tesla for winter tire
recommendations.Winter tires can be identified by a
mountain/snowflake symbol on the
tire's sidewall.
When driving with winter tires, you may
experience more road noise, shorter tread life, and less traction on dry roads.
Driving in Low Temperatures Tire performance is reduced in low ambient
temperatures, resulting in reduced grip and an
increased susceptibility to damage from
impacts. Performance tires can temporarily
harden when cold, causing you to hear
rotational noise for the first few miles (kms)
until the tires warm up.
Using Tire Chains Tesla has tested and approved Security Chain
Company (SCC) Model Z-563 chains for use
on the rear wheels. These chains must only be
used if your Model S has 245/45R19 rear tires
installed. Do not use chains on 21 inch tires.
When installing tire chains, follow the
instructions provided by the tire chain
manufacturer. Mount them as tightly as
possible.
When using tire chains:
• Drive slowly. Do not exceed 30 mph (48 km/h).
• Avoid heavily loading Model S (heavy loads can reduce the clearance between
the tires and the body).
• Remove the tire chains as soon as conditions allow.
Note: Tire chains are prohibited in some
jurisdictions. Check local laws before installing
tire chains.
Caution: Using non-recommended tire
chains, or using tire chains on other sized tires, can damage the suspension, body,wheels, and/or brake lines. Damagecaused by using non-recommended tire
chains is not covered by the warranty.Caution: Ensure that tire chains cannot
touch suspension components or brake
lines. If you hear the chains making
unusual noises that would indicate
contact with Model S, stop and
investigate immediately.
Tire Pressure Monitoring
Each tire should be checked monthly when
cold and inflated to the recommended pressures that are printed on the Tire and
Loading Information label located on the
driver’s door pillar (see Maintaining Tire
Pressures on page 109). If your vehicle has
tires of a different size than the size indicated
on the vehicle placard or tire inflation pressure
label, determine the proper tire inflation
pressure for those tires.
As an added safety feature, your vehicle has
been equipped with a tire pressure monitoring
system (TPMS) that displays a tire pressure
telltale (Tire Pressure Warning) on the
instrument panel when one or more of your
tires is significantly under- or over-inflated.
Accordingly, when the Tire Pressure indicator
light displays on the instrument panel alerting
of tire pressure, stop and check your tires as
soon as possible, and inflate them to the
proper pressure (see Maintaining Tire
Pressures on page 109). Driving on a
significantly under-inflated tire causes the tire
to overheat and can lead to tire failure. Under-
inflation also reduces fuel efficiency and tire
tread life, and may affect the vehicle's
handling and stopping ability.
If Model S detects a fault with the
Tire Pressure Monitoring System
(TPMS), this indicator flashes for one
minute whenever you power on
Model S.
Note: Installing accessories that are not
approved by Tesla can interfere with the TPMS system.
Warning: The TPMS is not a substitute for
proper tire maintenance, including
manually checking tire pressures and
regularly inspecting the condition of tires.
It is the driver's responsibility to maintain
correct tire pressure, even if under- or
over-inflation has not reached the level
Tire Care and Maintenance
112Model S Owner's Manual
 1
1 2
2 3
3 4
4 5
5 6
6 7
7 8
8 9
9 10
10 11
11 12
12 13
13 14
14 15
15 16
16 17
17 18
18 19
19 20
20 21
21 22
22 23
23 24
24 25
25 26
26 27
27 28
28 29
29 30
30 31
31 32
32 33
33 34
34 35
35 36
36 37
37 38
38 39
39 40
40 41
41 42
42 43
43 44
44 45
45 46
46 47
47 48
48 49
49 50
50 51
51 52
52 53
53 54
54 55
55 56
56 57
57 58
58 59
59 60
60 61
61 62
62 63
63 64
64 65
65 66
66 67
67 68
68 69
69 70
70 71
71 72
72 73
73 74
74 75
75 76
76 77
77 78
78 79
79 80
80 81
81 82
82 83
83 84
84 85
85 86
86 87
87 88
88 89
89 90
90 91
91 92
92 93
93 94
94 95
95 96
96 97
97 98
98 99
99 100
100 101
101 102
102 103
103 104
104 105
105 106
106 107
107 108
108 109
109 110
110 111
111 112
112 113
113 114
114 115
115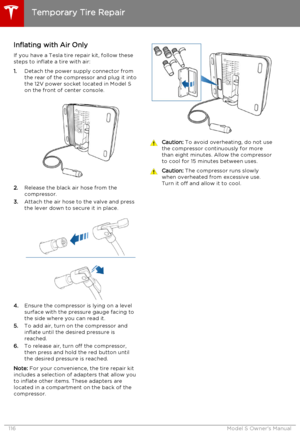 116
116 117
117 118
118 119
119 120
120 121
121 122
122 123
123 124
124 125
125 126
126 127
127 128
128 129
129 130
130 131
131 132
132 133
133 134
134 135
135 136
136 137
137 138
138 139
139 140
140 141
141 142
142 143
143 144
144 145
145 146
146 147
147 148
148 149
149 150
150 151
151 152
152 153
153 154
154 155
155 156
156 157
157 158
158 159
159 160
160 161
161 162
162 163
163