Page 97 of 164
• Most devices stay in learning mode foronly three to five minutes. Immediately
after pressing the device's LEARN button, follow the instructions displayed on the
touchscreen.
HomeLink ®
Universal Transceiver
Using the Touchscreen97
Page 98 of 164

Wi-Fi is available as a data connectionmethod and is often faster than cellular data
networks. Connecting to Wi-Fi is especially
useful in areas with limited or no cellular connectivity. To ensure fast, reliable deliveryof Model S updates (see Software Updates on
page 99), Tesla recommends leaving Wi-Fi
turned on and connected to a Wi-Fi network.
To connect to a Wi-Fi network:
1. Touch the 3G icon in the touchscreen
status bar. Model S will start scanning and
display the Wi-Fi networks that are within range.
2. Select the Wi-Fi network you want to use,
enter the password (if necessary), then
touch Connect .
You can also connect to a hidden network
that isn't shown on the list of scanned
networks. Just touch Wi-Fi Settings and enter
the name of the network in the resulting
dialog box.
Once you have connected to a network,
Model S auto-connects whenever the network
is within range. If more than one previously connected network is within range, Model S
connects to the one most recently used.
Note: You can also use a mobile hotspot or
your phone's Internet connection via Wi-Fi tethering.
Note: At Tesla service centers, Model S
automatically connects to a Tesla Service Wi-
Fi access point.
Connecting to Wi-Fi
98Model S Owner's Manual
Page 99 of 164

Loading New Software
Model S updates its software wirelessly,
providing new features throughout your term
of ownership. The first time you enter Model S after an update is made available, a
scheduling window displays on the
touchscreen.
Note: Some software updates can take from
two to three hours to complete. Model S must
be in P (Park) when the new software is being
installed. To ensure the fastest and most
reliable delivery of software updates, leave
the Wi-Fi turned on and connected whenever
possible (see Connecting to Wi-Fi on page
98).
When a software update is available, a yellow clock icon appears on the touchscreen’sstatus bar.
1. Touch the up and down arrows to change
the time you want the update to begin (if
necessary). Then touch Set For This Time
to schedule the update. Once scheduled,
the yellow clock icon on the touchscreen’s
status bar becomes white.
2. Touch Install Now to immediately start the
update process.
You can reschedule the update any time
before it begins. To do so, touch the clock icon on the touchscreen’s status bar to displaythe update window.
If Model S is charging when the software
update begins, charging stops. Charging resumes automatically when the update is
complete. If you are driving Model S at the scheduled update time, the update is canceled
and you need to reschedule.
If the touchscreen displays a message
indicating that a software update was not successfully completed, contact Tesla.
Viewing Release Notes
When a software update is complete, learn
about the new features by displaying the
release notes. To display release notes at any time touch the Tesla “T” at the top center of
the touchscreen, then touch Release Notes.
Software Updates
Using the Touchscreen99
Page 100 of 164

Model S Mobile AppThe Tesla Model S mobile app allows you tocommunicate with Model S remotely using
your iPhone ®
or Android ™
phone. With this app,
you can:
• Check charging progress and receive notifications when charging has started,
has been interrupted, or is complete.
• Heat or cool Model S before driving (even if it's in a garage).
• Locate Model S with directions, or track its movement across a map.
• Flash lights or honk the horn to find Model S when parked.
• Vent or close the sunroof.
• Lock or unlock Model S from afar. • Start Model S.
• Support the Model S Calendar app by allowing the mobile app to send your
phone's calendar data to Model S.
• Receive notifications when the car alarm has been triggered, or a new Model S
software update is available.
Simply download the Tesla Model S mobile
app to your phone and enter your MY TESLA
login credentials. You must also ensure that Model S is ready to communicate with the
mobile app by turning on its remote access
setting. Touch Controls > Settings > Safety &
Security > Remote Access > On (see Settings
on page 77).
Mobile App
100Model S Owner's Manual
Page 101 of 164
High Voltage Components1.Battery
2. DC-DC converter and junction box
3. High voltage cabling (colored orange)
4. 10 kW on-board master charger
5. OPTIONAL: 10 kW on-board charger
6. Charge port
7. Drive unitWarning: The high voltage system has no
user serviceable parts. Do not
disassemble, remove or replace high
voltage components, cables or
connectors. High voltage cables are
colored orange for easy identification.Warning: Read and follow all instructions
provided on the labels that are attached to Model S. These labels are there for
your safetyWarning: In the unlikely event that a fire
occurs, immediately contact your local
fire emergency responders.
Electric Vehicle Components
Charging101
Page 102 of 164

Charging Equipment
Charging equipment designed specifically to charge your Model S is available from Tesla. ATesla Wall Connector, which installs in your
garage, is the fastest way to charge Model S at home.
In several market regions, Model S is equipped
with a Mobile Connector and the adapter(s)
you need to plug into commonly used power outlets. When using the Mobile Connector,
first plug the Mobile Connector into the power
outlet, then plug in Model S. For more information about your Mobile Connector, see
the Mobile Connector Owner’s Manual.
Additional adapters can be purchased from
Tesla.
Tesla also provides various types of adapters
(including J1772, Mennekes Type 2, and CHAdeMO) that allow you to plug Model S
into the most commonly used public charging
stations in your region. Connect the adapter
to the charging station’s charge cable, open the charge port door using the touchscreen
(see Charging Model S on page 104), then
plug in Model S.
For more information on the charging
equipment available for your region, go to
www.teslamotors.com, choose your region, then view the available charging options.
Electric Vehicle Components
102Model S Owner's Manual
Page 103 of 164

About the Battery
Model S has one of the most sophisticated
battery systems in the world. The most important way to preserve the Battery is to
LEAVE YOUR MODEL S PLUGGED IN when
you are not using it. This is particularly
important if you are not planning to drive
Model S for several weeks. When plugged in,
Model S wakes up when needed to
automatically maintain a charge level that
maximizes the lifetime of the Battery.
There is no advantage to waiting until the
Battery’s level is low before charging. In fact,
the Battery performs best when charged
regularly.
Note: If the Model S Battery becomes
completely discharged in a situation in which
towing is required, the owner is responsible for towing expenses. Discharge-related
towing expenses are not covered under the
Roadside Assistance policy.
Battery Care
Never allow the Battery to fully discharge.
Even when Model S is not being driven, its
Battery discharges very slowly to power the
onboard electronics. On average, the Battery discharges at a rate of 1% per day. Situations
can arise in which you must leave Model S
unplugged for an extended period of time (for
example, at an airport when traveling). In these situations, keep the 1% in mind to ensure
that you leave the Battery with a sufficient
charge level. For example, over a two week
period (14 days), the Battery discharges by
approximately 14%.
Discharging the Battery to 0% may
permanently damage the Battery. To protect against a complete discharge, Model S enters
a low-power consumption mode when the
charge level drops to 5%. In this mode, the
Battery stops supporting the onboard electronics to slow the discharge rate to
approximately 4% per month. Once this low-
power consumption mode is active, it is
important to plug in Model S within two
months to avoid Battery damage.
Note: When the low-power consumption
mode is active, the auxiliary 12V battery is no
longer being charged and can completely
discharge within 12 hours. In the unlikely event
that this occurs, you may need to jump start
or replace the 12V battery before you can
charge. In this situation, contact Tesla.Temperature Limits
For better long-term performance, avoid
exposing Model S to ambient temperatures above 140° F (60° C) or below -22° F (-30° C)
for more than 24 hours at a time.
Energy Saving Feature
Model S has an energy-saving feature that
reduces the amount of energy being consumed when Model S is not in use. Touch
Controls > Displays > Energy Saving . For more
information on maximizing range and saving
energy, see Getting Maximum Range on page
70.
Battery Warnings and CautionsWarning: The Battery has no parts that an
owner or a non-Tesla authorized service technician can service. Under no
circumstances should you open or
tamper with the Battery. Always contact Tesla to arrange for Battery servicing.Caution: If the Battery’s charge level falls
to 0%, you must plug it in. If you leave it
unplugged for an extended period, it may
not be possible to charge Model S or use
the vehicle without jump starting or
replacing the 12V battery. Leaving Model S unplugged for an extendedperiod can also result in permanent
Battery damage. If you are unable to
charge Model S, contact Tesla
immediately.Caution: The Battery requires no owner
maintenance. Do not remove the filler cap
and do not add fluid. If the instrument
panel warns you that the fluid level is low, contact Tesla immediately.
Battery Information
Charging103
Page 104 of 164

Opening the Charge Port
The charge port is located on the driver’s side of Model S, behind a door that is part of therear tail light assembly.
Park Model S so that the charge cable easily
reaches the charge port.
With Model S unlocked, or a recognized key
nearby, press and release the button on a
Tesla charge cable to open the charge port door. If the cable you are using does not havethis button, you can also open the charge portdoor using any of these methods:
• Touch Controls > Charge Port on the
touchscreen.
• Touch the battery icon at the top of the touchscreen to display the Charging
screen, then touch Open Charge Port.
• Hold down the rear trunk button on the key for 1-2 seconds.
To charge at a public charging station, attach
an adapter to the station’s chargingconnector. The most commonly usedadapter(s) for each market region aresupplied with Model S. Depending on thecharging equipment you are using, you may
need to start and stop charging using a control on the charging equipment.
Note: The charge port lights up white when
you open the charge port door. If you do not
connect a charge cable, the light eventually
turns off.
Note: If you do not insert the charge cable
into the charge port within a few minutes after
opening the charge port door, the latch
closes. If this happens, use the touchscreen to
open the charge port door.Caution: The connector end of the charge
cable can damage the paint if dropped onto Model S.Caution: Do not attempt to force the
charge port door open. Doing so can
damage the latch. A damaged latch
cannot hold the door closed.
Plugging In
If desired, use the touchscreen to change the
charge limit and the charging current.
If you are using the Mobile Connector, plug it into the power outlet before plugging it intoModel S.
Align the connector to the charge port and
insert fully. When the connector is properly
inserted, charging begins automatically after Model S:
• Engages a latch that holds the connector in place.
• Shifts into Park (if it was in any other gear).
• Heats or cools the Battery, if needed. If the Battery requires heating or cooling,
you may notice a delay before charging begins.
Note: Whenever Model S is plugged in but not
actively charging, it draws energy from the wall instead of using energy stored in the
Battery. For example, if you are sitting in
Model S and using the touchscreen while it’s is
parked and plugged in, the energy being used
is drawn from the power outlet instead of the
Battery.
Charging Model S
104Model S Owner's Manual
 1
1 2
2 3
3 4
4 5
5 6
6 7
7 8
8 9
9 10
10 11
11 12
12 13
13 14
14 15
15 16
16 17
17 18
18 19
19 20
20 21
21 22
22 23
23 24
24 25
25 26
26 27
27 28
28 29
29 30
30 31
31 32
32 33
33 34
34 35
35 36
36 37
37 38
38 39
39 40
40 41
41 42
42 43
43 44
44 45
45 46
46 47
47 48
48 49
49 50
50 51
51 52
52 53
53 54
54 55
55 56
56 57
57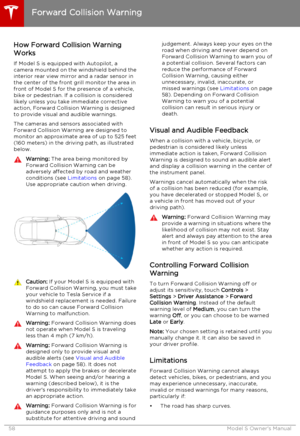 58
58 59
59 60
60 61
61 62
62 63
63 64
64 65
65 66
66 67
67 68
68 69
69 70
70 71
71 72
72 73
73 74
74 75
75 76
76 77
77 78
78 79
79 80
80 81
81 82
82 83
83 84
84 85
85 86
86 87
87 88
88 89
89 90
90 91
91 92
92 93
93 94
94 95
95 96
96 97
97 98
98 99
99 100
100 101
101 102
102 103
103 104
104 105
105 106
106 107
107 108
108 109
109 110
110 111
111 112
112 113
113 114
114 115
115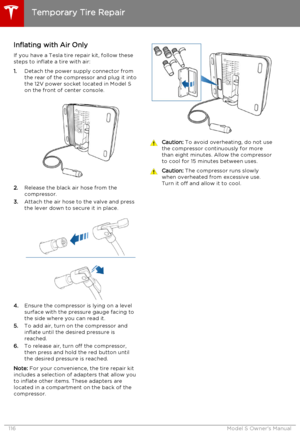 116
116 117
117 118
118 119
119 120
120 121
121 122
122 123
123 124
124 125
125 126
126 127
127 128
128 129
129 130
130 131
131 132
132 133
133 134
134 135
135 136
136 137
137 138
138 139
139 140
140 141
141 142
142 143
143 144
144 145
145 146
146 147
147 148
148 149
149 150
150 151
151 152
152 153
153 154
154 155
155 156
156 157
157 158
158 159
159 160
160 161
161 162
162 163
163

4. 10 kW on-board master charger
5. OPTIONAL: 10 kW on-board charger
6. Charge port
7. Dri")