Page 25 of 100
 Columbus Infotainment System Manual Media
Operation
Introduction
This chapter contains information on the following subjects:
Main menu
22
Select audio source
22
Playback
23
Folder / track list
23
Multimedia database
24
Settings
24
T")
Media
Operation
Introduction
This chapter contains information on the following subjects:
Main menu
22
Select audio source
22
Playback
23
Folder / track list
23
Multimedia database
24
Settings
24
The device allows you to play audio files from different media and connected
devices (hereinafter only “audio sources”).
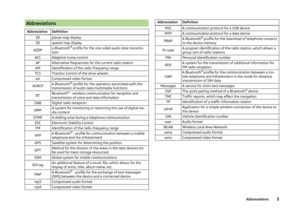
Main menu
Fig. 9
Media: Main menu / Album list
Display main menu
›
Press the button.
Main Menu - Information and function keys » Fig. 9
Information on playing track
Playback timeline with a slider
Selected audio source / display of the album list
Select the audio source
ABCDDepending on the audio source type:
› Folder / Title list
› Multimedia database
Menu settings Media
Album list
By touching with the finger in the area C
» Fig. 9 a list of albums is displayed.
Movement within the album list can be performed by moving a finger across
the screen to the right or left or by turning the controller
. After five seconds
since the last operation, the display returns to the main menu.
Note
■ Information concerning the given title appears on the screen, if they are stor-
ed as so-called ID3 Tag on the audio source. If no ID3 tag is available, only the
title name is displayed.■
The remaining playback time indicated does not correspond to the actual re-
maining playback time for titles with variable bit rates (VBR).
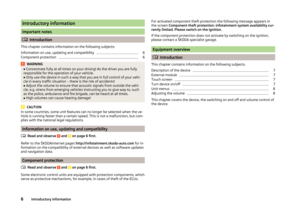
Select audio source
Fig. 10
Display examples of audio source selection
›
Repeatedly press the key the display will change between available au-
dio sources.
or
›
Press the key
→
1
» Fig. 10 -
and select the desired audio source.
or
›
In the folder/track list and in the multimedia database press the function key
and select the desired audio source » Fig. 10 -
.
22Media
Page 26 of 100
 Columbus Infotainment System Manual Audio sourcesJukebox - Internal device memory
CD/DVD - Inserted CD / DVD
SD card - inserted SD card
USB - connected to the USB input audio source
BT audio - coupled Bluetooth ®
player
WLAN - C")
Audio sourcesJukebox - Internal device memory
CD/DVD - Inserted CD / DVD
SD card - inserted SD card
USB - connected to the USB input audio source
BT audio - coupled Bluetooth ®
player
WLAN - Connected to the WLAN audio source
AUX - Connected to the AUX input audio source
Playback
The unit will play the contents of the connected audio source according to the
alphabetically sequenced directory and file name.
Operating modes
OperationActionPlay / PausePress from
Plays the current track from the start
Press from (after about 3 seconds
after the start of the track playback)Finger movement to the right of the screen area A
» Fig. 9 on page 22
(After 3 seconds from the start of the track playback)Fast-reverse within the titlePress and hold Fast-forward within the trackPress and hold
Play the previous track
Press from (within 3 seconds after
the start of the track playback)Finger movement to the right of the screen area A
» Fig. 9 on page 22
(Within 3 seconds after the start of the track playback)Play the next track
Press from Finger movement to the left of the
screen area A
» Fig. 9 on page 22Switch on/off the random playback
from the current album or folderPress from Switch on/off the repeat playback
from the current album or folderPress from OperationActionSwitch on/off repeat playback of spe-
cific trackPress from Search (applies to sources with a dis-
played multimedia database)Press from Turn on / off the preferred playback
(most played / best rated) trackPress from
The movement within the track is possible by finger touching the timeline
B
» Fig. 9 on page 22 .
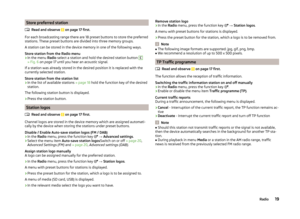
Folder / track list
Fig. 11
Folder / Title list
Show list
›
Press the key
→
.
The content of an audio source is displayed in alphabetical order in the fold-
er/track list.
Folders and title lists - information and function keys
ASelected audio source / audio source folder (movement within the
folder is done by pressing the function key for the folder)BOptions folder/track playbackCDisplay of multimedia database (available only for the display of the
main folder of the source)Select the audio sourceFolderPlay list 23Media
Page 27 of 100
 Columbus Infotainment System Manual / Currently playing title / track playback stoppedThe title cannot be played (pressing the function key shows the
cause).
Note
■ With more than 1,000 tracks in the folder only the first 1,")
/ Currently playing title / track playback stoppedThe title cannot be played (pressing the function key shows the
cause).
Note
■ With more than 1,000 tracks in the folder only the first 1,000 tracks with the
oldest creation date are displayed.■
The scanning speed of the folder / track list depends on the connection
speed and volume of data.
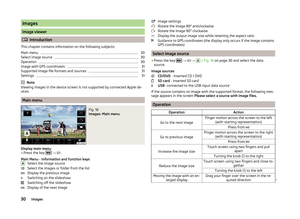
Multimedia database
Fig. 12
Multimedia database
In the multimedia database the tracks are sorted according to categories.
Viewing multimedia database
›
Press the key
→
.
or
›
Press the key
→
→
C
» Fig. 11 on page 23 .
Multimedia database - Information and function keys » Fig. 12
Selected audio source / selected category / audio source folder (move- ment within the folder is done by pressing the function key for the folder)
Display of folder / track list (available only for the display of the entire
source content - source folders)
Select the audio source
Sorting according to the track list name
Sorting according to the artist's name
Sorting according to the album name
Sorting according to the track title
Sorting according to the podcast name
ABSorting according to the genre type
Sorting according to the composer's name
Sorting according to audio books name
Sorting according to the video type
For playback the category and then the title is selected.
Settings
›
Press the key
→
.
■ Sound - Sound settings
■ Manage jukebox - Manage (record / delete) supported files (audio / video) in
the internal memory
■ Mix/repeat including subfolders - Switching the title display including sub-
directory
■ Bluetooth - Settings for the Bluetooth ®
function
■ WLAN - WLAN settings
■ Video (DVD) settings - Setting the parameters of the DVD video
■ Remove safely: - safe removal of the audio source
■ Traffic programme (TP) - Switches traffic programme on/off
■ External AUX device - Enables / disables the AUX input
■ Reset codec to system settings - Codec default settings
Audio sources
Introduction
This chapter contains information on the following subjects:
Jukebox
25
CD / DVD
26
SD card
27
USB input
27
Bluetooth ®
player
28
WLAN
28
AUX - input
28
Supported audio sources and file formats
29
The device allows you to play audio files in various formats and to connect dif-
ferent source types » page 29.
24Media
Page 28 of 100
 Columbus Infotainment System Manual WARNING■Never place audio sources close to the airbags. They could be thrown into
the passenger compartment when the airbags are deployed, injuring the
occupants.■
Never place audio sources on the")
WARNING■Never place audio sources close to the airbags. They could be thrown into
the passenger compartment when the airbags are deployed, injuring the
occupants.■
Never place audio sources on the dash panel, in your hand or on your
knees. They could be thrown into the passenger compartment during sud-
den driving manoeuvres, thereby injuring the occupants.
■
Always route the connection cable of the audio source such that is does
not restrict you when driving.
CAUTION
Do not store any important data on the connected sources. ŠKODA assumes
no responsibility for lost or damaged files or connected audio sources.
Jukebox
Fig. 13
Importing files into the Jukebox / Jukebox database
Read and observe
and on page 25 first.
In the Jukebox (in the internal memory of the device) audio and video files can
be imported from connected sources and then played back.
There is approximately 10 GB free memory available and you can save 3 000
files.
In the internal database the files are sorted according to categories.
View Jukebox
›
Press the key
→
1
» Fig. 10 on page 22 -
→
Jukebox .
Select files/folders for import
Shows the source/folder overview, function keys for higher-level sour-
ces/folders
Parent folder
Folder
File
Import into the Jukebox
Show level of the internal device memory
Press the key
Manage jukebox .
The following information is displayed:
■ In use: - Amount of memory used
■ Free: - Amount of memory free
■ Free files: - Number of files that can be imported
The current memory capacity is displayed on the screen when files are being imported or deleted.
Import files
Supported audio/video files can be imported from the sources currently con-
nected into the internal memory.
› Press the key
→ Manage jukebox → Import .
› Select the desired source.
› Select the desired folders or files.
› Press the function key
.
After the import is successful, the message Import ended. (… of … file(s)). Im-
port complete. .
› Press the function key
.
Delete files
› Press the key
→ Manage jukebox → Delete .
› Select the desired folder or files in the selected category.
› Press
→ Delete .
After successful deletion of the selected folders / files the message Files have
been deleted. appears.
› Press the function key
. ABCD25Media
Page 29 of 100
 Columbus Infotainment System Manual Note■It is not possible to copy the contents of copyright protected CDs or DVDs to
the Jukebox.■
Files that have already been copied are recognized and cannot be copied
again (shown in grey).
■")
Note■It is not possible to copy the contents of copyright protected CDs or DVDs to
the Jukebox.■
Files that have already been copied are recognized and cannot be copied
again (shown in grey).
■
It is not possible to copy files while simultaneously playing back audio or vid-
eo files in the CD/DVD drive.
CD / DVD
Fig. 14
CD/DVD case
Read and observe
and on page 25 first.
The CD/DVD slot is located in an external module in the glove box on the front
passenger side.
Inserting a CD/DVD
›
Insert a CD/DVD into the CD slot with the label facing up until it is automati-
cally drawn in.
Ejecting a CD/DVD
›
Release the symbol key
- the CD/DVD is ejected.
If the ejected medium is not taken out within 10 seconds, it will be retracted
again for safety reasons. However, the unit will not change to the CD/DVD
source.
WARNING■ The CD/DVD player is a laser product.■On the manufacturing date, this unit was classified as a class 1 laser prod-
uct in accordance with the national/international standards
DIN EN 60825-1: 2008-05 and DHHS Rules 21 CFR, Subchapter J. The laser
used in this class 1 laser product is so weak that there is no risk of danger
when operated correctly.■
This product is designed such that the laser is restricted to the inside of
the unit. However, the installed laser could be classified in a higher class
were the housing to be removed. For this reason, never remove the hous-
ing of the unit.
CAUTION
■ Be sure to remove the CD/DVD before you try to insert a new CD/DVD. Other-
wise you can damage the drive inside the unit.■
Only insert in the CD/DVD drive original audio CDs/video DVDs or standard
CD-R/RWs or DVD±R/RWs.
■
Do not affix anything to the CD/DVDs!
■
If the ambient temperature is too high or too low, the CD / DVD playback may
not work.
■
Damp (condensation) may affect the device in cold weather or after showers.
This can lead to playback jumps or impair the play function. Once the moisture
has dissipated, playback is fully functional again.
Note
■ After pressing the symbol key it takes a few seconds for the CD / DVD to
be ejected.■
With uneven or unpaved roads playback jumps may occur.
■
If the CD/DVD is damaged, is not readable or is inserted incorrectly, the fol-
lowing message is displayed Error: CD/DVD.
■
It is possible that CD/DVDs protected by copyright may not be played back at
all or only in certain circumstances.
■
The national copyright laws that apply in your country must be observed.
26Media
Page 30 of 100
 Columbus Infotainment System Manual SD cardFig. 15
SD card slots
Read and observe
and on page 25 first.
The SD card slots are located in an external module in the glove box on the
front passenger side.
Insert the SD card
›
Push th")
SD cardFig. 15
SD card slots
Read and observe
and on page 25 first.
The SD card slots are located in an external module in the glove box on the
front passenger side.
Insert the SD card
›
Push the SD card into the available slot with the cut edge to the right until it
“locks into place”.
›
In the menu Media start playback from the connected SD card.
Remove the SD card
›
Press the key in the main menu Media
→ Remove safely: and select the
desired SD card.
›
Press on the inserted SD memory card.
The SD card “jumps” into the eject position.
CAUTION
When using an SD card with an adapter, vehicle vibrations might cause the
card to fall out of the adapter.USB inputFig. 16
USB input
Read and observe and on page 25 first.
The USB input is in the centre console and is identified with the symbol .
The exact location of the input » Vehicle Operating Instructions .
The USB input audio source can be connected directly or via a connecting ca-
ble.
Playback from USB audio source
›
Plug the USB audio source into the appropriate input.
›
In the menu Media start playback from the connected USB audio source.
Separate USB audio source
›
Press the key in the menu Media
→ Remove safely: and select the USB
source.
›
Disconnect the audio source from the corresponding USB input.
Charge USB audio source
With the device on after connecting the USB audio source, the charging proc-
ess is automatically started (applies for audio sources where charging via the
USB connector is possible).
Some connected audio sources may not be recognised and cannot be charged.
CAUTION
USB extension cords, or reducers may impair the function of the connected au-
dio source.
Note
We recommend that you use extension cords from ŠKODA Original Accesso-
ries.27Media
Page 31 of 100
 Columbus Infotainment System Manual Bluetooth®
player
Read and observe
and on page 25 first.
The unit allows audio files of a connected Bluetooth ®
player to play using the
A2DP and AVRCP audio profile.
Connect the Bluetooth ®
p")
Bluetooth®
player
Read and observe
and on page 25 first.
The unit allows audio files of a connected Bluetooth ®
player to play using the
A2DP and AVRCP audio profile.
Connect the Bluetooth ®
player
›
Connect the player to the device - follow the same instructions as for pairing
the device with a telephone » page 41.
›
Select the audio source
BT audio » page 22 , Select audio source and then
the desired player.
Separate the Bluetooth ®
player
›
Terminate the connection in the list of paired devices » page 43.
Automatic playback stop and disconnection
If an Apple device is connected as a Bluetooth ®
player and is it connected to
the USB input (for example, for the purpose of charging the connected device),
then playback via Bluetooth ®
stops and playback is then only possible via USB.
If the audio source is switched from Bluetooth ®
Players to USB, then there is
an automatic interruption of the Bluetooth ®
connection. The following warning
message appears in the screen Bluetooth audio (A2DP) … Connection cancel-
led.
If the Bluetooth ®
player audio source is connected to the AUX input, then the
audio output is switched from the AUX input of the connected device. For fur-
ther playback the audio source is to be switched to AUX.
Note
If a device is connected to the device using Apple CarPlay, then a connection
using Bluetooth ®
is possible.
WLAN
Read and observe
and on page 25 first.
The device allows you to play audio files connected from a WLAN device to the
device.
Play over WLAN
›
Connect the player to the device's WLAN » page 51, WLAN Hotspot - Con-
nection to the external device with the device WLAN .
›Start the UPnP application in the connected device or connect a device that
allows you to set up a DLNA server.›
Select the audio source
WLAN » page 22 , Select audio source .
AUX - input
Fig. 17
AUX input
Read and observe and on page 25 first.
The AUX input is located in the centre console and is marked with the lettering
. The exact location of the input
» Vehicle Operating Instructions .
Connecting AUX audio sources
›
Insert the plug of the audio source in the corresponding well.
›
Select the audio source
AUX » page 22 , Select audio source .
›
Start playback on the connected audio source.
Disconnect AUX audio source
›
Disconnect the connector of the audio source.
CAUTION
■ The AUX input must only be used for audio devices!■If an external audio source is connected to the AUX input, which is equipped
with an adapter for external power supply, the sound may be impaired.
Note
■ The 3.5 mm stereo jack plug is used for the AUX input.■We recommend that you use extension cords from ŠKODA Original Accesso-
ries.28Media
Page 32 of 100
 Columbus Infotainment System Manual Supported audio sources and file formatsRead and observe
and on page 25 first.
Supported audio sources
SourceInterfaceTypeSpecificationFile sys-temSD cardSD readerStandard sizeSD, SDHC, SDXC
FAT16V")
Supported audio sources and file formatsRead and observe
and on page 25 first.
Supported audio sources
SourceInterfaceTypeSpecificationFile sys-temSD cardSD readerStandard sizeSD, SDHC, SDXC
FAT16VFAT
FAT32
exFAT NTFSUSB-
devices
USB 1.x; 2.x and 3.x or
higher with support of USB 2.x
MSC
USB stick;
HDD (without any special software); The MSC mode
supports USB de- vices
MTP
Devices with theAndroid operat- ing system or
Windows mobile (mobile phone, tablet)
Apple
Devices with the
operating system
iOS (iPhone, iPod, iPad)
CD/DVDCD/DVD-Drive
Audio CD (Up to 80 min);
CD-R / RW (Up to 700 MB);
DVD±R/RW; DVD audioISO9660;
Joliet (Level 1,2,3); UDF 1.x;UDF 2.x
-
Supported audio file formatsCodec type
(File formats)File suffixMax bit rateMaximumsampling rateMulti
channels a)Play listsWindows Media
Audio
9 and 10 (Lay- er-3)
wma384 kbit /s96 kHz
no
m3upls
wpl
m3u8 asx
WAVwav
Defined bythe format (approx.
1.5 Mbit/s)
48 kHz
MPEG-1; 2 and 2.5mp3320 kbit /sMPEG-2 and 4aac; mp4;m4a
yes
FLAC;
OGG Vorbisflac; ogg
Defined by the format (approx.
5.5 Mbit/s)a)
Applies to the CANTON sound system.
The GPT standards (GUID partition table) method structured audio sources are
not supported by the device.
Files that are protected by Digital Rights Management (DRM) technology can-
not be played back by the device.
29Media