Page 57 of 100
 Columbus Infotainment System Manual Main Menu - function KeysList of connected devices
Disconnection (appears with active connections)
Settings for the menu SmartLink
Function keys of the active connection (after pressing the main menu")
Main Menu - function KeysList of connected devices
Disconnection (appears with active connections)
Settings for the menu SmartLink
Function keys of the active connection (after pressing the main menu of
the active connection appears)
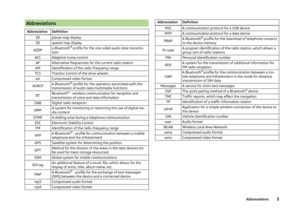
List of connected devices
Fig. 38
List of connected devices
Read and observe on page 53 first.
Open the list of connected devices
›
Press the function key in the main menu SmartLink
» Fig. 37 on page 53 .
A list of connected devices is displayed » Fig. 38.
Connection / change
› Select the device you want from the list of connected devices.
With an active connection one of the following symbols is displayed in the
function key of the device connected or one of the following symbols is shown.
Android Auto ™
Apple CarPlay MirrorLink ™
Select your preferred connection type
If one of the following connection types Android Auto ™
or MirrorLink ™
is sup-
ported from an external device, then a connection type can be set as prefer-
red.
› Press the function key in the main menu SmartLink
→ Pref. connection
type: .
› Select the preferred connection type.
1The change of the preferred connection type takes affect only after reconnect-
ing the external device.
Disconnection
The following procedure for the disconnection does not apply for MirrorLink ™
.
› Press the function key in the main menu SmartLink
.
› In the list of connected devices press the function key
Disconnect.
Settings
Read and observe
on page 53 first.
›
Press the key
→
→
.
■ Select device - Display a list of connected devices
■ Pref. connection type: - Select the preferred connection type (if different
connection types are supported by the device)
■ Android Auto - Connection using the Android Auto ™
function
■ MirrorLink™ - Connection using the MirrorLink ™
function
■ Activate data transfer for ŠKODA apps - Activation / deactivation of the data
transfer for the connected device for ŠKODA applications
■ MirrorLink™ - Setting the display MirrorLink ™
- connection
■ Screen orientation: - Screen display
■ Landscape - Width display
■ Portrait - Height display
■ Rotated 180 degrees - Image reversed by 180°
■ Infotainment system keyboard prioritised - Turn on / off the device key-
board
Android Auto ™
Introduction
This chapter contains information on the following subjects:
Main menu
55
Function problems
55
The Android Auto ™
connection can be set up under the following conditions.
The ignition is switched on.
The unit is switched on.
The device to be connected is switched on.
54SmartLink
Page 58 of 100
 Columbus Infotainment System Manual Some applications require that the data connection in the connected device is
turned on.
By establishing the Android Auto ™
connection all existing Bluetooth ®
connec-
tions are terminated to the")
Some applications require that the data connection in the connected device is
turned on.
By establishing the Android Auto ™
connection all existing Bluetooth ®
connec-
tions are terminated to the device and a Bluetooth ®
connection using the
Android Auto ™
is established to the device.
A device connected using Android Auto ™
cannot be used as an audio source in
the menu Media.
If route guidance is active at this moment in the device, then this is terminated
by starting the route guidance in the Android Auto ™
application. This is also
true reciprocally.
A list of devices and applications that the Android Auto ™
connection supports
can be found on the Google website.
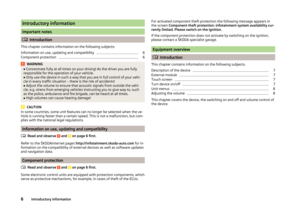
Main menu
Fig. 39
Android Auto™: Main menu
Connection set-up
The device saves the last 10 connected devices.
›
Connect the device to the USB input » Vehicle operating instructions .
In the main menu the Android Auto ™
connection is shown » Fig. 39.
The first connection of the device to the device must be made when the vehi- cle is not moving.
During the first connection establishment it is necessary to confirm the con-
nection request in the device screen and to confirm the connection approval
and the device to be connected.
During the connection establishment a device request can also occur requiring
the installation or update of the necessary application. It is possible the more
confirmations are demanded for example for the downloading of telephone
contacts.
Main menu - function keys and information Navigation applications
Telephone applications
Overview regarding current applications, telephone calls, accepted text
messages, tasks in the working directory, weather or similar
Music applications
List of ŠKODA applications
If the application symbol appears next to the function key , then by pressing
the application function key again a list of additional applications is shown.
Return to the main menu of the Android Auto ™
connection from another
device menu
› To return to the main menu of the Android Auto ™
connection (e.g. from the
menu Radio), press the key
→ Android Auto .
Start the application › In the main menu of the Android Auto ™
connection select the desired appli-
cation in the field
A
» Fig. 39 .
Disconnection
› Disconnect the device from the USB input.
or
› In the main menu of the Android Auto ™
connection press the function key
→
→
.
Function problems
If problems occur with the Android Auto ™
connection, then one of the follow-
ing messages may occur in the display. 55SmartLink
Page 59 of 100
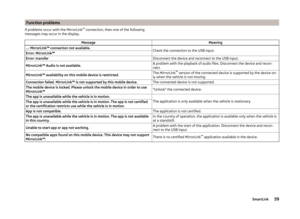
 Columbus Infotainment System Manual MessageMeaning… Unable to connect to mobile device. … is already connected via Android Au-
to.The device allows only one active connection.Check the setting on the mobile device and the connection")
MessageMeaning… Unable to connect to mobile device. … is already connected via Android Au-
to.The device allows only one active connection.Check the setting on the mobile device and the connection.Stop the vehicle, “unlock” the display of the connected device and follow the
instructions displayed on the connected device.Apple CarPlay
Introduction
This chapter contains information on the following subjects:
Home menu
56
Function problems
57
The Apple CarPlay connection can be set up under the following conditions. The ignition is switched on.
The unit is switched on.
The device to be connected is switched on.
The data connection is turned on in the device to be connected.
The Siri voice control is switched on in the device to be connected.
By establishing an Apple CarPlay connection all existing Bluetooth ®
connec-
tions to the device are terminated and a connection using Apple CarPlay to the
connected device is established. During the Apple CarPlay connection the use
of the menu Telephone is not possible.
A device connected with Apple CarPlay cannot be used as an audio source in
the menu Media.
If at this moment the route guidance is active by means of the menu Naviga-
tion , then the guidance by the device is terminated by the start of the route
guidance in the Apple CarPlay application. This is also true reciprocally.
A list of devices, supported regions and applications that the Apple CarPlay
connection supports, can be obtained from the Apple website.
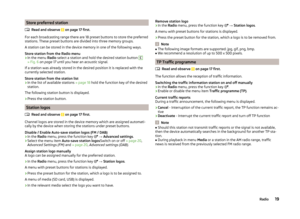
Home menuFig. 40
Apple CarPlay: Main menu
Connection set-up
›
Connect the device to the USB input » Vehicle operating instructions .
The main menu of the Apple CarPlay connection is displayed » Fig. 40.
The first connection of the device to the device must be made when the vehi-
cle is not moving.
During the first connection establishment it is necessary to confirm the con-
nection request in the device screen.
Main menu - function keys and information Push - Return to the main menu of the Apple CarPlay connection / Hold -
Switch on the Siri voice control
List of available applications
Other pages with applications (by running your finger sideways across the
screen or by turning the dial, the next page can be displayed )
Return to the main menu of the Apple CarPlay connection from another device menu
› To return to the main menu of the Apple CarPlay connection (e.g. from the
menu Radio), press the key
→ Apple CarPlay .
AB56SmartLink
Page 60 of 100
 Columbus Infotainment System Manual Start the application› In the main menu of the Apple CarPlay connection select the desired applica-
tion in the field A
» Fig. 40 .
Disconnection
› Disconnect the device from the USB input.
or")
Start the application› In the main menu of the Apple CarPlay connection select the desired applica-
tion in the field A
» Fig. 40 .
Disconnection
› Disconnect the device from the USB input.
or
› In the main menu of the Apple CarPlay connection press the function key
→
.
Function problems
If problems occur with the Apple CarPlay connection, then one of the following
messages may occur in the display.MessageMeaning… Unable to connect to mobile device. … is already connected via Apple Car-
Play.The device allows only one active connection.SmartLink: ... has been disconnected.Check the connection to the USB input.Unable to connect. … is not supported by the mobile device.The connection type is not supported by the connected device.Please note that this UBS port may not support Apple CarPlay. Use a different
USB port and try again.The Apple CarPlay connection is not supported by the USB input. Connect the
external device to a different USB port.MirrorLink ™
Introduction
This chapter contains information on the following subjects:
Home menu
57
Operation
58
Function problems
59
The MirrorLink ™
connection can be set up under the following conditions.
The ignition is switched on.
The unit is switched on.
The device to be connected is switched on.
Some applications require that the data connection in the connected device is turned on.
If you want to use the device menu Telephone, then before establishing the
MirrorLink ™
connection with the device then connect the device first via Blue-
tooth ®
.
A device connected using MirrorLink ™
cannot be used as an audio source in the
menu Media.
If route guidance is active at this moment in the device, then this is not termi-
nated by starting the route guidance in the MirrorLink ™
application.
The list of available applications and devices, which support the MirrorLink ™
function, can be seed in the ŠKODA Internet pages www.infotainment.skoda-
auto.com.
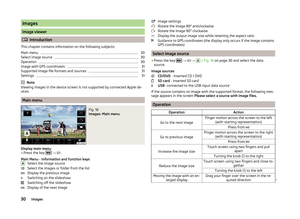
Home menu
Fig. 41
MirrorLink ™: Main menu
57SmartLink
Page 61 of 100
 Columbus Infotainment System Manual Connection set-up
The device saves the last 10 connected devices.›
Connect the device to the USB input » Vehicle operating instructions .
›
Press the key
→ MirrorLink™ .
In th")
Connection set-up
The device saves the last 10 connected devices.›
Connect the device to the USB input » Vehicle operating instructions .
›
Press the key
→ MirrorLink™ .
In the main menu the MirrorLink ™
connection is shown » Fig. 41.
During the first connection set-up proceed as follows.
›
Connect the device to the USB input.
›
Press the key
→ MirrorLink™ .
›
Press the function key in the displayed main menu SmartLink
.
›
Select the desired device.
›
Confirm the message concerning the connection in the device screen.
In the main menu the MirrorLink ™
connection is shown » Fig. 41.
Main menu - function keys and information Disconnection and return to the main menu SmartLink
Display a list of running applications with the ability to terminate them
Displays the screen contents of the connected device (while an application
is running)
Settings of the function MirrorLink ™
List of certified applications
Other pages with applications (by running your finger sideways across the
screen or by turning the dial, the next page can be displayed )
Return to the main menu of the MirrorLink ™
connection from another device
menu
› To return to the main menu of the MirrorLink ™
connection (e.g. from the
menu Radio), press the key
→ MirrorLink™ .
Disconnection
› Disconnect the device from the USB input.
or
› In the main menu of the MirrorLink ™
connection press the function key .
The connection will be terminated and the main menu SmartLink is displayed
» Fig. 37 on page 53 -
.
ABOperationFig. 42
Example of a running application
Start the application
›
In the main menu of the MirrorLink ™
connection select the desired applica-
tion.
The application starts and the following function keys are displayed » Fig. 42.
If there is only one available application it will be started automatically after
the MirrorLink ™
connection is established.
A
- Operation of the MirrorLink ™
connection
Return to the main menu of the MirrorLink ™
connection
Keyboard display
Masking the function keys Displays the function keys right / left / lower
B
- Using the connected device, as well as the running application
Depending on the type of the connected device, as well as the current running
application, various function keys of the connected device can be displayed (at
the most three at the same time).
Display hidden function keys › If the icon can be seen in the device screen when the function keys are mut-
ed then press the controller
.
Display of the running application
› In the list of applications, press the function key
» Fig. 41 on page 57 .
Ending the current application
› Press the function key
→
.
› Press the function key of the desired application with the symbol
.
By pressing the function key Close all, all running applications are closed.
58SmartLink
Page 62 of 100
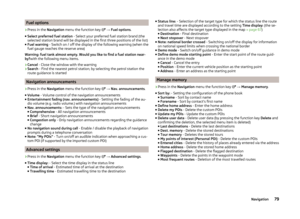
 Columbus Infotainment System Manual Function problemsIf problems occur with the MirrorLink™
connection, then one of the following
messages may occur in the display.MessageMeaning…: MirrorLink™ connection not available.Check the c")
Function problemsIf problems occur with the MirrorLink™
connection, then one of the following
messages may occur in the display.MessageMeaning…: MirrorLink™ connection not available.Check the connection to the USB input.Error: MirrorLink™Error: transferDisconnect the device and reconnect to the USB input.MirrorLink™ Audio is not available.A problem with the playback of audio files. Disconnect the device and recon-
nect.MirrorLink™ availability on this mobile device is restricted.The MirrorLink ™
version of the connected device is supported by the device on-
ly when the vehicle is not moving.Connection failed. MirrorLink™ is not supported by this mobile device.The connected device is not supported.The mobile device is locked. Please unlock the mobile device in order to use
MirrorLink™“Unlock” the connected device.The app is unavailable while the vehicle is in motion.
The application is only available when the vehicle is stationary.
The app is unavailable while the vehicle is in motion. The app is not certified
or the certification restricts use while the vehicle is in motion.App is not compatible.The application is not certified.The app is unavailable while the vehicle is in motion. The app is not available
in this country.In the country of operation, the application is available only when the vehicle is
at a standstill.Unable to start app or app not working.A problem with the start of the application. Disconnect the device and recon-
nect to the USB input.No compatible apps found on this mobile device. This device may not support
MirrorLink™.There is no certified MirrorLink ™
application available in the device.59SmartLink
Page 63 of 100
 Columbus Infotainment System Manual Navigation
Navigation description
Introduction
This chapter contains information on the following subjects:
GPS satellite signal
60
Navigation data
60
Main menu
60
Pop-up windows
61
GPS satellite s")
Navigation
Navigation description
Introduction
This chapter contains information on the following subjects:
GPS satellite signal
60
Navigation data
60
Main menu
60
Pop-up windows
61
GPS satellite signal
The unit uses the GPS (Global Positioning System) satellite signal for route
guidance.
Outside the range of the GPS satellite signal (e.g. in dense vegetation, in tun-
nels, parking garages, etc.), the unit navigates only with restrictions using
some on-vehicle sensors (such as speed sensor or steering angle sensor).
The unit offers the possibility to show in the split screen display the following
Position » Fig. 44 on page 61 information about the current geographical po-
sition of the vehicle and the satellite signal.
Geographical longitude
Geographical latitude
Elevation
Number of received/available satellites
To view the information on the longitude and latitude of the current vehicle
position display requires the reception of GPS signals from at least three satel-
lites.
To view the elevation information of the current vehicle position display re-
quires the reception of GPS signals from at least five satellites.
Navigation data
Navigation data source
The navigation data is stored in the internal memory.
Finding out the version of the navigation data › Press in the
Navigation menu the function key
→ Version information .
Update navigation data
We recommend that you update the navigation data on a regular basis (e.g.
Due to newly developed roads and changed traffic signs etc.).
For information on how to update the navigation data ask a ŠKODA partner or
go to the following ŠKODA website.
http://infotainment.skoda-auto.com
Main menu
Fig. 43
Navigation: Home menu
›
Press the button.
The Navigation main menu opens » Fig. 43.
If no map is displayed, then press the key
again.
Description of the function keys
A
Entering a new destination, ending the route guidance, route information,
entering a traffic obstruction, route change in the map
Storing of a destination flag, list of stored destinations, home address
Tour input / tour edit, tour memory
POI input / POI search
Map presentation options Operation of the radio / media playback
Navigation settings
60Navigation
Page 64 of 100
 Columbus Infotainment System Manual Pop-up windowsFig. 44
Extra window
Switch display on/off
›
Press in the Navigation menu the function key
→ Split screen .
The split screen can also be switched off by operating the fu")
Pop-up windowsFig. 44
Extra window
Switch display on/off
›
Press in the Navigation menu the function key
→ Split screen .
The split screen can also be switched off by operating the function key.
Select split screen content
In the split screen
A
» Fig. 44 it is possible to display some additional informa-
tion.
› Press the function key
.
› One of the following menu options are available, depending on the context.
■ Audio - Operating the radio / media / TV playback
■ Compass - Displays the current vehicle location in relation to the compass di-
rections
■ Frequent routes - Display of the three most frequently travelled routes
■ Manoeuvre - Display driving recommendations graphically
■ Waypoint tour - Display of waypoints
■ Position - Displays the geographical coordinates of the current vehicle loca-
tion
■ Map - Display the preview map
New destination
Introduction
This chapter contains information on the following subjects:
Enter the destination address
61
Enter POI
62
Enter destination on the map
62Enter destination via GPS coordinates62Enter destination in route62
This chapter covers the input options for a new destination target.
Enter the destination address
Fig. 45
List of places found
›
If no guidance takes place, then in the menu Navigation, press the function
key .
›
If
guidance takes place, then in the menu Navigation, press the function key
→ New dest./stopover .
›
Enter the address and confirm (when entering, the address can be checked in
the map by pressing the function key Map).
›
Press the function key Start.
If the menu setting for the alternative routes is turned on, the guidance for
this route type (economic / fast / short) must be selected before starting.
If the destination entry occurs during route guidance, the destination change
must be confirmed by pressing the function key Start in addition to confirming
in the following menu that appears.
While entering the address, the device provides a priority of places which have
been entered before. The list of these places can be deleted as follows.
› Press in the
Navigation menu the function key
→ Manage memory → De-
lete user data → Entered cities .
If in the country you entered there are several places with the same name,
then when you type, depending on the number of places found, a map will be
displayed with a list of the places » Fig. 45. This map can also be shown by
pressing the function key
» Fig. 5 on page 10 .
61Navigation