Page 130 of 229
130 Use AUX
Equipment by type
Use AUX
By connecting AUX devices to this product,
you can input audio from these devices to
the product and play it back.
CAUTION
• Video from AUX devices cannot be
viewed.
• If this is used with the engine stopped,
it may run down the battery and make it
impossible to start the engine.
ADVICE
• Please refer to your vehicle's user
manual regarding how to connect AUX
devices.
Outputting Audio
1Press the MODE key.
This displays the mode.
2Touch AUX .
▼
This outputs the audio from the AUX device.
Page 131 of 229
Calendar
131
INFO/SETTINGS INFO
INFO/SETTINGS
INFO
Calendar
This displays the calendar. You can check
and set special days and anniversaries.
Displaying
1Press the INFO key.
This displays the info menu.
2Touch Calendar .
▼
This displays the calendar.
NOTE
• Icons are displayed for days set as
special days or anniversaries.
• If one day is set as both a special day
and an anniversary, the special day icon
has priority.
Page 136 of 229
136 User SD
User SD
If the audio SD card is inserted in this
device, you can check the SD card capacity
and space available. You can also perform
various information updates.
Displaying
1Press the INFO key.
This displays the info menu.
2Touch User SD .
▼
This displays the User SD information screen.
You can check the SD card capacity and
available space.
ADVICE
• If an audio SD card containing the
map database for updating is inserted,
you can update the map database by
touching [Update map database].
Page 138 of 229

138 Trip
Equipment by type
Trip
You can check and set trip information.
Displaying
1Press the INFO key.
This displays the info menu.
2Touch Trip .
▼
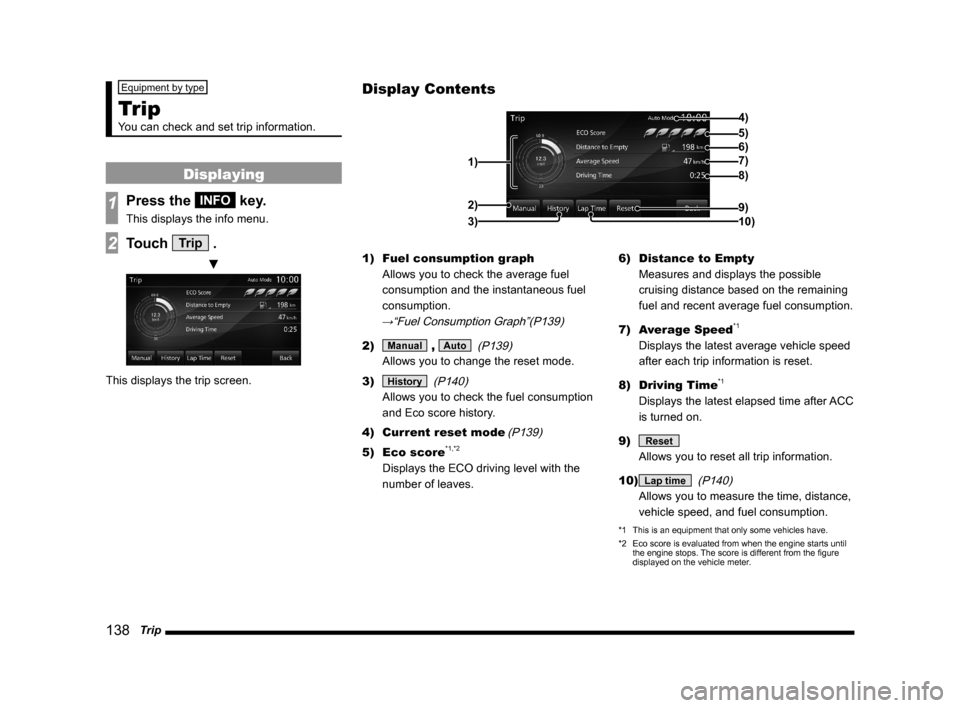
This displays the trip screen.1) Fuel consumption graph
Allows you to check the average fuel
consumption and the instantaneous fuel
consumption.
→“Fuel Consumption Graph”(P139)
2) Manual , Auto
(P139)
Allows you to change the reset mode.
3)
History
(P140)
Allows you to check the fuel consumption
and Eco score history.
4) Current reset mode
(P139)
5) Eco score*1,*2
Displays the ECO driving level with the
number of leaves.6) Distance to Empty
Measures and displays the possible
cruising distance based on the remaining
fuel and recent average fuel consumption.
7) Average Speed
*1
Displays the latest average vehicle speed
after each trip information is reset.
8) Driving Time
*1
Displays the latest elapsed time after ACC
is turned on.
9)
Reset
Allows you to reset all trip information.
10)
Lap time
(P140)
Allows you to measure the time, distance,
vehicle speed, and fuel consumption.
*1 This is an equipment that only some vehicles have.
*2 Eco score is evaluated from when the engine starts until
the engine stops. The score is different from the fi gure
displayed on the vehicle meter.
Display Contents
4)
6)5)
7)
8)
9)
10) 1)2)
3)
Page 141 of 229
Trip
141
INFO/SETTINGS INFO
3Touch Lap .
▼
The current measurement results are
recorded in “A”.
4Touch Stop .
▼
The measurement is stopped and the
measurement results are recorded in the
totals list.
ADVICE
• In Step 3, if you touch [Lap] again, the
measurement results in “A” are recorded
in “B”, and the previous measurement
results are recorded in “A”. In this
way, each time you touch “Lap”, the
measurement results are moved down
“A”, “B”, “C”, and “D”.
• After stopping in Step 4, if you touch
[Start], measurement resumes.
NOTE
• During measurement, if you switch
the ignition key to OFF, measurement
is stopped. At this time, if you return
the ignition key to ON, measurement
resumes.
Delete Lap Times
This deletes the recorded measurement
results.
1On the lap time screen, touch
Reset .
▼
Deletion of the recorded measurement results
is complete.
Page 142 of 229

142 Air Conditioner
Air Conditioner
You can check the air conditioner status.
(Only on vehicles that support this function)
Displaying
1Press the INFO key.
This displays the info menu.
2Touch Air Conditioner .
▼
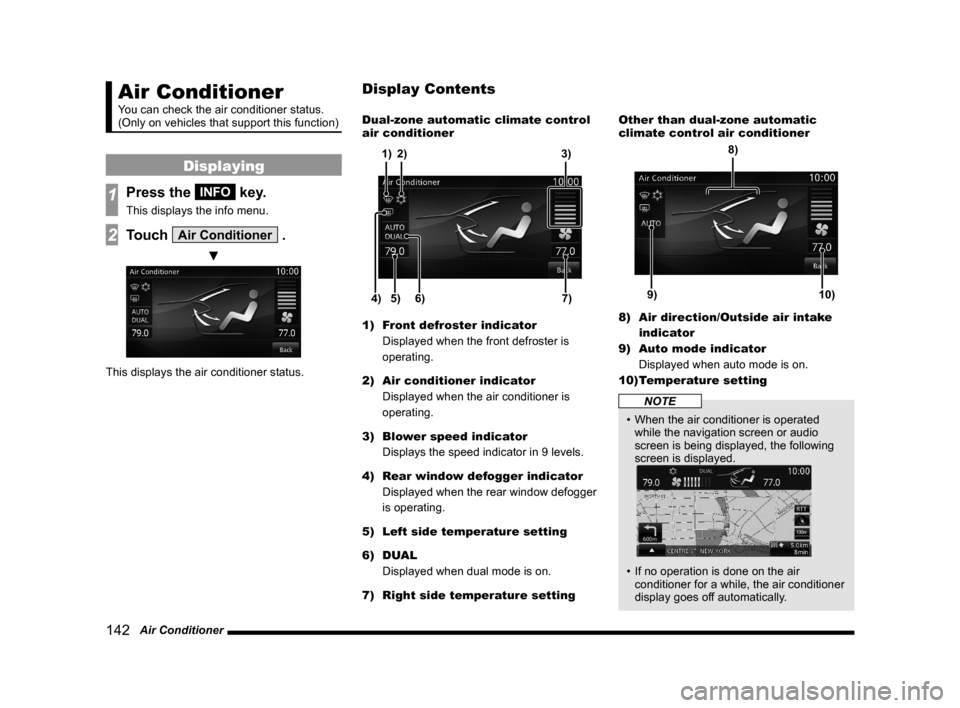
This displays the air conditioner status.Dual-zone automatic climate control
air conditioner
5) 6)4)7) 3)
2) 1)
1) Front defroster indicator
Displayed when the front defroster is
operating.
2) Air conditioner indicator
Displayed when the air conditioner is
operating.
3) Blower speed indicator
Displays the speed indicator in 9 levels.
4) Rear window defogger indicator
Displayed when the rear window defogger
is operating.
5) Left side temperature setting
6) DUAL
Displayed when dual mode is on.
7) Right side temperature settingOther than dual-zone automatic
climate control air conditioner
9)10)
8)
8) Air direction/Outside air intake
indicator
9) Auto mode indicator
Displayed when auto mode is on.
10) Temperature setting
NOTE
• When the air conditioner is operated
while the navigation screen or audio
screen is being displayed, the following
screen is displayed.
• If no operation is done on the air
conditioner for a while, the air conditioner
display goes off automatically.
Display Contents
Page 143 of 229

GPS Information
143
INFO/SETTINGS INFO
GPS Information
You can check the name of the current
location, its latitude/longitude, the number
of GPS satellites being received, and a map
of satellite locations.
Displaying
1Press the INFO key.
This displays the info menu.
2Touch GPS Information. .
▼
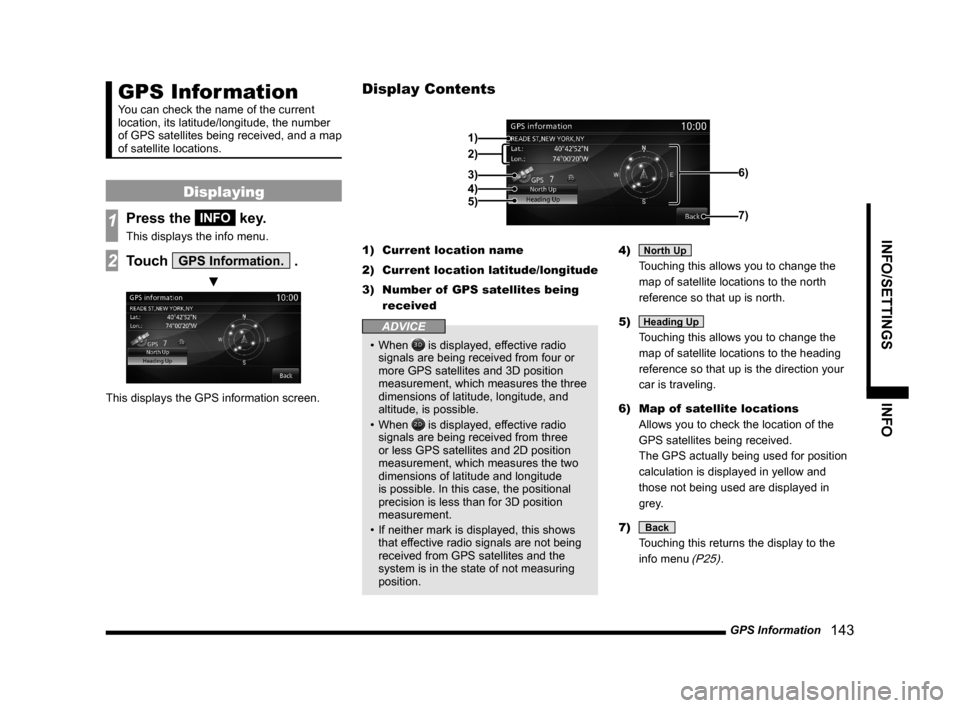
This displays the GPS information screen.1) Current location name
2) Current location latitude/longitude
3) Number of GPS satellites being
received
ADVICE
• When is displayed, effective radio
signals are being received from four or
more GPS satellites and 3D position
measurement, which measures the three
dimensions of latitude, longitude, and
altitude, is possible.
• When
is displayed, effective radio
signals are being received from three
or less GPS satellites and 2D position
measurement, which measures the two
dimensions of latitude and longitude
is possible. In this case, the positional
precision is less than for 3D position
measurement.
• If neither mark is displayed, this shows
that effective radio signals are not being
received from GPS satellites and the
system is in the state of not measuring
position.4)
North Up
Touching this allows you to change the
map of satellite locations to the north
reference so that up is north.
5)
Heading Up
Touching this allows you to change the
map of satellite locations to the heading
reference so that up is the direction your
car is traveling.
6) Map of satellite locations
Allows you to check the location of the
GPS satellites being received.
The GPS actually being used for position
calculation is displayed in yellow and
those not being used are displayed in
grey.
7)
Back
Touching this returns the display to the
info menu
(P25).
Display Contents
2)
3)
4)
5)
1)
6)
7)
Page 145 of 229

Mobile Phone
145
INFO/SETTINGS INFO
Equipment by type
(Vehicles with a Bluetooth® 2.0 interface).
Mobile Phone
Connecting your mobile phone to this
product with Bluetooth lets you use the
hands-free function.
WARNING
• The driver should not hold the mobile
phone in their hand while driving.
• Do not leave your mobile phone
unattended in the vehicle. If your mobile
phone rolls underfoot when you stop
the vehicle or when you go around a
curve and it get under the brake pedal,
it can interfere with driving and cause an
accident.
Connect Your Mobile Phone
This product and your mobile phone use the
Bluetooth function to connect.
For details on how to connect, refer to
“Bluetooth Setting”(P213).
Operation methods below describe situations
once connection has been completed.
NOTE
• This requires a mobile phone that can be
connected to the Bluetooth.
• For the equipment supported, refer to the
vehicle's user manual.
• Cancel functions such as the mobile
phone “dial lock”, and connect while on
the standby screen.
• Some equipment cannot be connected.
Display the Phonebook
There is the vehicle phonebook registered in
this product and the mobile phonebook that
can draw on the data in your mobile phone.
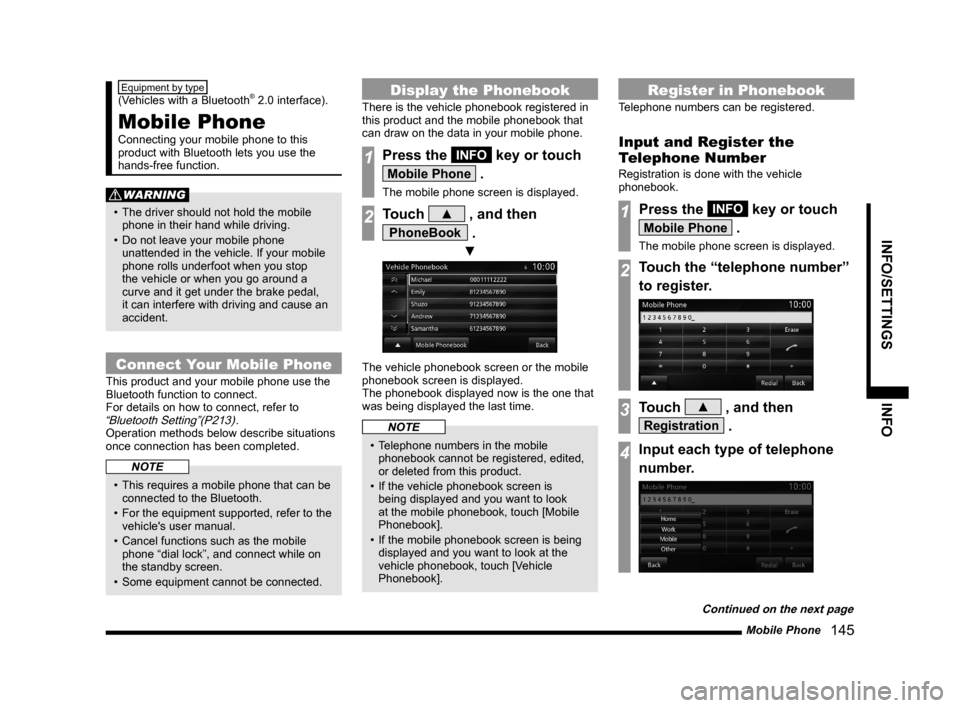
1Press the INFO key or touch
Mobile Phone .
The mobile phone screen is displayed.
2Touch ▲ , and then
PhoneBook .
▼
The vehicle phonebook screen or the mobile
phonebook screen is displayed.
The phonebook displayed now is the one that
was being displayed the last time.
NOTE
• Telephone numbers in the mobile
phonebook cannot be registered, edited,
or deleted from this product.
• If the vehicle phonebook screen is
being displayed and you want to look
at the mobile phonebook, touch [Mobile
Phonebook].
• If the mobile phonebook screen is being
displayed and you want to look at the
vehicle phonebook, touch [Vehicle
Phonebook].
Register in Phonebook
Telephone numbers can be registered.
Input and Register the
Telephone Number
Registration is done with the vehicle
phonebook.
1Press the INFO key or touch
Mobile Phone .
The mobile phone screen is displayed.
2Touch the “telephone number”
to register.
3Touch ▲ , and then
Registration .
4Input each type of telephone
number.
Continued on the next page