2015 MERCEDES-BENZ SLS AMG GT ROADSTER engine
[x] Cancel search: enginePage 224 of 290
X
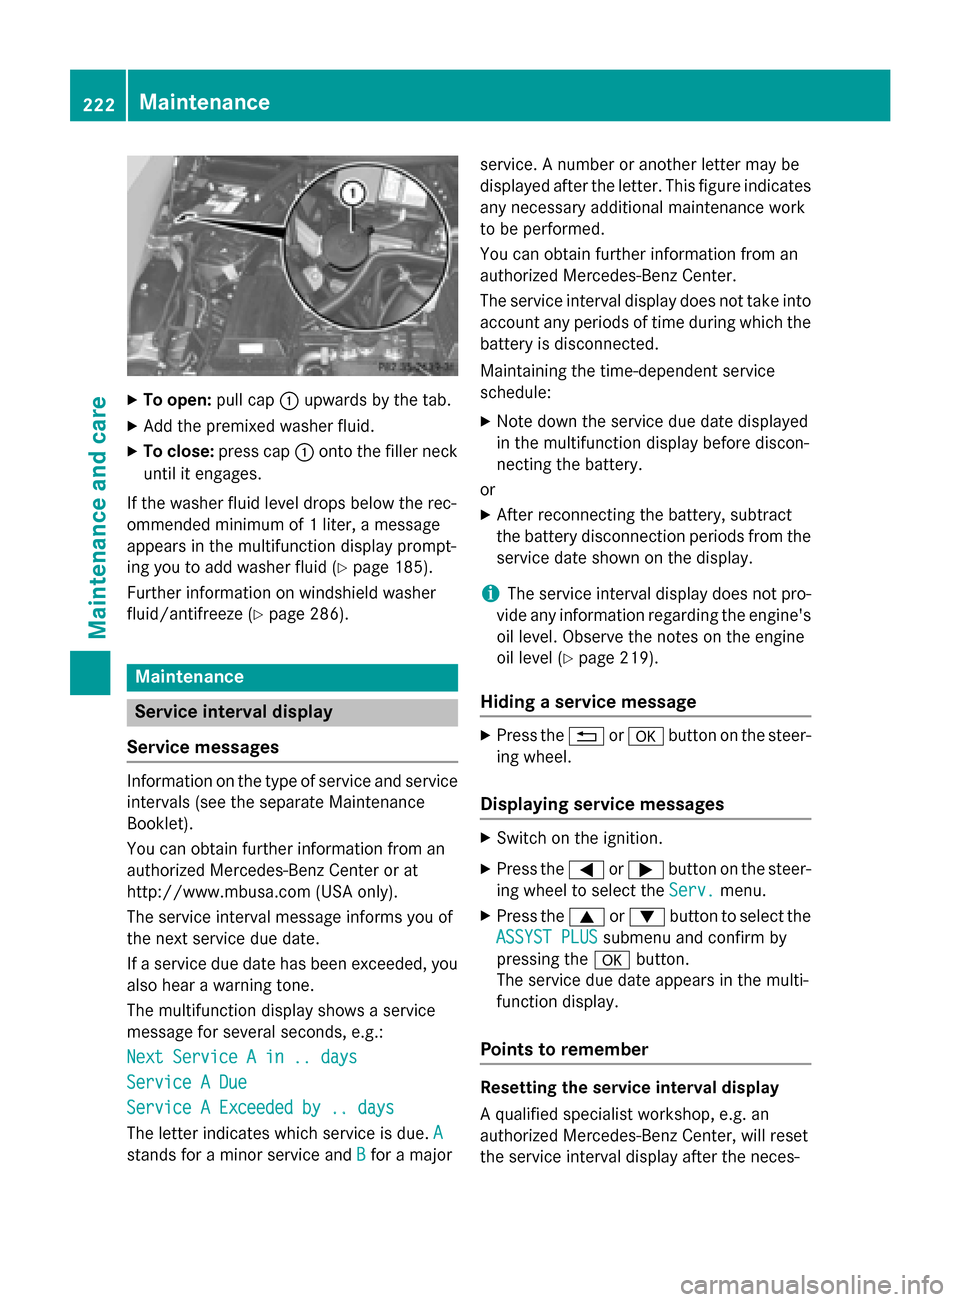
To open: pull cap0043upwards by the tab.
X Add the premixe dwashe rfluid.
X To close: press cap 0043onto the fille rneck
unti lite ngages.
If the washe rfluid level drops belo wthe rec-
ommended minimu mof1liter, am essage
appear sinthe multifunctio ndisplay prompt-
ing yo utoaddwashe rfluid (Y page 185).
Further informatio nonwindshield washer
fluid/antifreeze (Y page 286).Maintenance
Service interval display
Service messages Informatio
nonthe typ eofserviceand service
intervals (see the separate Maintenance
Booklet).
Yo uc an obtai nfurthe rinformatio nfrom an
authorize dMercedes-Benz Center or at
http://www.mbusa.com (USA only).
The servic einterva lmessage informs yo uof
the next servic eduedate.
If as ervic eduedate ha sbeene xceeded ,you
also hea rawarning tone.
The multifunctio ndisplay shows aservice
message for severa lseconds, e.g.:
Nex tServic eAin..d ays
Nex tServic eAin..d ays
Servic eADue
Servic eADue
Servic eAExceeded by .. days
Servic eAExceeded by .. days
The letter indicates which servic eisdue.A A
stands for aminorservic eand B
Bfor am ajor service.
Anumbe roranother letter ma ybe
displayed after the letter. Thi sfigur eindicates
any necessary additional maintenance work
to be performed.
Yo uc an obtai nfurthe rinformatio nfrom an
authorize dMercedes-Benz Center.
The servic einterva ldisplay does not take into
account any periods of time during which the battery is disconnected.
Maintaining the time-dependent service
schedule:
X Note down the servic eduedate displayed
in the multifunctio ndisplay before discon-
necting the battery.
or
X After reconnecting the battery ,sub tract
the battery disconnectio nperiods from the
servic edates hown on the display.
i The servic
einterva ldisplay does not pro-
vid eany informatio nregarding the engine's
oi llev el.O bserv ethe notes on the engine
oi llev el (Y page 219).
Hiding aservice message X
Press the 0038or0076 button on the steer-
ing wheel.
Displaying service messages X
Switch on the ignition.
X Press the 0059or0065 button on the steer-
ing whee ltoselect the Serv. Serv.menu.
X Press the 0063or0064 button to select the
ASSYST PLUS
ASSYST PLUS submenu and confirm by
pressing the 0076button.
The servic eduedate appear sinthe multi-
functio ndisplay.
Points to remember Resetting the service interval display
Aq
uali fied specialist workshop ,e.g.an
authorize dMercedes-Benz Center, will reset
the servic einterva ldisplay after the neces- 222
MaintenanceMaintenance and care
Page 225 of 290
sary service work has been carried out. You
can also obtain further information on main-
tenancew ork, for example.
! If the service interval displayh
as been
reset unintentionally,h ave the setting cor-
rected at aMercedes-Benz Center.
Have service work carried out as described in the Maintenance Booklet. This may oth-
erwise lead to increased wear and damage
to the major assemblies or the vehicle.
Special service requirements
The specified maintenance interval takes only the normal operation of the vehicle into
account. Under arduouso perating conditions
or increased load on the vehicle, mainte-
nance work must be carried out more fre-
quently, for example:
R regularc ity driving with frequent intermedi-
ate stops
R if the vehicle is primarily used to travel
short distances
R use in mountainous terrain or on poor road
surfaces
R if the engine is often left idling for long peri-
ods
Under these or similarc onditions, have, for
example, the air filter, engine oil and oil filter
replaced or changed more frequently. Under
arduouso perating conditions, the tires must
be checked more often. Further information
can be obtained at aqualified specialist work-
shop, e.g. an authorized Mercedes-Benz
Center.
Driving abroad
An extensive Mercedes-Benz Service network is also available in other countries. You can
obtain further information from any author-
ized Mercedes-Benz Center. Care
General notes
Regular care of your vehicle is acondition for
retaining the quality in the long term.
Use care products and cleaning agents rec-
ommended and approved by Mercedes-Benz.
! For cleaning your vehicle, do not use any
of the following:
R dry, rough or hard cloths
R abrasive cleaning agents
R solvents
R cleaning agents containing solvents
Do not scrub.
Do not touch the surfaces or protective
films with hard objects, e.g. aring or ice
scraper. You could otherwise scratch or
damage the surfaces and protective film. H
Environmental note
Dispose of empty packaging and cleaning
cloths in an environmentally responsible man-
ner.
! Do not park the vehicle for an extended
period straight after cleaning it, particularly after having cleaned the wheels with wheel cleaner. Wheel cleaners could cause
increased corrosion of the brake discs and
brake pads/linings. For this reason, you
should drive for afew minutes after clean-
ing. Braking heats the brake discs and the
brake pads/linings, thus drying them. The
vehicle can then be parked. Exterior care
Automatic car wash G
WARNING
Braking efficiency is reduced after washing
the vehicle. There is arisk of an accident.
After the vehicle has been washed, brake
carefully while paying attention to the traffic
conditions until full braking power is restored. Care
223Maintenance and care Z
Page 226 of 290
You can wash the vehicle in an automatic car
wash fro mthe very start.
If the vehicle is very dirty, pre-wash it before
cleaning it in an automatic car wash.
! Never clean your vehicle in
aTouchless
Automatic Car Wash as these use special
cleaning agents. These cleaning agent scan
damage the paintwork or plastic parts.
! When washing your vehicle in
atow-
through car wash, use the SmartKey
instead of the Start/Stop button.
Start the engin eusing the SmartKey.. Move
the transmission to Nwith the E-SELECT
lever .Use the SmartKey to switc hthe
engin eoff again and the nturn the Smart-
Key to position 2.Make sure that you then
leave the SmartKey in position 2.You may
otherwise damage the vehicle, the trans-
missio northe car wash.
Check the transmission position in the
instrumen tcluster.
! Use the E‑SELECT lever to shift the trans-
missio ntoNbefore switching the engine
off .Ify ou open the driver's or front-
passenger door, the transmission remains
in this position for up to 30 minutes if the
SmartKey is in the ignition, even if the
engin eisswitched off .Ifyou do not shift the
transmission to Nusing the E‑SELECT lever
beforehand, it shift sautomatically to park-
ing position Pand lock sthe wheels if the
driver's or front-passenge rdoor is opened
and the engin eisswitched off .This may
damage the vehicle, the transmission or
the car wash.
Observe the information on maneuvering
(Y page 131). !
Before drivin
gintoana utomatic car wash,
make sure that it is suitable for the dimen- sion soft he vehicle. In particular, make
sure that:
R there is enough groun dclearance
betwee nthe vehicle underbody and the
guide rails of the automatic car wash.
R the clearance width of the automatic car
wash is sufficient ,particularly the width
of the guide rails.
R you enter the automatic car wash
straight and in the center of the guide
rails in order to avoid damagin gthe tires
or wheel rims.
Fold in the exterior mirrors befor ethe vehi-
cle is washed. The exterior mirrors could
otherwise be damaged.
! Make sure that:
R the side windows and the roof are com-
pletely closed
R the climat econtrol blower is switched off
R the windshield wiper switc hisatposition
0
The vehicle could otherwise be damaged.
! In portal car washes, the windshield wip-
ers may be move dupthe windshield by the
cleaning brushes when the ignition is
switched off.
Set the Start/Stop button to key position 2
to reset the windshield wipers to their orig-
inal position.
! Preferably use automatic car washes with
adjustable high-pressure pre-cleaning. This corresponds with the specification for the
Cabriolet program. In car washes that use
high water pressures, there is arisk that a
small amount of water may leak int othe
vehicle.
! Cabriolet:
do not treat the vehicle with
hot wax under any circumstances.
After using an automatic car wash, wipe off
wax and drying agent sfromt he windshield
and the wiper blades. This will prevent smears 224
CareMaintenance and care
Page 230 of 290
!
Do not clean wiper blades too often and
do not rub them too hard. Otherwise, the
graphite coating could be damaged. This
could cause wiper noise.
X Switch off the engine.
X Remove your foot from the brake pedal.
X Set the windshieldw iper to the00AAposi-
tion on the combination switch.
X Press the Start/Stop button repeatedly
until the windshieldw iper starts.
X When the wiper arms have reached aver-
tical position, press the Start/Stop button.
X Fold the wiper arm awayf rom the wind-
shield until it engages.
X Set the wiper bladeatr ight angles to the
wiper arm.
X Carefully clean the wiper blades with a
damp cloth.
X Fold the windshieldw iper arms back again
before switching on the ignition.
! Hold the wiper arm securely when folding
back. The windshieldc ould be damagedif
the wiper arm smacks against it suddenly.
Cleaning the exterior lighting X
Cleant he plastic lenses of the exterior
lighting using awet sponge and amild
cleaning agent, e.g. Mercedes-Benz car
shampoo or cleaning cloths.
! Only use cleaning agents or cleaning
cloths which are suitablef or plastic light
lenses. Unsuitable cleaning agents or
cleaning cloths could scratch or damage
the plastic light lenses.
Cleaning the mirror turns ignals!
Only use cleaning agents or cleaning
cloths that are suitablef or plastic lenses.
Unsuitable cleaning agents or cleaning
cloths could scratch or damage the plastic
lenses of the mirror turn signals.
X Cleant he plastic lenses of the mirror turn
signals in the exterior mirror housing using aw
et sponge and amild cleaning agent,
e.g. Mercedes-Benz car shampoo or clean-
ing cloths.
Cleaning the sensors !
If you clean the sensors with
apower
washer, make sure that you keep adis-
tance of at least 11.8 in (30 cm) between
the vehicle and the power washer nozzle.
Information aboutt he correct distance is
available from the equipment manufac-
turer. X
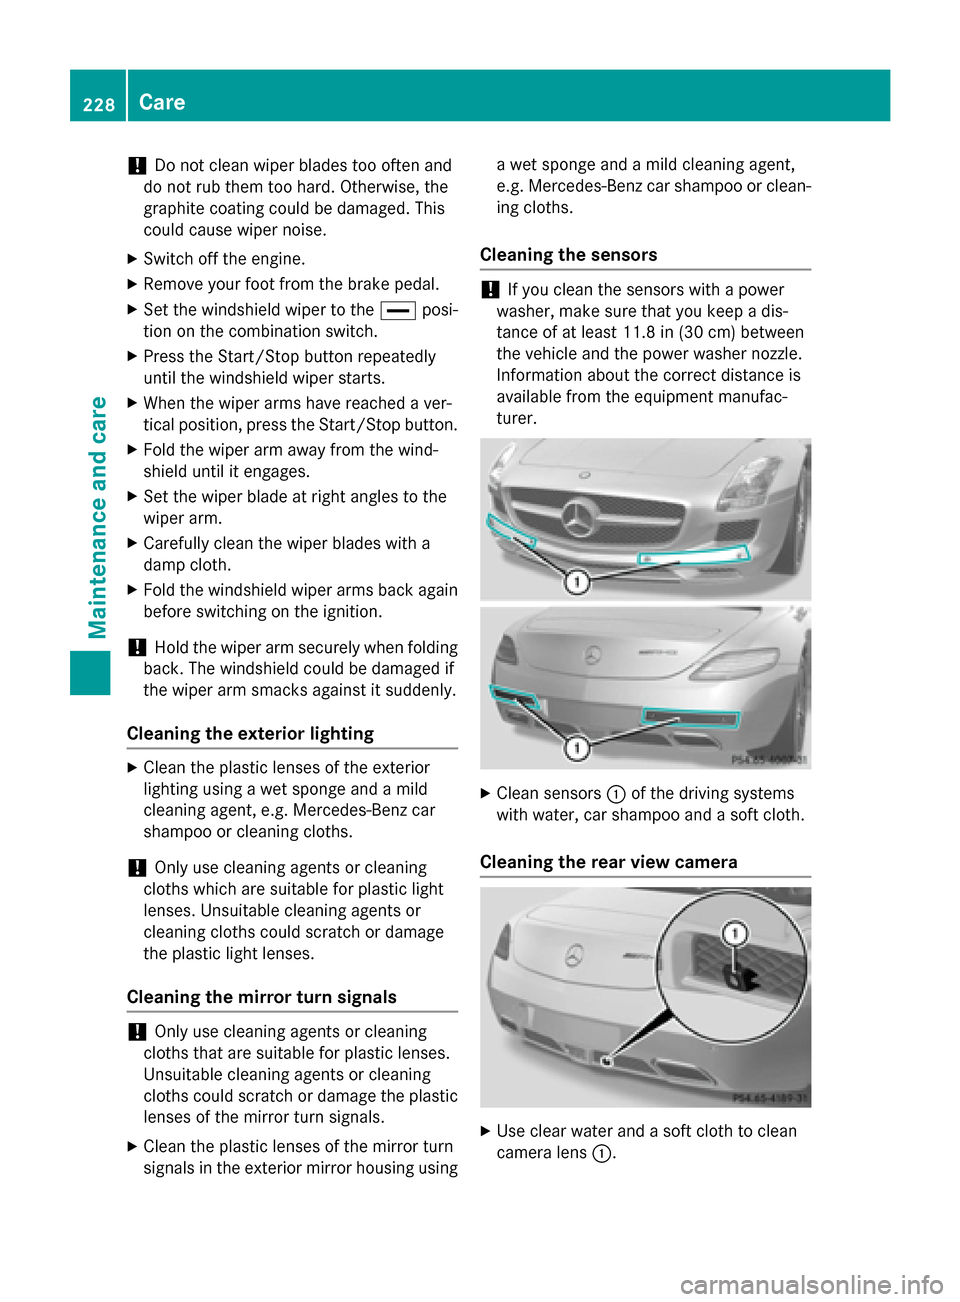
Cleans ensors0043of the driving systems
with water, car shampoo and asoft cloth.
Cleaning the rear view camera X
Use clear water and asoft cloth to clean
camera lens 0043.228
CareMaintenance and care
Page 237 of 290
X
Remove th ejackf romt heleft-han dstow-
age spac einthetrunk to allow th estowage
compartmen ttobeopened.
X Turn fastener 0044in th edirection of the
arrow.
X Ope nstowage compartment 0043.
X Remove th eTIREFI Tkit,w hee lchock ,align-
men tbolt and gloves. Flat tire
Preparing th
evehicle
Your vehicl eisequipped wit haTIREFI Tkit.
X Stop th evehicl eons olid, non-slipper yand
level ground ,asfar away as possibl efrom
traffic.
X Switc hont hehazard warnin glamps.
X Apply th eelectric parkin gbrak em anually
(Y page 133).
X Brin gthe fron twheels into th estraight-
ahead position.
X Shift th etransmission to Pwit hthe button
in th ecenter console.
X Switc hoff th eengine.
X Remove th eSmartKey from th eignition
lock.
X Allo ccupant smustg et out of th evehicle.
Mak esuret hatthe ya re no tend angered as
they do so.
X Mak esuret hatnoo neis near th edanger
area while awhee lisb eingchanged. Any-
on ew ho is no tdirectl yassistin ginthe
whee lcha ng es hould, for example, stand
behind th ebarrier.
X Get out of th evehicle. Pay attention to traf-
fic condition swhen doin gso.
X Clos ethe driver's door. TIREFIT kit
Usin gthe TIREFIT kit TIREFI
Tisat ires ealant.
You can use TIREFI Ttoseal punctures of up to
0.16 in (4 mm), particularly those in th etire
tread. You can use TIREFI Tatoutside tem-
peratures down to 00F84‡(00F820 †). G
WARNING
In th efollowin gsituations, th etires ealant is
unable to provid esufficien tbreakdown assis-
tance ,asitisu nable to seal th etirep roperly:
R there are cut sorpunctures in th etirel arger
than those mentioned above.
R thew hee lrim is damaged.
R you hav edriven at ver ylow tire pressures or
on aflat tire.
There is ariskofana ccident.
Do no tdrive th evehicle. Contac taqualified
specialist workshop. G
WARNING
The tire sealant is harmful and causes irrita-
tion .Itm ustn otcome into contact wit hyour
skin ,eyes or clothin gorbeswallowed .Donot
inhale TIREFI Tfumes. Kee ptires ealant away
from children .There is ariskofi njury.
If you come into contact wit hthe tire sealant,
observ ethe following:
R Rinse off th etires ealant from your skin
immediately wit hwater.
R If th etires ealant comes into contact with
your eyes ,immediately rinse them thor-
oughly wit hclean water.
R If tire sealant is swallowed ,immediately
rinse your mout hout thoroughl yand drink
plenty of water. Do no tind ucev omiting,
and see kmedica lattention immediately.
R Immediately chang eout of clothin gwhich
has come into contact wit htires ealant.
R If an allergic reaction occurs, see kmedical
attention immediately. Flat ti
re
235Breakdo wn assis tance Z
Page 239 of 290
you should start th
eengineu nless you are
inflatin gthe tire in an enclosed space. X
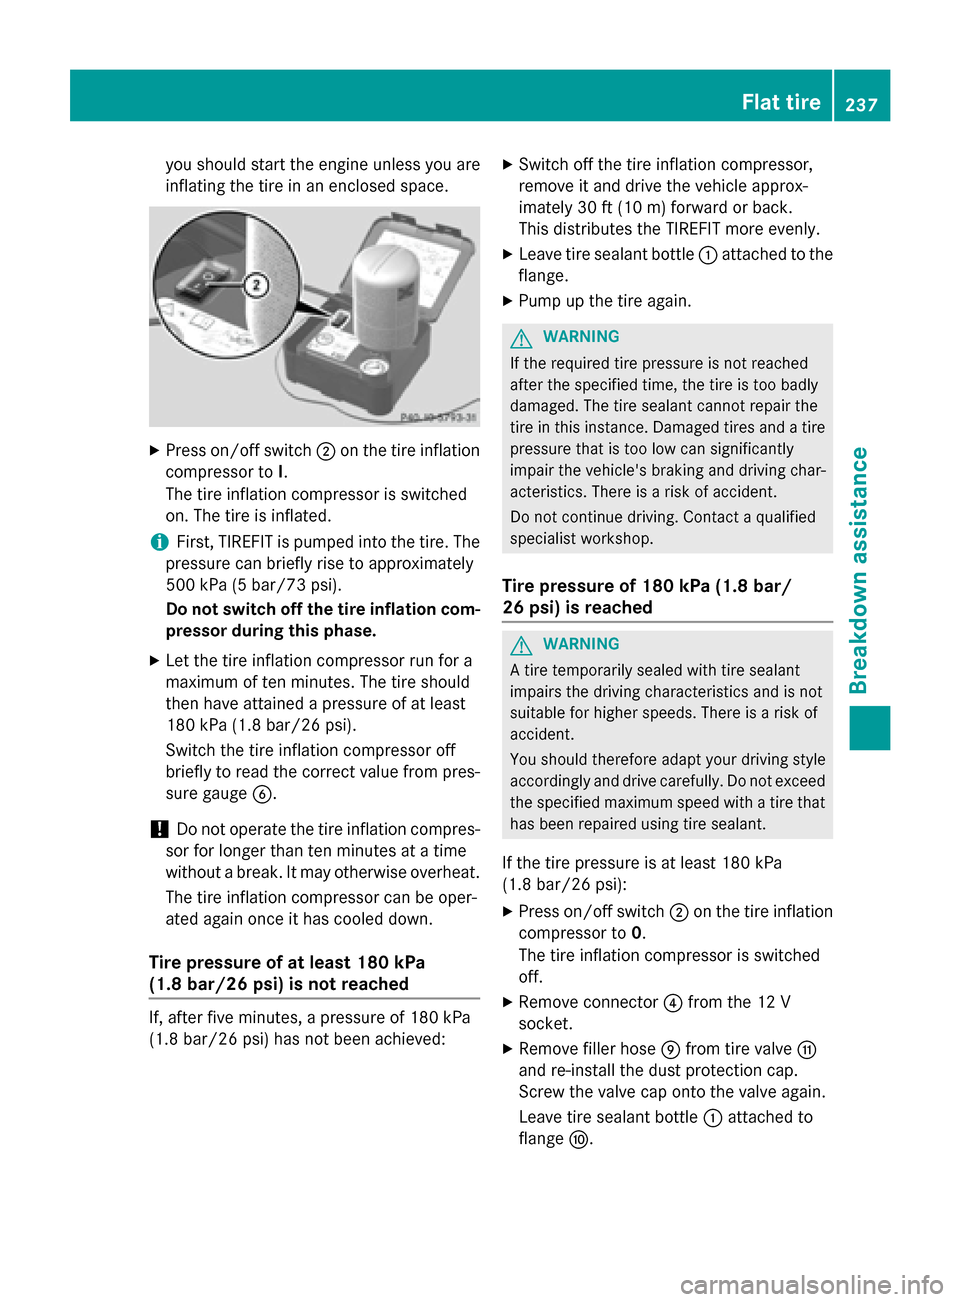
Press on/off switch 0044on th etirei nflation
compressor to I.
The tire inflation compressor is switched
on .The tire is inflated.
i First
,TIREFI Tisp umped into th etire. The
pressur ecan briefl yrisetoa pproximately
50 0k Pa(5 bar/73 psi).
Do not switch off th etirei nflation com-
pressor during this phase.
X Let th etirei nflation compressor run fo ra
maximum of te nminutes. The tire should
then hav eattained apressur eofatl east
18 0k Pa (1.8 ba r/26psi).
Switch the tire inflation compressor off
briefly to read the correct value from pres- sure gauge 0084.
! Do not operate the tire inflation compres-
sor for longe rthan ten minute satatime
without abreak. It may otherwise overheat.
The tire inflation compressor can be oper-
ated again once it has coole ddown.
Tire pressure of at leas t180 kPa
(1.8 bar/2 6psi) is not reached If, after five minutes,
apressure of 180 kPa
(1.8 bar/26 psi )has not bee nachieved: X
Switch off the tire inflation compressor,
remove it and drive the vehicle approx-
imately 30 ft (10 m) forward or back.
Thi sd istributes the TIREFIT more evenly.
X Leave tire sealant bottle 0043attache dtothe
flange.
X Pump up the tire again. G
WARNING
If the required tire pressure is not reached
after the specified time, the tire is too badly
damaged. The tire sealant cannot repair the
tire in this instance. Damaged tires and atire
pressure that is too low can significantly
impair the vehicle's braking and driving char-
acteristics. There is arisk of accident.
Do not continue driving. Contact aqualified
specialist workshop.
Tire pressure of 180 kPa (1.8 bar/
26 psi) is reached G
WARNING
At ire temporarily sealed with tire sealant
impairs the driving characteristics and is not
suitabl efor higher speeds. There is arisk of
accident.
You should therefore adapt you rdriving style
accordingl yand drive carefully .Donot exceed
the specified maximu mspee dwithatire that
has bee nrepaired using tire sealant.
If the tire pressure is at least 180 kPa
(1.8 bar/26 psi): X Press on/off switch 0044on the tire inflation
compressor to 0.
The tire inflation compressor is switched
off.
X Remove connector 0085from the 12 V
socket.
X Remove filler hose 006Dfrom tire valve 006F
and re-instal lthe dus tprotectio ncap.
Screw the valve cap onto the valve again.
Leave tire sealant bottle 0043attache dto
flange 006E. Flat tire
237Breakdow nassistance Z
Page 241 of 290
In the event of
ashort circuit or asimilar inci-
dent, contact aqualifieds pecialist workshop
immediately.Don ot drive any further. You
shouldh ave all work involving the battery car-
ried out at aqualifieds pecialist workshop. G
WARNING
Electrostatic build-up can leadtot he creation
of sparks, which could ignite the highlye xplo-
sive gases of abattery. There is arisk of an
explosion.
Before handling the battery, touch the vehicle body to remove any existing electrostatic
build-up.
The highlyf lammable gas mixture forms when
charging the battery as wellasw hen jump-
starting.
Alwaysm ake sure that neither you nor the
battery is electrostatically charged. Abuild-
up of electrostatic charge can be caused, for
example:
R by wearing clothing made from synthetic
fibers
R due to friction betwee nclothing and seats
R if you push or pullt he battery across the
carpet or other synthetic materials
R if you wipet he battery with acloth G
WARNING
During the charging process, abattery produ-
ces hydrogen gas. If ashort circuit occurs or
sparks are created, the hydrogen gas can
ignite. There is arisk of an explosion.
R Make sure that the positive terminal of a
connected battery does not come into con- tact with vehicle parts.
R Never place metal objects or tools on abat-
tery.
R It is important that you observe the descri-
bed order of the battery terminals when
connecting and disconnecting abattery.
R When jump-starting, make sure that the
battery polesw ith identical polarity are
connected. R
It is particularly important to observe the
describe dorder when connecting and dis-
connecting the jumper cables.
R Never connect or disconnect the battery
terminals whilet he engine is running. G
WARNING
Battery acid is caustic. There is arisk of injury.
Avoid contact with the skin, eyes or clothing.
Do not inhalea ny battery gases.Don ot lean
over the battery. Keep childre nawayfrom
batteries. Wash battery acid immediately with water and seek medica lattention. H
Environmental note Batteries contain dangerous
substances. It is against the
law to dispose of them with
the household rubbish. They
must be collected separately
and recycled to protect the
environment. Dispose of batteries in an
environmentally friendly
manner. Take discharged
batteries to
aqualifieds pe-
cialist workshop or aspecial
collection point for used bat- teries.
! Have the battery checked regularly at a
qualified specialist workshop.
Observe the service intervals in the Main-
tenance Booklet or contact aqualified spe-
cialist workshop for more information.
! You shouldh
ave all work involving the
battery carried out at aqualified specialist
workshop. In the exceptional case that it is
necessary for you to disconnect the battery yourself, make sure that:
R you switch off the engine and remove the
SmartKey. On vehicle swith KEYLESS-
GO, ensure that the ignition is switched
off. Check that all the indicator lampsin
the instrument cluster are off. Otherwise, Battery (vehicle)
239Breakdownassistance Z
Page 243 of 290
Avoi
dcontact with the skin, eyes or clothing.
Do not inhal eany battery gases .Donot lean
ove rthe battery .Keepc hildren away from
batteries. Wash battery aci dimmediatel ywith
water and see kmedica lattention. G
WARNING
Ad ischarge dbattery can freeze at tempera-
ture sbelow freezing point. Whe njump-start-
ing the vehicl eorcharging the battery ,gases
can escap efrom the battery .There is ariskof
an explosion.
Allow the froze nbattery to tha woutbefore
charging it or jump-starting.
! Onl
yusebattery chargers with amaxi-
mu mc harging voltag eof14.8V.
! Only
charge the battery using the jump-
starting connection point.
The jump-starting connection point is in the
engine compartment (Y page 242).
Neve rcharge the battery if it is stil linstalled in
the vehicle ,unless yo uuseab attery charger
which ha sbeent ested and approved by
Mercedes-Benz. Abattery charge runits pe-
ciall yadapt ed for Mercedes-Benz vehicles
and tested and approved by Mercedes-Benz
is available as an accessory. It permits the
charging of the battery in its installed posi-
tion. Contact an authorized Mercedes-Benz
Center for further information and availabil-
ity .C harget he battery in accordance with the
separate instructions for the accessory bat-
tery charger.
Read the battery charger's operating instruc- tions before charging the battery.
X Ope nthe hoo d(Ypage 218).
X Connect the battery charge rtothe positive
terminal and ground point in the same
order as when connecting the dono rbat-
tery in the jump-starting procedure
(Y page 242). Battery (vehicle)
241Breakdown assistance Z