2015 MERCEDES-BENZ SLS AMG GT ROADSTER wheel alignment
[x] Cancel search: wheel alignmentPage 236 of 290
Useful information
i This Operator's Manual describes all
models and all standard and optional equip- ment of your vehicle available at the time of
publication of the Operator's Manual.
Country-specific differences are possible.
Please not ethat your vehicle may not be
equipped with all feature sdescribed. This
also applies to safety-related system sand
functions.
i Please read the information on qualified
specialist workshops (Y page 23).Wher
ewillIfind...? First-aid kit
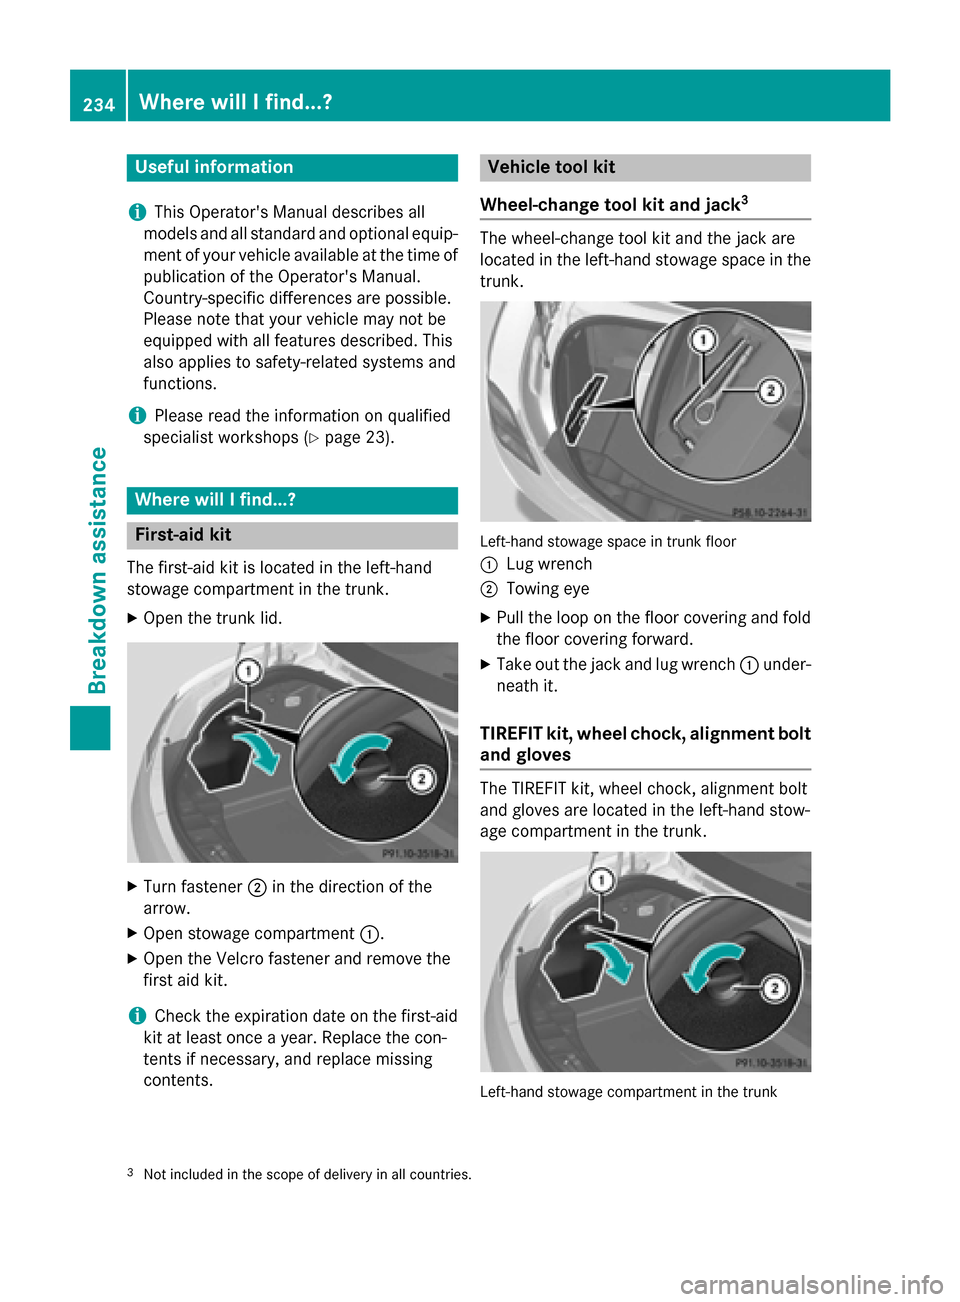
The first-aid kit is locate dinthe left-hand
stowage compartment in the trunk.
X Open the trun klid. X
Turn fastener 0044in the direction of the
arrow.
X Open stowage compartment 0043.
X Open the Velcr ofastener and remov ethe
first aid kit.
i Check the expiration date on the first-aid
kit at least onc eayear. Replace the con-
tents if necessary, and replace missing
contents. Vehicle tool kit
Wheel-change tool kit and jack 3 The wheel-change tool kit and the jack are
locate
dinthe left-hand stowage space in the
trunk. Left-han
dstowage space in trun kfloor
0043 Lug wrench
0044 Towing eye
X Pull the loop on the floor covering and fold
the floor covering forward.
X Take out the jack and lug wrench 0043under-
neat hit.
TIREFIT kit, wheel chock, alignment bolt
and gloves The TIREFIT kit
,wheel chock, alignmen tbolt
and gloves are locate dinthe left-hand stow-
age compartment in the trunk. Left-han
dstowage compartmen tinthe trunk
3 Not included in the scope of delivery in all countries. 234
Wher
ewillIfind...?Breakdown assistance
Page 273 of 290
of hydroplaning. You will only gain these ben-
efits if the correc tdirection of rotation is
maintained.
An arrow on the sidewal lofthe tire indicates
its correc tdirection of rotation. Storing wheels
Storew heels that are not being used in acool,
dry and preferably dark place. Protec tthe
tires from oil, grease, gasoline and diesel. Cleaning the wheels
G
WARNING
The water jet from acircular jet nozzle (dirt
blasters) can cause invisible exterior damage to the tires or chassis components. Compo-
nentsd amaged in this way may fail unexpect-
edly. There is arisk of an accident.
Do not use power washers with circular jet
nozzles to clean the vehicle. Have damaged
tires or chassis components replaced imme-
diately. Mounting
awheel
Preparing the vehicle X
Stop the vehicle on solid, non-slippery and
level ground.
X Apply the electric parking brake manually.
X Bring the front wheels into the straight-
ahead position.
X Shift the transmission to position P.
X Switch off the engine.
X Open the driver's door.
The on-board electronics now have status
0.T his is the same as the SmartKey having
been removed.
X Remove Start/Stop button from ignition
lock (Y page 119). X
Take the following object sfrom the left-
hand stowage compartment and the left-
hand stowage space in the trunk:
R lug wrench
R folding wheel chock
R jack
R alignment bolt
X Secure the vehicle to prevent it from rolling
away.
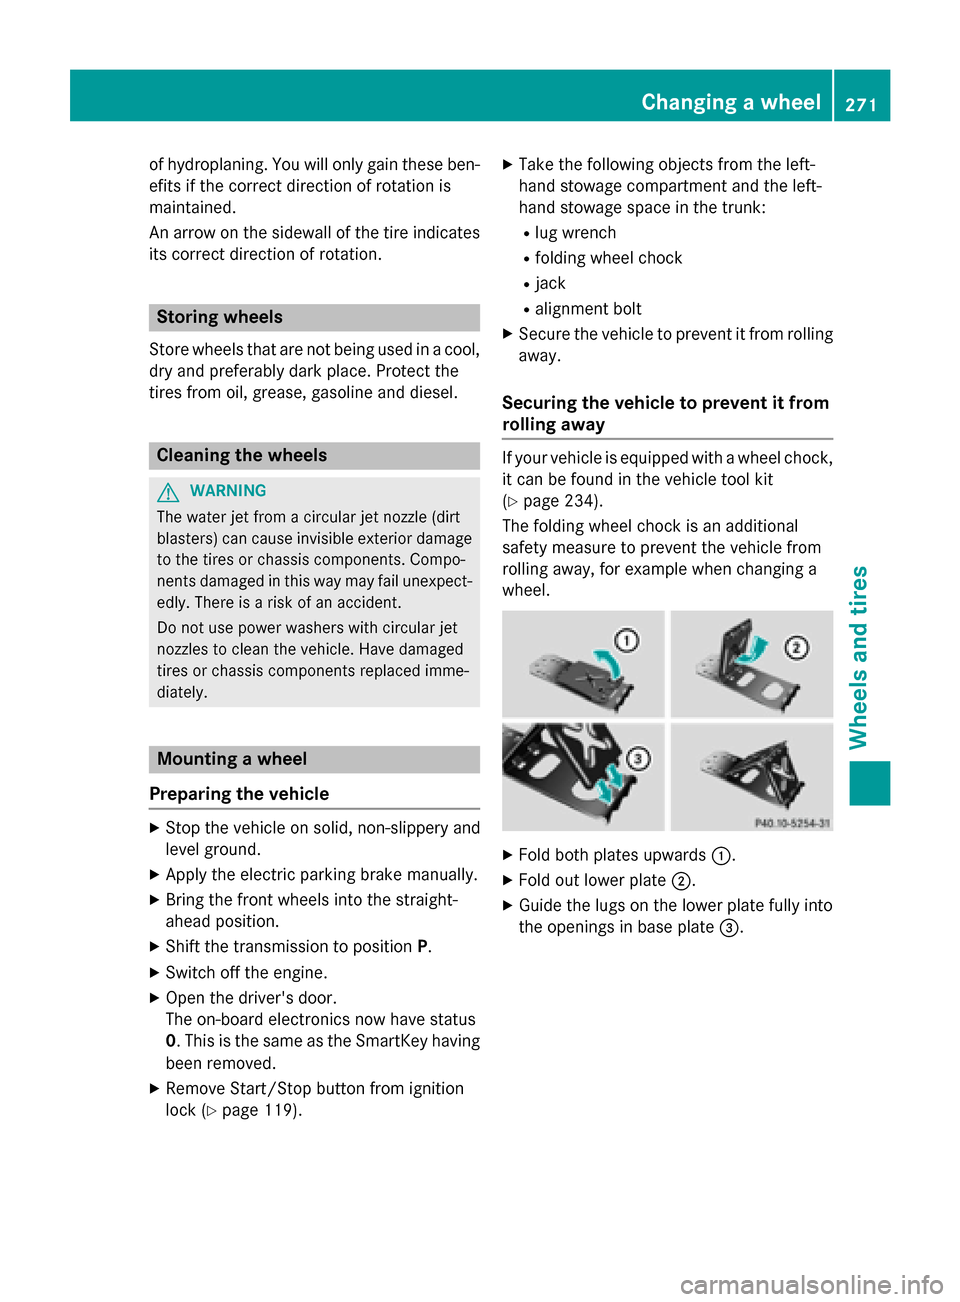
Securing the vehicle to prevent it from
rolling away If your vehicle is equipped with
awheel chock,
it can be found in the vehicle tool kit
(Y page 234).
The folding wheel chock is an additional
safety measure to prevent the vehicle from
rolling away,f or example when changing a
wheel. X
Fold both plates upwards 0043.
X Fold out lower plate 0044.
X Guide the lugs on the lower plate fully into
the openings in base plate 0087. Changing
awheel
271Wheels and tires Z
Page 275 of 290
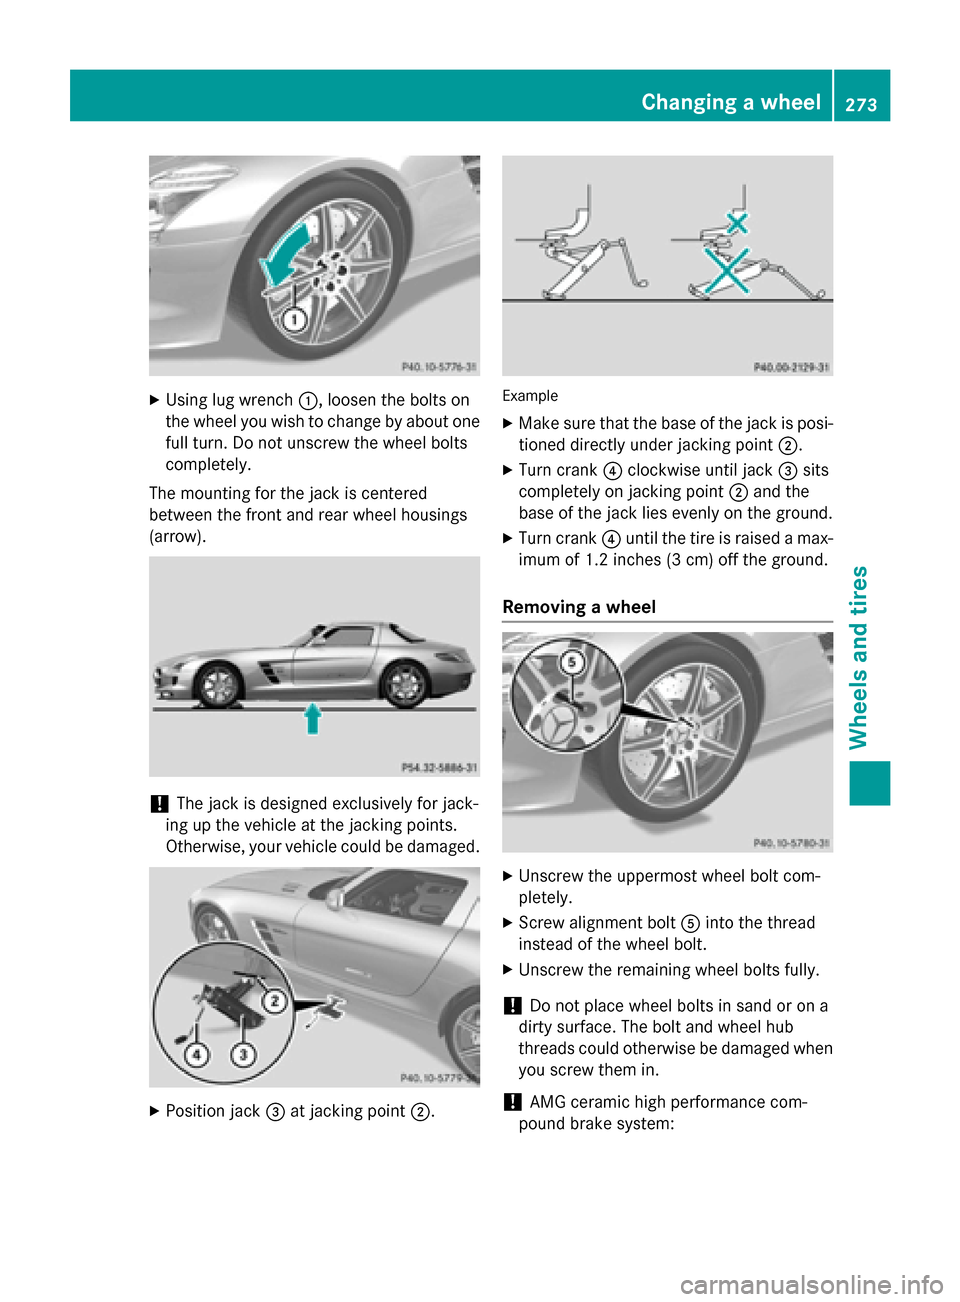
X
Using lug wrench 0043,loosen the bolts on
the wheel you wish to change by abouto ne
full turn. Do not unscrew the wheel bolts
completely.
The mounting for the jack is centered
between the front and rear wheel housings
(arrow). !
The jack is designed exclusively for jack-
ing up the vehicle at the jacking points.
Otherwise, your vehicle could be damaged. X
Position jack 0087at jacking point 0044. Example
X Make sure that the base of the jack is posi-
tioned directly under jacking point 0044.
X Turn crank 0085clockwise until jack 0087sits
completely on jacking point 0044and the
base of the jack lies evenly on the ground.
X Turn crank 0085until the tire is raised amax-
imum of 1.2 inches (3 cm) off the ground.
Removing awheel X
Unscrew the uppermost wheel bolt com-
pletely.
X Screw alignment bolt 0083into the thread
instead of the wheel bolt.
X Unscrew the remaining wheel bolts fully.
! Do not place wheel bolts in sand or on a
dirty surface. The bolt and wheel hub
threads could otherwise be damagedw hen
you screw them in.
! AMG ceramic high performance com-
pound brake system: Changing
awheel
273Wheels and tires Z
Page 276 of 290
When detachin
gorattaching the wheel, the
wheel rim may hit against the ceramic
brake disc and damage it.
For this reason, you should proceed care-
fully. Request the assistanc eofasecond
person or use asecon dalignment bolt.
X Remove the wheel.
Mounting anew wheel G
WARNING
Oiled or greased wheel bolts or damaged
wheel bolts/hub threads can cause the wheel bolts to come loose. As aresult, you could
lose awheel while driving. There is arisk of
accident.
Never oil or grease wheel bolts. In the event of damage to the threads, contact aqualified
specialist workshop immediately. Have the
damaged wheel bolts or hub threads
replaced/renewed. Do not continue driving. G
WARNING
If you tighten the wheel bolts or wheel nuts
when the vehicle is raised, the jack could tip
over. There is arisk of injury.
Only tighten the wheel bolts or wheel nuts
when the vehicle is on the ground.
Always pay attention to the instructions and
safety notes in the "Changing awheel" sec-
tion (Y page 270).
Only use wheel bolts that have been designed for the wheel and the vehicle. For safety rea-
sons, Mercedes-Benz recommends that you
only use wheel bolts which have been
approved for Mercedes-Benz vehicles and the
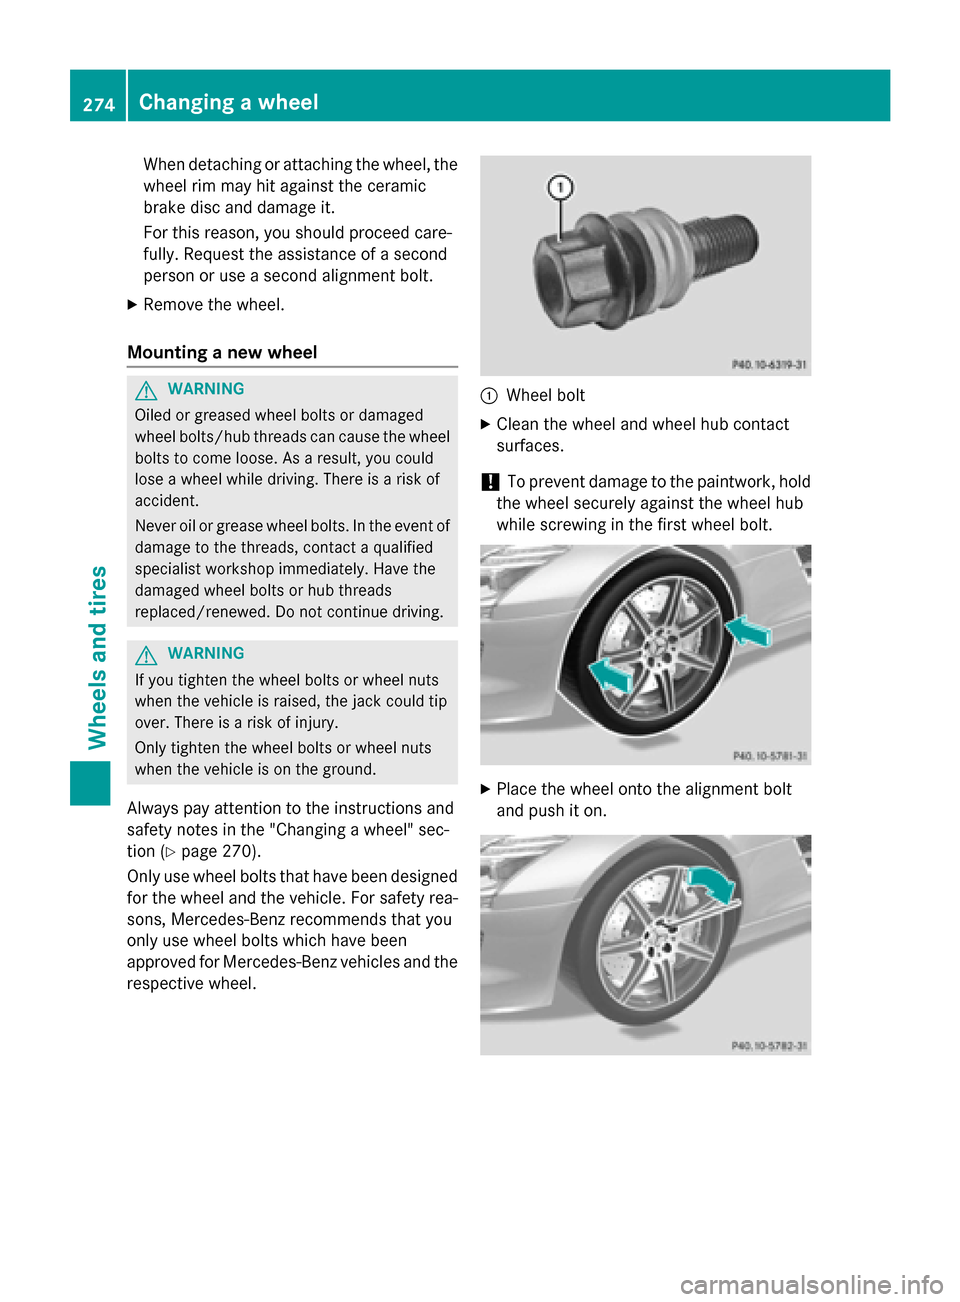
respective wheel. 0043
Wheel bolt
X Clean the wheel and wheel hub contact
surfaces.
! To preven
tdamage to the paintwork ,hold
the wheel securely against the wheel hub
while screwin ginthe first wheel bolt. X
Place the wheel ontot he alignment bolt
and push it on. 274
Changing
awheelWheels and tires
Page 277 of 290
X
Tighten the wheel bolts until they are fin-
ger-tight.
X Unscrew the alignment bolt.
X Tighten the last wheel bolt until it is finger-
tight.
Lowering the vehicle G
WARNING
The wheels could work loose if the wheel nuts and bolts are not tightened to the specified
tightening torque. There is arisk of accident.
Have the tightening torque immediately
checked at aqualified specialist workshop
after awheel is changed.
X Turn the crank of the jack counter-clock-
wise until the vehicle is once again standing
firmly on the ground.
X Place the jack to one side. X
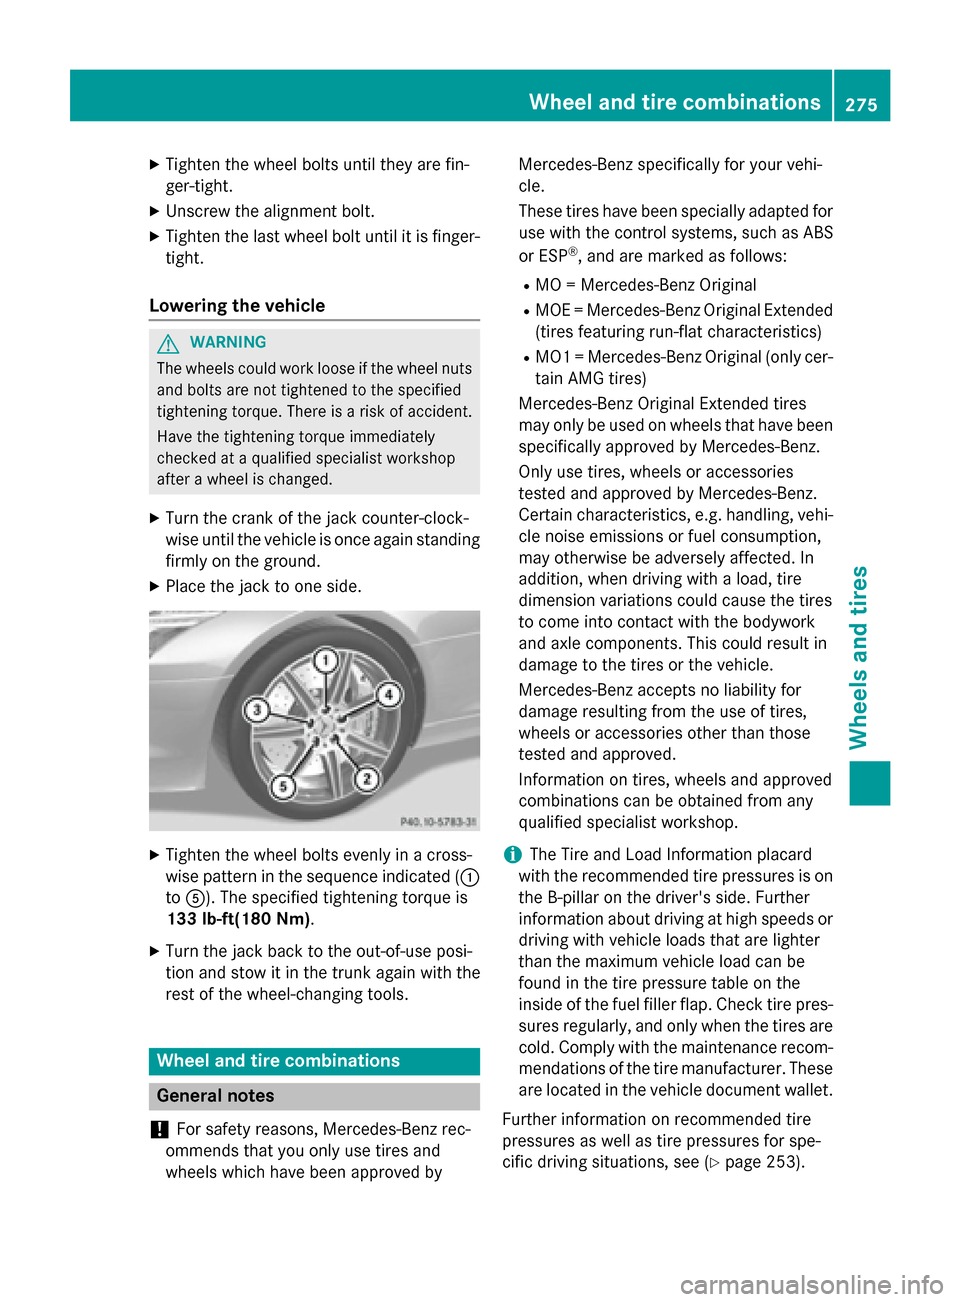
Tighten the wheel bolts evenly in across-
wise pattern in the sequence indicated ( 0043
to 0083). The specified tightening torque is
133 lb-ft(180 Nm).
X Turn the jack back to the out-of-use posi-
tion and stow it in the trunk again with the
rest of the wheel-changin gtools. Wheel and tire combinations
General notes
! For safety reasons, Mercedes-Benz rec-
ommends that you only use tires and
wheels which have been approved by Mercedes-Benz specifically for your vehi-
cle.
These tires have been specially adapted for
use with the control systems, such as ABS
or ESP ®
,a nd are marked as follows:
R MO =Mercedes-Benz Original
R MOE =Mercedes-Benz Original Extended
(tires featuring run-flat characteristics)
R MO1 =Mercedes-Benz Original (only cer-
tain AMG tires)
Mercedes-Benz Original Extended tires
may only be used on wheels that have been
specifically approved by Mercedes-Benz.
Only use tires, wheels or accessories
tested and approved by Mercedes-Benz.
Certain characteristics, e.g. handling, vehi-
cle noise emissions or fuel consumption,
may otherwise be adversely affected. In
addition, when driving with aload, tire
dimension variations could cause the tires
to come into contact with the bodywork
and axle components. This could result in
damage to the tires or the vehicle.
Mercedes-Benz accepts no liability for
damage resulting from the use of tires,
wheels or accessories other than those
tested and approved.
Information on tires, wheels and approved
combinations can be obtained from any
qualified specialist workshop.
i The Tire and Load Information placard
with the recommended tire pressures is on the B-pillar on the driver's side. Further
information about driving at high speeds or driving with vehicle loads that are lighter
than the maximum vehicle load can be
found in the tire pressure table on the
inside of the fuel filler flap. Check tire pres- sures regularly, and only when the tires arecold. Comply with the maintenance recom-
mendation softhe tire manufacturer. These
are located in the vehicle document wallet.
Further information on recommended tire
pressures as well as tire pressures for spe-
cific driving situations, see (Y page 253). Wheel and tirec
ombinations
275Wheels and tires Z