2015 MERCEDES-BENZ SLS AMG GT ROADSTER engine
[x] Cancel search: enginePage 140 of 290
becomes trapped in snow. There is
arisk of
fatal injury.
If you leave the engin eorthe auxiliary heating
running, make sure the exhaust pipe and area
around the vehicle are clear of snow. To
ensure an adequate supply of fresh air, open a window on the side of the vehicle that is not
facin gintot he wind.
At the onset of winter ,have your vehicle win-
terized at aqualified specialist workshop, e.g.
at an authorized Mercedes-Benz Center.
Driv eparticularly carefully on slippery road
surfaces. Avoid sudden acceleration, steering
and brakin gmaneuvers. Do not use cruise
control.
If the vehicle threatens to skid or cannot be
stopped when movin gatlow speed:
X Shift the transmission to position N.
The outside temperature indicator is not
designed to serve as an ice-warning device
and is therefore unsuitable for that purpose.
Changes in the outside temperature are dis-
played after ashort delay.
Indicated temperatures just above the freez-
ing point do not guarantee that the road sur-
face is free of ice. The road may still be icy,
especially in wooded areas or on bridges. You
should pay special attention to road condi-
tion swhen temperatures are around the
freezing point.
For more information on driving with snow
chains, see (Y page 253).
For more information on driving with summer tires, see (Y page 252).
Observe the notes in the "Winter operation"
section (Y page 252). Driving systems
Cruise control
Important safet ynotes Cruise contro
lmaintains aconstan troad
speed for you. It brakes automatically in order
to avoid exceeding the set speed.
On long and steep downhill gradients, espe-
cially if the vehicle is laden, you must select
shift range 1,2or 3in good time
(Y page 127). By doing so, you will make use
of the brakin geffec toft he engine. This
relieves the load on the brake system and
prevents the brakes from overheating and
wearing too quickly.
If you fail to adapt your driving style, cruise
contro lcan neither reduce the risk of an acci-
dent nor override the laws of physics. Cruise
contro lcannot take int oaccoun tthe road,
traffic and weather conditions. Cruise control
is only an aid. You are responsible for the dis-
tanc etot he vehicle in front, for vehicle speed,
for brakin gingood time and for staying in
your lane.
Use cruise contro lonly if road and traffic con-
dition smake it appropriate to maintain a
steady speed for aprolonge dperiod. You can
set any road speed above 20 mph (30 km/h).
Do not use cruise control:
R in road and traffic condition swhich do not
allow you to maintain aconstan tspeed e.g.
in heavy traffic or on winding roads
R on slippery road surfaces. Braking or accel-
eratin gcould cause the drive wheels to lose
traction and the vehicle could then skid
R when ther eispoor visibility, e.g. due to fog,
heavy rain or snow
If ther eisac hangeofd rivers, advise the new
driver of the speed stored. 138
Driving systemsDriving and parking
Page 142 of 290
Making adjustments in
1mph incre-
ments X
Briefl ypress the cruis econtrol leve rtothe
pressure point, up 0043for ahigher spee dor
down 0044for alower speed.
The lasts peedstored is increased or
reduced.
Making adjustments in 10 mph incre-
ments X
Briefl ypress the cruis econtrol lever
beyond the pressure point, up 0043for a
higher spee dordown0044for alower speed.
The lasts peedstored is increased or
reduced.
Deactivatin gcruise control There are severa
lwaystod eactivate cruise
control:
X Briefl ypress the cruis econtrol leve rfor-
wards 0087.
or X Brake.
Cruise control is automatically deactivated if: R you press the electric parking brake han-
dle.
R you are driving below 20 mph (30 km/h).
R ESP ®
intervenes or you deactivate ESP ®
R you shift the transmission to Nwhile the
vehicl eisinm otion.
If cruis econtrol is deactivated, you willh eara
warning tone. The "Cruise Control Off Cruise Control Off"
message is displayed in the multifunction dis- playf or approximately five seconds.
i The lasts
peedstored is cleared when you
switch off the engine. AMG adaptive sport suspensions
ys-
tem
General notes The electronicall
ycontrolled damping system
works continuously.T his improves driving
safety and ride comfort.
The damping is tuned individually to each
whee land depends on:
R yourd riving style ,e.g. sporty
R the road surface condition, e.g. bumps
R youri ndividuals election of Sport, Sport +
or Comfort
If you select Comfort or Sport +mode and
restart the engine, the mode reverts to Sport.
i GT model:
you can only choose between
Sport and Sport +modes .Ifyou select
Sport +mode and restart the engine, the
mode reverts to Sport. Sport mode
The firmer suspension tuning in Sport mode
ensure
seven better contact with the road.
Select this mode when employing asporty
driving style ,e.g. on winding country roads.
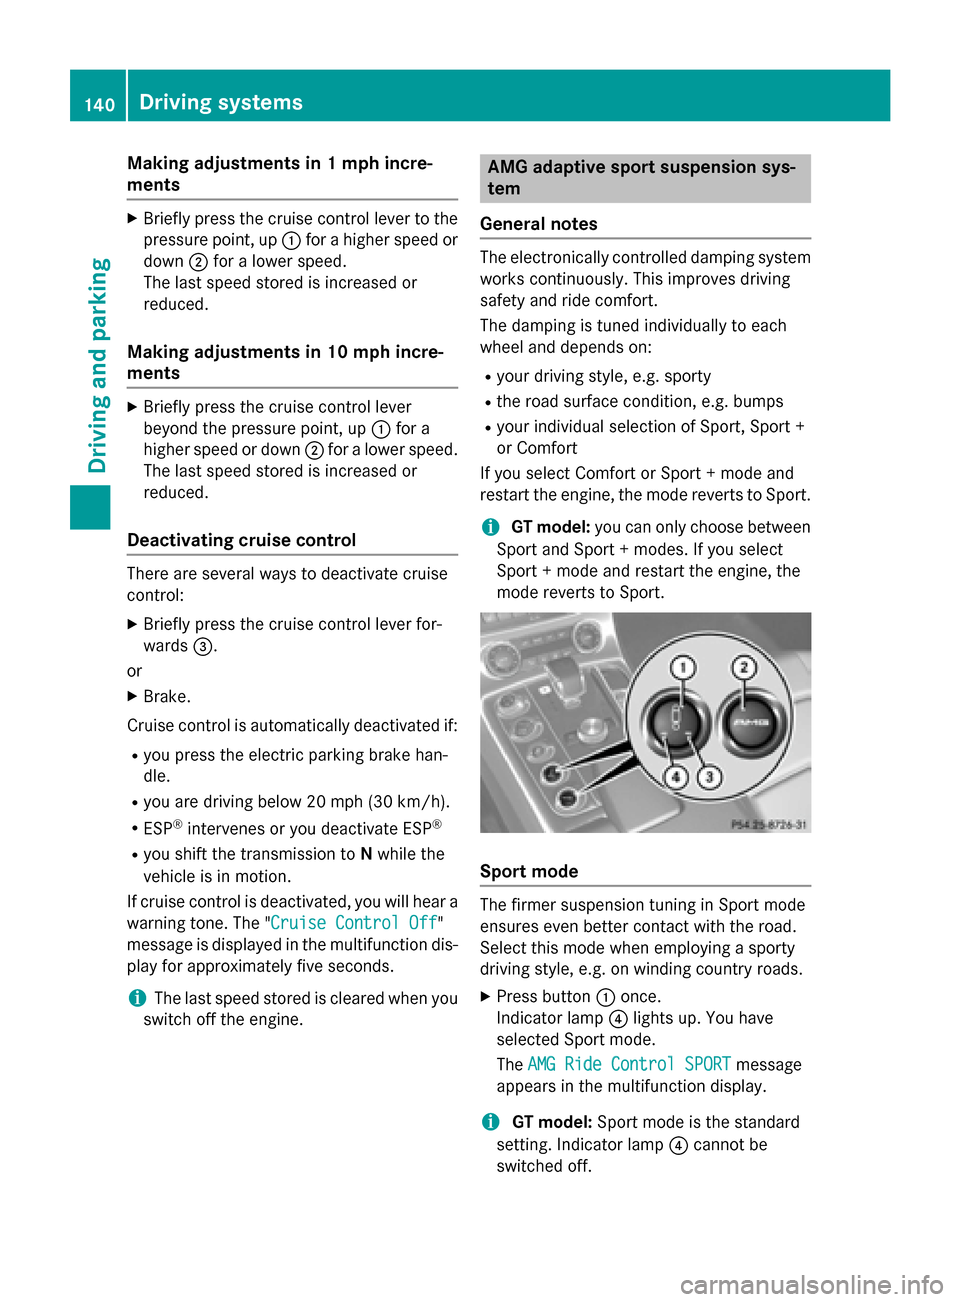
X Press button 0043once.
Indicator lamp 0085lights up. You have
selected Sport mode.
The AMG Ride Control SPORT AMG Ride Control SPORT message
appears in the multifunction display.
i GT model:
Sport mode is the standard
setting. Indicator lamp 0085cannot be
switched off. 140
Driving systemsDriving and parking
Page 145 of 290
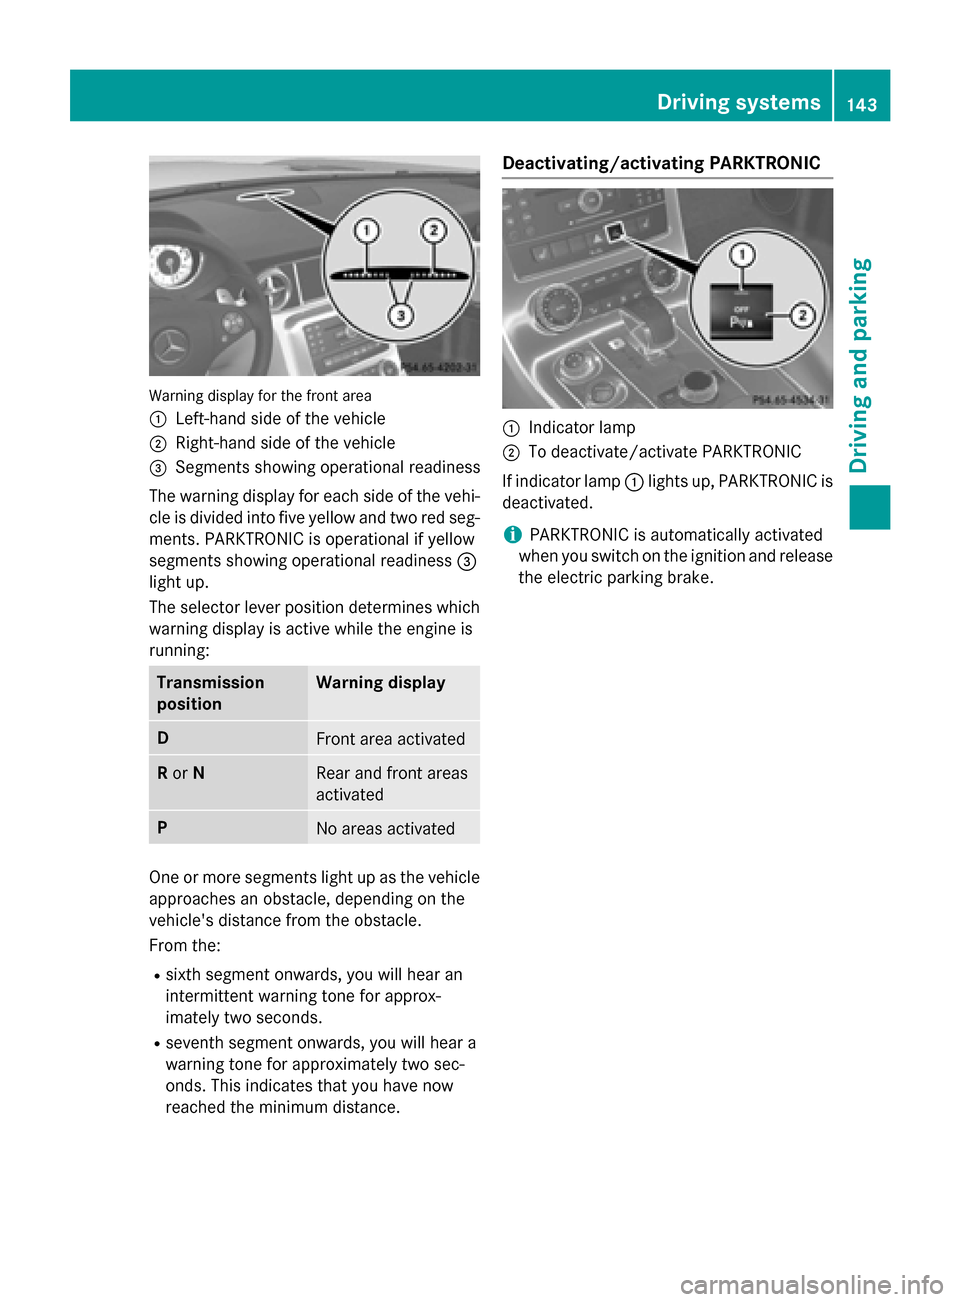
Warning display for the fron
tarea
0043 Left-hand side of the vehicle
0044 Right-han dside of the vehicle
0087 Segments showing operational readiness
The warning display for each side of the vehi- cle is divided into five yellow and two red seg-ments. PARKTRONIC is operational if yellow
segment sshowing operational readiness 0087
light up.
The selector lever position determines which
warning display is active while the engine is
running: Transmission
position Warning display
D
Fron
tarea activated R
or N Rear and fron
tareas
activated P
No areas activated
One or more segment
slight up as the vehicle
approaches an obstacle, depending on the
vehicle's distanc efrom the obstacle.
From the:
R sixt hsegment onwards, you will hear an
intermittent warning tonef or approx-
imately two seconds.
R sevent hsegment onwards, you will hear a
warning tonef or approximately two sec-
onds. This indicates that you have now
reached the minimum distance. Deactivating/activating PARKTRONIC
0043
Indicator lamp
0044 To deactivate/activate PARKTRONIC
If indicator lamp 0043lights up, PARKTRONIC is
deactivated.
i PARKTRONIC is automatically activated
when you switch on the ignition and release
the electric parking brake. Driving systems
143Driving and parking Z
Page 152 of 290
Useful information
i This Operator's Manual describes all
models and all standard and optional equip- ment of your vehicle available at the time of
publication of the Operator's Manual.
Country-specific differences are possible.
Please not ethat your vehicle may not be
equipped with all feature sdescribed. This
also applies to safety-related system sand
functions.
i Please read the information on qualified
specialist workshops (Y page 23).Important safet
ynotes
You will find an illustration of the instrument
cluster in the "At aglance" section
(Y page 27). G
WARNING
If you operate information system sand com-
munication equipment integrated in the vehi- cle while driving, you will be distracted from
traffic conditions. You could also lose control of the vehicle. There is arisk of an accident.
Only operate the equipment when the traffic
situatio npermits. If you are not sure that this
is possible, park the vehicle paying attention
to traffic condition sand operate the equip-
ment when the vehicle is stationary. G
WARNING
If the instrumen tcluster has failed or mal-
functioned, you may not recogniz efunction
restrictions in system srelevan ttosafety. The
operatin gsafet yofy our vehicle may be
impaired. There is arisk of an accident.
Driv eonc arefully. Have the vehicle checked
at aq ualified specialist workshop immedi-
ately.
You must observ ethe legal requirements for
the country in which you are currently driving when operatin gthe on-board computer. The on-board computer only shows messages
or warnings from certain system sinthe mul-
tifunction display. You should therefore make
sure your vehicle is operatin gsafely at all
times .Otherwise, avehicle that is not oper-
ating safely may cause an accident. Displays and operation
Engine oil temperatured
isplay
The engin eoil temperature gauge is in the
instrumen tcluster on the right-han dside.
Under normal operatin gconditions, the tem-
perature may rise to 140 †.
The transmission fluid temperature and the
coolan ttemperature are displayed in the
AMG menu (Y page 160). Tachometer
The red band in the tachometer indicates the engine's overrevvin grange.
! Do not drive in the overrevvin
grange, as
this could damage the engine.
The fuel supply is interrupted to protect the
engin ewhen the red band is reached. Outside temperatured
isplay
You should pay special attention to road con-
dition swhen temperature sare around freez-
ing point.
The outside temperature display is in the mul- tifunction display (Y page 152).
Changes in the outside temperature are dis-
played after ashort delay. 150
Displays and operationOn-boar
dcomputer and displays
Page 160 of 290
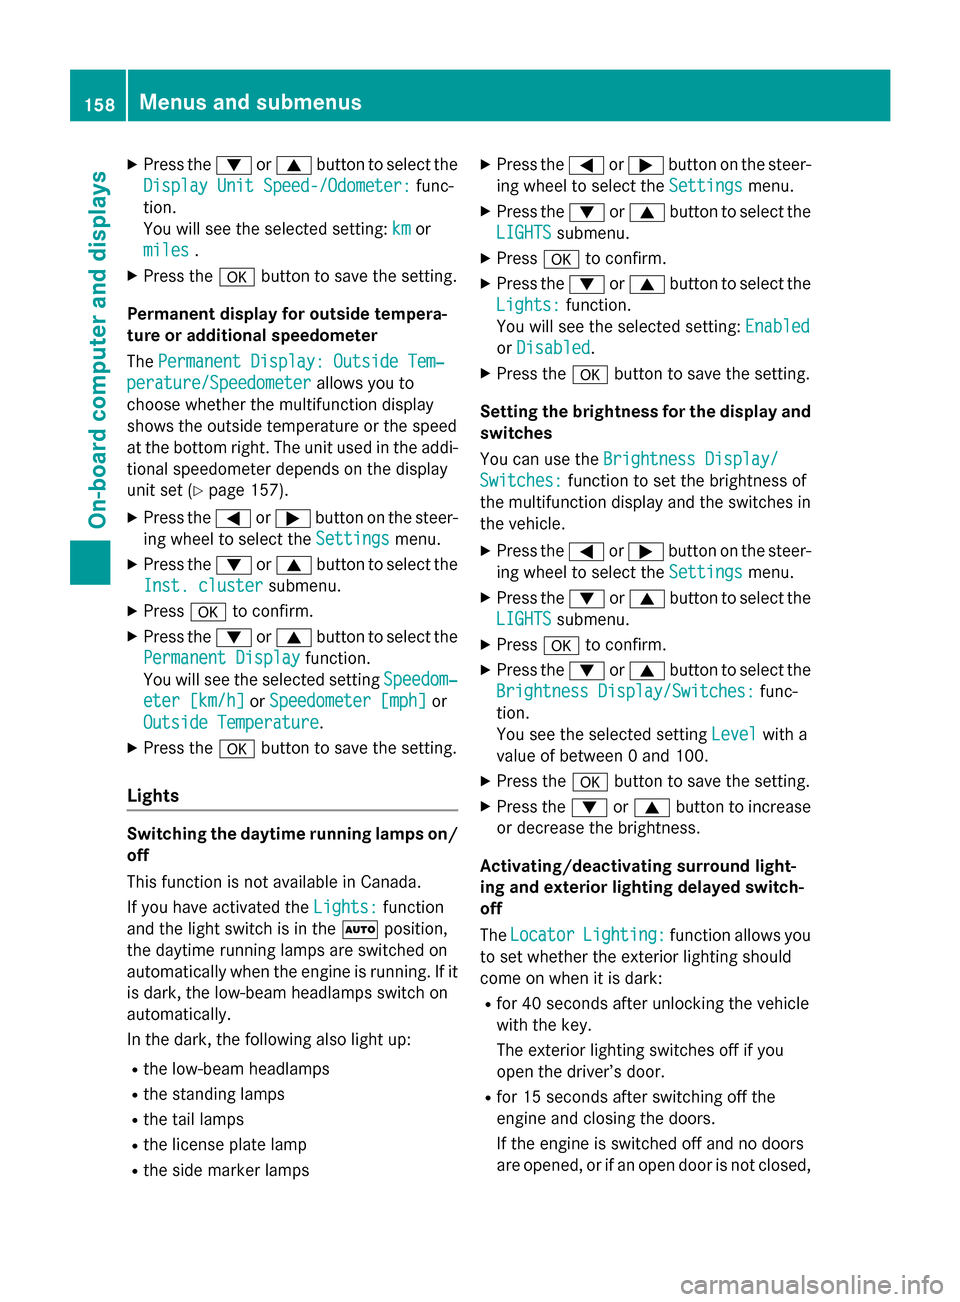
X
Press the 0064or0063 button to select the
Display Unit Speed-/Odometer:
Display Unit Speed-/Odometer: func-
tion.
You will see the selected setting: km
km or
miles miles .
X Press the 0076button to save the setting.
Permanent display for outside tempera-
tureora dditional speedometer
The Permanent Display: Outside Tem‐ Permanent Display: Outside Tem‐
perature/Speedometer
perature/Speedometer allows you to
choose whether the multifunction display
shows the outside temperature or the speed
at the bottom right. The unit used in the addi-
tional speedometer depends on the display
unit set (Y page 157).
X Press the 0059or0065 button on the steer-
ing wheel to select the Settings
Settings menu.
X Press the 0064or0063 button to select the
Inst. cluster
Inst. cluster submenu.
X Press 0076to confirm.
X Press the 0064or0063 button to select the
Permanent Display
Permanent Display function.
You will see the selected setting Speedom‐
Speedom‐
eter [km/h]
eter [km/h] orSpeedometer [mph]
Speedometer [mph] or
Outside Temperature
Outside Temperature.
X Press the 0076button to save the setting.
Lights Switching the daytime running lampso
n/
off
This function is not availabl einCanada.
If you have activated the Lights: Lights:function
and the light switch is in the 0058position,
the daytime runnin glamps are switched on
automatically when the engine is running. If it is dark, the low-beam headlamps switch on
automatically.
In the dark, the following also light up:
R the low-beam headlamps
R the standin glamps
R the tail lamps
R the license plate lamp
R the side marker lamps X
Press the 0059or0065 button on the steer-
ing wheel to select the Settings Settingsmenu.
X Press the 0064or0063 button to select the
LIGHTS LIGHTS submenu.
X Press 0076to confirm.
X Press the 0064or0063 button to select the
Lights:
Lights: function.
You will see the selected setting: Enabled
Enabled
or Disabled
Disabled.
X Press the 0076button to save the setting.
Setting the brightness for the display and switches
You can use the BrightnessDisplay/
Brightnes sDisplay/
Switches: Switches: function to set the brightness of
the multifunction display and the switches in
the vehicle.
X Press the 0059or0065 button on the steer-
ing wheel to select the Settings
Settingsmenu.
X Press the 0064or0063 button to select the
LIGHTS
LIGHTS submenu.
X Press 0076to confirm.
X Press the 0064or0063 button to select the
Brightnes sDisplay/Switches:
Brightnes sDisplay/Switches: func-
tion.
You see the selected setting Level
Level with a
value of between 0and 100.
X Press the 0076button to save the setting.
X Press the 0064or0063 button to increase
or decrease the brightness.
Activating/deactivating surround light-
ing and exterior lighting delayed switch-
off
The Locator
Locator Lighting: Lighting: function allows you
to set whether the exterior lighting should
come on when it is dark:
R for 40 seconds after unlocking the vehicle
with the key.
The exterior lighting switches off if you
open the driver’s door.
R for 15 seconds after switchin goff the
engine and closing the doors.
If the engine is switched off and no doors
are opened, or if an open door is not closed, 158
Menus and submenusOn-board computer and displays
Page 161 of 290
the exterior lighting goes ou
tafter
60 second s.
If you activate the Locator
Locator Lighting:
Lighting: func-
tion, the following lightu p:
R the parking lamps
R the low-beam headlamps
R the license plate lamp
R the surround lighting in the exterior mirrors
X Press the 0059or0065 button on the steer-
ing wheeltos elect theSettings
Settings menu.
X Press the 0064or0063 button to select the
LIGHTS
LIGHTS submenu.
X Press 0076to confirm.
X Press the 0064or0063 button to select the
Locator Lighting:
Locator Lighting: function.
You wills ee the selected setting: Enabled
Enabled
or Disabled
Disabled.
X Press the 0076button to save the setting.
Deactivating the delayed switch-off tempora-
rily:
X Select key position 0with the Start/Stop
button before leaving the vehicle.
X Select key position 2and then key position
0 again with the Start/Stop button
The delayed shut-off is deactivated.
The delayed shut-off is reactivated the next
time you start the engine.
Activating/deactivating the interio rlight-
ing delayed switch-off
If you select key position 0with the Start/
Stop button when the Light. delay
Light. delay func-
tion is activated, the interior lighting lights up
for approximately 20 seconds if it is dark.
X Press the 0059or0065 button on the steer-
ing wheeltos elect theSettings Settings menu.
X Press the 0064or0063 button to select the
Light
Light submenu.
X Press 0076to confirm.
X Press the 0064or0063 button to select the
Light. delay
Light. delay function.
You wills ee the selected setting: on
onoroff
off.
X Press the 0076button to save the setting. Vehicle Activating/deactivating the automatic
door locking mechanism
If you select the
Automatic Door Lock: Automatic Door Lock:
function, the vehicle is centrally locked above
as peed of around 9mph(15 km/h).
i For further information on the automatic
locking feature, see (Y page 70).
X Press the 0059or0065 button on the steer-
ing wheeltos elect theSettings
Settings menu.
X Press the 0064or0063 button to select the
Vehicle
Vehicle submenu.
X Press the 0076button to confirm.
X Press the 0064or0063 button to select the
Automatic door locks
Automatic door locks function.
You wills ee the selected setting: Enabled
Enabled
or Disabled Disabled.
X Press the 0076button to save the setting.
Convenience Activating/deactivating the EASY-
ENTRY/EXIT feature
G
WARNING
When the EASY-ENTRY/EXIT feature adjusts
the steering wheel, you and other vehicle
occupants –particularly childre n–could
become trapped .There is arisk of injury.
Whilet he EASY-ENTRY/EXIT feature is mak-
ing adjustments, make sure that no one has
any body parts in the sweep of the steering
wheel.
If somebod ybecomes trapped:
R press one of the memory function position
buttons, or
R move the switch for steering wheela djust-
ment in the opposite direction to that in
which the steering wheelism oving.
The adjustment process is stopped.
You can use the Easy
Easy Entry/Exit: Entry/Exit: function
to activate or deactivate the EASY-ENTRY/
EXIT feature (Y page 89). Menus and submenus
159On-board computer and displays Z
Page 162 of 290
X
Press the 0059or0065 button on the steer-
ing wheel to select the Settings Settingsmenu.
X Press the 0064or0063 button to select the
Convenience
Convenience submenu.
X Press 0076to confirm.
X Press the 0064or0063 button to select the
Easy Entry/Exit
Easy Entry/Exit function.
You will see the selected setting: Enabled Enabled
or Disabled
Disabled.
X Press the 0076button to save the setting.
Switching the fold-in mirrors when lock-
ing feature on/off
If you switch on the Fold FoldMirrors
Mirrors in
inwhen
when
Locking
Locking function, the exterior mirrors fold in
when you lock the vehicle. If you unlock the
vehicle and then open the driver's or front-
passenger door, the exterior mirrors fold out
again.
If you have switched the function on and you fold the exterior mirrors in using the button on
the door (Y page 91), they will not fold out
automatically. The exterior mirrors can then
only be folded out using the button on the
door.
X Press the 0059or0065 button on the steer-
ing wheel to select the Settings
Settings menu.
X Press the 0064or0063 button to select the
CONVENIENCE
CONVENIENCE submenu.
X Press 0076to confirm.
X Press the 0064or0063 button to select the
Fold Mirrors in when Locking
Fold Mirrors in when Locking func-
tion.
You will see the selected setting: Enabled
Enabled
or Disabled Disabled.
X Press the 0076button to save the setting.
Restoring the factor ysettings For safety reasons, the
Lights:
Lights:function in
the LIGHTS
LIGHTS submenu is only reset if the vehi-
cle is stationary. X
Press the 0059or0065 button on the steer-
ing wheel to select the Settings
Settingsmenu.
X Press the 0064or0063 button to select the
Factory Settings
Factory Settings submenu.
X Press 0076to confirm.
The Reset All Settings?
Reset All Settings? message
appears.
X Press the 0064or0063 button to select
Yes
Yes orNo
No.
X Press the 0076button to confirm the selec-
tion.
If you have selected Yes Yes,the multifunction
display shows aconfirmation message. AMG menu
AMG displays X
Press 0059or0065 on the steerin gwheel
to select the AMG
AMGmenu. 0043
Digital speedometer
0044 Engine oil temperature
0087 Coolant temperature
0085 Transmission fluid temperature
If the engine oil temperature is below 80 †or
if the transmission fluid temperature is below
60 †, the correspondin gtemperature gauge
flashes .Avoid drivin gatfull engine output
durin gthis time.
SETUP SETUP displays the drive program, the AMG
adaptiv
esport suspension system setting
and the selected traction assist. 160
Menus and submenusOn-board computer and displays
Page 163 of 290
X
Press the 0059or0065 button on the steer-
ing wheel to select the AMG AMGmenu.
X Press the 0063button repeatedly until
SETUP is displayed.
or
X Vehicles without AMG Performance
Media: press the AMG button on the center
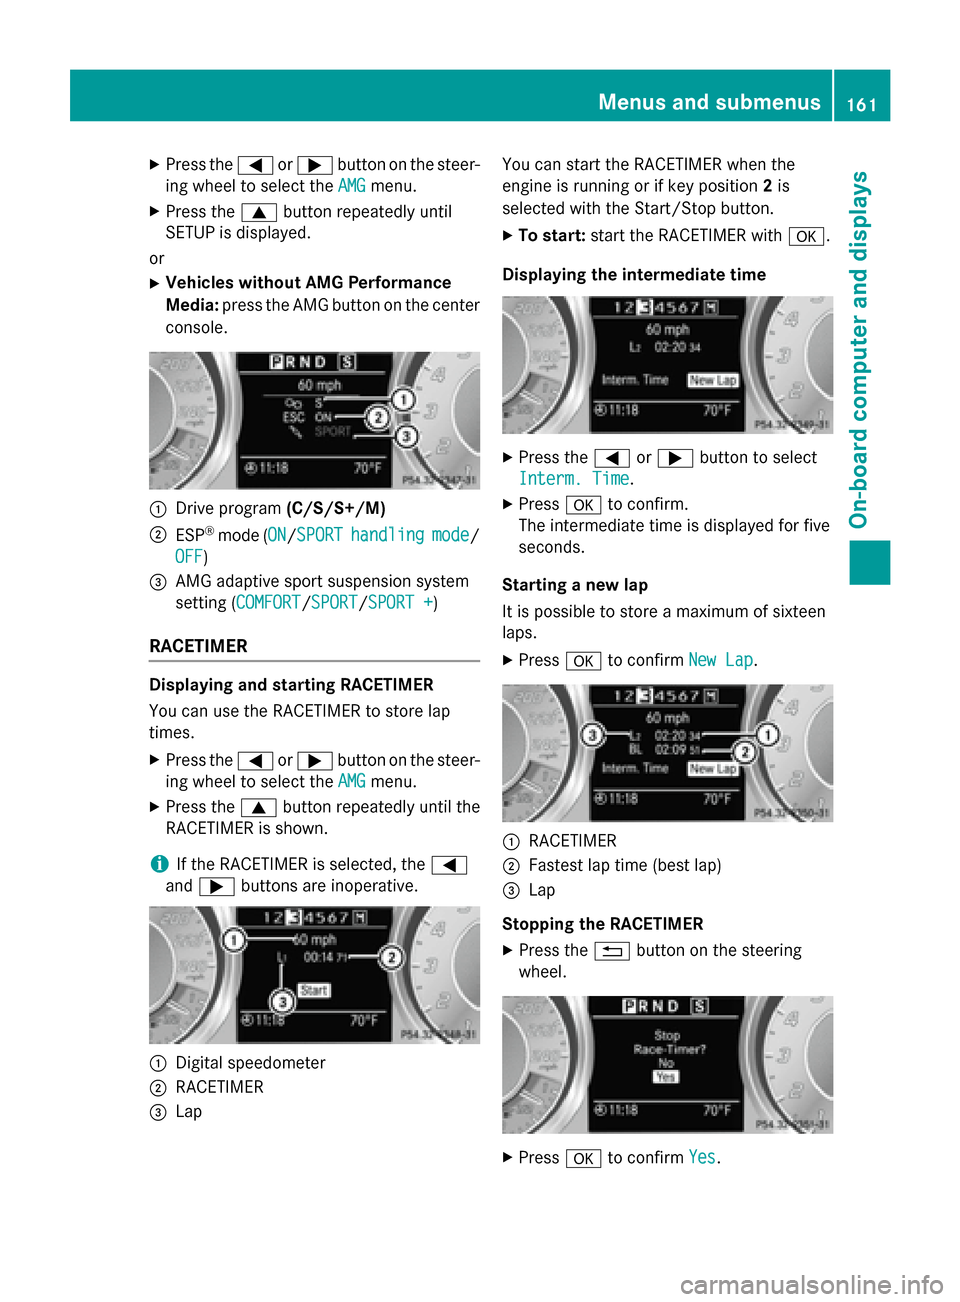
console. 0043
Drive program (C/S/S+/M)
0044 ESP ®
mode (ON ON/SPORTSPORT handling handling mode
mode/
OFF
OFF)
0087 AMG adaptive sport suspension system
setting (COMFORT COMFORT/SPORT SPORT/SPORT +
SPORT +)
RACETIMER Displaying and starting RACETIMER
You can use the RACETIME
Rtostore lap
times.
X Press the 0059or0065 button on the steer-
ing wheel to select the AMG
AMG menu.
X Press the 0063button repeatedly until the
RACETIME Risshown.
i If the RACETIME
Risselected, the 0059
and 0065 button sare inoperative. 0043
Digital speedometer
0044 RACETIMER
0087 Lap You can start the RACETIME
Rwhen the
engine is runnin gorifkey position 2is
selected with the Start/Stop button.
X To start: start the RACETIME Rwith0076.
Displaying the intermediate time X
Press the 0059or0065 button to select
Interm. Time Interm. Time.
X Press 0076to confirm.
The intermediate time is displaye dfor five
seconds.
Starting anew lap
It is possible to store amaximum of sixteen
laps.
X Press 0076to confirm New Lap
New Lap. 0043
RACETIMER
0044 Fastest lap time (best lap)
0087 Lap
Stopping the RACETIMER
X Press the 0038button on the steering
wheel. X
Press 0076to confirm Yes
Yes. Menus and submenus
161On-board computer and displays Z