2015 MERCEDES-BENZ SLS AMG GT ROADSTER engine
[x] Cancel search: enginePage 100 of 290
X
To switc honthe standin glamps: the
SmartKe yisnot in the ignition lock or it is in
position 0.
X Turn the light switch to 0063(left-hand side
of the vehicle) or 0064(right-hand side of
the vehicle). Combination switch
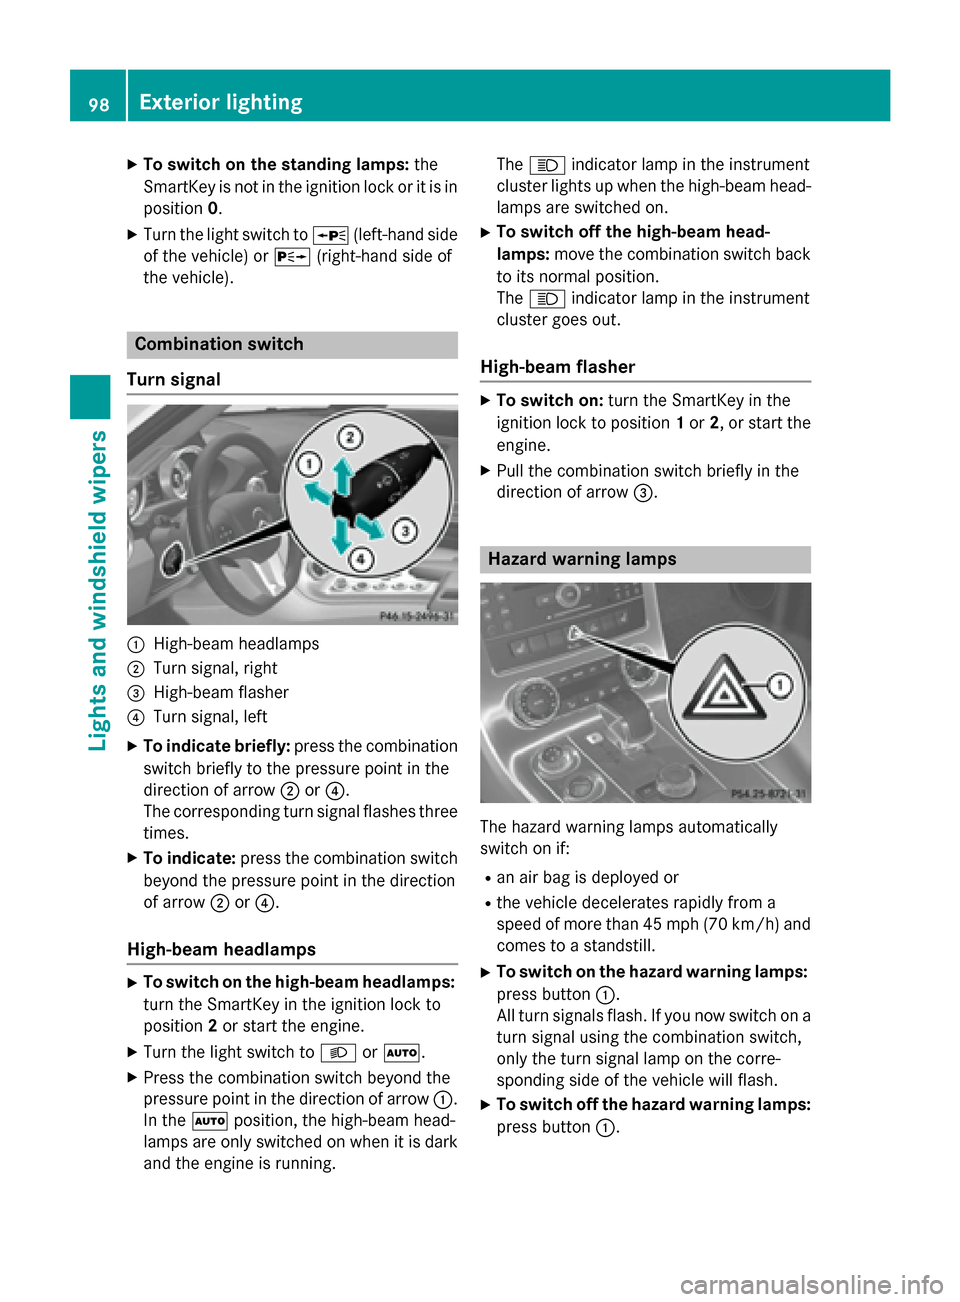
Turn signal 0043
High-bea mheadlamps
0044 Turn signal, right
0087 High-bea mflasher
0085 Turn signal, left
X To indicate briefly: press the combination
switch briefl ytothe pressure point in the
direction of arrow 0044or0085.
The corresponding tur nsigna lflashe sthree
times.
X To indicate: press the combinatio nswitch
beyond the pressure point in the direction
of arrow 0044or0085.
High-beam headlamps X
To switc honthe high-beam headlamps:
tur nthe SmartKe yinthe ignition lock to
position 2or start the engine.
X Turn the light switch to 0058or0058.
X Press the combinatio nswitch beyond the
pressure point in the direction of arrow 0043.
In the 0058position, the high-bea mhead-
lamps ar eonlys witched on when it is dark
and the engine is running. The
0057 indicator lamp in the instrument
cluster lights up when the high-bea mhead-
lamps ar eswitched on.
X To switc hoffthe high-beam head-
lamps: movethe combinatio nswitch back
to its normal position.
The 0057 indicator lamp in the instrument
cluster goe sout.
High-beam flasher X
To switc hon:tur nthe SmartKe yinthe
ignition lock to position 1or 2,ors tart the
engine.
X Pull the combinatio nswitch briefl yinthe
direction of arrow 0087. Hazard warning lamps
The hazar
dwarning lamps automatically
switch on if:
R an ai rbag is deployed or
R the vehicl edecelerates rapidl yfrom a
speed of mor ethan45m ph (70 km/h) and
come stoas tandstill.
X To switc honthe hazard warning lamps:
press button 0043.
All tur nsignals flash. If yo unow switch on a
tur ns igna lusing the combinatio nswitch,
onl ythe tur nsigna llam pont he corre-
sponding side of the vehicl ewillf lash.
X To switc hoffthe hazard warning lamps:
press button 0043.98
Exterior lightingLights and
windshield wipers
Page 101 of 290
The hazard warning lamps switch off auto-
matically if the vehicle exceeds aspeed of
6m ph(10 km/h) again after afull brake appli-
cation.
i The hazard warning lamps still operate if
the ignition is switched off. Headlam
pcleaning system
The headlamps are cleaned automatically if
the "Wipe with washer fluid" function is oper-
ated five times (Y page 101) while the lights
are on and the engine is running. When you
switch off the ignition ,the automatic head-
lamp cleaning system is reset and counting is
resumed from 0. Headlamps fogged up on the inside
The headlamps may fog up on the inside if
there is high atmospheric humidity.
X Drive with the headlamps switched on.
The level of moisture diminishes, depend-
ing on the length of the journey and the
weather conditions (humidity and temper-
ature).
If the level of moisture does not diminish:
X Have the headlamps checked at aqualified
specialist workshop. Interior lighting
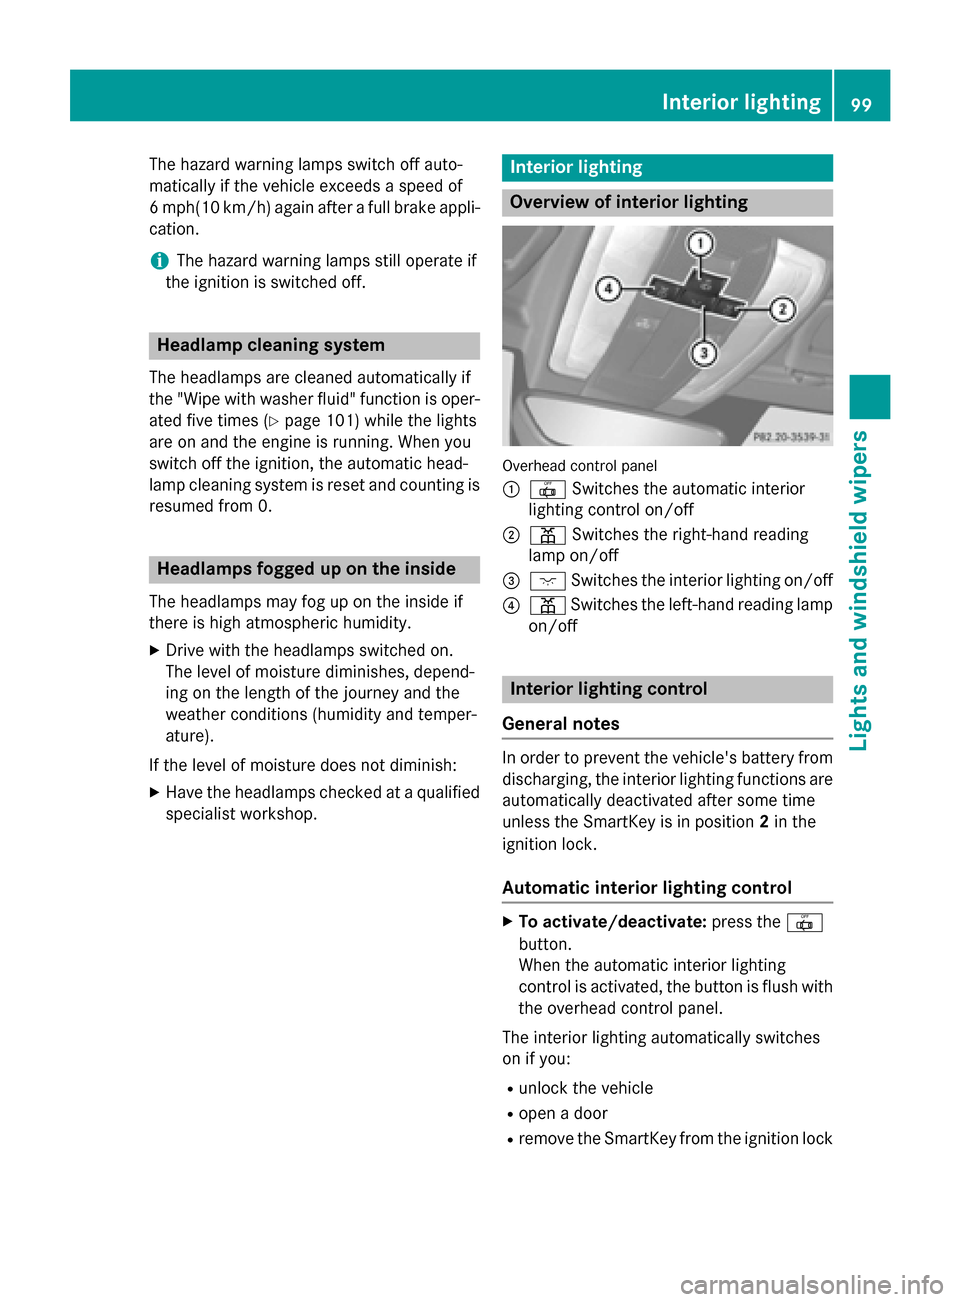
Overview of interior lighting
Overhead control panel
0043
0033 Switches the automatic interior
lighting control on/off
0044 003D Switches the right-hand reading
lamp on/off
0087 004A Switches the interior lighting on/off
0085 003D Switches the left-hand reading lamp
on/off Interior lighting control
General notes In order to prevent the vehicle's battery from
discharging, the interior lighting functions are
automatically deactivated after some time
unless the SmartKey is in position 2in the
ignition lock.
Automatic interior lighting control X
To activate/deactivate: press the0033
button.
When the automatic interior lighting
control is activated, the button is flush with
the overhead control panel.
The interior lighting automatically switches
on if you:
R unlock the vehicle
R open adoor
R remove the SmartKey from the ignition lock Interior lighting
99Lights and windshield wipers Z
Page 102 of 290
The interior light is activated for
ashort while
when the SmartKey is removed from the igni-
tion lock. You can activat ethis delayed
switch-off using the on-board computer
(Y page 159).
Manua linterior lighting control X
To switch the interior lighting on/off:
press the 004Abutton.
X To switch the reading lampso n/off:
press the 003Dbutton. Crash-responsive emergency lighting
The interior lighting is activated automatically
if the vehicle is involved in an accident.
X To switch off the crash-responsive
emergency lighting: press the hazard
warning lamp button.
or X Lock and then unlock the vehicle using the
key. Replacing bulbs
Important safety notes
Xenon bulbs G
DANGER
Xenon bulbs carry ahigh voltage. You can get
an electric shock if you remove the cover of
the Xenon bulb and touch the electrical con-
tacts. There is arisk of fatal injury.
Never touch the parts or the electrical con-
tactsoft he Xenon bulb. Always have work on
the Xenon bulbs carried out at aqualified spe-
cialist workshop.
Your vehicle is equipped with Xenon bulbs.
You can recognize this by the following: the
cone of light from the Xenon bulbs moves
from the top to the bottom and back again
when you start the engine. For this to be observed, the lights must be switched on
before starting the engine.
Bulbs and lamps are an importan
taspect of
vehicle safety. You must therefore make sure that these function correctly at all times.
Have the headlamp setting checked regularly.
Other bulbs G
WARNING
Bulbs, lamps and connector scan get very hot
when operating. If you change abulb, you
could burn yourself on these components.
There is arisk of injury.
Allow these components to cool down before changin gabulb.
There are bulbs other than the Xenon bulbs
that you cannot replace. Replace only the
bulbs listed (Y page 101). Have the bulbs that
you cannot replace yourself changed at a
qualified specialist workshop.
If you require assistance changin gbulbs, con-
sult aqualified specialist workshop.
Do not touch the glass tube of new bulbs with
your bare hands. Even minor contamination
can burn into the glass surface and reduce
the service life of the bulbs. Always use alint-
free cloth or only touch the base of the bulb
when installing.
Only use bulbs of the correc ttype.
If the new bulb still does not light up, consult
aq ualified specialist workshop.
Bulbs and lamps are an importan taspect of
vehicle safety. You must therefore make sure that these function correctly at all times.
Have the headlamp setting checked regularly. Changing the front bulbs
You cannot replace the bulbs at the front
yourself. Contact aqualified specialist work-
shop which has the necessary specialist
knowledge and tools to carry out the work
required. Mercedes-Benz recommends that 100
Replacing bulbsLights and windshield wipers
Page 104 of 290
tha
nint he0062 position, causing the wind-
shiel dwiper stow ipem oref requently.
If the wipe rblade sareworn, the windshield
will no longe rbewipedproperly. This could
prevent yo ufromo bser ving the traffi ccondi-
tions. Replace the wipe rblade stwice ayear,
ideall yinspringand fall. Replacin
gthe wiper blades
Important safety notes G
WARNING
If the windshiel dwiper sbegin to mov ewhile
yo ua rechanging the wipe rblades, youc ould
be trapped by the wipe rarm .The re is ariskof
injury.
Alway sswitch off the windshiel dwiper sand
ignition befor echanging the wipe rblades.
! To avoi
ddamagin gthe wipe rblades,
make sure tha tyou touch onl ythe wiper
ar moft he wiper.
! Never open the hood if
awindshiel dwiper
ar mh asbeen folde dawayfromt he wind-
shield.
Never fol dawindshiel dwiper armw ithout a
wipe rblade back onto the windshield.
Hol dthe windshiel dwiper armf irml yw hen
yo uc hange the wipe rblade .Ify ourelease
the windshiel dwiper armw ithout awiper
blad eand it fall sonto the windshield, the
windshiel dmaybe damage dbythe force of
the impact.
Mercedes-Benz recommend stha tyou have
the wipe rblade schange dataq ualified
specialis tworkshop.
Replacin gthe wiper blades Removing the wiper blades
X Switch off the engine.
X Remov eyourfoo tfromt he brake pedal.
X Set the windshiel dwiper to the 00AAposi-
tion. X
Press the Start/Stop button repeatedly
unti lthe windshiel dwiper sstart.
X When the wipe rarm sh aver eache daver-
tica lposit ion, press the Start/Stop button.
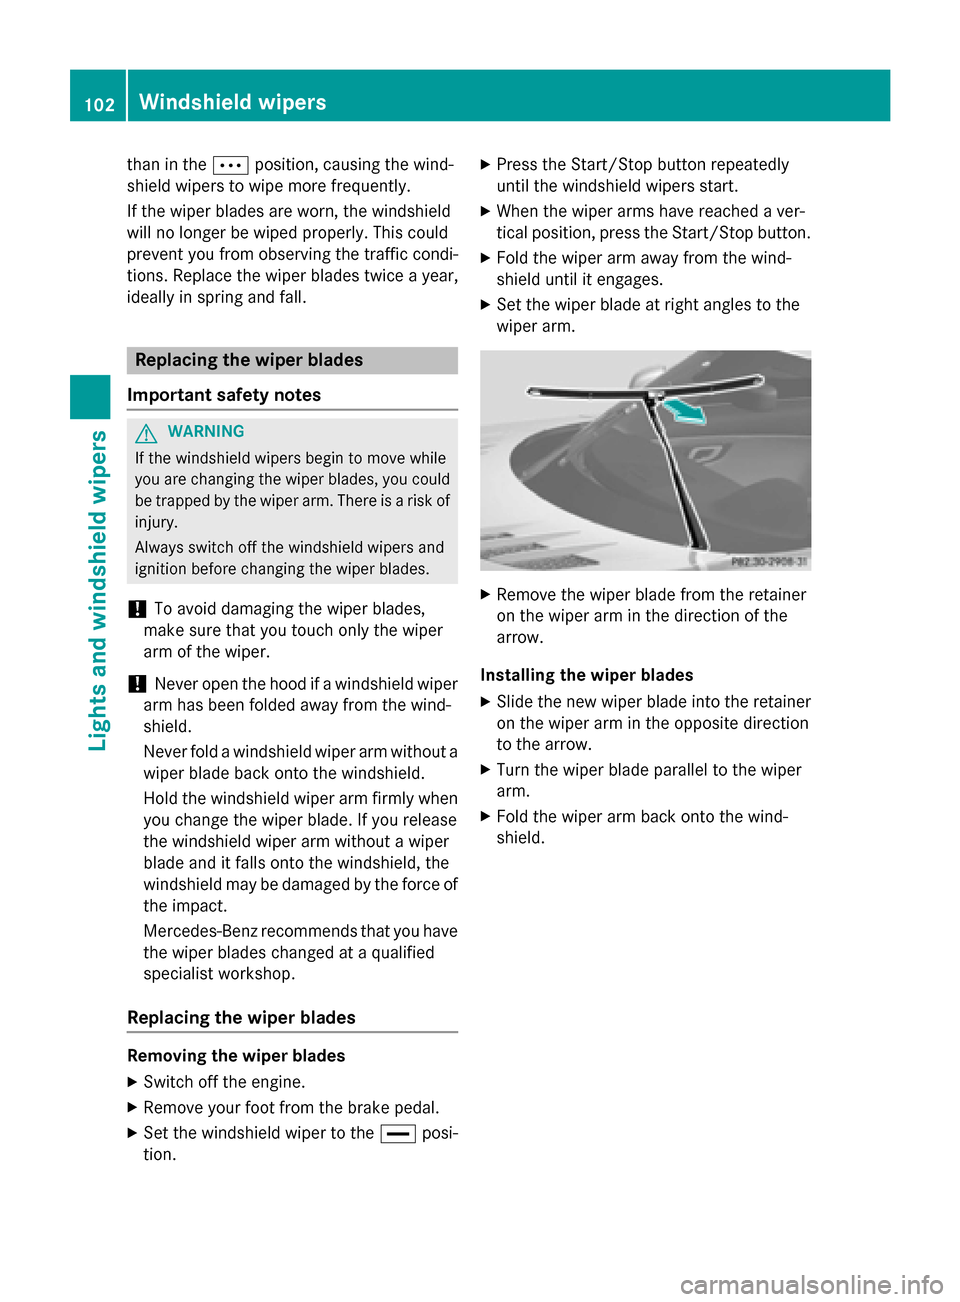
X Fol dthe wipe rarm away fro mthe wind-
shiel duntilite ngages.
X Set the wipe rblade at righ tangle stot he
wipe rarm. X
Remov ethe wipe rblade fromt he retainer
on the wipe rarm in the directio nofthe
arrow.
Installing the wiper blades X Slide the new wipe rblade into the retainer
on the wipe rarm in the opposite direction
to the arrow.
X Turn the wipe rblade parallel to the wiper
arm.
X Fol dthe wipe rarm back onto the wind-
shield. 102
Windshiel
dwipersLigh ts an dwindshield wipers
Page 105 of 290
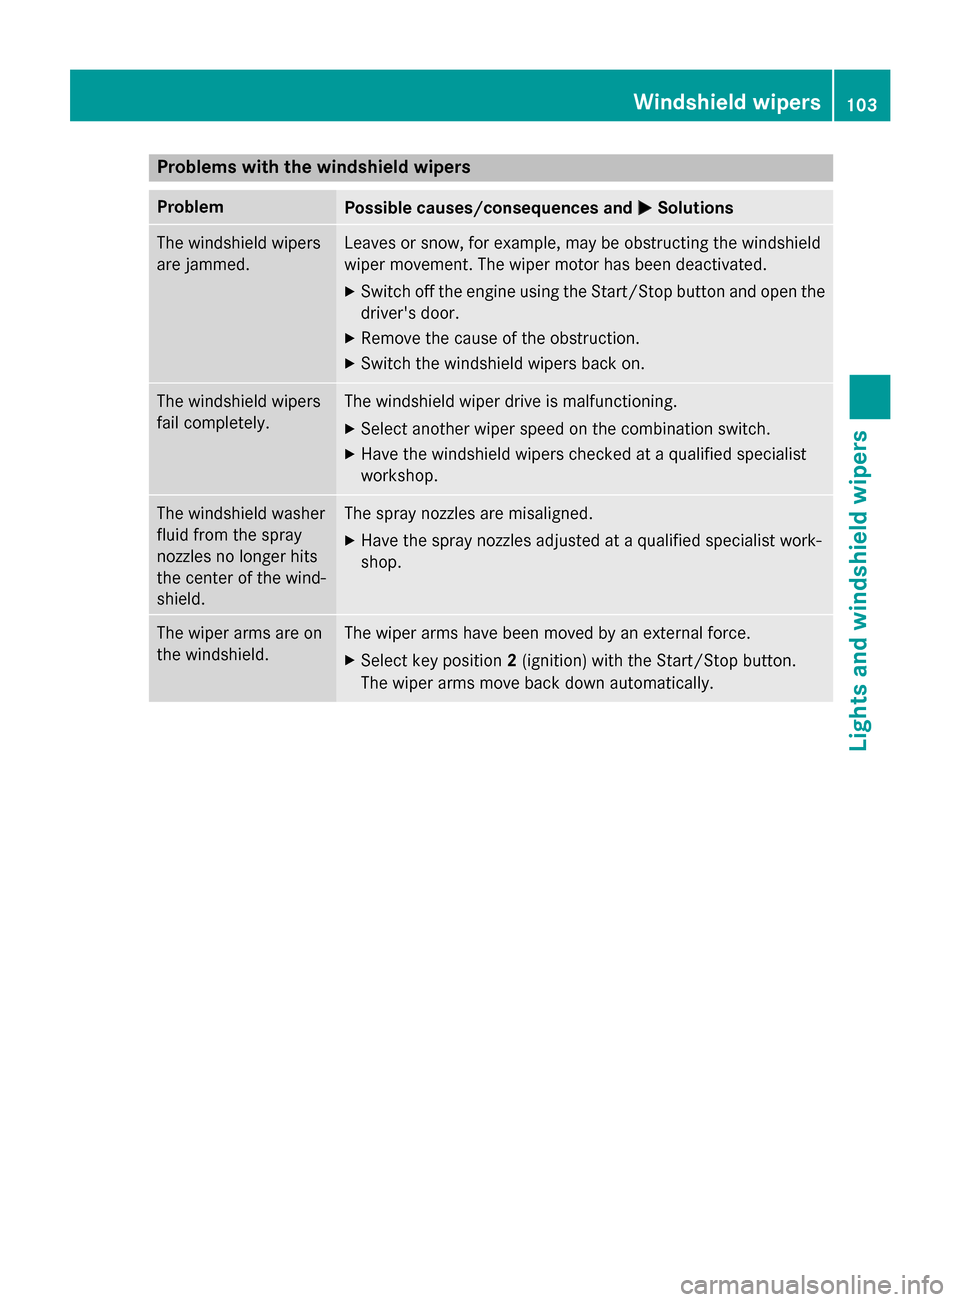
Problems with the windshield wipers
Problem
Possible causes/consequences and
0050
0050Solutions The windshield wipers
are jammed. Leaves or snow, for example, may be obstructing the windshield
wiper movement.T
he wiper motor has been deactivated.
X Switch off the engine using the Start/Stop button and open the
driver's door.
X Remove the cause of the obstruction.
X Switch the windshield wipers back on. The windshield wipers
fail completely. The windshield wiper drive is malfunctioning.
X Select another wiper speed on the combination switch.
X Have the windshield wipers checked at aqualified specialist
workshop. The windshield washer
fluid from the spray
nozzles no longer hits
the center of the wind-
shield. The spray nozzles are misaligned.
X Have the spray nozzles adjusted at aqualified specialist work-
shop. The wiper arms are on
the windshield. The wiper arms have been moved by an external force.
X Select key position 2(ignition) with the Start/Stop button.
The wiper arms move back down automatically. Windshield wipers
103Lights and windshieldw ipers Z
Page 110 of 290
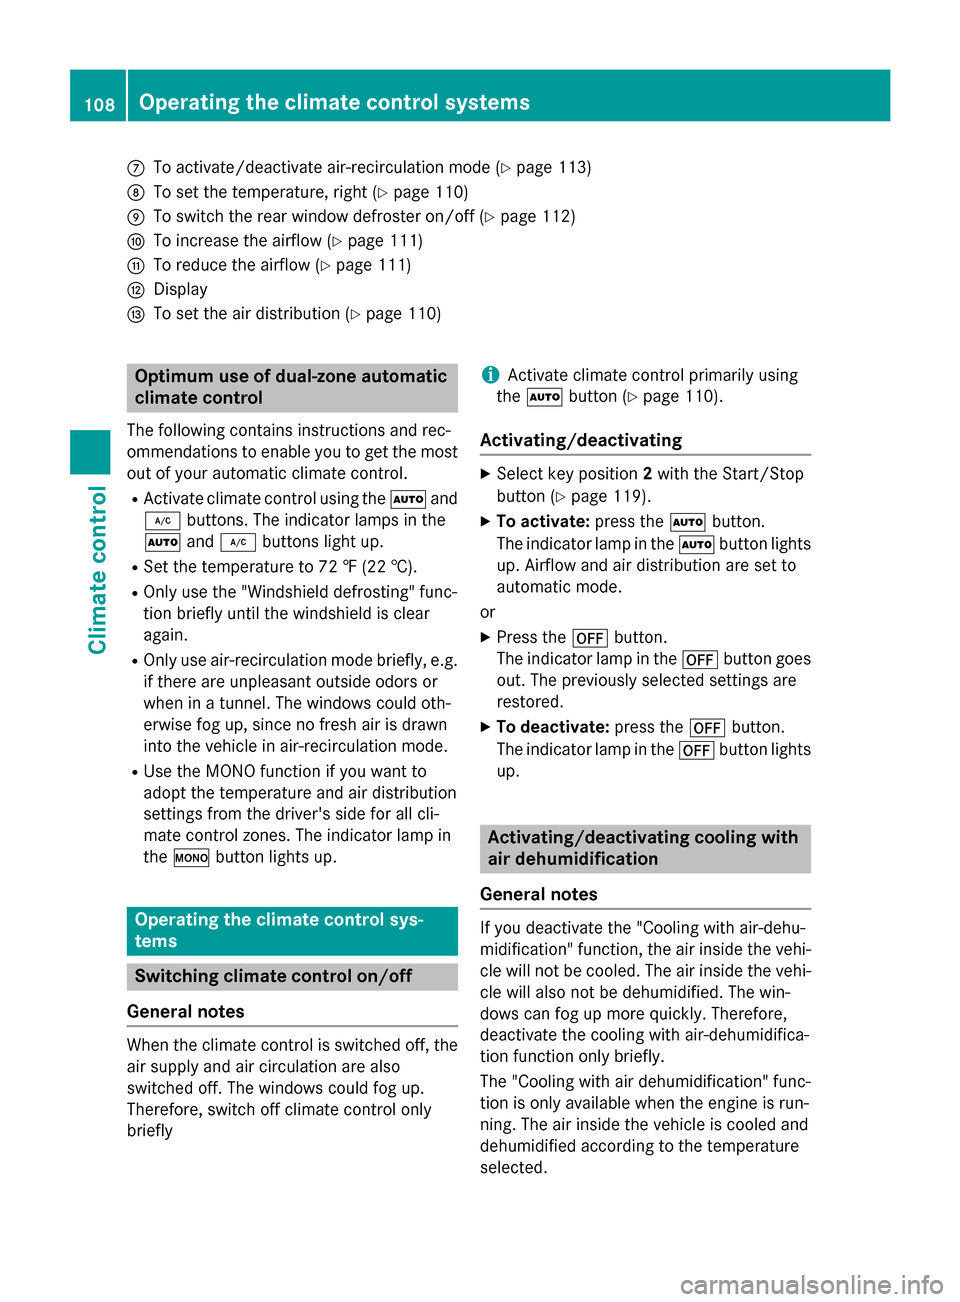
006B
To activate/deactivat eair-recirculation mode (Y page 113)
006C To set the temperature, right (Y page 110)
006D To switch the rear window defroster on/of f(Ypage 112)
006E To increase the airflow (Y page 111)
006F To reduce the airflow (Y page 111)
0070 Display
0071 To set the air distribution (Y page 110)Optimum use of dual-zone automatic
climate control
The following contains instructions and rec-
ommendations to enable you to get the most
out of your automatic climate control.
R Activate climate control using the 0058and
005A buttons. The indicator lamps in the
0058 and005A button slight up.
R Set the temperature to 72 ‡(22 †).
R Only use the "Windshield defrosting" func-
tion briefly until the windshield is clear
again.
R Only use air-recirculation mode briefly, e.g.
if there are unpleasant outside odors or
when in atunnel. The windows could oth-
erwise fog up, since no fresh air is drawn
into the vehicle in air-recirculation mode.
R Use the MONO function if you want to
adopt the temperature and air distribution
settings from the driver's side for all cli-
mate control zones. The indicator lamp in
the 005B button lights up. Operating the climate control sys-
tems
Switching climate control on/off
General notes When the climate control is switched off, the
air supply and air circulation are also
switched off. The windows could fog up.
Therefore, switch off climate control only
briefly i
Activate climate control primarily using
the 0058 button (Y page 110).
Activating/deactivating X
Select key position 2with the Start/Stop
button (Y page 119).
X To activate: press the0058button.
The indicator lamp in the 0058button lights
up. Airflow and air distribution are set to
automatic mode.
or X Press the 0078button.
The indicator lamp in the 0078button goes
out. The previously selected settings are
restored.
X To deactivate: press the0078button.
The indicator lamp in the 0078button lights
up. Activating/deactivating cooling with
air dehumidification
General notes If you deactivate the "Cooling with air-dehu-
midification" function, the air inside the vehi-
cle will not be cooled. The air inside the vehi-
cle will also not be dehumidified. The win-
dows can fog up more quickly. Therefore,
deactivate the cooling with air-dehumidifica-
tion function only briefly.
The "Cooling with air dehumidification" func-
tion is only available when the engine is run-
ning. The air inside the vehicle is cooled and
dehumidified accordin gtothe temperature
selected. 108
Operating the climate control systemsClimate control
Page 113 of 290
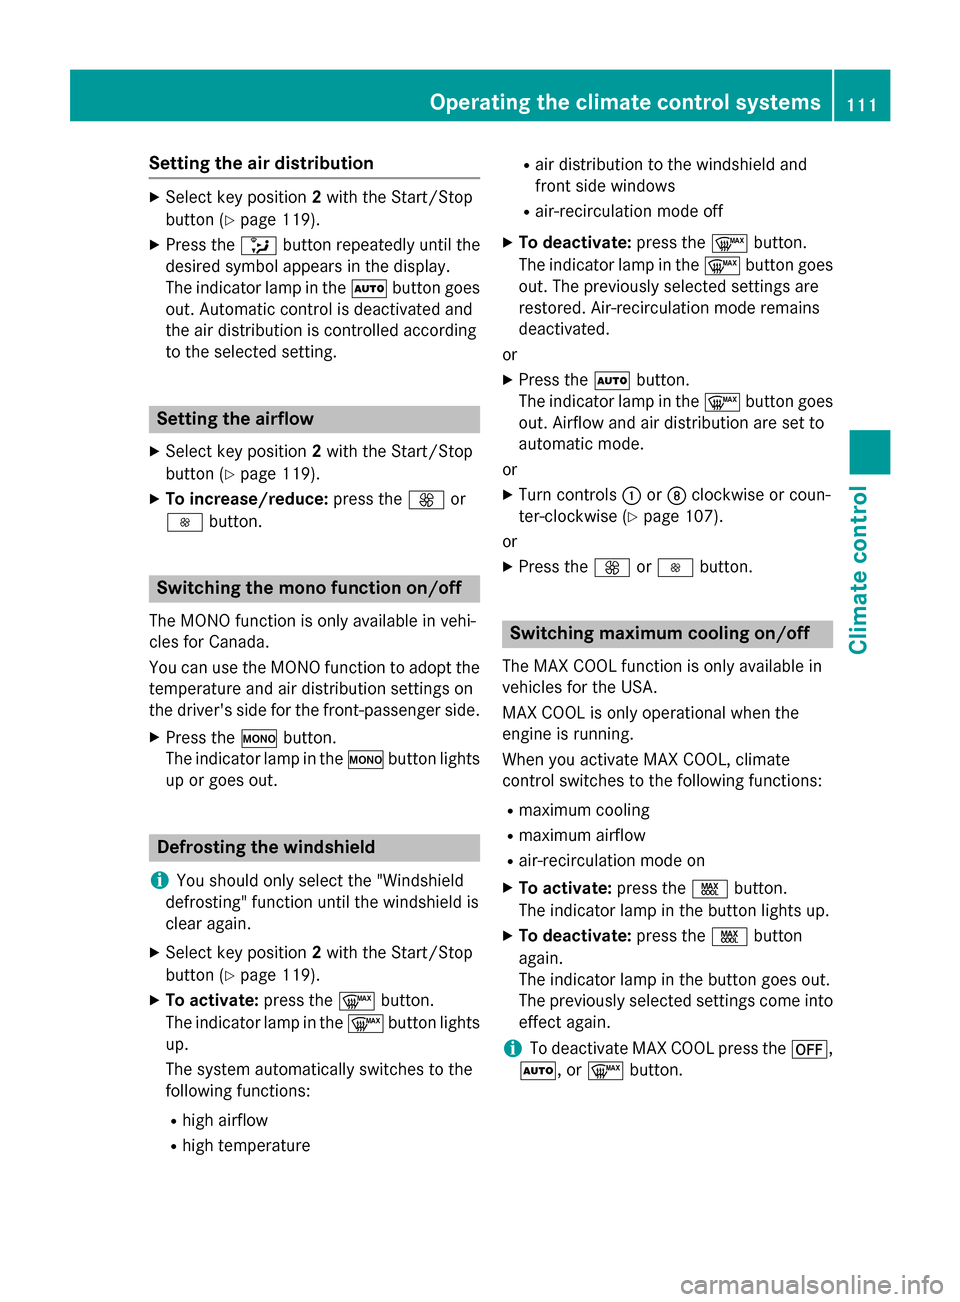
Setting the air distribution
X
Select key position 2with the Start/Stop
button (Y page 119).
X Press the 008Fbutton repeatedly until the
desired symbol appears in the display.
The indicator lamp in the 0058button goes
out. Automatic control is deactivated and
the air distribution is controlled according
to the selected setting. Setting the airflow
X Select key position 2with the Start/Stop
button (Y page 119).
X To increase/reduce: press the0097or
0095 button. Switching the mono function on/off
The MONO function is only available in vehi-
cles for Canada.
You can use the MONO function to adopt the temperature and air distribution settings on
the driver's side for the front-passenger side.
X Press the 005Bbutton.
The indicator lamp in the 005Bbutton lights
up or goes out. Defrosting the windshield
i You should only select the "Windshield
defrosting" function until the windshield is
clear again.
X Select key position 2with the Start/Stop
button (Y page 119).
X To activate: press the0064button.
The indicator lamp in the 0064button lights
up.
The system automatically switches to the
following functions:
R high airflow
R high temperature R
air distribution to the windshield and
front side windows
R air-recirculation mode off
X To deactivate: press the0064button.
The indicator lamp in the 0064button goes
out. The previously selected settings are
restored. Air-recirculation mode remains
deactivated.
or X Press the 0058button.
The indicator lamp in the 0064button goes
out. Airflow and air distribution are set to
automatic mode.
or
X Turn controls 0043or006C clockwise or coun-
ter-clockwise (Y page 107).
or
X Press the 0097or0095 button. Switching maximum cooling on/off
The MAX COOL function is only available in
vehicles for the USA.
MAX COOL is only operational when the
engine is running.
When you activate MAX COOL, climate
control switches to the following functions:
R maximum cooling
R maximum airflow
R air-recirculation mode on
X To activate: press the00C9button.
The indicator lamp in the button lights up.
X To deactivate: press the00C9button
again.
The indicator lamp in the button goes out.
The previously selected settings come into
effect again.
i To deactivate MAX COOL press the
0078,
0058,or 0064button. Operating the climate control systems
111Climatecontrol
Page 121 of 290
!
Warm up the engine quickly. Do not use
the engine's full performance until it has
reached operating temperature. The oper-
ating temperature has been reached when
the engine oil temperature displayint he
on-board computer's AMG menu no longer flashes.
Only shift into reverse gear when the vehi-
cle is stationary.
Where possible, avoid spinning the drive
wheels when pulling awayons lippery
roads. You could otherwise damage the
drive train.
! During
acold start with low engine oil
temperatures (below 32 ‡) (0 †), the max- imum engine speed is restricted in order toprotect the engine. To protect the engine
and maintain smooth engine operation,
avoid driving at full throttle when the
engine is cold. Key positions
KEYLESS-GO start function You can switch the engine on and off with the
Start/Stop button. For this, the SmartKey
must be inside the vehicle. The Start/Stop
button is located in the center console and is
illuminated when the vehicle is unlocked.
Pressing the Start/Stop button several times
in succession corresponds to the different
key positions in the ignition lock. This is only
the case if you are not depressing the brake
pedal.
If you depress the brake pedal and press the
Start/Stop button, the engine starts immedi-
ately.
If there is aSmartKey in the ignition lock, this
takes precedence over the KEYLESS-GO start
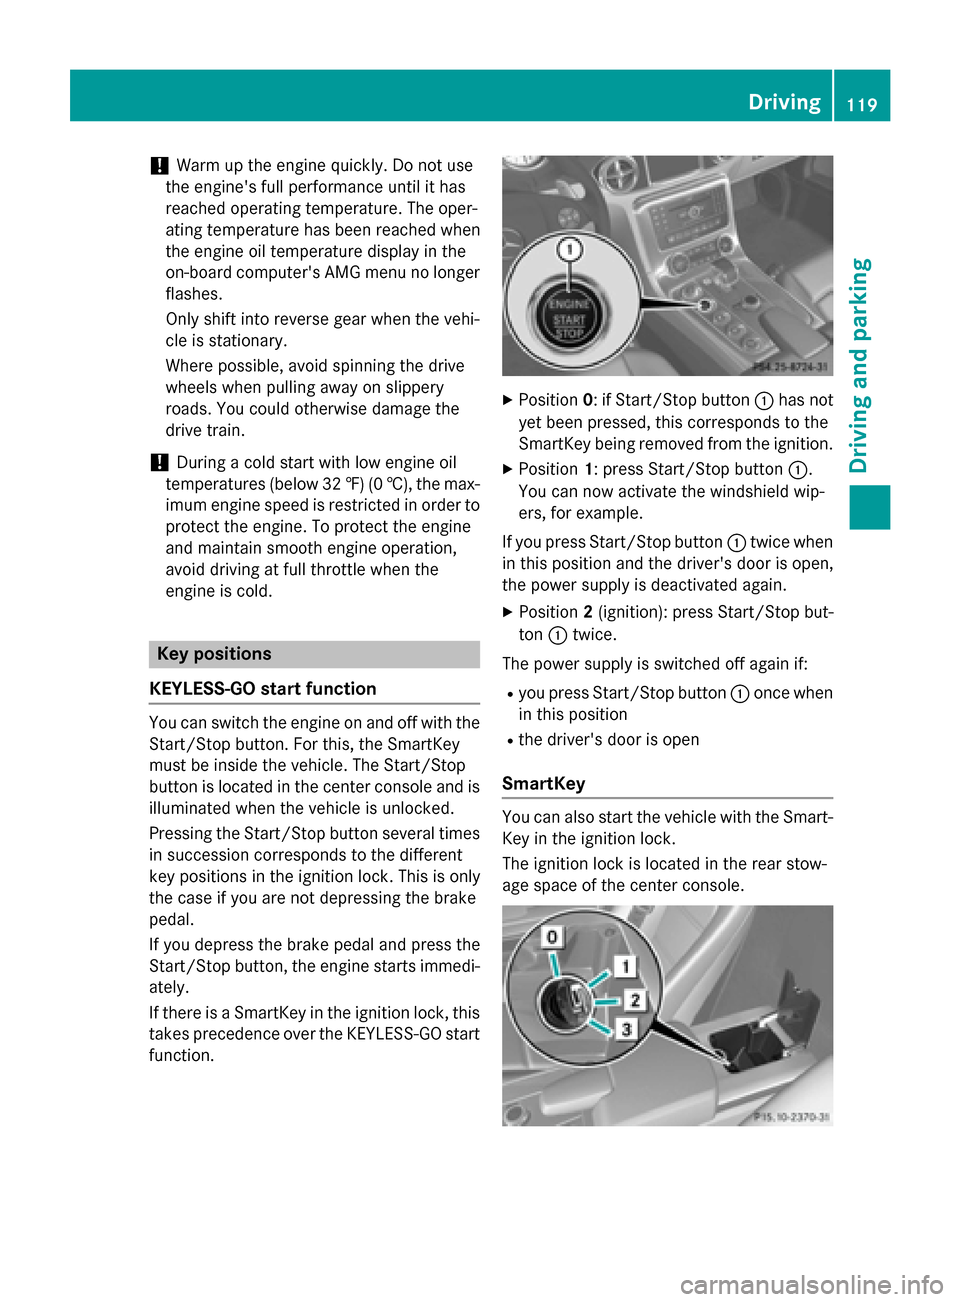
function. X
Position 0:ifStart/Stop button 0043has not
yet been pressed, this corresponds to the
SmartKey being removed from the ignition.
X Position 1:press Start/Stop button 0043.
You can now activate the windshieldw ip-
ers, for example.
If you press Start/Stop button 0043twice when
in this position and the driver's door is open,
the power supplyisd eactivated again.
X Position 2(ignition): press Start/Stop but-
ton 0043twice.
The power supplyiss witched off againif:
R you press Start/Stop button 0043once when
in this position
R the driver's door is open
SmartKey You can also start the vehicle with the Smart-
Key in the ignition lock.
The ignition lock is located in the rear stow-
age space of the center console. Driving
119Driving and parking Z