2015 MERCEDES-BENZ SLS AMG GT ROADSTER trunk release
[x] Cancel search: trunk releasePage 9 of 290
Distanc
erecorder ............................ .152
see Odometer
see Trip odometer
Door control panel
Overview .......................................... 33
Doors
Automatic locking (on-board com-
puter) ............................................. 159
Automatic locking (switch) .............. .70
Central locking/unlocking
(SmartKey) ...................................... .62
Display message .................... 184 ,186
Emergency locking ........................... 71
Emergency unlocking ....................... 70
Important safety note s.................... 68
Opening (fro minside )...................... 69
Drinking and driving ......................... 135
Drive program Automati c...................................... 126
Manua l........................................... 127
SETUP (on-board computer) .......... 160
Drive program display ...................... 123
Driver's door see Doors
Drivin gabroad
Mercedes-Benz Service ................. 223
Symmetrical lo wbeam. ................... 96
Drivin glamps
see Daytime running lamps
Drivin gonfloodedroads .................. 137
Drivin gsafety systems
ABS (Anti-lock Braking System) ....... 54
ADAPTIV EBRAK E............................. 57
BAS (Brake Assist System) .............. 55
Electroni cbrake force distribution ... 57
ESP ®
(Electronic Stability Pro-
gram) ............................................... 56
ETS (Electronic Tractio nSystem) ..... 55
Important safety information ........... 54
Overview .......................................... 54
Drivin gsystems
AMG adaptive sport suspension
system ........................................... 140
Blind Spot Assist ............................ 145
Cruise control ................................ 138
Displa ymessage ............................ 180 PARKTRONIC ................................. 141
Rear vie
wcamera .......................... 144
Drivin gtips
AMG ceramic high-performance
compound brake system ............... 137
Brakes ........................................... 135
Break-in perio d.............................. 118
Drinking and driving ....................... 135
Driving abroa d................................. 96
Driving in winter ............................. 137
Driving on we troads ...................... 137
Exhaus tcheck ............................... 135
Fue l................................................ 135
Genera l.......................................... 134
Hydroplaning ................................. 137
Icy roa dsurfaces ........................... 137
Limite dbraking efficiency on
salte droads ................................... 136
Snow chains .................................. 253
Symmetrical lo wbeam. ................... 96
Wet roa dsurface ........................... 136
DVD audio (on-board computer) ...... 155
DVD video (on-board computer) ...... 155 E
EASY-ENTRY feature Activating/deactivating ................. 159
Function/note s................................ 89
EASY-EXIT feature
Crash-responsiv e............................. 90
Function/note s................................ 89
Switching on/of f........................... 159
EBD (electroni cbrake forc edistri-
bution) Displa ymessage ............................ 166
Function/note s................................ 57
Electronic Stability Program
see ESP ®
(Electronic Stability Program)
Electronic traction contro lsystem
see ETS ............................................ 55
Emergenc yrelease
Driver's doo r.................................... 70
Trunk ............................................... 74
Vehicl e............................................. 70
Emergenc yTensionin gDevices
Function ........................................... 50
Safety guideline s............................. 37 Index
7
Page 17 of 290
DOT (Department of Transporta-
tion) (definition) ............................. 268
GAW
R(GrossA xle Weight Rating)
(definition) .................................... .268
GVW (Gross Vehicle Weight) (def-
inition) .......................................... .268
GVW R(Gross Vehicle Weight Rat-
ing) (definition) .............................. 269
Important safety notes .................. 250
Increase dvehicle weight due to
optional equipment (definition) ...... 268
Kilopascal (kPa )(definition) ........... 269
Labeling (overview )........................ 264
Loa dbearing index (definition) ...... 270
Loa dindex ..................................... 266
Loa dindex (definition) ................... 269
Maximu mloaded vehicleweight
(definition) ..................................... 269
Maximu mloadona tire (definition) .. 269
Maximu mpermissibl etire pres-
sure (definition) ............................. 269
Maximu mtire load ......................... 267
Maximu mtire load (definition) ....... 269
Optiona lequipment weight (defi-
nition) ............................................ 269
PSI (pounds pe rsquare inch )(de f-
inition) ........................................... 269
Replacing ....................................... 270
Service life ..................................... 252
Sidewal l(de finition) ....................... 269
Speed rating (definition) ................ 268
Storing ........................................... 271
Structure and characteristics
(definition) ..................................... 268
Technica ldata. .............................. 277
Temperature .................................. 264
TIN (Tire Identification Number)
(definition) ..................................... 270
Tire bead (definition) ...................... 269
Tire pressure (definition) ................ 269
Tire pressures (recommended )...... 268
Tire size (data )............................... 275
Tire size designation, load-bearing capacity, speed rating .................... 264
Tire trea d....................................... 251
Tire trea d(definition) ..................... 269
Tota lloa dlim it (definition) ............. 270
Tractio n......................................... 263 Tractio
n(definition) ....................... 270
Tread wear ..................................... 263
Uniform Tire Quality Grading
Standard s...................................... 263
Uniform Tire Quality Grading
Standard s(de finition) .................... 268
Wea rindicator (definition) ............. 270
Wheel rim (definition) .................... 268
see Fla ttire
Top Tether ............................................ 53
Tow-away alarm .................................. 59
Towing Important safety guideline s........... 244
Installing the towing ey e................ 245
Removing the towing ey e............... 245
With the rea raxler aised ................ 245
Towin gaway
With both axles on the ground ....... 246
Transmission
Driving tip s.................................... 124
Selector lever ................................ 121
Shift rang e..................................... 127
Transmissio nposition display ......... 123
Transmissio npositions .................... 123
Transporting the vehicle .................. 246
Trim piece s(clea ning instructions) .. 230
Trip computer (on-board computer) .. 153
Trip odometer Calling up ....................................... 152
Trunk
Emergency release .......................... 74
Important safety guideline s............. 72
Locking separatel y........................... 74
Opening (automatically from
inside ).............................................. 73
Trunk lid
Displa ymessage ............................ 184
Opening/closing ........................ 72, 73
Opening dimensions ...................... 286
Trunk load (maximum) ...................... 286
see Technical data
Turn signal (display message) ......... 174
Turn signals Switching on/of f.............................. 98
Type identificatio nplate
see Vehicl eide ntification plate Index
15
Page 75 of 290
hot, and
achild could be burned on these
parts. G
WARNING
Do not carry heavy or hard objectsint he
passenger compartmentort runk unless they
are firmly secured in place.
Unsecured or improperly positioned cargo
increases achild's risk of injury in the event of
R strongb raking maneuvers
R sudden changes of direction
R an accident
! The temperature in the trunk may be high.
For this reason, do not store any tempera-
ture-sensitive objectsint he trunk.
! The trunk lid swings upwards when
opened. Therefore, make sure that there is sufficient clearance above the trunk lid.
Coupe:tof ully open the trunk lid, aminimum
height of 5.5 ft (1.68 m) from the ground is
necessary.
Roadster: to fully open the trunk lid, amini-
mum height of 5.7 ft (1.75 m) from the ground
is necessary.
The trunk lid can be:
R opened automatically from outside
R opened automatically from inside
R locked separately
R unlocked with the mechanical key
R opened with the emergency release button Opening/closing the trunk
Opening/closing from outside Opening
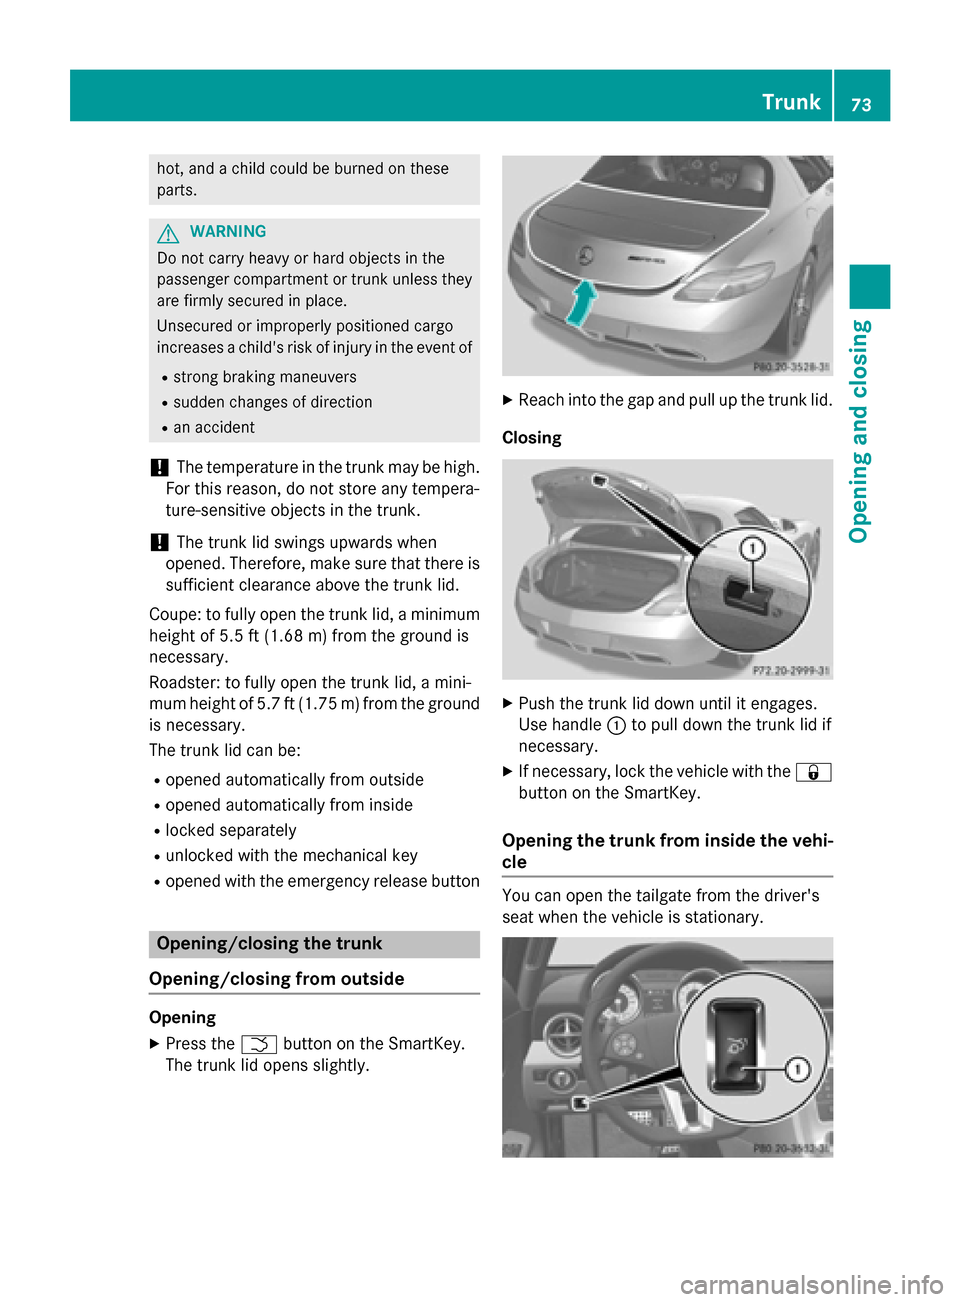
X Press the 0054button on the SmartKey.
The trunk lid opens slightly. X
Reach into the gap and pull up the trunk lid.
Closing X
Push the trunk lid down until it engages.
Use handle 0043to pull down the trunk lid if
necessary.
X If necessary, lock the vehicle with the 0037
button on the SmartKey.
Opening the trunk from inside the vehi- cle You can open the tailgate from the driver's
seat when the vehicle is stationary. Trunk
73Opening and closing Z
Page 76 of 290
X
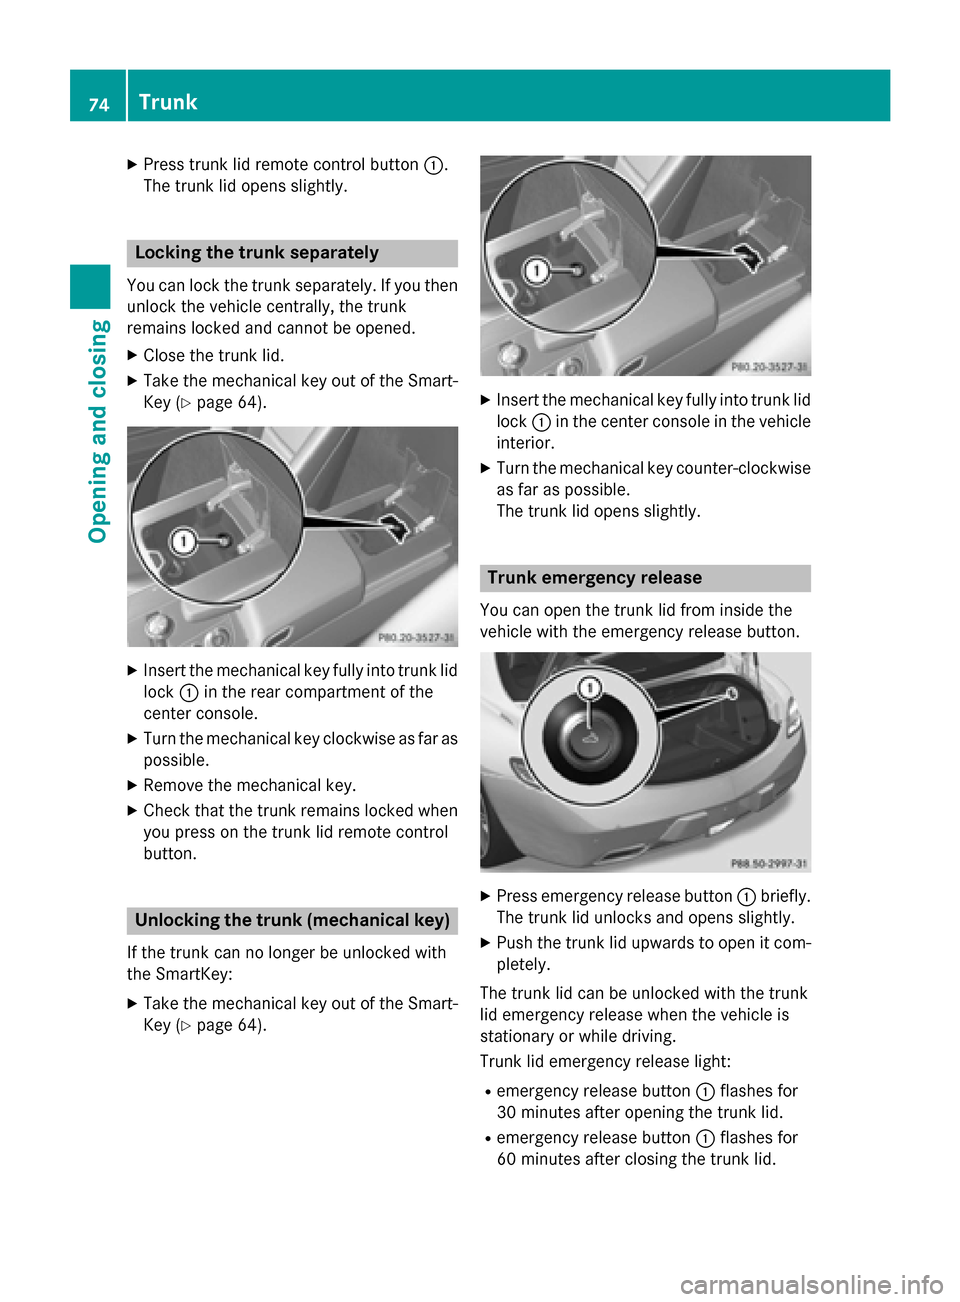
Press trunkl id remotecontrol button 0043.
The trunkl id opens slightly. Locking the trunk separately
You can lock the trunks eparately. If you then
unlock the vehicle centrally, the trunk
remains locked and cannot be opened.
X Close the trunkl id.
X Take the mechanical key out of the Smart-
Key (Y page 64). X
Inser tthe mechanical key fully into trunkl id
lock 0043in the rear compartment of the
center console.
X Turn the mechanical key clockwise as far as
possible.
X Remove the mechanical key.
X Check that the trunkr emains locked when
you press on the trunkl id remotecontrol
button. Unlocking the trunk (mechanical key)
If the trunkc an no longer be unlocked with
the SmartKey:
X Take the mechanical key out of the Smart-
Key (Y page 64). X
Inser tthe mechanical key fully into trunkl id
lock 0043in the center console in the vehicle
interior.
X Turn the mechanical key counter-clockwise
as far as possible.
The trunkl id opens slightly. Trunk emergency release
You can open the trunkl id from inside the
vehicle with the emergenc yrelease button. X
Press emergenc yrelease button 0043briefly.
The trunkl id unlocksand opens slightly.
X Push the trunkl id upwards to open it com-
pletely.
The trunkl id can be unlocked with the trunk
lid emergenc yrelease when the vehicle is
stationary or while driving.
Trunk lid emergenc yrelease light:
R emergenc yrelease button 0043flashes for
30 minutes after opening the trunkl id.
R emergenc yrelease button 0043flashes for
60 minutes after closing the trunkl id.74
TrunkOpening and closing
Page 77 of 290
The trunk lid emergenc
yrelease does not
unlock the trunk lid if the battery is discon-
nected or discharged.
If the vehicle was locked centrally, opening
the trunk lid with the trunk lid emergency
release triggers the anti-theft alarm system. Side windows
Important safety notes
G
WARNING
While opening the side windows, body parts
could become trapped between the side win- dow and the door frame as the side window
moves. There is arisk of injury.
Make sure that nobody touches the side win-
dow during the opening procedure. If some-
body becomes trapped, release the switch or pull the switch to close the side window again. G
WARNING
While closing the side windows, body parts in the closing area could become trapped. There is ar isk of injury.
When closing make sure that no parts of the
body are in the closing area. If somebody
becomes trapped, release the switch or press
the switch to open the side window again. G
WARNING
If children operate the side windows they
could become trapped, particularly if they are left unsupervised. There is arisk of injury.
When leaving the vehicle, alway stake the
SmartKey with you and lock the vehicle. Never
leave children unsupervised in the vehicle.
The side windows are equipped with an auto-
matic reversin gfeature. If an object blocks or
restricts aside window during the closing
process, the side window opens again auto-
matically. G
WARNING
The reversin gfeature does not react:
R to soft, light and thin objects, e.g. small fin-
gers
R over the last 4mmofthe closing movement
R during resetting
R when closing the side window again man-
ually immediately after automatic reversing
This means that the reversin gfeature cannot
prevent someone being trapped in these sit-
uations. There is arisk of injury.
Make sure that no body parts are in close
proximit yduring the closing procedure. If
someone becomes trapped, press the switch
to open the side window again.
Observe the importan tsafety notes in the
"Children in the vehicle" section (Y page 51). Opening and closing the side win-
dows
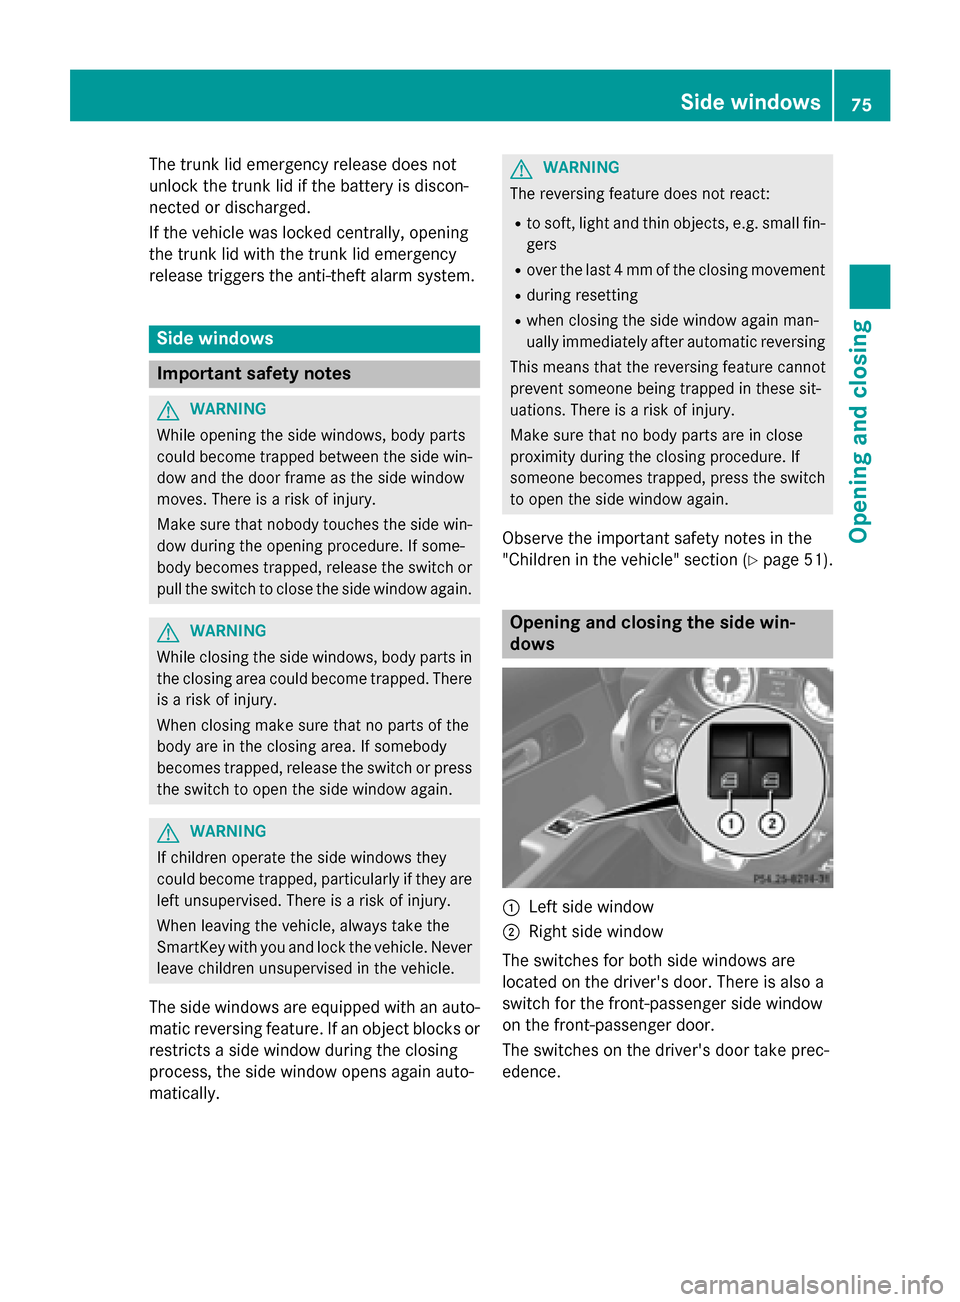
0043
Left side window
0044 Right side window
The switches for both side windows are
located on the driver's door. There is also a
switch for the front-passenger side window
on the front-passenger door.
The switches on the driver's door take prec-
edence. Side windows
75Opening and closing Z
Page 81 of 290
!
Never sit on the soft top when it is closed
or store heavy objects on it. You will other- wise damage the soft top of the vehicle.
! When opening and closing the soft top,
make sure that:
R there is sufficient clearance above it, as
the soft top swings upwards.
R there are no objects on the soft top or the
soft-top covers to the side.
R the fabric is not dirty, wet or frozen
R the outside temperature is above -10 †.
You could otherwise damage the soft top as
well as other parts of the vehicle.
i Make sure that the soft top is dry and
clean before closing it. Otherwise, water or
dirt could enter the vehicle interior or trunk. Opening and closing with the soft top
switch
Important safety notes G
WARNING
When opening or closing the soft top, there is ar isk that parts of the body could become
trapped by moving parts such as the roof
mechanism, the trunk lid, or the side win-
dows. There is arisk of injury.
When opening or closing the roof, make sure
that no parts of the body are in the vicinity of
moving parts. Release the switch if somebody
becomes trapped. G
WARNING
If the vehicle speed exceeds 30 mph
(50 km/h), the soft top stops during the open- ing or closing procedure. This impairs your
view to the rear. There is arisk of an accident.
Reduce your speed to below 30 mph
(50 km/h) or stop the vehicle in accordance
with the traffic conditions. Press or pull the
soft-top switch againino rder to open or close
the soft top fully. Opening and closing X
When the vehicle is stationary, depress the
brake pedal.
X Select key position 2with the Start/Stop
button (Y page 119). X
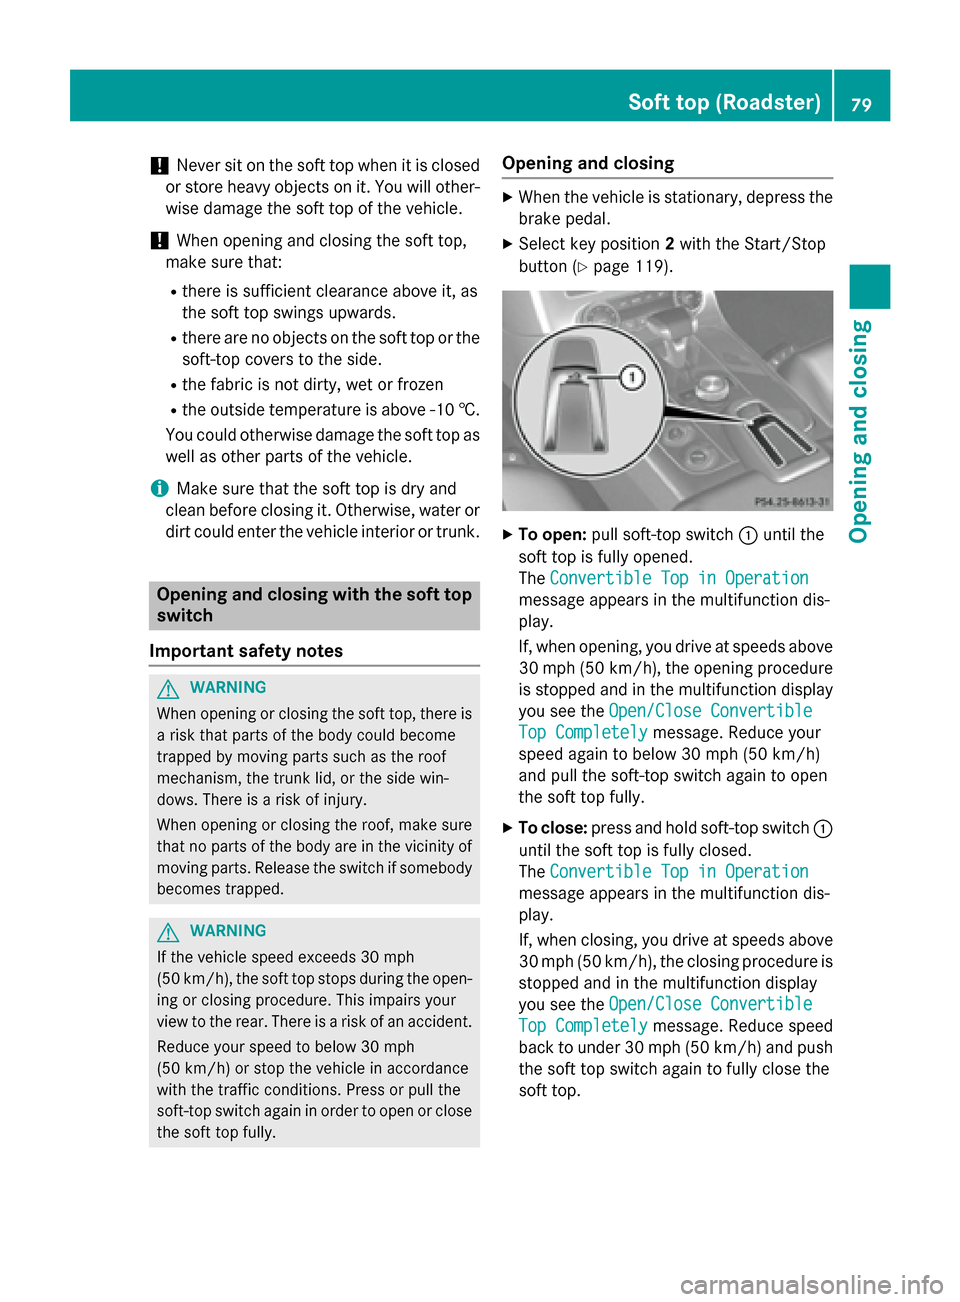
To open: pull soft-top switch 0043until the
soft top is fully opened.
The Convertible Top in Operation Convertible Top in Operation
message appears in the multifunction dis-
play.
If, when opening, you drive at speeds above 30 mph (50 km/h) ,the opening procedure
is stopped and in the multifunction display
you see the Open/Close Convertible Open/Close Convertible
Top Completely
Top Completely message. Reduce your
speed againtob elow 30 mph (50 km/h)
and pull the soft-top switch againtoo pen
the soft top fully.
X To close: press and hold soft-top switch 0043
until the soft top is fully closed.
The Convertible Top in Operation
Convertible Top in Operation
message appears in the multifunction dis-
play.
If, when closing, you drive at speeds above
30 mph (50 km/h), the closing procedure is
stopped and in the multifunction display
you see the Open/Close Convertible Open/Close Convertible
Top Completely
Top Completely message. Reduce speed
back to under 30 mph (50 km/h) and push the soft top switch againtof ully close the
soft top. Soft top (Roadster)
79Opening and closing Z
Page 82 of 290
Opening and closing using the Smart-
Key
Important safet ynotes G
WARNING
When opening or closing the soft top, there is ar isk that parts of the body could become
trapped by movin gparts such as the roof
mechanism, the trun klid, or the side win-
dows. There is arisk of injury.
When opening or closing the roof, make sure
that no parts of the body are in the vicinity of
movin gparts. Release the switch if somebody
becomes trapped.
Opening and closing i
The SmartKey must be close to the driv-
er's door handle.
X Point the tip of the SmartKey at the driver's
door handle.
X To open: press and hold the 0036button
on the SmartKey until the soft top is fully
opened.
The Convertible Top in Operation Convertible Top in Operation
message appears in the multifunction dis-
play.
X To close: press and hold the 0037button
on the SmartKey until the soft top is fully
closed.
The Convertible Top in Operation
Convertible Top in Operation
message appears in the multifunction dis-
play. The soft top and the side windows
close. Relocking the soft top
G
WARNING
If you do not lock the closed soft top, it may
open during ajourney. This could cause you to
lose control of the vehicle. There is arisk of an
accident.
Only drive with the soft top fully open or
locked closed. The soft top is not locked if:
R the Convertible Top in Operation Convertible Top in Operation
message appears in the multifunction dis-
play.
R you hear awarning tonef or up to ten sec-
onds when pulling away or while driving.
You can lock the soft top again if it is not
locked fully.
X Pull over and stop the vehicle safely as soon
as possible, paying attention to road and
traffic conditions.
X Select key position 2with the Start/Stop
button (Y page 119).
X Press the soft-top switch. Installing/removing the wind screen
G
WARNING
If the wind screen is incorrectly installed, it
could detach itself during ajourney and
endanger other road users. There is arisk of
an acciden tand injury.
Install the wind screen as described. Do not
place any objects on top of the installed wind screen.
! Install or remove the wind screen only
when the soft top is open. You could oth-
erwise damage the wind screen or the vehi-
cle interior.
! Mercedes-Benz recommends that you
only use wind screen swhich have been
tested and approved for Mercedes-Benz
vehicles. This helps to preven tdamage to
the vehicle.
The wind screen protects against wind when
driving with the soft top open. It is secured
between the roll bars.
The wind screen is in abag on the tank par-
tition wall in the trunk.
X Open the trunk. 80
Soft top (Roadster)Opening and closing
Page 135 of 290
The transmission remains in
Nif:
R the SmartKey is in the ignition lock and
R you use the E ‑SELECT lever to shift the
transmission to Nbefore switchin gthe
engine off
This still applies if you open the driver's or
front-passenger door.
Further information on transmission posi-
tion Nwhen operating with aSmartKey is
available in the "Car wash" section
(Y page 223). Electric parking brake
General notes G
WARNING
If you leave children unsupervised in the vehi- cle, they could set it in motion by, for example:
R release the parking brake.
R shift the automatic transmission out of the
parking position P.
R start the engine.
In addition, they may operate vehicle equip-
ment and become trapped. There is arisk of
an accident and injury.
When leaving the vehicle, alway stake the
SmartKey with you and lock the vehicle. Never
leave children unsupervised in the vehicle.
The function of the electric parking brake is
dependent on the on-board voltage. If the on-
board voltage is low or there is amalfunction
in the system, it may not be possible to apply
the released parking brake.
X If this is the case, only park the vehicle on
level ground and secure it to prevent it roll- ing away.
X Shift the automatic transmission to posi-
tion P.
It may not be possible to release an applied
parking brake, if the on-board voltage is low
or there is amalfunction in the system. Con-
tact aqualified specialist workshop. Applying/releasing manually
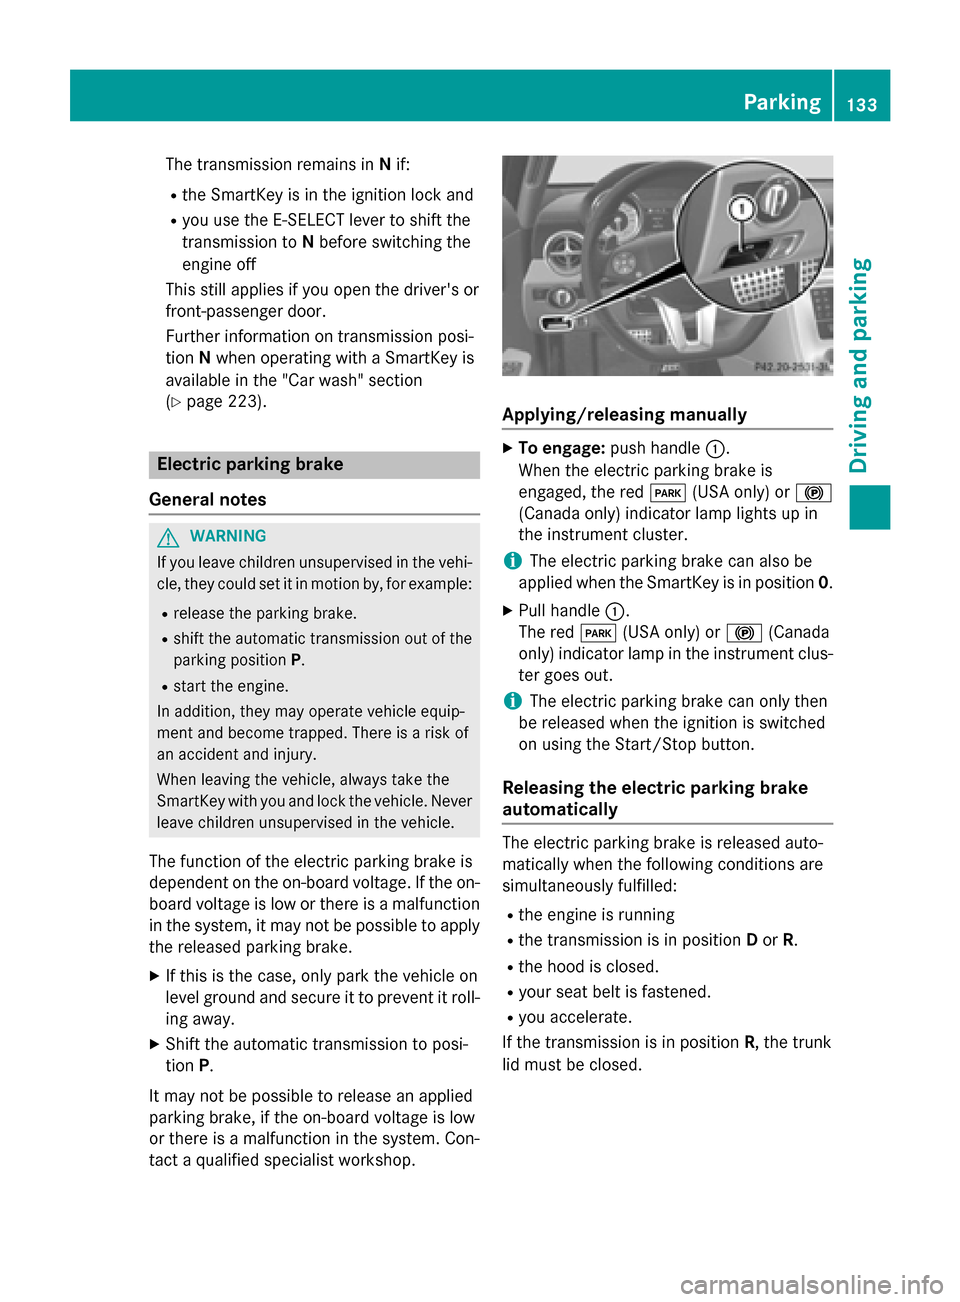
X
To engage: push handle 0043.
When the electric parking brake is
engaged, the red 0049(USA only) or 0024
(Canada only) indicator lamp lights up in
the instrument cluster.
i The electric parking brake can also be
applied when the SmartKey is in position 0.
X Pull handle 0043.
The red 0049(USA only) or 0024(Canada
only) indicator lamp in the instrument clus- ter goes out.
i The electric parking brake can only then
be released when the ignition is switched
on using the Start/Stop button.
Releasing the electric parking brake
automatically The electric parking brake is released auto-
matically when the following conditions are
simultaneously fulfilled:
R the engine is running
R the transmission is in position Dor R.
R the hood is closed.
R your seat belt is fastened.
R you accelerate.
If the transmission is in position R,the trunk
lid must be closed. Parking
133Driving and parking Z