2015 MERCEDES-BENZ SLS AMG GT ROADSTER engine
[x] Cancel search: enginePage 244 of 290
Jump-starting
G
WARNING
Battery acid is caustic. There is arisk of injury.
Avoid contact with the skin, eyes or clothing. Do not inhale any battery gases. Do not lean over the battery. Keep children away from batteries. Wash battery acid immediately with water and seek
medical attention. G
WARNING
During charging and jump-starting, explosive gases can escape from the battery. There is arisk
of an explosion.
Particularly avoid fire, open flames, creating sparks and smoking. Ensure there is sufficient ven-
tilation while charging and jump-starting. Do not lean over abattery. G
WARNING
During the charging process, abattery produces hydrogen gas. If ashort circuit occurs or sparks
are created, the hydrogen gas can ignite. There is arisk of an explosion.
R Make sure that the positive terminal of aconnected battery does not come into contact with
vehicle parts.
R Never place metal objects or tools on abattery.
R It is important that you observe the described order of the battery terminals when connecting
and disconnecting abattery.
R When jump-starting, make sure that the battery poles with identical polarity are connected.
R It is particularly important to observe the described order when connecting and disconnecting
the jumper cables.
R Never connect or disconnectt he battery terminals while the engine is running.G
WARNING
Ad ischarged battery can freeze at temperatures below freezing point. When jump-starting the
vehicle or charging the battery, gases can escape from the battery. There is arisk of an explosion.
Allow the frozen battery to thaw out before charging it or jump-starting.
! Avoid repeated and lengthy startinga
ttempts. Otherwise, the catalytic converter could be
damaged by the non-combusted fuel.
Do not start the vehicle using arapid charging device. If your vehicle's battery is discharged,
the engine can be jump-started from another vehicle or from asecond battery using jumper
cables. Observe the following points:
R The battery is not accessible in all vehicles. If the other vehicle's battery is not accessible,
jump-start the vehicle using asecond battery or ajump-starting device.
R You may only jump-start the vehicle when the engine and exhaust system are cold.
R Do not start the engine if the battery is frozen.L et the battery thaw first.
R Only jump-start from batteries with a12Vvoltage rating.
R Only use jumper cables which have asufficient cross-section and insulated terminal clamps. 242
Jump-startingBreakdown assistance
Page 245 of 290
R
If the battery is fullyd ischarged, leave the battery that is being used to jump-start connected
for afew minutes before attempting to start. This charges the battery slightly.
R Make sure that the two vehicle sdonot touch.
Make sure that:
R the jumper cablesa re not damaged.
R when the jumper cablesa re connected to the battery, uninsulated sections of the terminal
clamp do not come into contact with other metal sections.
R the jumper cablesc annot come into contact with parts such as the V-belt pulley or the fan.
These parts move when the engine is started and whileitisr unning.
X Press the electric parking brake handle.
X Shift the transmission to Pwith the button in the center console.
X Remove the SmartKey from the ignition lock.
X Switch off all electrical consumers (e.g. radio, blower, etc.).
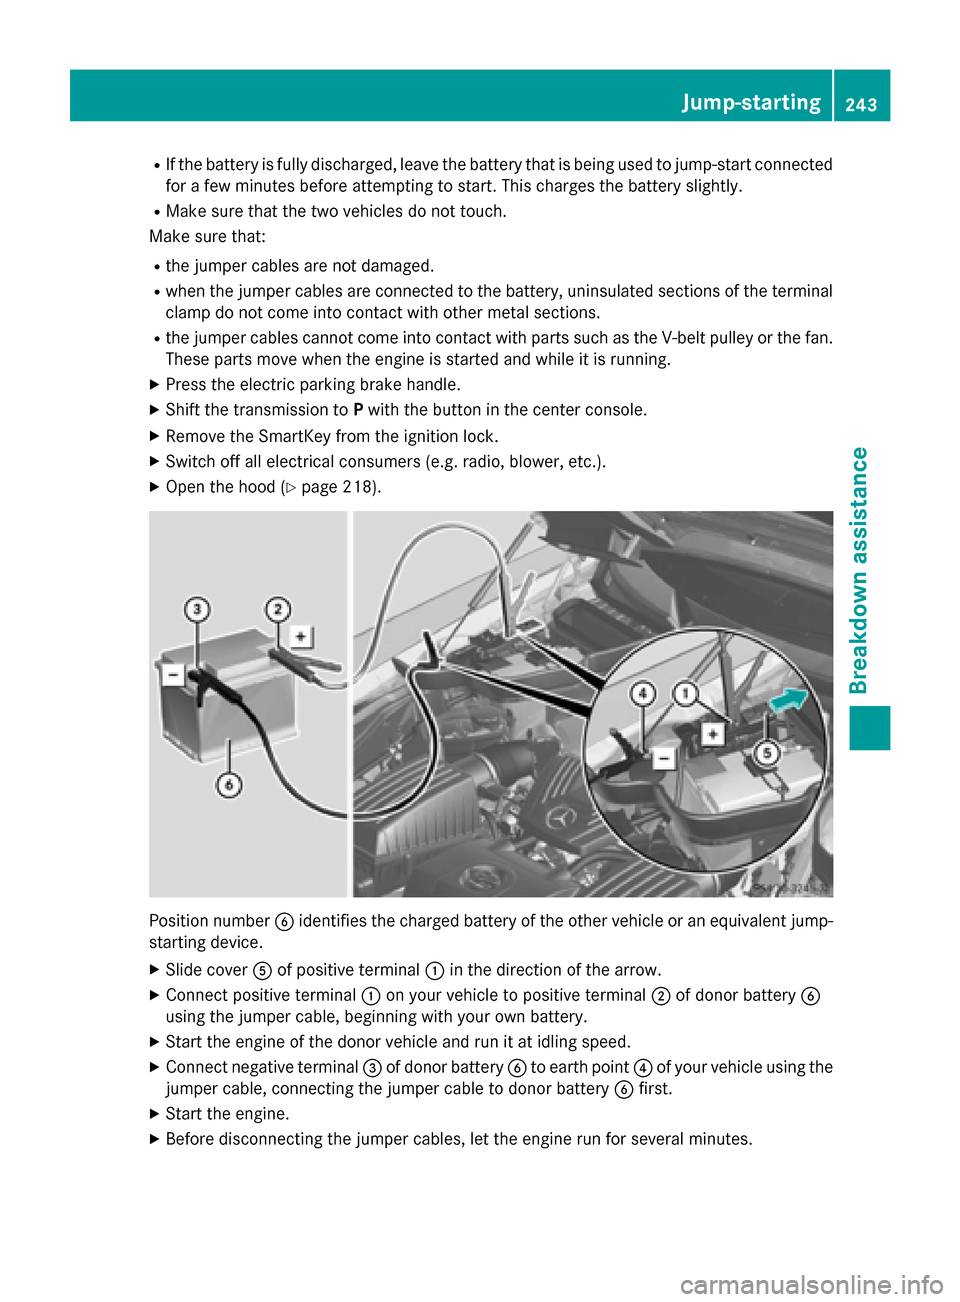
X Open the hood (Y page 218). Positio
nnumber 0084identifie sthe charged battery of the other vehicle or an equivalent jump-
starting device.
X Slide cover 0083of positive terminal 0043in the direction of the arrow.
X Connect positive terminal 0043on yourv ehicle to positive terminal 0044of donor battery 0084
using the jumper cable,b eginning with yourown battery.
X Start the engine of the donor vehicle and run it at idling speed.
X Connect negative terminal 0087of donor battery 0084to earth point 0085of yourv ehicle using the
jumper cable,c onnecting the jumper cable to donor battery 0084first.
X Start the engine.
X Before disconnecting the jumper cables, let the engine run for several minutes. Jump-starting
243Breakdown assistance Z
Page 246 of 290
X
First, remove the jumper cable sfrom earth point 0085and negative terminal 0087,then from
positiv eclamp 0043and positiv eterminal 0044.Each time beginning with your vehicle' sbattery.
X Slide cover 0083of the positiv eterminal in the opposite directio ntothe arrow.
X Have the battery checke dataqualified specialist workshop.
i Jump-starting is not considered to be
anorma loperating condition.
i Jumpe
rcable sand further information regarding jump-starting can be obtained at any
qualified specialist workshop. Towing and tow-starting
Important safety notes
G
WARNING
The rea raxlel ocks when:
R the engine is not running
R the engine stalls while the vehicle is being
towed
R there is amalfunction in the power supply
or the vehicle' selectrica lsystem
There is ariskofana ccident.
In the event of abreakdown, yo ushould
always hav ethe vehicle transported. G
WARNING
If the brake system or power steering is mal-
functioning and your vehicle is then towed
away ,significantly more effort may be
required to stee rand brake than is normally
required .There is ariskofana ccident.
In such cases, use atow bar. Befor etowing,
make sur ethat the steering move sfreely. G
WARNING
If the weigh tofthe vehicle to be towe dortow-
starte disgreater than the permissible gross
weigh tofyourv ehicle:
R the towing ey ecould detach itself
R the vehicle/trailer combinatio ncould roll-
over.
There is ariskofana ccident.
Whe ntowing or tow-starting another vehicle,
its weigh tshoul dnot be greater than the per-
missible gros sweigh tofy ourv ehicle. !
Use the SmartKe
yinstead of the Start/
Stop button whe ntowing the vehicle.
Start the engine and keep it running. Turn
the SmartKe ytoposition 2in the ignition.
Set the transmission to Nusing the E-
SELECT lever. Make sure that yo uthen
leave the SmartKe yinposition 2.
Check the transmission positio ninthe
instrument cluster.
! Make sure that the electric parking brake
is released .Ifthe electric parking brake is
faulty ,visit aquali fied specialist workshop.
Mercedes-Benz recommends that yo uuse
an authorized Mercedes-Benz Center for
this purpose.
! Whe
ntowing, pull away slowl yand
smoothly .Ifthe tractive power is too high,
the vehicles could be damaged.
! Only secure the tow rope or tow ba
ratthe
towing eyes. Otherwise, the vehicle could
be damaged.
! Do not us
ethe towing eyes for recovery
purposes as this could damag ethe vehicle.
If in doubt, recover the vehicle with acrane.
! The vehicle can be towe
damaximum of
30 miles (50km). The towing speed of
30 mph (50 km/h )mustn ot be exceeded.
If the vehicle ha stobetowedmore than
30 miles (50km), the entire vehicle mus tbe
raised and transported.
! Do not tow with sling-typ
eequipment.
Thi scould damag ethe vehicle. 244
Towinga
nd tow-startingBreakdow nassistance
Page 247 of 290
!
Tow-starting the vehicle is not permitted.
The transmission may otherwise be dam-
aged.
If the vehicle can no longer be driven because of an accident or breakdown, you have the
following options:
R transportingt he vehicle
As arule, you should have the vehicle trans-
ported.
R towing the vehicle with the rear axle raised
Only tow the vehicle with the rear axle
raised in exceptional cases.
R towing the vehicle with atow rope or tow
bar
Only tow the vehicle in exceptional cases.
The engine must be running if you tow the
vehicle with atow rope or tow bar. Observe
the following notes.
Also observe the following notes:
R If the engine does not start, try jump-start-
ing it (Y page 242). Tow-starting the vehicle
is not permitted.
R If it is not possibletoj ump-start the vehicle,
have it transported to the nearest qualified specialist workshop, e.g. an authorized
Mercedes-Benz Center.
R If the vehicle has transmission damage,
have it transported to aqualified specialist
workshop. Observe the displaym essages
in the instrument cluster. Installing/removing the towing eye
Installingt he towing eye X
Take the towing eye and the wheel wrench 4
out of the wheel-change tool kit
(Y page 234).
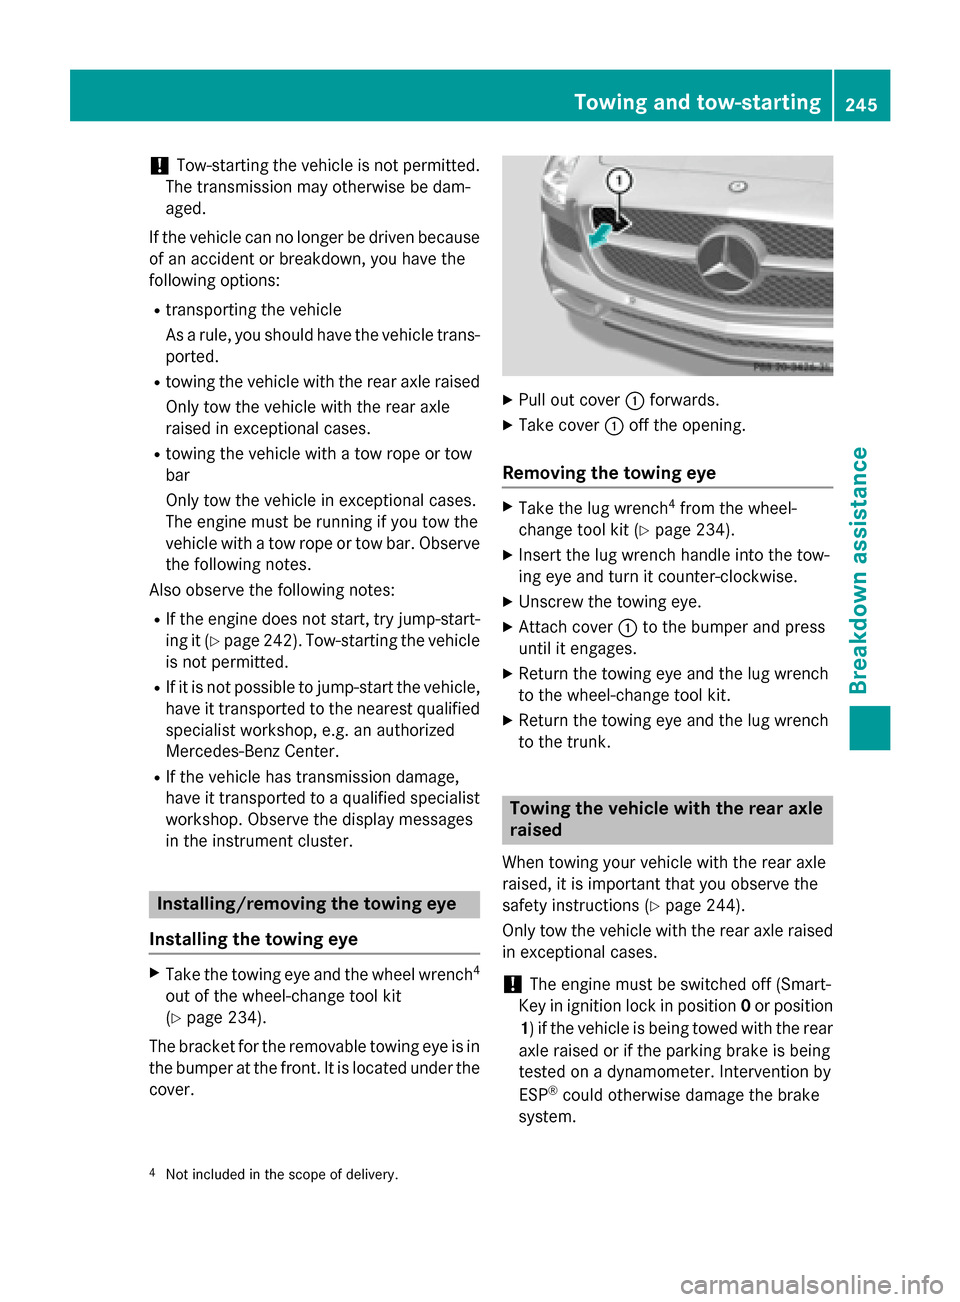
The bracket for the removable towing eye is in
the bumper at the front.Itisl ocated under the
cover. X
Pull out cover 0043forwards.
X Take cover 0043off the opening.
Removing the towing eye X
Take the lug wrench 4
from the wheel-
change tool kit (Y page 234).
X Insert the lug wrench handle into the tow-
ing eye and turn it counter-clockwise.
X Unscrew the towing eye.
X Attach cover 0043to the bumper and press
until it engages.
X Return the towing eye and the lug wrench
to the wheel-change tool kit.
X Return the towing eye and the lug wrench
to the trunk. Towing the vehiclew
ith the rear axle
raised
When towing your vehicle with the rear axle
raised, it is important that you observe the
safety instructions (Y page 244).
Only tow the vehicle with the rear axle raised in exceptional cases.
! The engine must be switched off (Smart-
Key in ignition lock in position 0or position
1)ift he vehicle is being towed with the rear
axle raised or if the parking brake is being
tested on adynamometer. Intervention by
ESP ®
could otherwise damage the brake
system.
4 Not included in the scope of delivery. Towing and tow-starting
245Breakdown assistance Z
Page 248 of 290
X
Switch on the hazard warning lamps
(Y page 98).
X Make sure tha tthe SmartKey is in position
2 in the ignition and tha tthe engine is run-
ning throughout the towing procedure.
X Mov ethe transmissio ntoNwith the E-
SELECT lever. Check the transmissio nposi-
tion in the instrument cluster. Towin
gavehicle with both axles on
the ground
It is important tha tyou observe the safety
instructions when towing away your vehicle
(Y page 244).
X Switch on the hazard warning lamps
(Y page 98).
i Whe
ntowing with the hazard warning
flashers switche don, us ethe combination
switch as usua ltosignal in which direction
yo ua re changing. In this case, onl ythe
indicator lamps for the direction of travel
flash. Whe nyou reset the combination
switch, the hazard warning flashers start
flashing again.
X Insert the SmartKey into the ignition lock
(Y page 119).
X Start the engine and leave the SmartKey in
the ignition.
X Mov ethe transmissio ntoNwith the E-
SELECT lever.
X Check the transmissio nposition in the
instrument cluster display (Y page 123).
X Leave the engine running throughout the
entir etowing procedure Transporting the vehicle
The towing ey ecan be used to pull the vehicle
onto atraile rort ransporter for transporting
purposes.
! Yo
um ay onl ysecure the vehicl ebythe
wheels, not by parts of the vehicl esuchas axl
eors teering components .Otherwise,
the vehicl ecould be damaged.
X Start the engine.
X Make sure tha tthe SmartKey is in position
2 in the ignition and tha tthe engine is run-
ning during the entir eloadin goperation.
X Mov ethe transmissio ntoNwith the E-
SELECT lever. Check the transmissio nposi-
tion in the instrument cluster.
As soon as the vehicle has been loaded: X Prevent the vehicl efrom rolling away by
applying the electri cparking brake.
X Shift the transmissio ntoPwith the button
in the center console.
X Turn the SmartKey to position 0in the igni-
tion lock and remove the SmartKey from
the ignition lock.
X Secure the vehicle. Fuses
Important safety notes
G
WARNING
If yo umanipulate or bridge afaulty fus eorif
yo ur eplace it with afusew ithah ighe ramper-
age, the electri ccable scould be overloaded.
Thi scould resul tinafire. There is ariskofan
accident and injury.
Alway sreplace faulty fuses with the specified
new fuses having the correct amperage.
! Only us
efuses tha thaveb eena pproved
for Mercedes-Benz vehicles and which
have the correct fus erating for the system
concerned. Otherwise, components or sys-
tems could be damaged.
The fuses in your vehicl eserve to close down
faulty circuits. If afuseb lows ,allthe compo-
nents on the circuit and thei rfunctions stop
operating.
Blown fuses mus tbereplaced with fuses of
the same rating, which yo ucan recognize by 246
FusesBreakdown assistance
Page 273 of 290
of hydroplaning. You will only gain these ben-
efits if the correc tdirection of rotation is
maintained.
An arrow on the sidewal lofthe tire indicates
its correc tdirection of rotation. Storing wheels
Storew heels that are not being used in acool,
dry and preferably dark place. Protec tthe
tires from oil, grease, gasoline and diesel. Cleaning the wheels
G
WARNING
The water jet from acircular jet nozzle (dirt
blasters) can cause invisible exterior damage to the tires or chassis components. Compo-
nentsd amaged in this way may fail unexpect-
edly. There is arisk of an accident.
Do not use power washers with circular jet
nozzles to clean the vehicle. Have damaged
tires or chassis components replaced imme-
diately. Mounting
awheel
Preparing the vehicle X
Stop the vehicle on solid, non-slippery and
level ground.
X Apply the electric parking brake manually.
X Bring the front wheels into the straight-
ahead position.
X Shift the transmission to position P.
X Switch off the engine.
X Open the driver's door.
The on-board electronics now have status
0.T his is the same as the SmartKey having
been removed.
X Remove Start/Stop button from ignition
lock (Y page 119). X
Take the following object sfrom the left-
hand stowage compartment and the left-
hand stowage space in the trunk:
R lug wrench
R folding wheel chock
R jack
R alignment bolt
X Secure the vehicle to prevent it from rolling
away.
Securing the vehicle to prevent it from
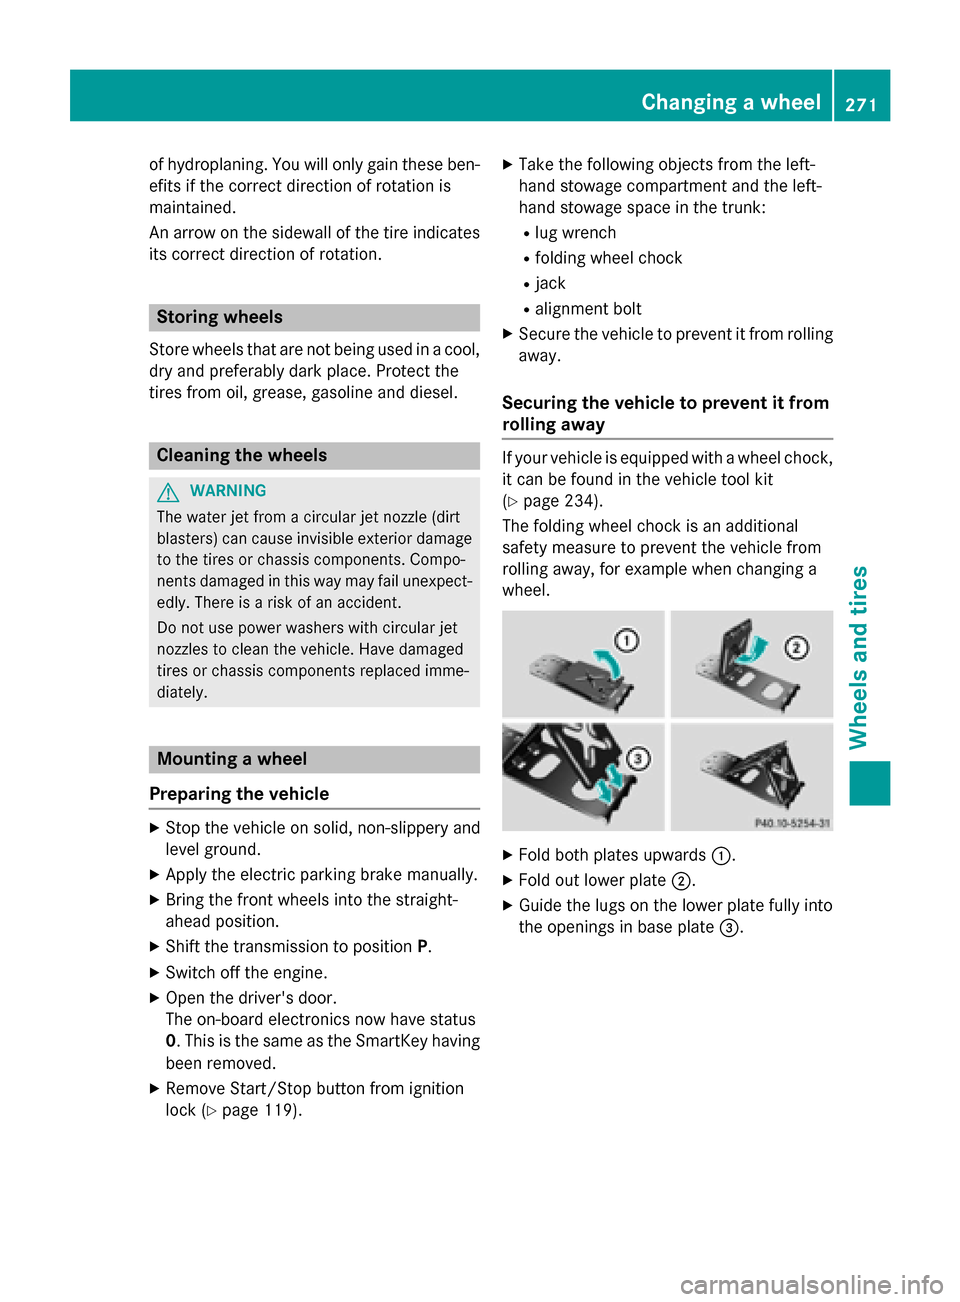
rolling away If your vehicle is equipped with
awheel chock,
it can be found in the vehicle tool kit
(Y page 234).
The folding wheel chock is an additional
safety measure to prevent the vehicle from
rolling away,f or example when changing a
wheel. X
Fold both plates upwards 0043.
X Fold out lower plate 0044.
X Guide the lugs on the lower plate fully into
the openings in base plate 0087. Changing
awheel
271Wheels and tires Z
Page 274 of 290
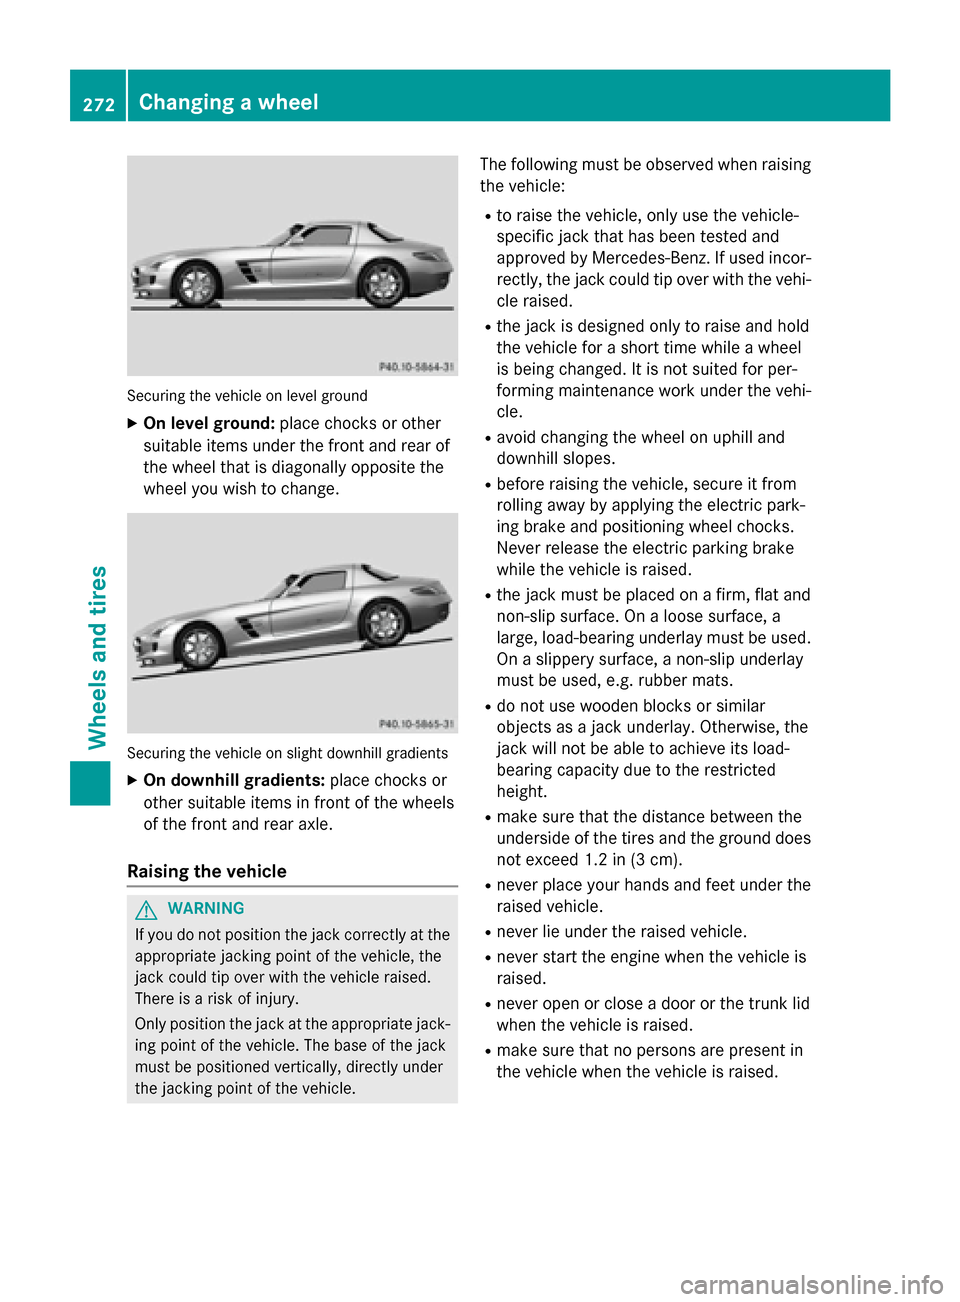
Securing the vehicle on level ground
X On level ground: place chocks or other
suitabl eitem sunder the front and rea rof
the wheel that is diagonall yopposite the
wheel yo uwishtoc hange. Securing the vehicle on slight downhil
lgradients
X On downhill gradients: place chocks or
othe rsuitabl eitem sinf ront of the wheels
of the front and rea raxle.
Raisin gthe vehicle G
WARNING
If yo udon ot position the jack correctly at the
appropriate jacking point of the vehicle ,the
jack could tip ove rwitht he vehicle raised.
There is ariskofi njury.
Only position the jack at the appropriate jack-
ing point of the vehicle .The base of the jack
mus tbep ositioned vertically ,directl yunder
the jacking point of the vehicle. The following mus
tbeo bserve dwhenr aising
the vehicle:
R to raise the vehicle ,only us ethe vehicle-
specifi cjack that ha sbeent ested and
approved by Mercedes-Benz. If used incor-
rectly, the jack could tip ove rwitht he vehi-
cle raised.
R the jack is designe donly to raise and hold
the vehicle for ashort time whil eawheel
is being changed .Itisnot suited for per-
forming maintenance work under the vehi-
cle.
R avoid changing the wheel on uphil land
downhil lslopes.
R before raising the vehicle ,secure it from
rolling away by applying the electri cpark-
ing brake and positioning wheel chocks.
Neve rrelease the electri cparking brake
whil ethe vehicle is raised.
R the jack mus tbep lace donaf irm,flata nd
non-slip surface. On aloose surface, a
large ,load-bearing underlay mus tbeu sed.
On aslippery surface, anon-slip underlay
mus tbeu sed, e.g. rubber mats.
R do not us ewoodenb locks or similar
objects as ajack underlay .Otherwise, the
jack will not be able to achieve its load-
bearing capacity du etothe restricted
height.
R make sure that the distance between the
underside of the tire sand the ground does
not excee d1.2 in (3 cm).
R never place your hands and fee tunder the
raised vehicle.
R never li eunder the raised vehicle.
R never star tthe engine when the vehicle is
raised.
R never ope norclosead oorort he trunk lid
when the vehicle is raised.
R make sure that no persons are present in
the vehicle when the vehicle is raised. 272
Changing
awheelWheels and tires
Page 283 of 290
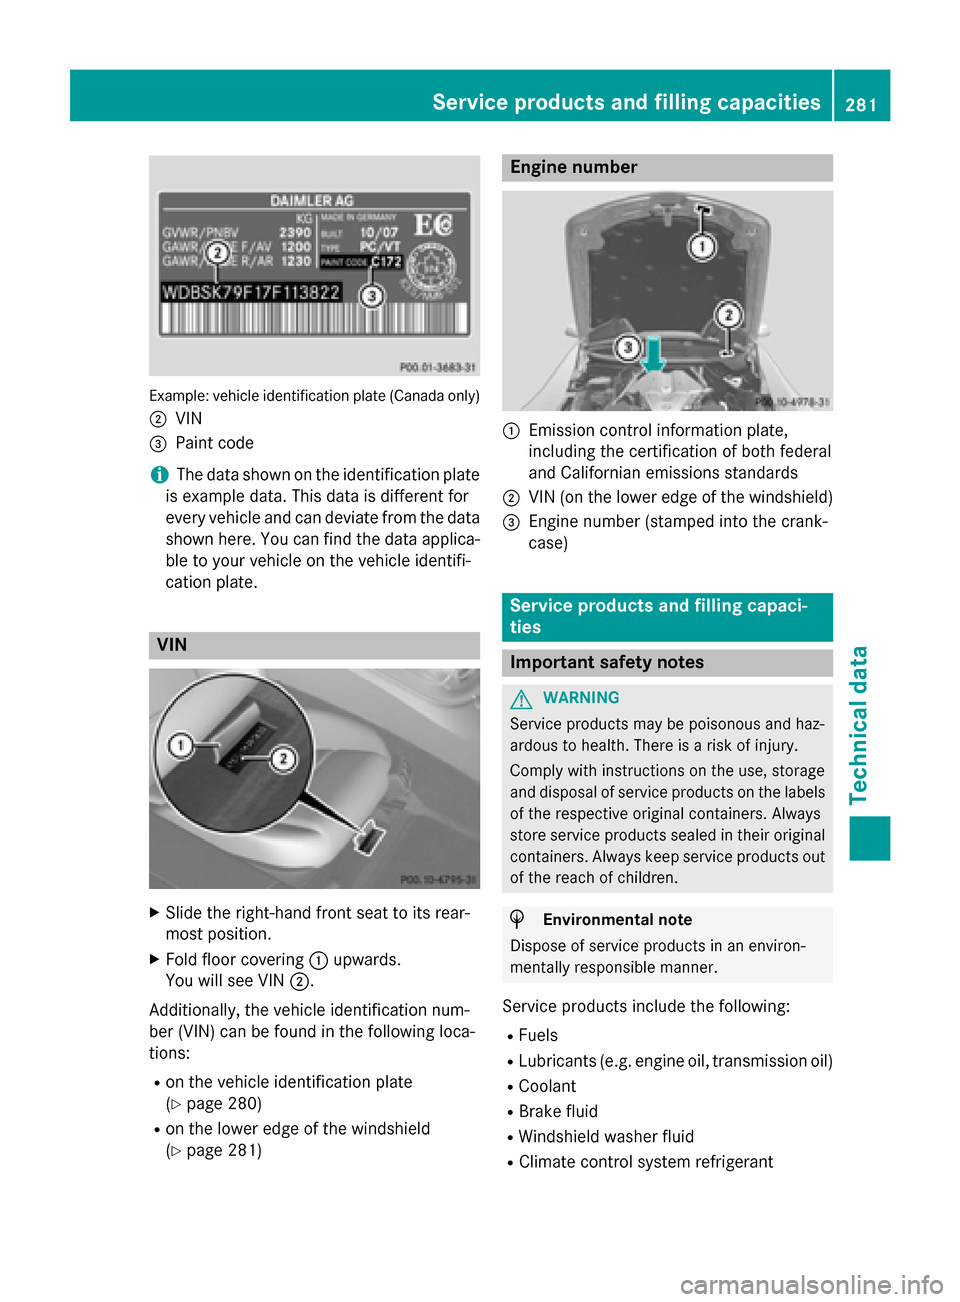
Example: vehicl
eide ntification plate (Canada only)
0044 VIN
0087 Paint code
i The data shown on the identificatio
nplate
is exampl edata. Thi sdataisd ifferent for
every vehicl eand can deviate from the data
shown here. Yo ucan find the data applica-
bl etoy ourv ehicl eont he vehicl eide ntifi-
cation plate. VIN
X
Slide the right-hand front sea ttoits rear-
mos tposit ion.
X Fol dfloor covering 0043upwards.
Yo uw ills ee VIN 0044.
Additionally, the vehicl eide ntificatio nnum-
be r(VIN) can be found in the following loca-
tions:
R on the vehicl eide ntificatio nplate
(Y page 280)
R on the lowe redgeoft he windshield
(Y page 281) Engine number
0043
Emission contro linformatio nplate,
including the certificatio nofbothf ederal
and Californian emissions standards
0044 VIN (o nthe lowe redgeoft he windshield)
0087 Engine numbe r(stamped into the crank-
case) Servic
eproducts and filling capaci-
ties Important safety notes
G
WARNING
Service products ma ybepoisonousand haz-
ardous to health .There is ariskofi njury.
Compl ywithi nstructions on the use, storage
and disposa lofservic eproducts on the labels
of the respective original containers. Always
stor eservic eproducts seale dintheiroriginal
containers. Alway skeeps ervic eproducts out
of the reach of children. H
Environmental note
Dispose of servic eproducts in an environ-
mentall yresponsibl emanner.
Service products includ ethe following:
R Fuels
R Lubricants (e.g. engine oil, transmission oil)
R Coolant
R Brake fluid
R Windshield washe rfluid
R Climate contro lsystem refrigerant Servic
eproducts and filling capacities
281Technicaldata Z