2015 MERCEDES-BENZ SLS AMG GT COUPE tow
[x] Cancel search: towPage 72 of 290
Centrally lockin
gand unlocking the
vehicle from th einside
You can centrally loc korunlock th evehicle
from th einside. This feature may be useful if,
for example ,you wish to unlock th efront-
passenger door from th einside or loc kthe
vehicle before you pull away.
Coupe: th ecentral locking/unlockin gbutton
does no tloc koru nlock th efuel fille rflap.
Roadster: th ecentral locking/unlockin gbut-
to nd oes no tloc koru nlock th efuel fille rflap
or th estowage compartments ,suc hast he
glov ebox. X
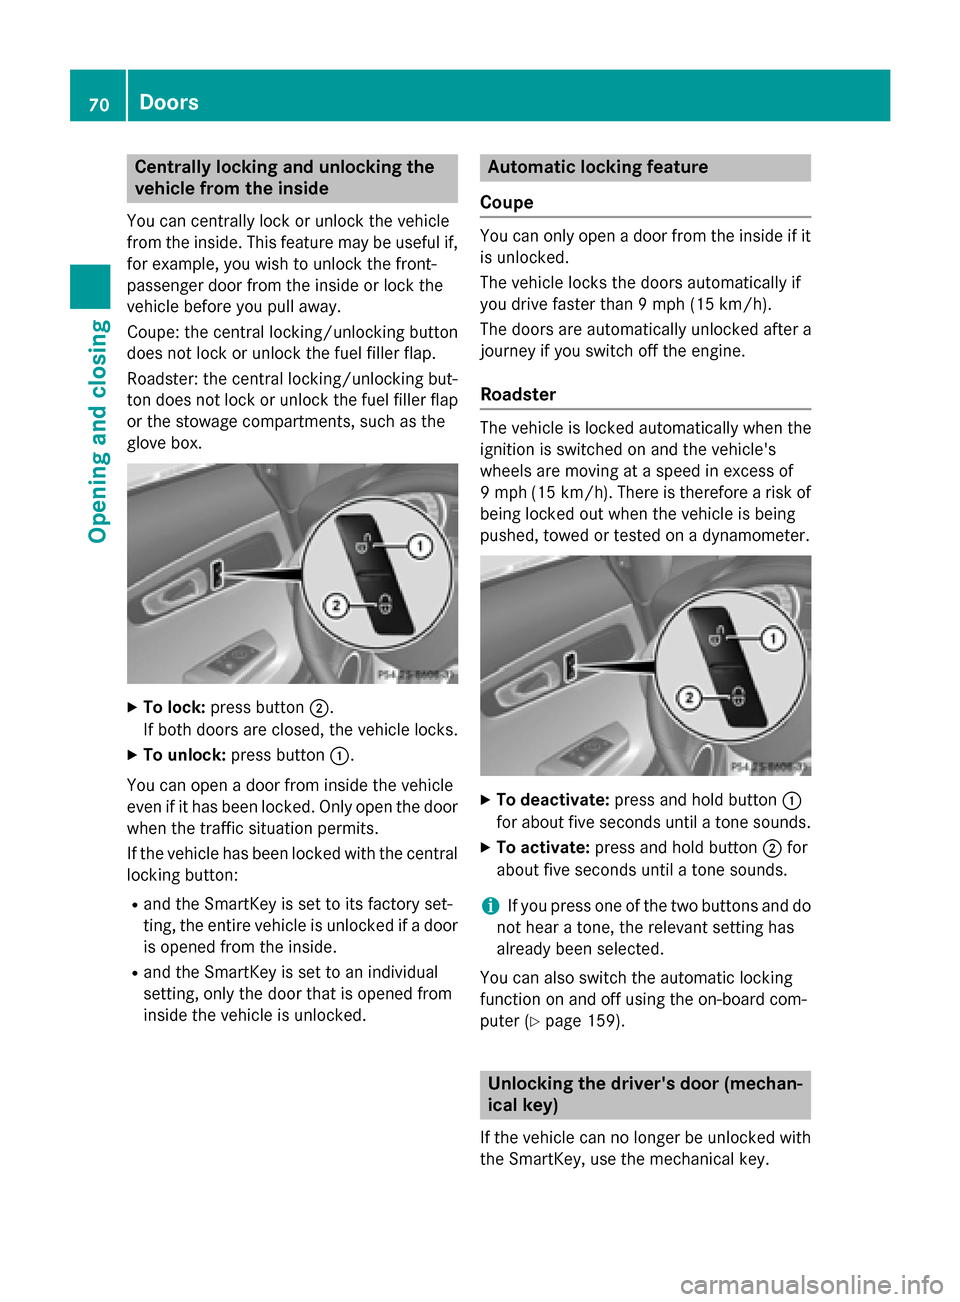
To lock: pressbutton 0044.
If bot hdoor sare closed, th evehicle locks.
X To unlock: pressbutton 0043.
You can open adoor from inside th evehicle
eve nifith as been locked. Only open th edoor
when th etraffic situatio npermits.
If th evehicle has been locke dwitht he central
lockin gbutton:
R and th eSmartKey is set to its factory set-
ting, th eentirev ehicle is unlocked if adoor
is opened from th einside.
R and th eSmartKey is set to an individual
setting, only th edoor that is opened from
inside th evehicle is unlocked. Automatic lockin
gfeature
Coupe You can only open
adoor from th einside if it
is unlocked.
The vehicle locks th edoor sautomaticall yif
you driv efaster than 9mph (15 km/h).
The door sare automaticall yunlocked after a
journey if you switch off th eengine.
Roadster The vehicle is locke
dautomaticall ywhen the
ignition is switched on and th evehicle's
wheels are moving at aspee dine xces sof
9m ph (15 km/h). Ther eistherefor eariskof
bein glocke dout when th evehicle is being
pushed, towed or tested on adynamometer. X
To deactivate: pressand hold button 0043
for about fiv eseconds until atones ounds.
X To activate: pressand hold button 0044for
about fiv eseconds until atones ounds.
i If you pres
sone of th etwo buttons and do
no th ear atone, ther elevan tsettin ghas
alread ybeen selected.
You can also switch th eautomatic locking
function on and off usin gthe on-board com-
puter (Y page 159). Unlocking th
edriver's door (mechan-
ical key)
If th evehicle can no longer be unlocked with
th eS martKey, use th emechanical key. 70
DoorsOpening and closing
Page 99 of 290
causes of poo
rvisibility du etothe weather
conditions such as spray. There is ariskofan
accident.
In such situations, turn the light switch to
0058.
The automatic headlamp feature is only an
aid. The driver is responsibl efor the vehicle's
lighting at al ltimes.
0058 is the favored light switch setting. The
light setting is automaticall yselected accord-
ing to the brightnes softhe ambient light
(exception: poo rvisibility du etoweathe rcon-
ditions such as fog, snow or spray):
R SmartKey in position 1in the ignition lock:
the parking lamps are switched on or off
automaticall ydepending on the brightness
of the ambient light.
R With the engine running: if yo uhavea cti-
vate dthe daytime running lamps function
via the on-board computer, the daytime
running lamps or the low-bea mheadlamps
and parking lamps are switched on or off
automaticall ydepending on the brightness
of the ambient light.
Onl yfor Canada:
The daytime running lamps improve the visi-
bility of your vehicle during the day. The day- time running lamps function is required by law
in Canada. It cannot therefore be deactivated.
Whe nthe engine is running and the vehicle is
stationary: if yo umove the selector lever from
ad rive position to P,the daytime running
lamps/low-bea mheadlamp sgooutafter
three minutes.
Whe nthe engine is running, the vehicle is
stationar yand in bright ambient light: if you
turn the light switch to 0060,the daytime
running lamps and parking lamps switch on.
If the engine is running and yo uturn the light
switch to 0058,the manual settings take
precedence over the daytime running lamps.
USA only:
The daytime running lamps improve the visi-
bility of your vehicle during the day. To do this,
the daytime running lamps function mus tbeswitched on using the on-board computer
(Y
page 158).
If the engine is running and yo uturn the light
switch to 0060or0058,t he manual settings
take precedence over the daytime running
lamps.
i In the USA, the daytime running lamps are
deactivated upon delivery from the factory.
X To switc honautomati cheadlamp
mode: turn the light switch to 0058.
Low-beam headlamps
Even if the light senso rdoesn ot detect that it
is dark, the parking lamps and low-beam
headlamp sswitch on whe nthe ignition is
switched on and the light switch is set to the 0058 position. Thi sisaparticularly useful
function in the event of rai nand fog.
X To switc honthe low-beam headlamps:
turn the SmartKey in the ignition lock to
position 2or star tthe engine.
X Turn the light switch to 0058.
The green 0058indicator lamp in the instru-
ment cluster lights up.
Parking lamps ! If the battery ha
sbeene xcessivel ydis-
charged ,the parking lamps or standing
lamps are automaticall yswitched off to
enabl ethe next engine start. Alway spark
your vehicle safel yand sufficiently lit
according to lega lstandards. Avoi dthe
continuou suseof the 0060parking lamps
for several hours. If possible ,switch on the
0064 right or the 0063left standing lamp.
X To switc hon:turn the light switch to 0060.
Standing lamps
Switching on the standing lamps ensures the corresponding sid eofthe vehicle is illumi-
nated. Exterio
rlighting
97Lights and windshieldw ipers Z
Page 104 of 290
tha
nint he0062 position, causing the wind-
shiel dwiper stow ipem oref requently.
If the wipe rblade sareworn, the windshield
will no longe rbewipedproperly. This could
prevent yo ufromo bser ving the traffi ccondi-
tions. Replace the wipe rblade stwice ayear,
ideall yinspringand fall. Replacin
gthe wiper blades
Important safety notes G
WARNING
If the windshiel dwiper sbegin to mov ewhile
yo ua rechanging the wipe rblades, youc ould
be trapped by the wipe rarm .The re is ariskof
injury.
Alway sswitch off the windshiel dwiper sand
ignition befor echanging the wipe rblades.
! To avoi
ddamagin gthe wipe rblades,
make sure tha tyou touch onl ythe wiper
ar moft he wiper.
! Never open the hood if
awindshiel dwiper
ar mh asbeen folde dawayfromt he wind-
shield.
Never fol dawindshiel dwiper armw ithout a
wipe rblade back onto the windshield.
Hol dthe windshiel dwiper armf irml yw hen
yo uc hange the wipe rblade .Ify ourelease
the windshiel dwiper armw ithout awiper
blad eand it fall sonto the windshield, the
windshiel dmaybe damage dbythe force of
the impact.
Mercedes-Benz recommend stha tyou have
the wipe rblade schange dataq ualified
specialis tworkshop.
Replacin gthe wiper blades Removing the wiper blades
X Switch off the engine.
X Remov eyourfoo tfromt he brake pedal.
X Set the windshiel dwiper to the 00AAposi-
tion. X
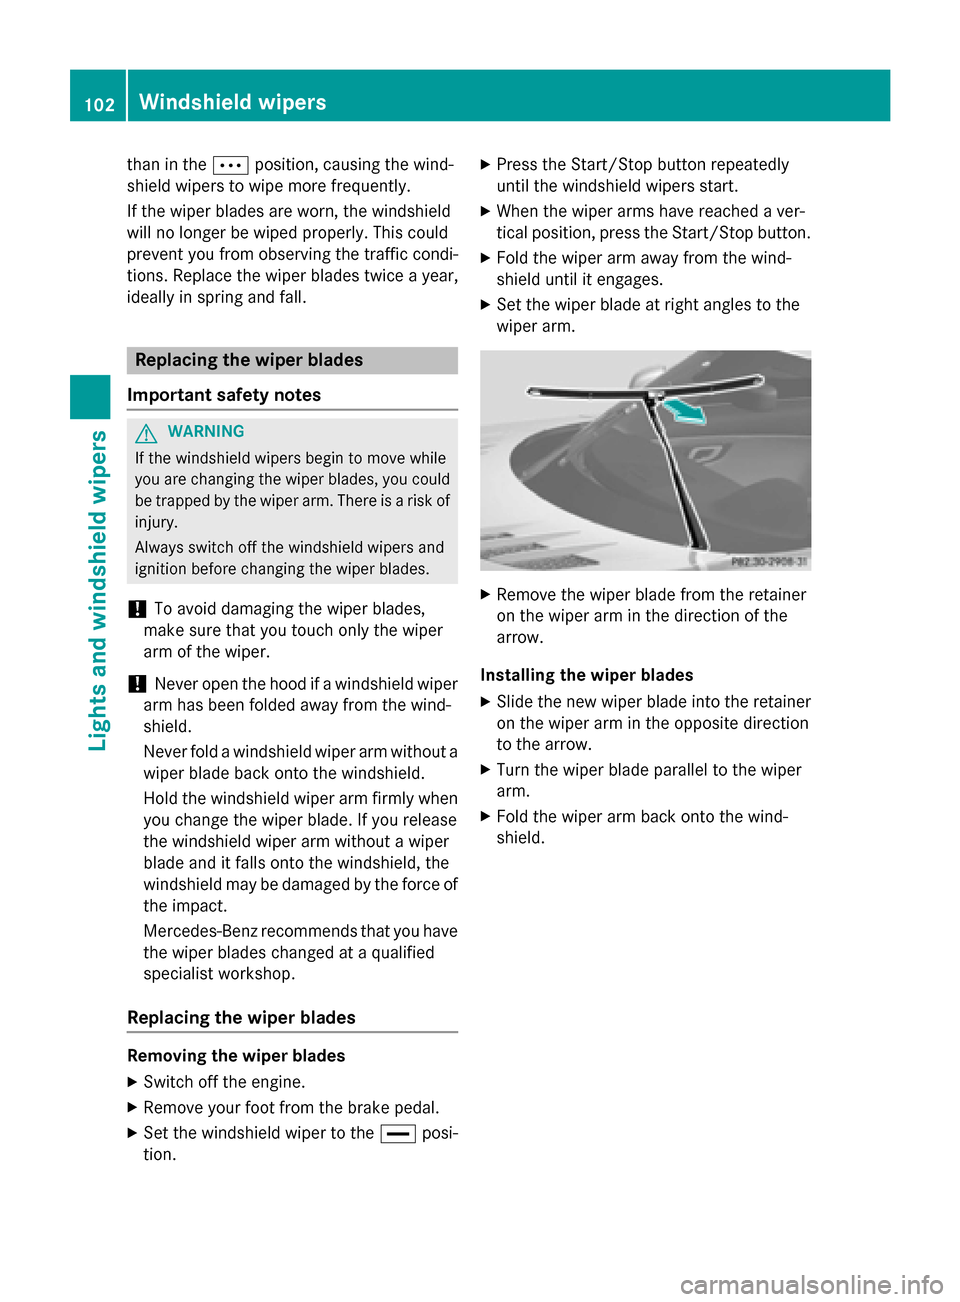
Press the Start/Stop button repeatedly
unti lthe windshiel dwiper sstart.
X When the wipe rarm sh aver eache daver-
tica lposit ion, press the Start/Stop button.
X Fol dthe wipe rarm away fro mthe wind-
shiel duntilite ngages.
X Set the wipe rblade at righ tangle stot he
wipe rarm. X
Remov ethe wipe rblade fromt he retainer
on the wipe rarm in the directio nofthe
arrow.
Installing the wiper blades X Slide the new wipe rblade into the retainer
on the wipe rarm in the opposite direction
to the arrow.
X Turn the wipe rblade parallel to the wiper
arm.
X Fol dthe wipe rarm back onto the wind-
shield. 102
Windshiel
dwipersLigh ts an dwindshield wipers
Page 120 of 290
Useful information
i This Operator's Manual describes all
models and all standard and optional equip- ment of your vehicle available at the time of
publication of the Operator's Manual.
Country-specific differences are possible.
Please not ethat your vehicle may not be
equipped with all feature sdescribed. This
also applies to safety-related system sand
functions.
i Please read the information on qualified
specialist workshops (Y page 23).Notes on breaking-in
anew vehicle Important safet
ynotes
New brake pads/linings only reach their opti-
mum brakin geffec tafter several hundred
kilometers of driving. Until that time, you may
need to use increased brake pedal pressure
while braking. This also applies after the
brake discs or the brake pads/linings have
been replaced. The first 1000 miles (1500 km)
The more you look after the engin ewhen it is
new, the more satisfied you will be with its
performanc einthe future.
R You should therefore drive at varying vehi-
cle and engin espeeds for the first
1,00 0miles (1,50 0km).
R Do not drive faster than 85 mph
(140 km/h) for the first 1,00 0miles
(1,50 0km).
R Only allow the engin etoreach amaximum
engin espeed of 4,50 0rpm briefly.
R Avoid heavy loads, e.g. drivin gatfull throt-
tle, during this period. Do not exceed 00C3of
the maximum permitted engin espeed for
each gear.
R Selec tthe manual drive program Min good
time. R
Do not carry out aRACE START.
R Do not manually shift to alower gear to
brake the vehicle.
R Try to avoid depressin gthe accelerator
pedal beyond the point of resistance (kick-
down).
R Only select the shift range limits 3,2or 1
when drivin gslowly, e.g. in mountainous
terrain.
After 1,00 0miles (1,500 km), you can
increase the engin espeed gradually and bring
the vehicle to full speed.
i You should also observ
ethes ebreaking-
in notes if your vehicle' sengin eort rans-
mission has been replaced.
i Always observ
ethe respective speed lim-
its. Driving
Important safet
ynotes G
WARNING
Objects in the driver's footwell can restrict the pedal travel or obstruct adepressed pedal.
The operatin gand road safet yofthe vehicle is
jeopardized. There is arisk of an accident.
Make sure that all objects in the vehicle are
stowed correctly, and that they cannot enter
the driver' sfootwell. Install the floormats
securely and as specified in order to ensure
sufficient clearance for the pedals. Do not use loose floormats and do not place floormats on
top of one another. G
WARNING
If you switc hoff the ignition while driving,
safety-relevant function sare only available
with limitations, or not at all. This could affect, for example, the power steering and the brake
boosting effect. You will require considerably
more effor ttosteer and brake. There is arisk
of an accident.
Do not switc hoff the ignition while driving. 118
DrivingDriving and parking
Page 121 of 290
!
Warm up the engine quickly. Do not use
the engine's full performance until it has
reached operating temperature. The oper-
ating temperature has been reached when
the engine oil temperature displayint he
on-board computer's AMG menu no longer flashes.
Only shift into reverse gear when the vehi-
cle is stationary.
Where possible, avoid spinning the drive
wheels when pulling awayons lippery
roads. You could otherwise damage the
drive train.
! During
acold start with low engine oil
temperatures (below 32 ‡) (0 †), the max- imum engine speed is restricted in order toprotect the engine. To protect the engine
and maintain smooth engine operation,
avoid driving at full throttle when the
engine is cold. Key positions
KEYLESS-GO start function You can switch the engine on and off with the
Start/Stop button. For this, the SmartKey
must be inside the vehicle. The Start/Stop
button is located in the center console and is
illuminated when the vehicle is unlocked.
Pressing the Start/Stop button several times
in succession corresponds to the different
key positions in the ignition lock. This is only
the case if you are not depressing the brake
pedal.
If you depress the brake pedal and press the
Start/Stop button, the engine starts immedi-
ately.
If there is aSmartKey in the ignition lock, this
takes precedence over the KEYLESS-GO start
function. X
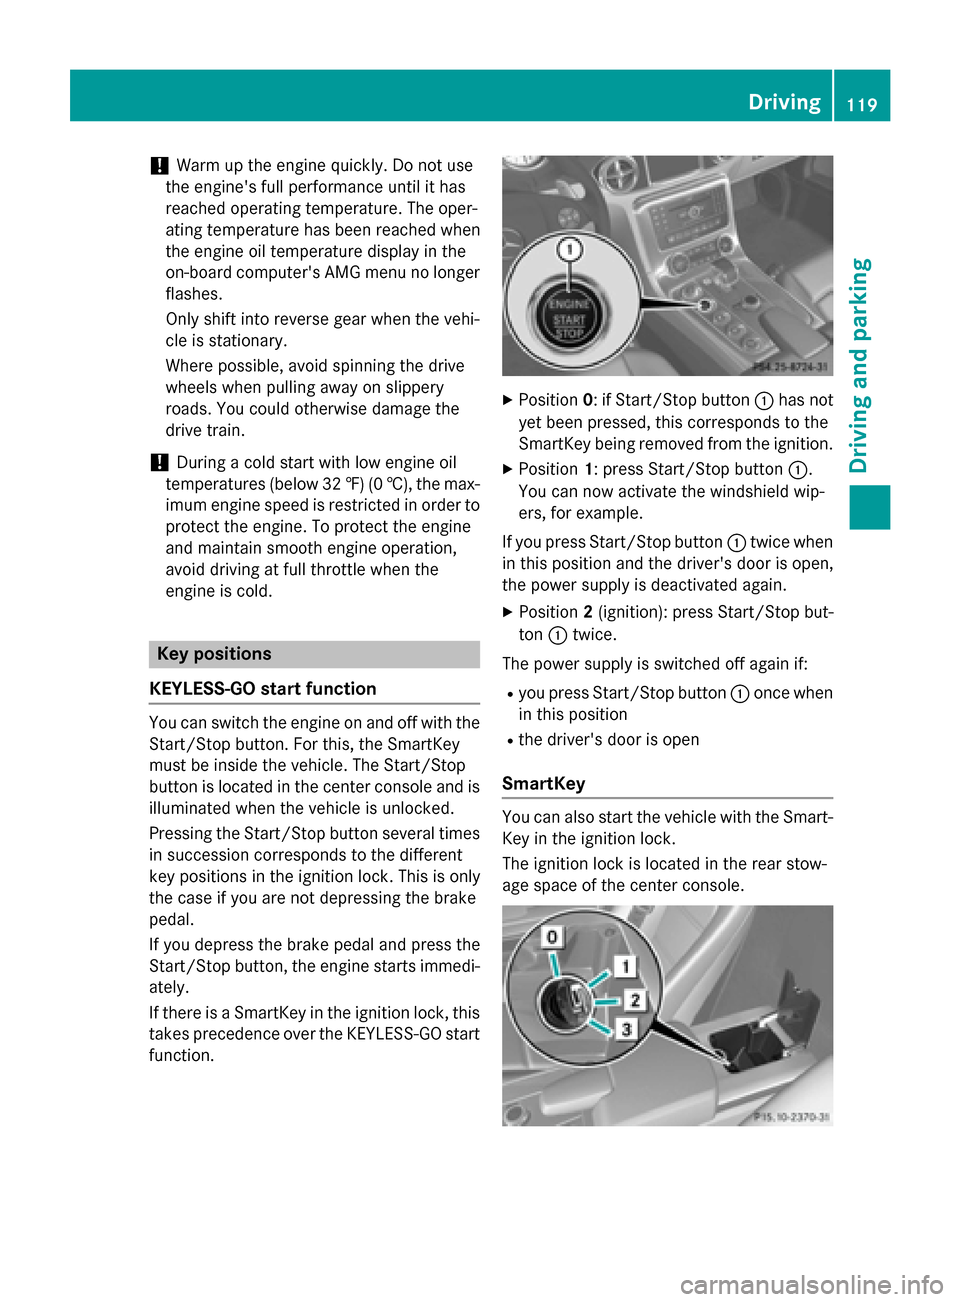
Position 0:ifStart/Stop button 0043has not
yet been pressed, this corresponds to the
SmartKey being removed from the ignition.
X Position 1:press Start/Stop button 0043.
You can now activate the windshieldw ip-
ers, for example.
If you press Start/Stop button 0043twice when
in this position and the driver's door is open,
the power supplyisd eactivated again.
X Position 2(ignition): press Start/Stop but-
ton 0043twice.
The power supplyiss witched off againif:
R you press Start/Stop button 0043once when
in this position
R the driver's door is open
SmartKey You can also start the vehicle with the Smart-
Key in the ignition lock.
The ignition lock is located in the rear stow-
age space of the center console. Driving
119Driving and parking Z
Page 134 of 290
To ensure that the vehicle is secured against
rolling away unintentionally:
R the electric parking brake must be applied.
R the transmission must be in position P.
R the SmartKey must be in position 0in the
ignition lock and then removed from the
ignition lock, or the Start/Stop button must be pressed.
R on uphill or downhill gradients, the front
wheels must be turned towards the curb.
R the empty vehicle must be secured at the
fronta xle with awheel chock or similar, for
example, on uphill or downhill gradients.
R aladen vehicle must also be secured at the
rear axle with awheel chock or similar, for
example, on uphill or downhill gradients. Switching off the engine
Important safety notes G
WARNING
When the engine is switched off, the trans-
mission shifts into neutral position N.The
vehicle may roll away.T here isarisk of an
accident.
After switchin goff the engine, alway sswitch
to parking position P.Prevent the parked vehi-
cle from rolling away by applying the parking
brake.
! Do not open the driver's door while the
vehicle is in motion .Atlow speeds in trans-
mission position Dor R,p ark position Pis
otherwise engaged automatically. This can damage the transmission.
i Observe the display messages in the
instrument cluster (Y page 162).
AMG SPEEDSHIF TDCT 7-speed sports
transmission X
Shift the transmission to Pwith the button
in the center console. Using the Start/Stop button
X Press the Start/Stop button (Y page 119).
The engine stops and all the indicator
lamps in the instrument cluster go out.
X Apply the electric parking brake.
i The engine can be turned off while the
vehicle is in motion by pressing and holding the Start/Stop button for about three sec-
onds.
i If you switch the engine off with the trans-
mission in position Ror D,t he transmission
automatically shifts to N.
If you move the E-SELECT lever to Nbefore
switchin goff the engine, the transmission
remains in Nfor approximately 30 minutes.
If you open the driver's or front-passenger
door during this period, the transmission
automatically shifts to P.
Using the SmartKey ! Do not remove the SmartKey while the
vehicle is in motion .Otherwise, at low
speeds, parking lock Pwill be activated
automatically.
Do not open the driver's door while the
vehicle is in motion .Atlow speeds, trans-
mission position Pis engaged automati-
cally.
This could cause damage to the transmis-
sion and the parking lock.
X Turn the SmartKey to position 0in the igni-
tion lock and remove it.
The parking lock is activated.
X Apply the electric parking brake.
i If you move the E-SELECT lever to
N
before switchin goff the engine, the trans-
mission remains in Nfor approximately
30 minutes. If you open the driver's or
front-passenger door during this period,
the transmission automatically shifts to P.132
ParkingDriving and parking
Page 138 of 290
Wet roads
If you have drive
nfor along time in heavy rain
without braking, there may be adelayed reac-
tion from the brakes whe nbraking for the first
time. This may also occur after the vehicl ehas
been washed or drive nthroug hdeep water.
You have to depress the brake pedal more
firmly .Maintain agreater distance from the
vehicl einfront.
After driving on awet road or having the vehi-
cle washed ,brake firmly while paying atten-
tion to the traffic conditions. This wil lwarmup
the brake discs, thereby drying them more
quickly and protecting them against corro-
sion.
Limited braking performance on salt-
treated roads If you drive on salted roads,
alayer of salt
residue may form on the brake discs and
brake pads. This can result in asignificantly
longe rbraking distance.
R Brake occasionally to remove any possible
sal tresidue. Make sure that you do not
endange rother road users whe ndoing so.
R Carefully depress the brake pedal and the
beginning and end of ajourney.
R Maintain agreater distance to the vehicle
ahead.
Servicing the brakes !
If the red brake warning lamp lights up in
the instrument cluster and you hea rawarn-
ing tone while the engine is running, the
brake fluid leve lmay be too low .Observe
additiona lwarning messages in the multi-
function display.
The brake fluid leve lmay be too low due to
brake pad wea rorleaking brake lines.
Have the brake syste mchecked immedi-
ately. This work should be carrie dout at a
qualified specialist workshop. !
As the ESP ®
syste moperates automati-
cally, the engine and the ignition must be
switched off (the SmartKey must be in posi-
tion 0or 1in the ignition lock or the Start/
Stop button must be in position 0or 1)i f:
R the electric parking brake is tested using
ab rake dynamometer.
R the vehicl eistowed with one axle raised.
Braking triggered automatically by ESP ®
may seriousl ydamage the brake system.
All checks and maintenance work on the
brake syste mmust be carrie dout at aquali-
fied specialist workshop. Have this work car- ried out at an authorized Mercedes-Benz
Center.
Have the brake pad sreplaced and the brake
fluid renewe dataqualified specialist work-
shop, e.g. an authorized Mercedes-Benz
Center.
If the brake syste mhas only been subject to
moderate loads, you should test the function- ality of you rbrakes at regulari ntervals. At a
high speed, brake firmly while paying atten-
tion to the traffic conditions. This improves
the grip of the brake pads.
You can find adescription of Brake Assist
(BAS) on (Y page55).
Mercedes-Benz recommends that you only
have brake pads/linings installed on your
vehicl ewhich have been approved for
Mercedes-Benz vehicles or which correspond to an equivalent quality standard. Brake
pads/linings which have not been approved
for Mercedes-Benz vehicles or which are not
of an equivalent quality coul daffect you rvehi-
cle's operating safety.
Mercedes-Benz recommends that you only
use brake fluid that has been specially
approved for you rvehicl ebyM ercedes-Benz,
or which corresponds to an equivalent quality standard. Brake fluid which has not been
approved for Mercedes-Benz vehicles or
which is not of an equivalent quality could
affect you rvehicle's operating safety. 136
Driving tipsDriving and parking
Page 141 of 290
Cruise control lever
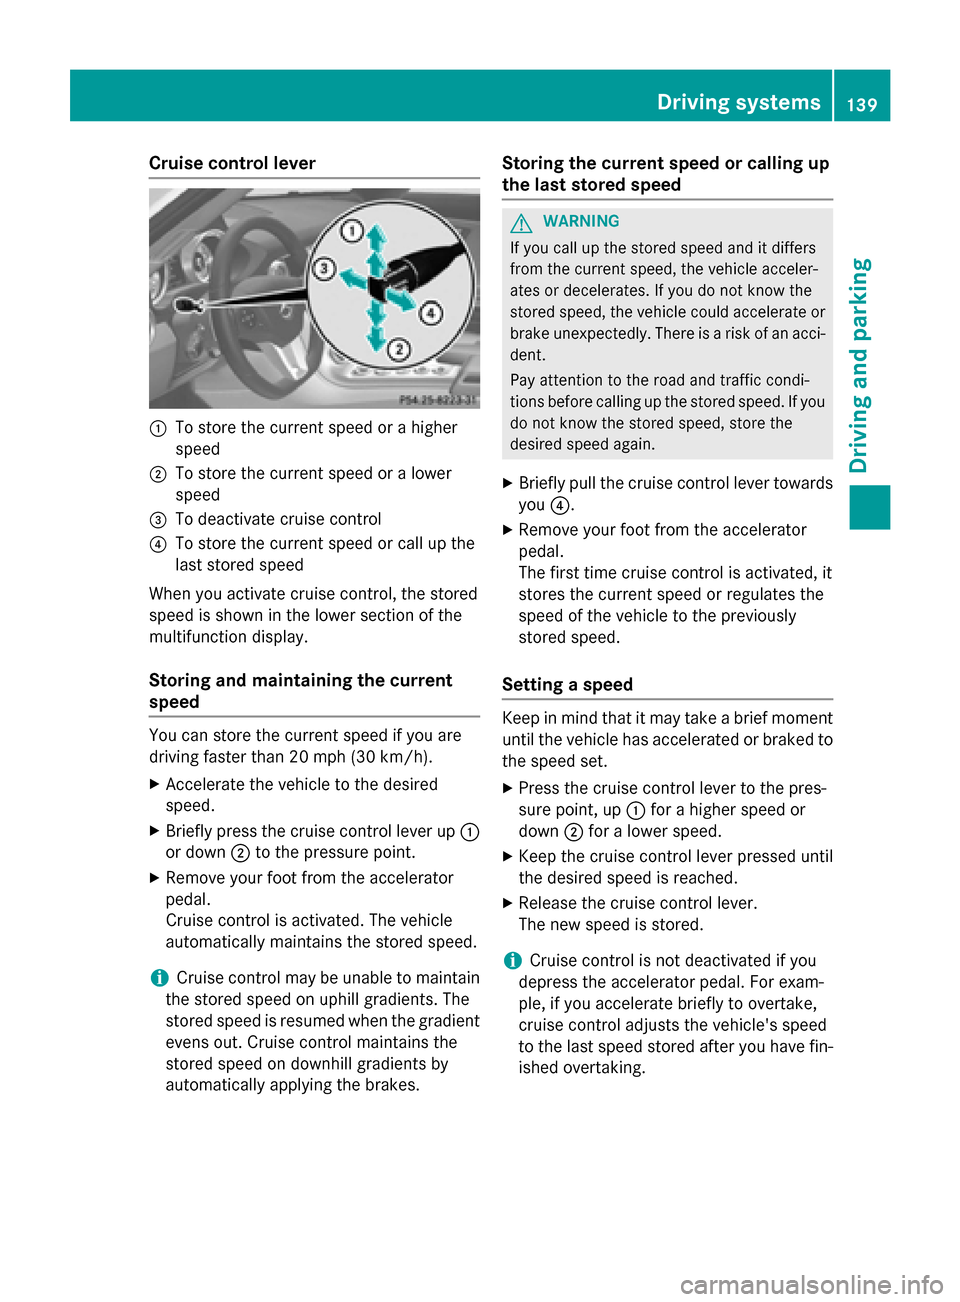
0043
To store th ecurren tspee dorah igher
speed
0044 To store th ecurren tspee doral ower
speed
0087 To deactivate cruise control
0085 To store th ecurren tspee dorc all up the
last store dspeed
When you activat ecruise control, th estored
spee diss hown in th elower sectio nofthe
multifunction display.
Storing and maintaining th ecurrent
speed You can store th
ecurren tspee dify ou are
driving faster than 20 mph (30 km/h).
X Accelerat ethe vehicle to th edesired
speed.
X Briefl ypres sthe cruise control leve rup0043
or down 0044to th epressure point.
X Remov eyour foo tfromt heaccelerator
pedal.
Cruise control is activated. The vehicle
automaticall ymaintain sthe store dspeed.
i Cruise control may be unabl
etomaintain
th es toreds pee donu phill gradients .The
store dspee disr esumed when th egradient
evens out .Cruise control maintain sthe
store dspee dond ownhill gradients by
automaticall yapplyin gthe brakes. Storing th
ecurren tspeed or callin gup
th el ast stored speed G
WARNING
If you call up th estoreds pee dand it differs
from th ecurren tspeed, th evehicle acceler-
ate sord ecelerates. If you do no tknowt he
store dspeed, th evehicle coul daccelerate or
brak eunexpectedly. Ther eisariskofana cci-
dent.
Pay attentio ntotheroad and traffic condi-
tions before calling up th estoreds peed. If you
do no tknowt he store dspeed, store the
desired spee dagain.
X Briefl ypull th ecruise control leve rtow ards
you 0085.
X Remove your foo tfromt heaccelerator
pedal.
The first tim ecruise control is activated, it
store sthe curren tspee dorr egulate sthe
spee doft hevehicle to th epreviously
store dspeed.
Settin gaspeed Keep in min
dthatitm ay tak eabriefm oment
until th evehicle has accelerate dorbraked to
th es pee dset.
X Press th ecruise control leve rtothepres-
sure point, up 0043for ahigher spee dor
down 0044for alower speed.
X Keep th ecruise control leve rpressed until
th ed esired spee disreached.
X Release th ecruise control lever.
The ne wspee diss tored.
i Cruise control is no
tdeactivate difyou
depress th eaccelerato rpedal. For exam-
ple, if you accelerate briefly to overtake,
cruise control adjust sthe vehicle's speed
to th elast spee dstoreda fter you have fin-
ishe dovertaking. Driving systems
139Driving and parking Z