2015 MERCEDES-BENZ SLS AMG GT COUPE tow
[x] Cancel search: towPage 236 of 290
Useful information
i This Operator's Manual describes all
models and all standard and optional equip- ment of your vehicle available at the time of
publication of the Operator's Manual.
Country-specific differences are possible.
Please not ethat your vehicle may not be
equipped with all feature sdescribed. This
also applies to safety-related system sand
functions.
i Please read the information on qualified
specialist workshops (Y page 23).Wher
ewillIfind...? First-aid kit
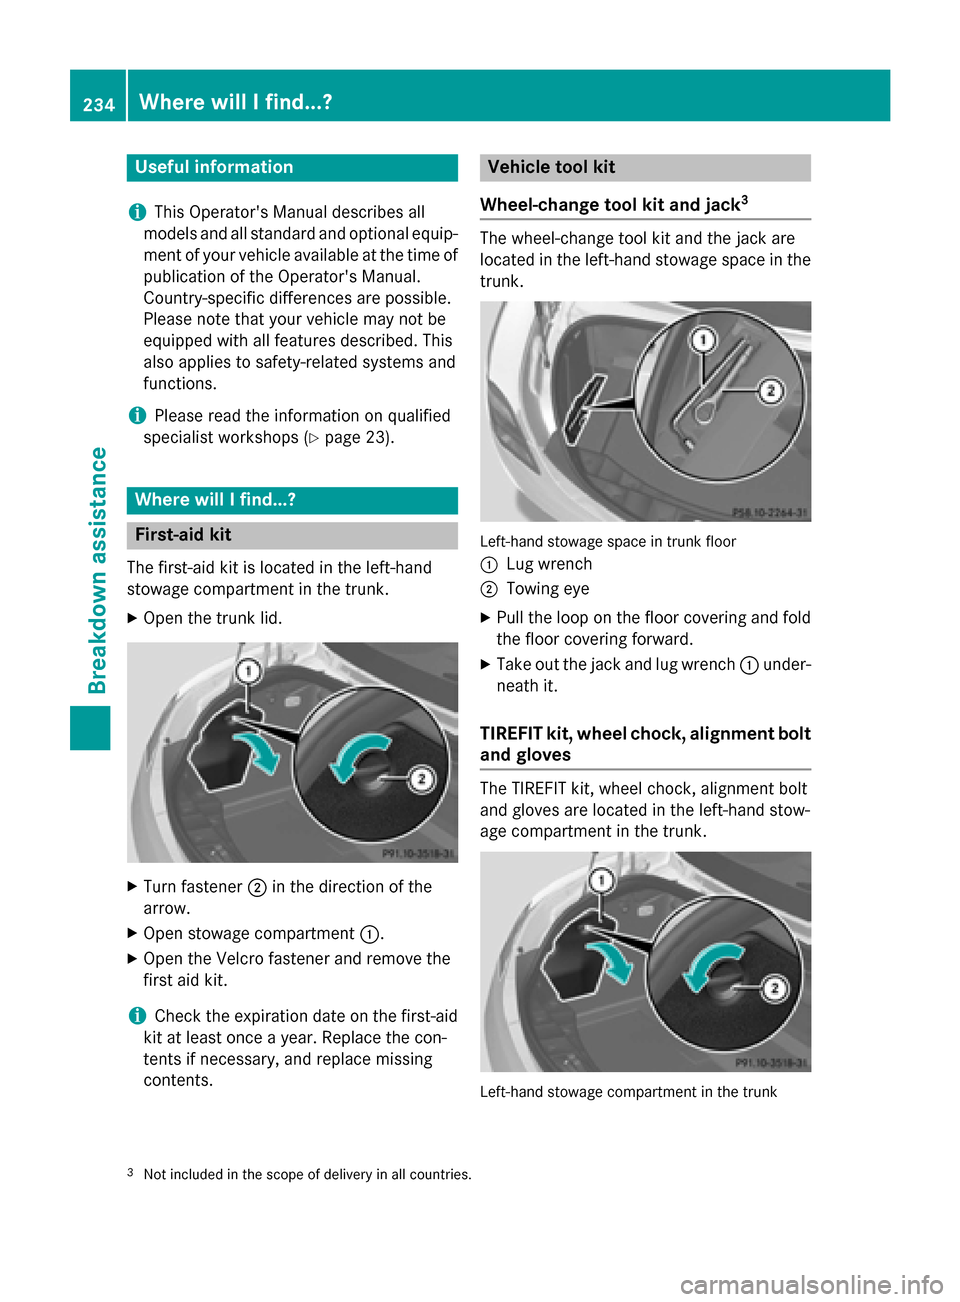
The first-aid kit is locate dinthe left-hand
stowage compartment in the trunk.
X Open the trun klid. X
Turn fastener 0044in the direction of the
arrow.
X Open stowage compartment 0043.
X Open the Velcr ofastener and remov ethe
first aid kit.
i Check the expiration date on the first-aid
kit at least onc eayear. Replace the con-
tents if necessary, and replace missing
contents. Vehicle tool kit
Wheel-change tool kit and jack 3 The wheel-change tool kit and the jack are
locate
dinthe left-hand stowage space in the
trunk. Left-han
dstowage space in trun kfloor
0043 Lug wrench
0044 Towing eye
X Pull the loop on the floor covering and fold
the floor covering forward.
X Take out the jack and lug wrench 0043under-
neat hit.
TIREFIT kit, wheel chock, alignment bolt
and gloves The TIREFIT kit
,wheel chock, alignmen tbolt
and gloves are locate dinthe left-hand stow-
age compartment in the trunk. Left-han
dstowage compartmen tinthe trunk
3 Not included in the scope of delivery in all countries. 234
Wher
ewillIfind...?Breakdown assistance
Page 237 of 290
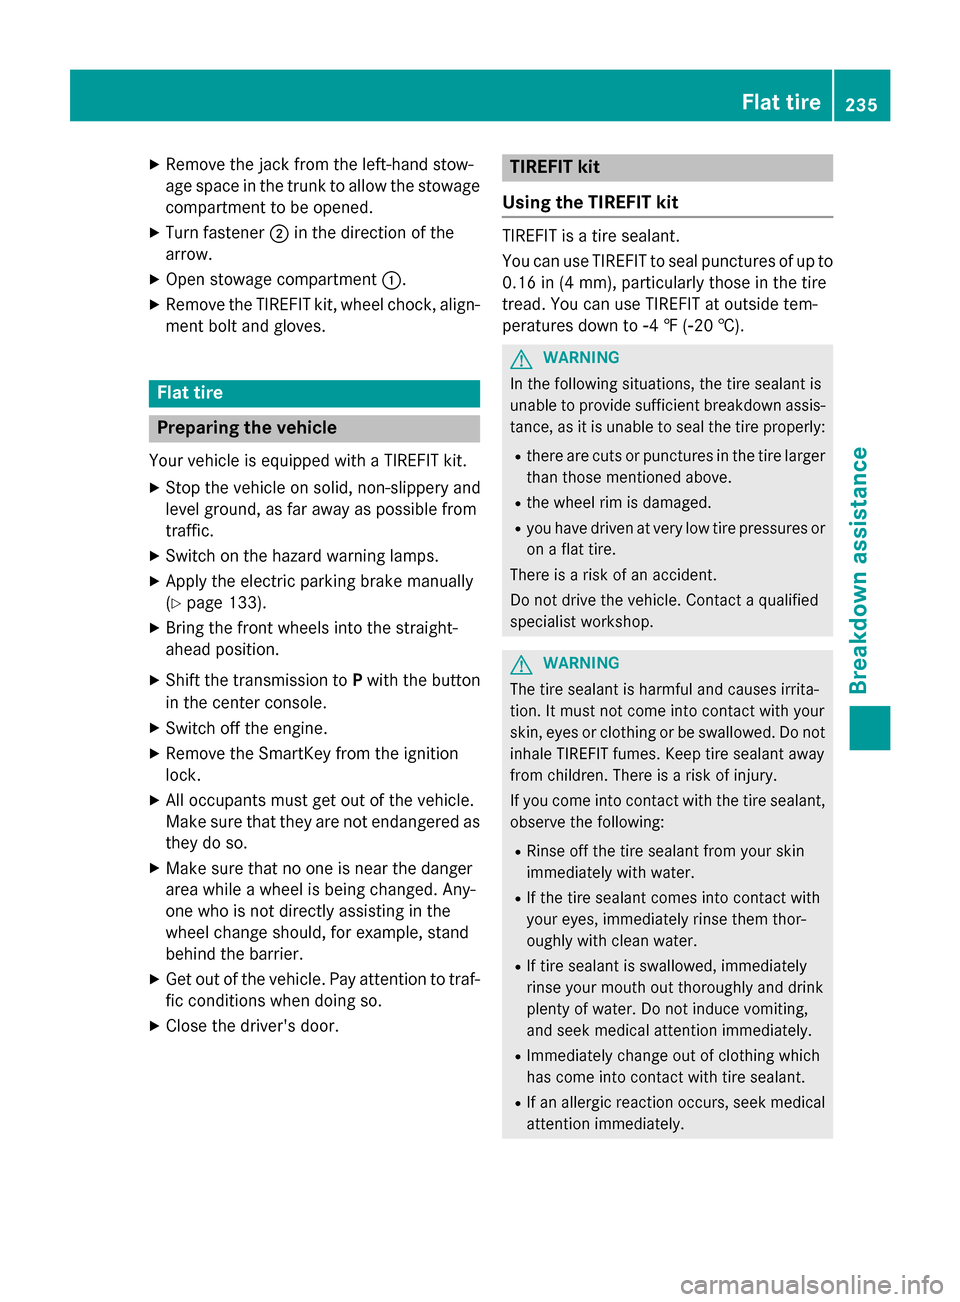
X
Remove th ejackf romt heleft-han dstow-
age spac einthetrunk to allow th estowage
compartmen ttobeopened.
X Turn fastener 0044in th edirection of the
arrow.
X Ope nstowage compartment 0043.
X Remove th eTIREFI Tkit,w hee lchock ,align-
men tbolt and gloves. Flat tire
Preparing th
evehicle
Your vehicl eisequipped wit haTIREFI Tkit.
X Stop th evehicl eons olid, non-slipper yand
level ground ,asfar away as possibl efrom
traffic.
X Switc hont hehazard warnin glamps.
X Apply th eelectric parkin gbrak em anually
(Y page 133).
X Brin gthe fron twheels into th estraight-
ahead position.
X Shift th etransmission to Pwit hthe button
in th ecenter console.
X Switc hoff th eengine.
X Remove th eSmartKey from th eignition
lock.
X Allo ccupant smustg et out of th evehicle.
Mak esuret hatthe ya re no tend angered as
they do so.
X Mak esuret hatnoo neis near th edanger
area while awhee lisb eingchanged. Any-
on ew ho is no tdirectl yassistin ginthe
whee lcha ng es hould, for example, stand
behind th ebarrier.
X Get out of th evehicle. Pay attention to traf-
fic condition swhen doin gso.
X Clos ethe driver's door. TIREFIT kit
Usin gthe TIREFIT kit TIREFI
Tisat ires ealant.
You can use TIREFI Ttoseal punctures of up to
0.16 in (4 mm), particularly those in th etire
tread. You can use TIREFI Tatoutside tem-
peratures down to 00F84‡(00F820 †). G
WARNING
In th efollowin gsituations, th etires ealant is
unable to provid esufficien tbreakdown assis-
tance ,asitisu nable to seal th etirep roperly:
R there are cut sorpunctures in th etirel arger
than those mentioned above.
R thew hee lrim is damaged.
R you hav edriven at ver ylow tire pressures or
on aflat tire.
There is ariskofana ccident.
Do no tdrive th evehicle. Contac taqualified
specialist workshop. G
WARNING
The tire sealant is harmful and causes irrita-
tion .Itm ustn otcome into contact wit hyour
skin ,eyes or clothin gorbeswallowed .Donot
inhale TIREFI Tfumes. Kee ptires ealant away
from children .There is ariskofi njury.
If you come into contact wit hthe tire sealant,
observ ethe following:
R Rinse off th etires ealant from your skin
immediately wit hwater.
R If th etires ealant comes into contact with
your eyes ,immediately rinse them thor-
oughly wit hclean water.
R If tire sealant is swallowed ,immediately
rinse your mout hout thoroughl yand drink
plenty of water. Do no tind ucev omiting,
and see kmedica lattention immediately.
R Immediately chang eout of clothin gwhich
has come into contact wit htires ealant.
R If an allergic reaction occurs, see kmedical
attention immediately. Flat ti
re
235Breakdo wn assis tance Z
Page 240 of 290
X
Stow the TIREFIT kit in asafea nd accessi-
bl ep lace in the vehicle.
X Pul lawa yimmediately.
The maximum speed for atire seale dwitht ire
sealant is 50 mph (80 km/h). The uppe rpart
of the TIREFIT sticke rmustb ea ffixe dtot he
instrument cluster in the driver' sfield of
vision.
! After use, exces
sTIREFIT may run ou tof
the fille rhose. Thi scould cause stains.
X Stop afte rdriving for approximatel yten
minutes and check the tire pressure with
the tire inflation compressor.
The tire pressure mus tnow be at least
130 kPa (1.3 bar/19 psi).
i On tire
stha tare equipped with atire pres-
sure sensor (tire pressure monitor) ,the use
of sealant can lead to malfunction mes-
sages and incorrect displays. Therefore,
us ep ressure gauge 0084in the TIREFIT kit to
check and correct the tire pressure. G
WARNING
If the required tire pressure is not reached
afte rdriving for ashort period, the tire is too
badl ydam aged .The tire sealant canno trepair
the tire in this instance. Damaged tire sand a
tire pressure tha tist oo lo wcan significantly
impai rthe vehicle's braking and driving char-
acteristics. There is ariskofa ccident.
Do not continu edriving .Contact aquali fied
specialist workshop.
X Correct the tire pressure if it is stil latleast
130 kPa (1.3 bar/20 psi )(fort he values,
see the Tire and Loading Information plac-
ard on the driver' ssideB -pillar or tire pres-
sure table on the fue lfille rflap).
To increase the tire pressure: switch on
the tire inflation compressor.
To reduc ethe tire pressure: openrelease
screw 006B.
! The manufacturer doe
snot guarantee
tha talltire damag ecan be repaired using
the TIREFIT kit, particularly in the cas eofcuts and puncture
swithad iameter of more
tha nfou rm illimeters or on the sidewall. The
manufacturer is not responsible for dam-
ag ec aused by inappropriate us eofthe
TIREFIT kit.
X Drive to the neares tworksho pand have the
tire changed there.
X Hav ethe tire sealant bottl ereplaced as
soo naspossible at aquali fied specialist
workshop, e.g. at an authorized Mercedes- Benz Center. H
Environmental note
Hav ethe used tire sealant bottl edisposed of
professionally ,e.g. at an authorized
Mercedes-Benz Center.
X Hav ethe TIREFIT kit replaced every four
years at aquali fied specialist workshop,
e.g. an authorized Mercedes-Benz Center. Battery (vehicle)
Important safety notes
Specia ltool sand expert knowledge are
required when working on the battery ,e.g.
removal and installing .You shoul dtherefore
have al lworki nvolving the battery carrie dout
at aq uali fied specialist workshop. G
WARNING
Wor kcarrie doutincorrectl yonthe battery
can lead ,for example, to ashort circuit and
thu sdam aget he vehicl eelectronics. Thi scan
lead to function restrictions applying to
safety-relevant systems ,e.g. the lighting sys-
tem, ABS (anti-lock braking system) or ESP ®
(Electronic Stability Program). The operating
safety of your vehicl emay be restricted. You
could lose contro lofthe vehicle, for example:
R braking
R in the event of abrup tsteering maneuver
and/or when the vehicle's speed is not
adapted to the roa dconditions
There is ariskofana ccident. 238
Battery (vehicle)Breakdown assistance
Page 246 of 290
X
First, remove the jumper cable sfrom earth point 0085and negative terminal 0087,then from
positiv eclamp 0043and positiv eterminal 0044.Each time beginning with your vehicle' sbattery.
X Slide cover 0083of the positiv eterminal in the opposite directio ntothe arrow.
X Have the battery checke dataqualified specialist workshop.
i Jump-starting is not considered to be
anorma loperating condition.
i Jumpe
rcable sand further information regarding jump-starting can be obtained at any
qualified specialist workshop. Towing and tow-starting
Important safety notes
G
WARNING
The rea raxlel ocks when:
R the engine is not running
R the engine stalls while the vehicle is being
towed
R there is amalfunction in the power supply
or the vehicle' selectrica lsystem
There is ariskofana ccident.
In the event of abreakdown, yo ushould
always hav ethe vehicle transported. G
WARNING
If the brake system or power steering is mal-
functioning and your vehicle is then towed
away ,significantly more effort may be
required to stee rand brake than is normally
required .There is ariskofana ccident.
In such cases, use atow bar. Befor etowing,
make sur ethat the steering move sfreely. G
WARNING
If the weigh tofthe vehicle to be towe dortow-
starte disgreater than the permissible gross
weigh tofyourv ehicle:
R the towing ey ecould detach itself
R the vehicle/trailer combinatio ncould roll-
over.
There is ariskofana ccident.
Whe ntowing or tow-starting another vehicle,
its weigh tshoul dnot be greater than the per-
missible gros sweigh tofy ourv ehicle. !
Use the SmartKe
yinstead of the Start/
Stop button whe ntowing the vehicle.
Start the engine and keep it running. Turn
the SmartKe ytoposition 2in the ignition.
Set the transmission to Nusing the E-
SELECT lever. Make sure that yo uthen
leave the SmartKe yinposition 2.
Check the transmission positio ninthe
instrument cluster.
! Make sure that the electric parking brake
is released .Ifthe electric parking brake is
faulty ,visit aquali fied specialist workshop.
Mercedes-Benz recommends that yo uuse
an authorized Mercedes-Benz Center for
this purpose.
! Whe
ntowing, pull away slowl yand
smoothly .Ifthe tractive power is too high,
the vehicles could be damaged.
! Only secure the tow rope or tow ba
ratthe
towing eyes. Otherwise, the vehicle could
be damaged.
! Do not us
ethe towing eyes for recovery
purposes as this could damag ethe vehicle.
If in doubt, recover the vehicle with acrane.
! The vehicle can be towe
damaximum of
30 miles (50km). The towing speed of
30 mph (50 km/h )mustn ot be exceeded.
If the vehicle ha stobetowedmore than
30 miles (50km), the entire vehicle mus tbe
raised and transported.
! Do not tow with sling-typ
eequipment.
Thi scould damag ethe vehicle. 244
Towinga
nd tow-startingBreakdow nassistance
Page 247 of 290
!
Tow-starting the vehicle is not permitted.
The transmission may otherwise be dam-
aged.
If the vehicle can no longer be driven because of an accident or breakdown, you have the
following options:
R transportingt he vehicle
As arule, you should have the vehicle trans-
ported.
R towing the vehicle with the rear axle raised
Only tow the vehicle with the rear axle
raised in exceptional cases.
R towing the vehicle with atow rope or tow
bar
Only tow the vehicle in exceptional cases.
The engine must be running if you tow the
vehicle with atow rope or tow bar. Observe
the following notes.
Also observe the following notes:
R If the engine does not start, try jump-start-
ing it (Y page 242). Tow-starting the vehicle
is not permitted.
R If it is not possibletoj ump-start the vehicle,
have it transported to the nearest qualified specialist workshop, e.g. an authorized
Mercedes-Benz Center.
R If the vehicle has transmission damage,
have it transported to aqualified specialist
workshop. Observe the displaym essages
in the instrument cluster. Installing/removing the towing eye
Installingt he towing eye X
Take the towing eye and the wheel wrench 4
out of the wheel-change tool kit
(Y page 234).
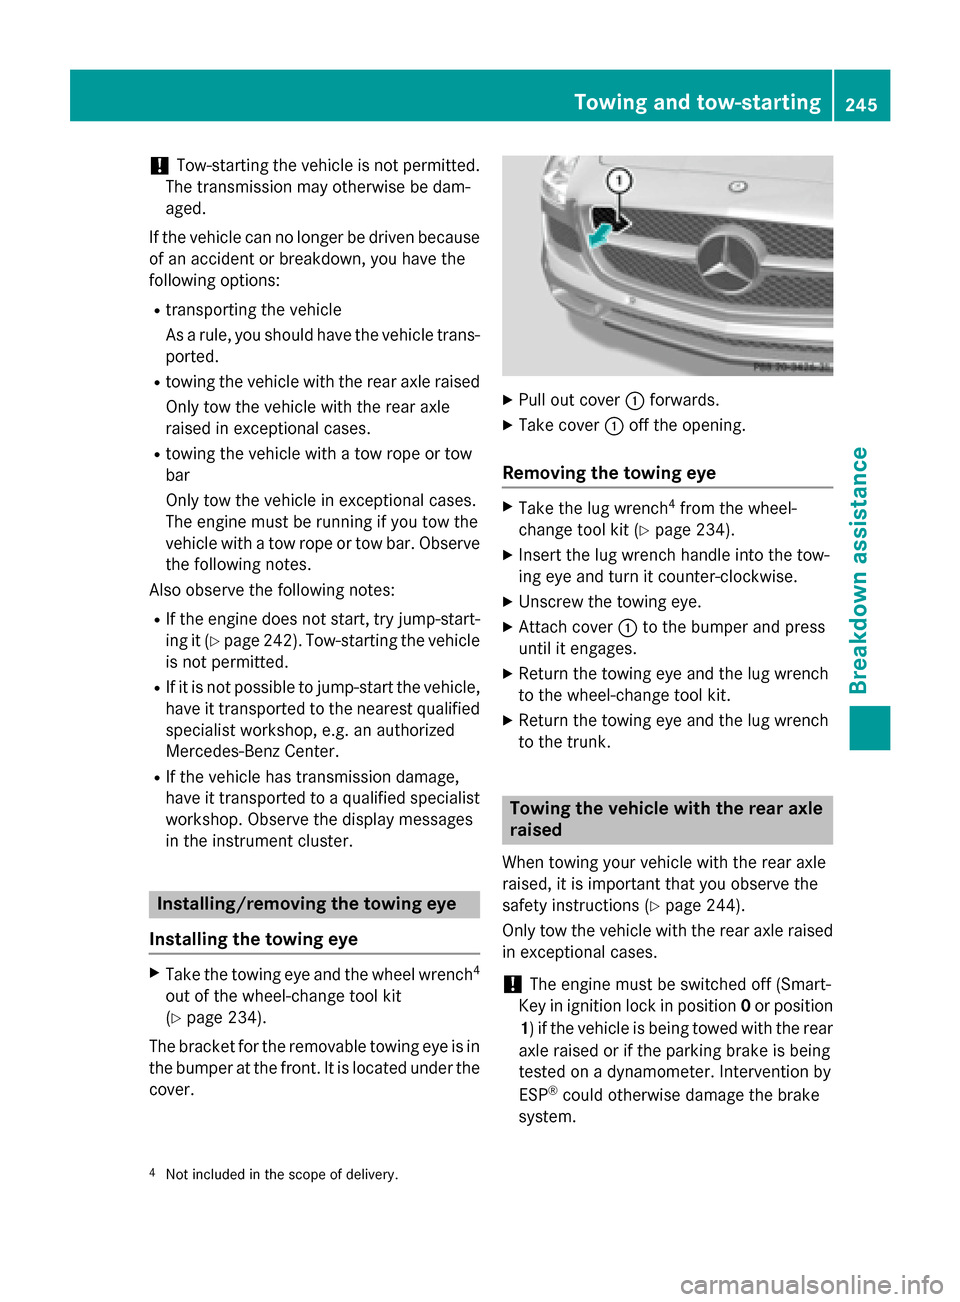
The bracket for the removable towing eye is in
the bumper at the front.Itisl ocated under the
cover. X
Pull out cover 0043forwards.
X Take cover 0043off the opening.
Removing the towing eye X
Take the lug wrench 4
from the wheel-
change tool kit (Y page 234).
X Insert the lug wrench handle into the tow-
ing eye and turn it counter-clockwise.
X Unscrew the towing eye.
X Attach cover 0043to the bumper and press
until it engages.
X Return the towing eye and the lug wrench
to the wheel-change tool kit.
X Return the towing eye and the lug wrench
to the trunk. Towing the vehiclew
ith the rear axle
raised
When towing your vehicle with the rear axle
raised, it is important that you observe the
safety instructions (Y page 244).
Only tow the vehicle with the rear axle raised in exceptional cases.
! The engine must be switched off (Smart-
Key in ignition lock in position 0or position
1)ift he vehicle is being towed with the rear
axle raised or if the parking brake is being
tested on adynamometer. Intervention by
ESP ®
could otherwise damage the brake
system.
4 Not included in the scope of delivery. Towing and tow-starting
245Breakdown assistance Z
Page 248 of 290
X
Switch on the hazard warning lamps
(Y page 98).
X Make sure tha tthe SmartKey is in position
2 in the ignition and tha tthe engine is run-
ning throughout the towing procedure.
X Mov ethe transmissio ntoNwith the E-
SELECT lever. Check the transmissio nposi-
tion in the instrument cluster. Towin
gavehicle with both axles on
the ground
It is important tha tyou observe the safety
instructions when towing away your vehicle
(Y page 244).
X Switch on the hazard warning lamps
(Y page 98).
i Whe
ntowing with the hazard warning
flashers switche don, us ethe combination
switch as usua ltosignal in which direction
yo ua re changing. In this case, onl ythe
indicator lamps for the direction of travel
flash. Whe nyou reset the combination
switch, the hazard warning flashers start
flashing again.
X Insert the SmartKey into the ignition lock
(Y page 119).
X Start the engine and leave the SmartKey in
the ignition.
X Mov ethe transmissio ntoNwith the E-
SELECT lever.
X Check the transmissio nposition in the
instrument cluster display (Y page 123).
X Leave the engine running throughout the
entir etowing procedure Transporting the vehicle
The towing ey ecan be used to pull the vehicle
onto atraile rort ransporter for transporting
purposes.
! Yo
um ay onl ysecure the vehicl ebythe
wheels, not by parts of the vehicl esuchas axl
eors teering components .Otherwise,
the vehicl ecould be damaged.
X Start the engine.
X Make sure tha tthe SmartKey is in position
2 in the ignition and tha tthe engine is run-
ning during the entir eloadin goperation.
X Mov ethe transmissio ntoNwith the E-
SELECT lever. Check the transmissio nposi-
tion in the instrument cluster.
As soon as the vehicle has been loaded: X Prevent the vehicl efrom rolling away by
applying the electri cparking brake.
X Shift the transmissio ntoPwith the button
in the center console.
X Turn the SmartKey to position 0in the igni-
tion lock and remove the SmartKey from
the ignition lock.
X Secure the vehicle. Fuses
Important safety notes
G
WARNING
If yo umanipulate or bridge afaulty fus eorif
yo ur eplace it with afusew ithah ighe ramper-
age, the electri ccable scould be overloaded.
Thi scould resul tinafire. There is ariskofan
accident and injury.
Alway sreplace faulty fuses with the specified
new fuses having the correct amperage.
! Only us
efuses tha thaveb eena pproved
for Mercedes-Benz vehicles and which
have the correct fus erating for the system
concerned. Otherwise, components or sys-
tems could be damaged.
The fuses in your vehicl eserve to close down
faulty circuits. If afuseb lows ,allthe compo-
nents on the circuit and thei rfunctions stop
operating.
Blown fuses mus tbereplaced with fuses of
the same rating, which yo ucan recognize by 246
FusesBreakdown assistance
Page 273 of 290
of hydroplaning. You will only gain these ben-
efits if the correc tdirection of rotation is
maintained.
An arrow on the sidewal lofthe tire indicates
its correc tdirection of rotation. Storing wheels
Storew heels that are not being used in acool,
dry and preferably dark place. Protec tthe
tires from oil, grease, gasoline and diesel. Cleaning the wheels
G
WARNING
The water jet from acircular jet nozzle (dirt
blasters) can cause invisible exterior damage to the tires or chassis components. Compo-
nentsd amaged in this way may fail unexpect-
edly. There is arisk of an accident.
Do not use power washers with circular jet
nozzles to clean the vehicle. Have damaged
tires or chassis components replaced imme-
diately. Mounting
awheel
Preparing the vehicle X
Stop the vehicle on solid, non-slippery and
level ground.
X Apply the electric parking brake manually.
X Bring the front wheels into the straight-
ahead position.
X Shift the transmission to position P.
X Switch off the engine.
X Open the driver's door.
The on-board electronics now have status
0.T his is the same as the SmartKey having
been removed.
X Remove Start/Stop button from ignition
lock (Y page 119). X
Take the following object sfrom the left-
hand stowage compartment and the left-
hand stowage space in the trunk:
R lug wrench
R folding wheel chock
R jack
R alignment bolt
X Secure the vehicle to prevent it from rolling
away.
Securing the vehicle to prevent it from
rolling away If your vehicle is equipped with
awheel chock,
it can be found in the vehicle tool kit
(Y page 234).
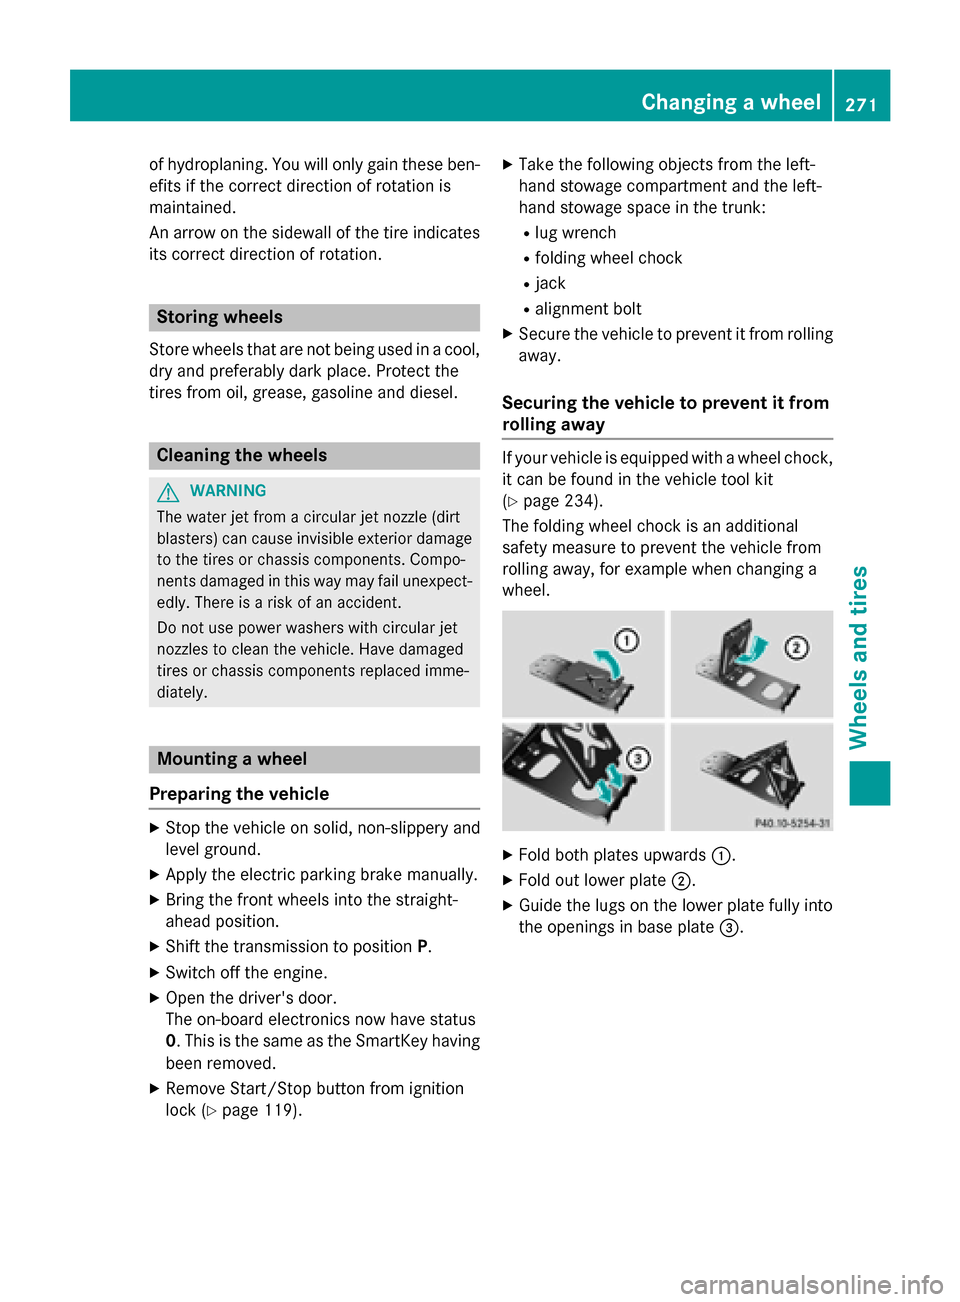
The folding wheel chock is an additional
safety measure to prevent the vehicle from
rolling away,f or example when changing a
wheel. X
Fold both plates upwards 0043.
X Fold out lower plate 0044.
X Guide the lugs on the lower plate fully into
the openings in base plate 0087. Changing
awheel
271Wheels and tires Z
Page 277 of 290
X
Tighten the wheel bolts until they are fin-
ger-tight.
X Unscrew the alignment bolt.
X Tighten the last wheel bolt until it is finger-
tight.
Lowering the vehicle G
WARNING
The wheels could work loose if the wheel nuts and bolts are not tightened to the specified
tightening torque. There is arisk of accident.
Have the tightening torque immediately
checked at aqualified specialist workshop
after awheel is changed.
X Turn the crank of the jack counter-clock-
wise until the vehicle is once again standing
firmly on the ground.
X Place the jack to one side. X
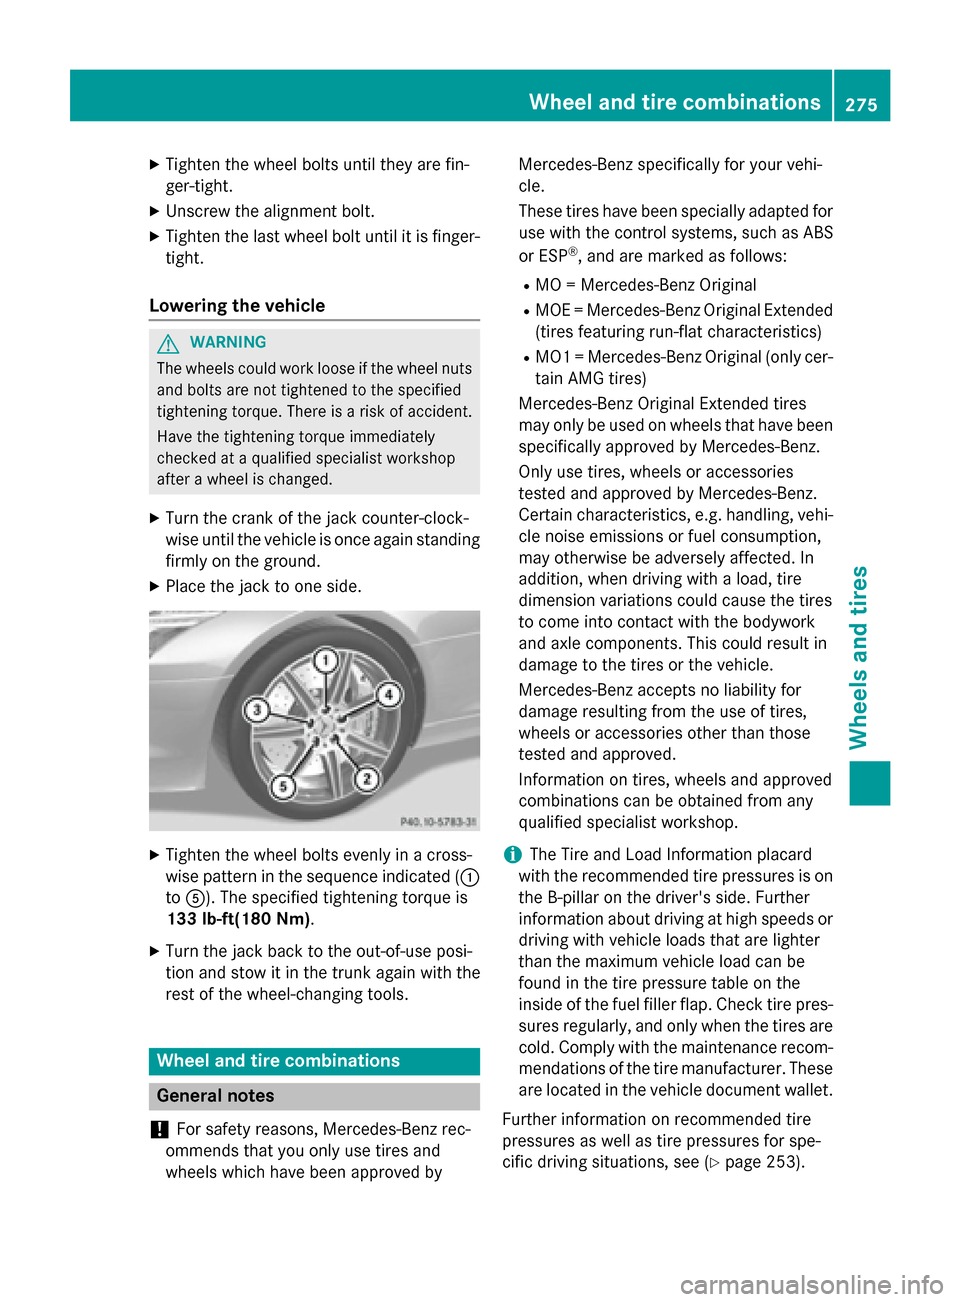
Tighten the wheel bolts evenly in across-
wise pattern in the sequence indicated ( 0043
to 0083). The specified tightening torque is
133 lb-ft(180 Nm).
X Turn the jack back to the out-of-use posi-
tion and stow it in the trunk again with the
rest of the wheel-changin gtools. Wheel and tire combinations
General notes
! For safety reasons, Mercedes-Benz rec-
ommends that you only use tires and
wheels which have been approved by Mercedes-Benz specifically for your vehi-
cle.
These tires have been specially adapted for
use with the control systems, such as ABS
or ESP ®
,a nd are marked as follows:
R MO =Mercedes-Benz Original
R MOE =Mercedes-Benz Original Extended
(tires featuring run-flat characteristics)
R MO1 =Mercedes-Benz Original (only cer-
tain AMG tires)
Mercedes-Benz Original Extended tires
may only be used on wheels that have been
specifically approved by Mercedes-Benz.
Only use tires, wheels or accessories
tested and approved by Mercedes-Benz.
Certain characteristics, e.g. handling, vehi-
cle noise emissions or fuel consumption,
may otherwise be adversely affected. In
addition, when driving with aload, tire
dimension variations could cause the tires
to come into contact with the bodywork
and axle components. This could result in
damage to the tires or the vehicle.
Mercedes-Benz accepts no liability for
damage resulting from the use of tires,
wheels or accessories other than those
tested and approved.
Information on tires, wheels and approved
combinations can be obtained from any
qualified specialist workshop.
i The Tire and Load Information placard
with the recommended tire pressures is on the B-pillar on the driver's side. Further
information about driving at high speeds or driving with vehicle loads that are lighter
than the maximum vehicle load can be
found in the tire pressure table on the
inside of the fuel filler flap. Check tire pres- sures regularly, and only when the tires arecold. Comply with the maintenance recom-
mendation softhe tire manufacturer. These
are located in the vehicle document wallet.
Further information on recommended tire
pressures as well as tire pressures for spe-
cific driving situations, see (Y page 253). Wheel and tirec
ombinations
275Wheels and tires Z