2015 MERCEDES-BENZ SLS AMG GT COUPE tow
[x] Cancel search: towPage 213 of 290
Problems with the rear spoiler
Problem
Possible causes/consequences and
0050
0050Solutions The rear spoiler stops
before reaching the
end position when
retracting manually. You have opened the trunk lid while manually retracting the rear
spoiler.
X Close the trunk lid.
The rear spoiler extends or, if you press and hold button 0043,
continues retracting. The rear spoiler stops
before reaching the
end position when
retracting/extending
manually. You have switched off the ignition.
X Switch the ignition back on.
X Press button to extend/retract the rear spoiler.
The rear spoiler extends/retracts. The rear spoiler cannot
be retracted again after
manually extending it. You have opened the trunk lid while manually extending the rear
spoiler.
X Close the trunk lid. The rear spoiler does
not extendorr
etract
automatically. The rear spoiler's movement is blocked, e.g. by an object jammed
between the body and the rear spoiler.
X Remove the object. Garage door opener
Important safety notes G
WARNING
When you operate or program the garage door with the integrated garage door opener, per-
sons in the range of movement of the garage
door can become trapped or struck by the
garage door. There is arisk of injury.
When using the integrated garage door
opener, always make sure that nobody is
within the range of movement of the garage
door. G
WARNING
Combustion engines emit poisonous exhaust
gases such as carbon monoxide. Inhaling
these exhaust gases leads to poisoning. There is ar isk of fatal injury. Therefore never leave
the engine running in enclosed spaces with-
out sufficient ventilation. The HomeLink
®
garage door opener inte-
grated in the rear-view mirror allowsy ou to
operate up to three different door and gate
systems.
Use the integrated garage door opener only
on garage doors that:
R have safety stop and reverse features and
R meet current U.S. federal safety standards
When programing agarage door opener, park
the vehicle outside the garage.
i Certain garage door drives are incompat-
ible with the integrated garage door
opener. If you have difficulty programing
the integrated garage door opener, contact
an authorized Mercedes-Benz Center.
Alternatively, you can call the following
telephone assistance services:
R USA: Mercedes-Benz Customer Assis-
tanceC enter at 1-800-FOR-MERCedes
R Canada: Customer Service at
1-800-387-0100 Features
211Stowage and features Z
Page 214 of 290
i
Notes aboutt
he declaration of conformity
can be found here (Y page 22).
USA: FCC ID: CB2HMIHL4
Canada: IC: 279B-HMIHL4
Programming Programing buttons
Pay attention to the "Important safety notes"
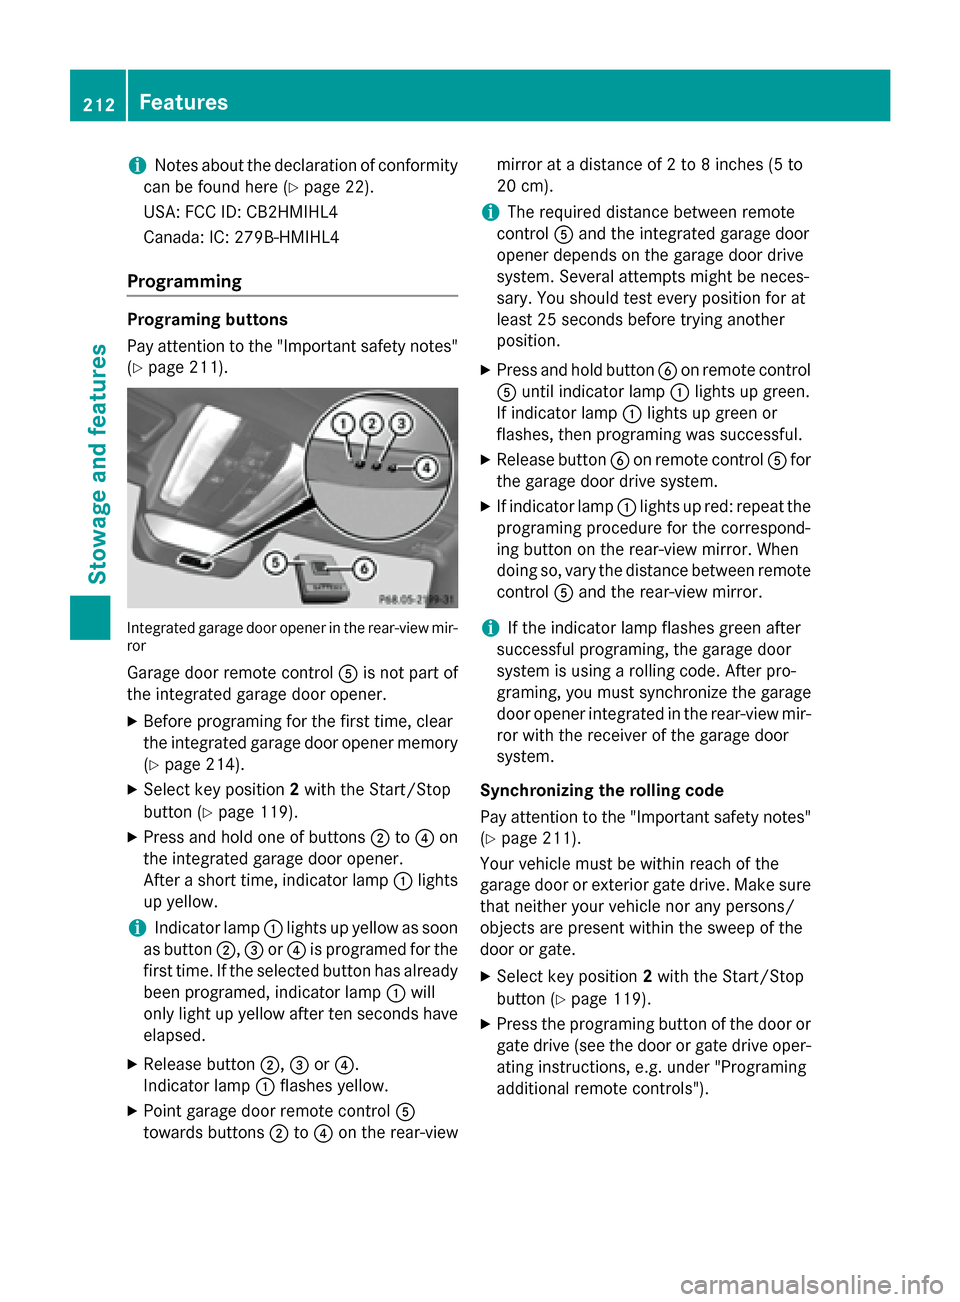
(Y page 211). Integrated garaged
oor opener in the rear-view mir-
ror
Garage door remote control 0083is not part of
the integrated garaged oor opener.
X Before programing for the first time, clear
the integrated garaged oor opener memory
(Y page 214).
X Select key position 2with the Start/Stop
button (Y page 119).
X Press and hold one of buttons 0044to0085 on
the integrated garaged oor opener.
After ashort time, indicator lamp 0043lights
up yellow.
i Indicator lamp
0043lights up yellow as soon
as button 0044,0087or0085 is programed for the
first time. If the selected button has already been programed ,indicator lamp 0043will
only light up yellow after ten seconds have
elapsed.
X Release button 0044,0087or0085.
Indicator lamp 0043flashesy ellow.
X Point garaged oor remote control 0083
towards buttons 0044to0085 on the rear-view mirror at
adistance of 2to8i nches (5 to
20 cm).
i The required distance between remote
control 0083and the integrated garaged oor
opener depends on the garaged oor drive
system. Several attempts might be neces-
sary. You shouldt est every position for at
least 25 seconds before trying another
position.
X Press and hold button 0084on remote control
0083 until indicator lamp 0043lights up green.
If indicator lamp 0043lights up green or
flashes, then programing was successful.
X Release button 0084on remote control 0083for
the garaged oor drive system.
X If indicator lamp 0043lights up red: repeatt he
programing procedure for the correspond-
ing button on the rear-view mirror. When
doing so, vary the distance between remote
control 0083and the rear-view mirror.
i If the indicator lamp flashesg
reen after
successful programing, the garaged oor
system is using arolling code. After pro-
graming, you must synchronize the garage
door opener integrated in the rear-view mir- ror with the receiver of the garaged oor
system.
Synchronizing the rollingc ode
Pay attention to the "Important safety notes" (Y page 211).
Your vehicle must be within reach of the
garaged oor or exterior gate drive. Make sure
that neither yourv ehicle nor any persons/
objects are present within the sweep of the
door or gate.
X Select key position 2with the Start/Stop
button (Y page 119).
X Press the programing button of the door or
gate drive (see the door or gate drive oper- ating instructions, e.g. under "Programing
additional remote controls"). 212
FeaturesStowagea
nd features
Page 215 of 290
i
Usually, you now have 30 seconds to ini-
tiate the next step.
X Press previouslyp rogramed button0044,0087
or 0085 of the integrated garage door opener
until the door closes.
The rolling code synchronization is then
complete.
Notes on programing the remote control
Canadian radio frequency lawsr equire a
"break" (or interruption) of the transmission
signals after broadcasting for afew seconds.
Therefore, these signals may not last long
enough for the integrated garage door
opener. The signal is not recognized during
programing. Comparable with Canadian law,
some U.S. garage door openers also feature a
"break".
Proceed as follows:
R if you live in Canada
R if you have difficulties programing the
garage door opener (regardless of where
you live) when using the programing steps
X Press and hold one of buttons 0044to0085 on
the integrated garage door opener.
After ashort time, indicator lamp 0043lights
up yellow.
X Release the button.
Indicator lamp 0043flashes yellow.
X Press button 0084of garage door remote
control 0083for two seconds, then release it
for two seconds.
X Press button 0084againf or two seconds.
X Repeatt his sequence on button 0084of
remote control 0083until indicator lamp 0043
lights up green.
If indicator lamp 0043turns red, repeat the
process.
X Continue with the other programing steps
(see above). Problems when programing
If you are experiencing problems programing
the integrated garage door opener on the
rear-view mirror, take note of the following
instructions:
R Check the transmitter frequency of garage
door drive remote control 0083.This can usu-
ally be found on the back of the remote
control.
The integrated garage door opener is com-
patible with devices that have units which
operate in the frequency range of 280 to
433 MHz .
R Replace the batteries in garage door
remote control 0083.This increases the like-
lihood that garage door remote control 0083
will transmit astrong and precise signal to
the integrated garage door opener in the
rear-view mirror.
R When programing, hold remote control 0083
at varying distances and angles from the
button that you are programing. Try various angles at adistance between 2and
12 inches (5to 30 cm) or at the same angle
but at varying distances.
R If another remote control for the same
garage door drive is available,r epeat the
same programing steps with this remote
control. Before performing these steps,
make sure that new batteries have been
installed in garage door drive remote
control 0083.
R Note that some remote controls only trans-
mit for alimited amount of time (the indi-
cator lamp on the remote control goes out). Press button 0084on remote control 0083again
before transmission ends.
R Align the antennac able of the garage door
opener unit. This can improve signal recep- tion/transmission.
Opening/closing the garage door Once programed, the integrated garage door
opener 0083will assume the function of the
garage door system's remote control. Please Features
213Stowage and features Z
Page 216 of 290
also read th
eoperatin ginstruction sfor the
garag edoor system.
X Select ke yposition 2wit hthe Start/Stop
button.
X Press button 0044,0087or0085 whic hyou have
programed to operate th egarag edoor.
Garage door system wit hafixed code: indi-
cator lamp 0043light supg reen.
Garage door system wit harolling code:
indicator lamp 0043flashes green.
i The transmitte
rwill transmit asignal as
lon gast hebutto nisp ressed. The trans-
mission is halted after amaximum of ten
seconds and indicator lamp 0043light sup
yellow. Press button 0044,0087or0085 again if
necessary.
Clearing th ememory X
Select ke yposition 2wit hthe Start/Stop
button.
X Press buttons 0044and 0085.
The indicator lamp light supyellow.
X Press and hold buttons 0044and 0085until the
indicator lamp turns green.
i Mak
esure that you clear th ememory of
th ei ntegrate dgarag edoor opener before
sellin gthe vehicle. Charg
emaintenance socket
The battery may drain if th evehicle is left sta-
tionar yfor lon gperiods. In this case,
Mercedes-Ben zrecommends attaching the
trickle charge rtothecharge maintenance
socket.
The charge maintenance socke tisdesigned
solely for connecting atrickle charger. A
trickle charge rcan be obtaine dfroman
authorized Mercedes-Ben zCenter, for exam-
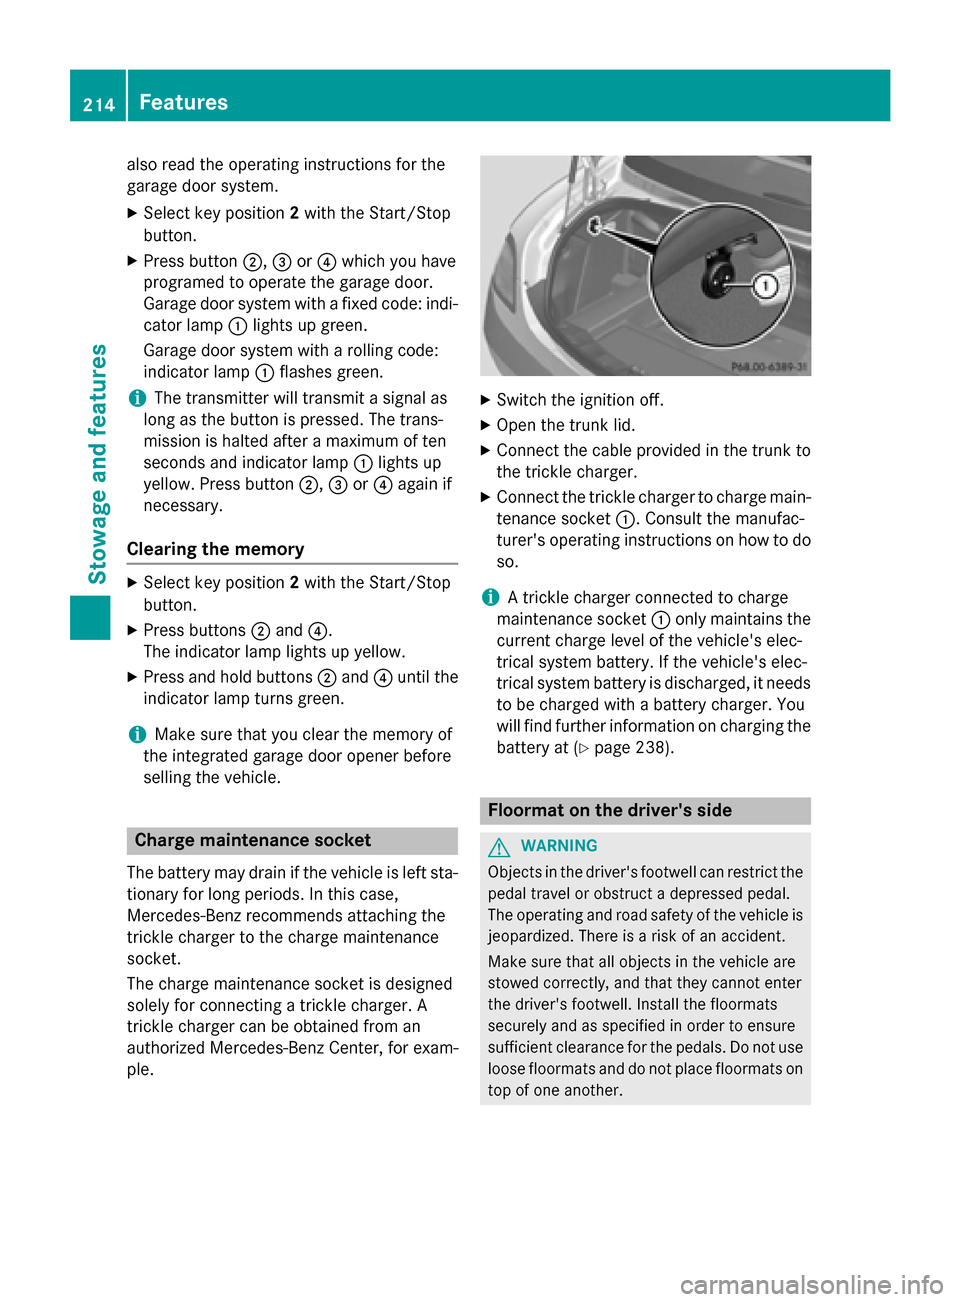
ple. X
Switch th eignition off.
X Open th etrunk lid.
X Connect th ecabl ep rovide dinthetrunk to
th et rickle charger.
X Connect th etrickle charge rtocharge main-
tenance socket 0043.Consult th emanufac-
turer' soperatin ginstruction sonhow to do
so.
i At
rickle charge rconnected to charge
maintenance socket 0043only maintain sthe
curren tcharge leve lofthevehicle's elec-
trical system battery. If th evehicle's elec-
trical system battery is discharged, it needs
to be charge dwithab attery charger. You
will fin dfurther informatio nonchargin gthe
battery at (Y page 238). Floorma
tonthedriver's side G
WARNING
Object sinthedriver' sfootwell can restrict the
pedal travel or obstruc tadepressed pedal.
The operatin gand road safety of th evehicle is
jeopardized. Ther eisariskofana ccident.
Mak esure that all object sinthevehicle are
stowed correctly, and that they canno tenter
th ed river' sfootwell. Install th efloormats
securely and as specifie dinorder to ensure
sufficient clearance for th epedals .Don otuse
loos efloormats and do no tplac efloormats on
to pofo neanother. 214
FeaturesStowage and features
Page 217 of 290
X
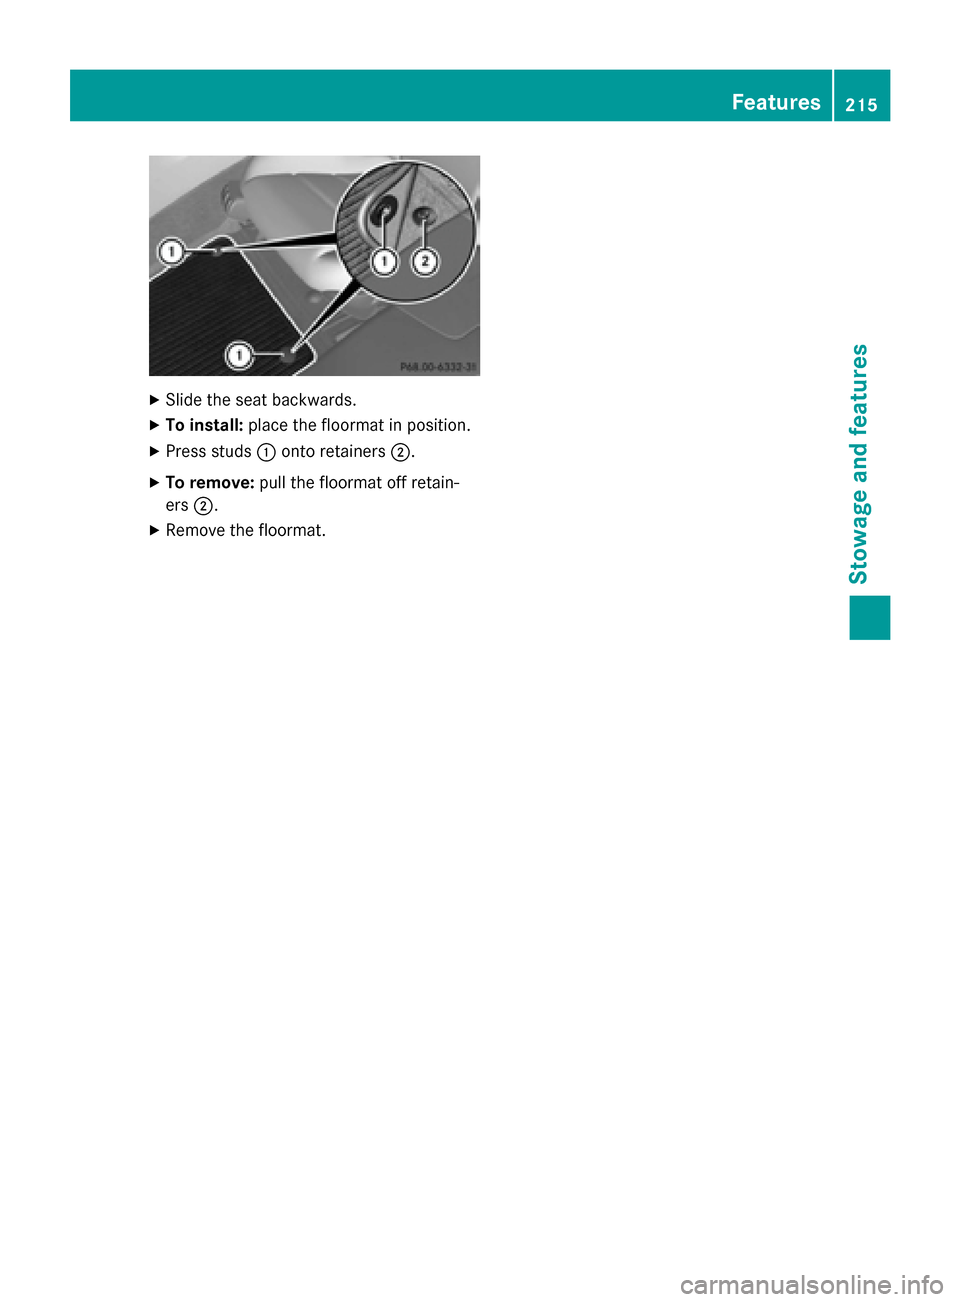
Slide the sea tbackwards.
X To install: place the floorma tinposition.
X Press studs 0043onto retainers 0044.
X To remove: pull the floorma toff retain-
ers 0044.
X Remove the floormat. Features
215Stowage and features Z
Page 226 of 290
You can wash the vehicle in an automatic car
wash fro mthe very start.
If the vehicle is very dirty, pre-wash it before
cleaning it in an automatic car wash.
! Never clean your vehicle in
aTouchless
Automatic Car Wash as these use special
cleaning agents. These cleaning agent scan
damage the paintwork or plastic parts.
! When washing your vehicle in
atow-
through car wash, use the SmartKey
instead of the Start/Stop button.
Start the engin eusing the SmartKey.. Move
the transmission to Nwith the E-SELECT
lever .Use the SmartKey to switc hthe
engin eoff again and the nturn the Smart-
Key to position 2.Make sure that you then
leave the SmartKey in position 2.You may
otherwise damage the vehicle, the trans-
missio northe car wash.
Check the transmission position in the
instrumen tcluster.
! Use the E‑SELECT lever to shift the trans-
missio ntoNbefore switching the engine
off .Ify ou open the driver's or front-
passenger door, the transmission remains
in this position for up to 30 minutes if the
SmartKey is in the ignition, even if the
engin eisswitched off .Ifyou do not shift the
transmission to Nusing the E‑SELECT lever
beforehand, it shift sautomatically to park-
ing position Pand lock sthe wheels if the
driver's or front-passenge rdoor is opened
and the engin eisswitched off .This may
damage the vehicle, the transmission or
the car wash.
Observe the information on maneuvering
(Y page 131). !
Before drivin
gintoana utomatic car wash,
make sure that it is suitable for the dimen- sion soft he vehicle. In particular, make
sure that:
R there is enough groun dclearance
betwee nthe vehicle underbody and the
guide rails of the automatic car wash.
R the clearance width of the automatic car
wash is sufficient ,particularly the width
of the guide rails.
R you enter the automatic car wash
straight and in the center of the guide
rails in order to avoid damagin gthe tires
or wheel rims.
Fold in the exterior mirrors befor ethe vehi-
cle is washed. The exterior mirrors could
otherwise be damaged.
! Make sure that:
R the side windows and the roof are com-
pletely closed
R the climat econtrol blower is switched off
R the windshield wiper switc hisatposition
0
The vehicle could otherwise be damaged.
! In portal car washes, the windshield wip-
ers may be move dupthe windshield by the
cleaning brushes when the ignition is
switched off.
Set the Start/Stop button to key position 2
to reset the windshield wipers to their orig-
inal position.
! Preferably use automatic car washes with
adjustable high-pressure pre-cleaning. This corresponds with the specification for the
Cabriolet program. In car washes that use
high water pressures, there is arisk that a
small amount of water may leak int othe
vehicle.
! Cabriolet:
do not treat the vehicle with
hot wax under any circumstances.
After using an automatic car wash, wipe off
wax and drying agent sfromt he windshield
and the wiper blades. This will prevent smears 224
CareMaintenance and care
Page 227 of 290
and reduc
ewipin gnoises caused by residue
on th ewindshield.
Washin gbyhand In som
ecountries ,washin gbyh andiso nly
allowed at specially equippe dwashin gbays.
Observ ethe legal requirements in each coun-
try.
X Do no tuse hot wate rand do no twash the
vehicle in direct sunlight.
X Use asofts ponge to clean.
X Use amild cleanin gagent, suc hasacar
shampoo approved by Mercedes-Benz.
X Thoroughl yhosed own th evehicle wit ha
gentle je tofwater.
X Do no tpoin tthe wate rjet directly towards
th ea ir inlet.
X Use plenty of wate rand rinse out the
sponge frequently.
X Rins ethe vehicle wit hclean wate rand dry
thoroughly wit hachamois.
X Do no tlet th ecleanin gagen tdry on the
paintwork.
Carefully remove all deposits of road salt as
soon as possible when driving in winter.
Power washers G
WARNING
The wate rjet from acircular je tnozzle (dirt
blasters )can caus einvisible exterior damage
to th etires or chassis components. Compo-
nent sdamaged in this way may fail unexpect-
edly. Ther eisariskofana ccident.
Do no tuse power washers wit hcircular jet
nozzles to clean th evehicle .Haved amaged
tires or chassis component sreplace dimme-
diately.
! Always maintain
adistanc eofatl east
11.8 in (30 cm)between thev ehicle and the
power washe rnozzle .Inf ormation about
th ec orrec tdistanc eisavailabl efromt he
equipmen tmanufacturer. Mov
ethe power washe rnozzle around
when cleanin gyour vehicle.
Do no taim directly at any of th efollowing:
R tires
R door gaps, roo fgaps, joints, etc.
R electrical components
R battery
R connectors
R lights
R seals
R trim
R ventilatio nslots
Damaged seals or electrical components
can lead to leak sorfailures.
Cleaning th ewheels !
Do no
tuse acidic wheel cleanin gproducts
to remove brak edust .This could damage
wheel bolt sand brak ecom ponents.
! Do no
tpark th evehicle for an extended
period straigh tafter cleanin git, particularly
after havin gcleane dthe wheels wit hwheel
cleaner. Whee lcleaners could cause
increased corrosio nofthebrak ediscsa nd
brak epads/linings. For this reason ,you
should driv efor afew minute safter clean-
ing .Brakin gh eat sthe brak ediscsa nd the
brak epads/linings, thus dryin gthem. The
vehicle can then be parked.
Cleaning th epaintwork Scratches, corrosiv
edeposits ,areas affected
by corrosio nand damag ecaused by inade-
quat ecarec anno talways be completely
repaired. In suc hcases, visit aqualified spe-
cialist workshop, e.g .anauthorized
Mercedes-Ben zCenter.
X Remove impurities immediately, where
possible, whils tavoiding rubbing to ohard.
X Soak insect remains wit hinsect remover
and rinse off th etreated areas afterwards.
X Soak bird droppings wit hwaterand rinse
off th etreated areas afterwards. Care
225Maintenance and care Z
Page 235 of 290
Useful information
............................234
Wher ewillIfind...? ........................... 234
Flat tire .............................................. 235
Batter y(vehicle) ................................ 238
Jump-starting .................................... 242
Towing and tow-starting ..................244
Fuses .................................................. 246 233Breakdown assistance