2015 MERCEDES-BENZ SLS AMG GT COUPE steering wheel adjustment
[x] Cancel search: steering wheel adjustmentPage 54 of 290
Children that are to
olarge for achild restraint
must travel in seat susingn orma lseat belts.
Positio nthe shoulder belt across th echest
and shoulder ,not thef aceorn eck.Abooster
seat may be necessary to achieve proper seat
belt positionin gfor children ove r41lbs
(18 kg )until they reac haheight wher ealap/
shoulder belt fit sproperly without abooster
seat.
When th echild restraint is no tinuse, remove
it from th evehicle or secure it wit hthe seat
belt to preven tthe child restraint from becom-
ing aprojectile in th eevent of an accident. G
WARNING
When leaving th evehicle ,always remove the
SmartKey from th eignition lock. Always take
th eS martKey wit hyou and loc kthe vehicle.
Do no tleave children unattende dinthevehi-
cle ,eve nift heya re secured in achild restraint
system, or wit haccess to an unlocked vehicle.
Ac hild's unsupervised access to avehicle
could result in an acciden tand/or serious
personal injury. The children could:
R injure themselve sonpartsoft hevehicle
R be seriously or fatally injured through
excessiv eexposur etoe xtrem eheat or cold
R injure themselve sorcauseana cciden twith
vehicle equipmen ttha tc an be operated
eve nift heSmartKey is remove dfromt he
ignition loc korremove dfromt hevehicle,
suc hass eat adjustment, steering wheel
adjustment, or th ememory function
If children open adoor ,the yc ould injure other
person sorget out of th evehicle and injure
themselve sorbeinjured by followin gtraffic.
Do no texpose th echild restraint system to
direct sunlight .The child restraint system's
metal parts, for example ,cou ld become very
hot ,and th echild could be burned on these
parts. G
WARNING
Do no tcarry heav yorhard object sinthe
passenger compartmen tunless they are
firmly secured in place. Unsecured or improperly positione
dcargo
increases achild's ris kofinjury in th eevent
of:
R stron gbraking maneuvers
R sudde nchanges of direction
R an accident
If an infant or child is traveling in th evehicle:
X Secure th echild wit hachild or infant seat
restraint system appropriat etotheage and
weigh tofthechild.
X Mak esure that th einfant or child is prop-
erly secured at all times while th evehicle is
in motion.
Mercedes-Ben zrecommends that you always
properl ysecure all infant sand childre nwitha
child or infant seat restraint system for the
trip.
The use of seat belt sand infant and child
restraint systems is required by law in:
R all 50 states
R theU .S.t erri tories
R theD istrict of Columbia
R all Canadian provinces
Infants and childre nmust always be seated in
an appropriat einfant or child restraint system
recommended for th esizea nd weigh tofthe
child. The infant or child restraint system
must be properl ysecured wit hathree-point
seat belt in accordanc ewitht he manufactur-
er' sinstructions.
All infant or child restraint systems must meet
th ef ollowin gstandards:
R U.S. Federal Motor Vehicle Safet yStand-
ards 21 3and 225
R Canadian Motor Vehicle Safet yStandards
21 3a nd 210.2
Confirmation that th echild restraint system
correspond stothestandards can be found
on an instruction label on th echild restraint
system. This confirmatio ncan also be found
in th einstallatio ninstruction sthata re
included wit hthe child restraint system. 52
Child restraint systemsSafety
Page 86 of 290
Useful information
i This Operator's Manual describes all
models and all standard and optional equip- ment of your vehicle available at the time of
publication of the Operator's Manual.
Country-specific differences are possible.
Please not ethat your vehicle may not be
equipped with all feature sdescribed. This
also applies to safety-related system sand
functions.
i Please read the information on qualified
specialist workshops (Y page 23).Correct driver's seat position
Observ
ethe safet yguidelines on seat adjust-
ment (Y page 85).
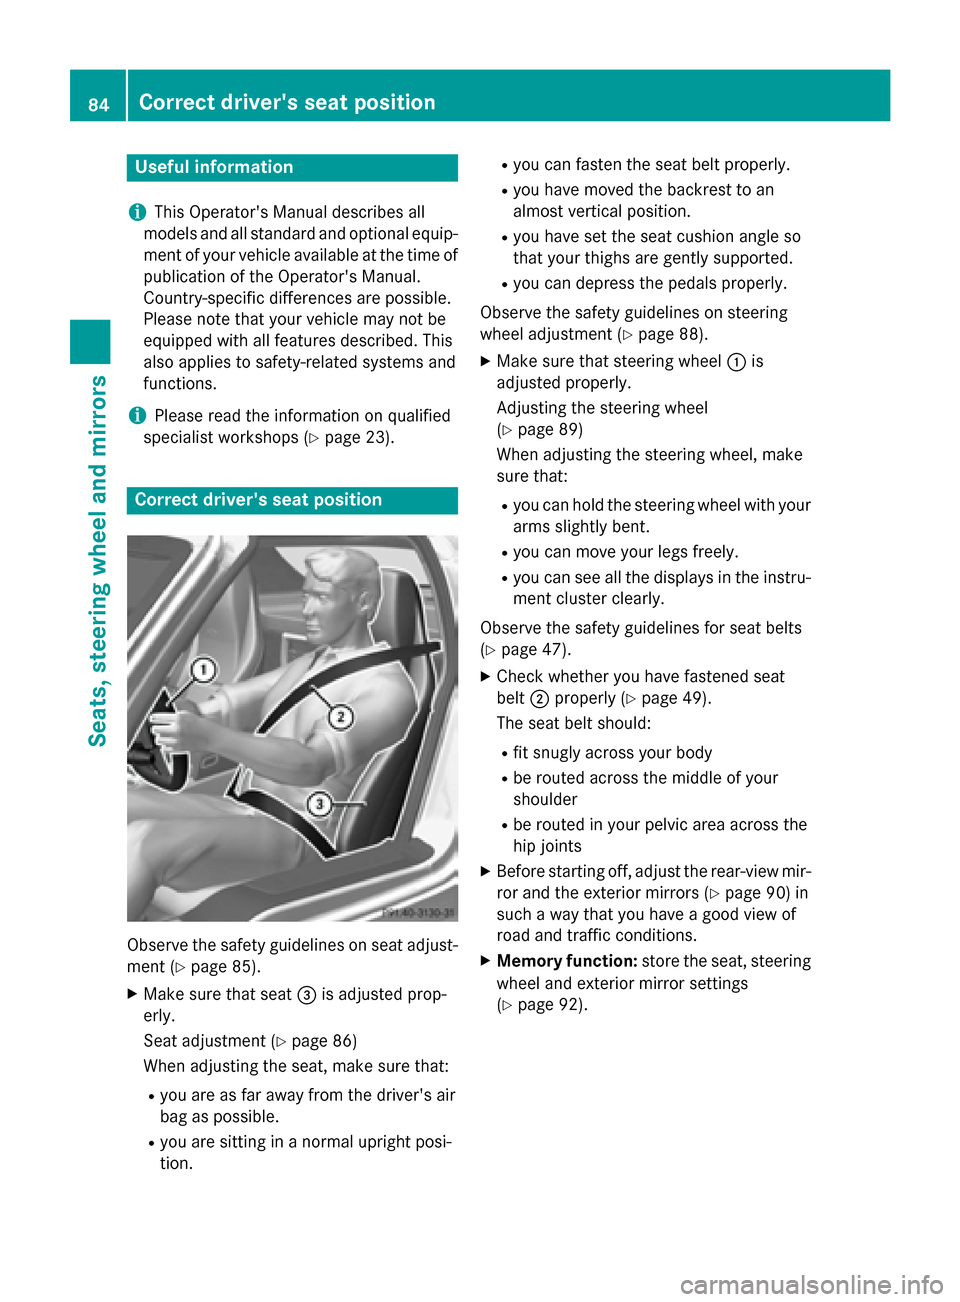
X Make sure that seat 0087is adjusted prop-
erly.
Seat adjustment (Y page 86)
When adjusting the seat, make sure that:
R you are as far away from the driver' sair
bag as possible.
R you are sitting in anormal upright posi-
tion. R
you can faste nthe seat belt properly.
R you have moved the backrest to an
almost vertical position.
R you have set the seat cushion angle so
that your thighs are gently supported.
R you can depress the pedals properly.
Observ ethe safet yguidelines on steering
wheel adjustment (Y page 88).
X Make sure that steering wheel 0043is
adjusted properly.
Adjustin gthe steering wheel
(Y page 89)
When adjusting the steering wheel, make
sure that:
R you can hold the steering wheel with your
arms slightly bent.
R you can move your legs freely.
R you can see all the displays in the instru-
ment cluster clearly.
Observ ethe safet yguidelines for seat belts
(Y page 47).
X Check whether you have fastened seat
belt 0044properly (Y page 49).
The seat belt should:
R fit snugly across your body
R be routed across the middle of your
shoulder
R be routed in your pelvic area across the
hip joints
X Before starting off, adjust the rear-view mir-
ror and the exterior mirrors (Y page 90) in
such away that you have agood view of
road and traffic conditions.
X Memor yfunction: storethe seat, steering
wheel and exterior mirro rsettings
(Y page 92). 84
Correct driver's seat positionSeats, steering wheel and mirrors
Page 87 of 290
Seats
Important safety notes
G
WARNING
Children could become trapped if they adjust the seats, particularly when unattended.
There is arisk of injury.
When leaving the vehicle, always take the
SmartKey with you and lock the vehicle. Never leave children unsupervised in the vehicle. G
WARNING
You could lose control of your vehicle if you do the following while driving:
R adjust the driver's seat, head restraint,
steering wheel or mirrors
R fasten the seat belt
There is arisk of an accident.
Adjust the driver's seat, head restraint ,steer-
ing wheel and mirror and fasten your seat belt before startingt he engine. G
WARNING
If you adjust the seat height carelessly, you or other vehicle occupants could be trapped andthereby injured. Children in particular could
accidentally press the electrical seat adjust-
ment buttons and become trapped. There is a
risk of injury.
While moving the seats, make sure that your
hands or other body parts do not get under the
lever assembly of the seat adjustment sys-
tem. G
WARNING
When you adjust aseat, you or other vehicle
occupants could become trapped, e.g. on the seat guide rail. There is arisk of injury.
Make sure when adjusting aseat that no one
has any body parts in the sweep of the seat. G
WARNING
The seat belt does not offer the intended level of protection if you have not moved the back-
rest to an almost vertical position. When brak- ing or in the event of an accident, you could
slide underneath the seat belt and sustain
abdomen or neck injuries, for example. This
poses an increased risk of injury or even fatal
injury.
Adjust the seat properly before beginning
your journey. Always ensure that the backrest is in an almost vertical position and that the
shoulder section of your seat belt is routed
across the center of your shoulder. G
WARNING
If head restraint sare not installed and
adjusted correctly, they cannot provide pro-
tection as intended. There is an increased risk
of injury in the head and neck area, e.g. in the event of an accident or when braking.
Always drive with the head restraint sinstal-
led. Before driving off, make sure for every
vehicle occupant that the center of the head
restraint supports the back of the head at
about eye level. G
WARNING
The seat belt does not offer the intended level of protection if you have not moved the back-
rest to an almost vertical position. When brak-
ing or in the event of an accident, you could
slide underneath the seat belt and sustain
abdomen or neck injuries, for example. This
poses an increased risk of injury or even fatal injury.
Adjust the seat properly before beginning
your journey. Always ensure that the backrest
is in an almost vertical position and that the
shoulder section of your seat belt is routed
across the center of your shoulder.
! To avoid damage to the seats and the seat
heating, observe the following information:
R do not spill any liquids on the seats. If
liquidiss pilled on the seats, dry them as
soon as possible.
R if the seat covers are damp or wet, do not
switch on the seat heating. The seat Seats
85Seats, steering wheela nd mirrors Z
Page 88 of 290
heating should also not to be used to dry
the seats.
R clean the seat covers as recommended;
see the "Interior care" section.
R do not transport heavy loads on the
seats. Do not place sharp objectsont he
seat cushions, e.g. knives, nails or tools. The seats should only be occupied by
passengers, if possible.
R when the seat heating is in operation, do
not cover the seats with insulating mate-
rials, e.g. blankets, coats, bags, seat cov- ers, child seats or booster seats.
! Make sure that there are no objectsint
he
footwell under or behind the seats when
moving the seats back. There is arisk that
the seats and/or the objectsc ould be dam-
aged. Adjusting the seats manually
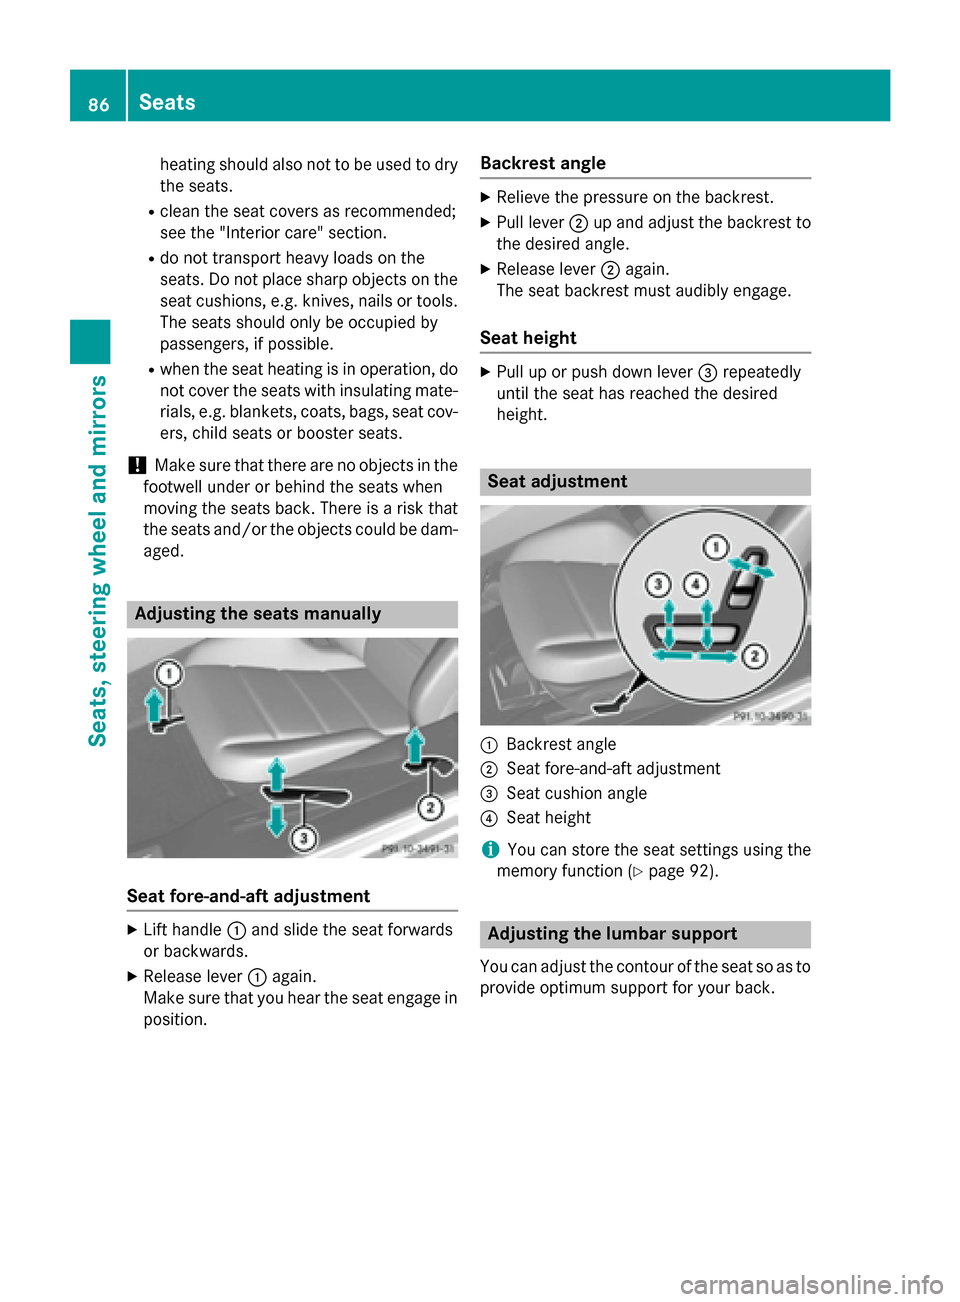
Seat fore-and-aft adjustment
X
Lift handle 0043and slide the seat forwards
or backwards.
X Release lever 0043again.
Make sure that you hear the seat engage in
position. Backrest angle X
Relieve the pressure on the backrest.
X Pull lever 0044up and adjust the backrest to
the desired angle.
X Release lever 0044again.
The seat backrest must audibly engage.
Seat height X
Pull up or push down lever 0087repeatedly
until the seat has reached the desired
height. Seat adjustment
0043
Backrest angle
0044 Seat fore-and-aft adjustment
0087 Seat cushion angle
0085 Seat height
i You can store the seat settings using the
memory function (Y page 92). Adjusting the lumbar support
You can adjust the contour of the seat so as to
provide optimum support for your back. 86
SeatsSeats, steering wheela
nd mirrors
Page 89 of 290
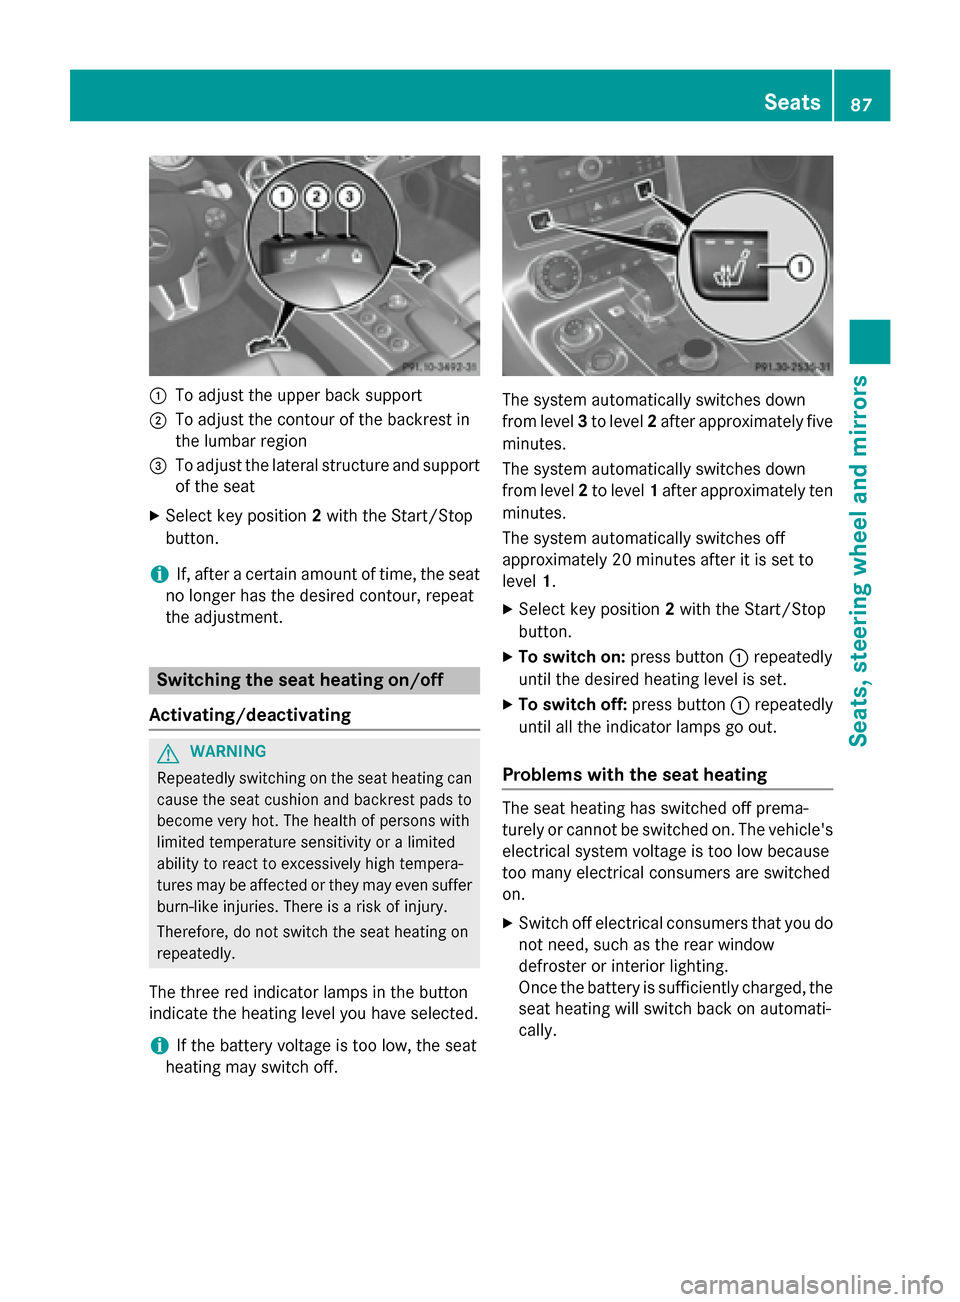
0043
To adjust the upper back support
0044 To adjust the contour of the backrest in
the lumbar region
0087 To adjust the lateral structure and support
of the seat
X Select key position 2with the Start/Stop
button.
i If, after
acertain amount of time, the seat
no longer has the desired contour, repeat
the adjustment. Switching the seat heating on/off
Activating/deactivating G
WARNING
Repeatedly switchin gonthe seat heating can
cause the seat cushion and backrest pads to
become very hot. The health of persons with
limited temperature sensitivity or alimited
ability to react to excessively high tempera-
tures may be affected or they may even suffer burn-lik einjuries. There is arisk of injury.
Therefore, do not switch the seat heating on
repeatedly.
The three red indicator lamps in the button
indicate the heating level you have selected.
i If the battery voltage is too low, the seat
heating may switch off. The system automatically switches down
from level
3to level 2after approximately five
minutes.
The system automatically switches down
from level 2to level 1after approximately ten
minutes.
The system automatically switches off
approximately 20 minutes after it is set to
level 1.
X Select key position 2with the Start/Stop
button.
X To switch on: press button0043repeatedly
until the desired heating level is set.
X To switch off: press button0043repeatedly
until all the indicator lamps go out.
Problems with the seat heating The seat heating has switched off prema-
turely or cannot be switched on. The vehicle's
electrical system voltage is too low because
too many electrical consumers are switched
on.
X Switc hoff electrical consumers that you do
not need, such as the rear window
defroster or interior lighting.
Oncet he battery is sufficiently charged, the
seat heating will switch back on automati-
cally. Seats
87Seats, steering wheel and mirrors Z
Page 91 of 290
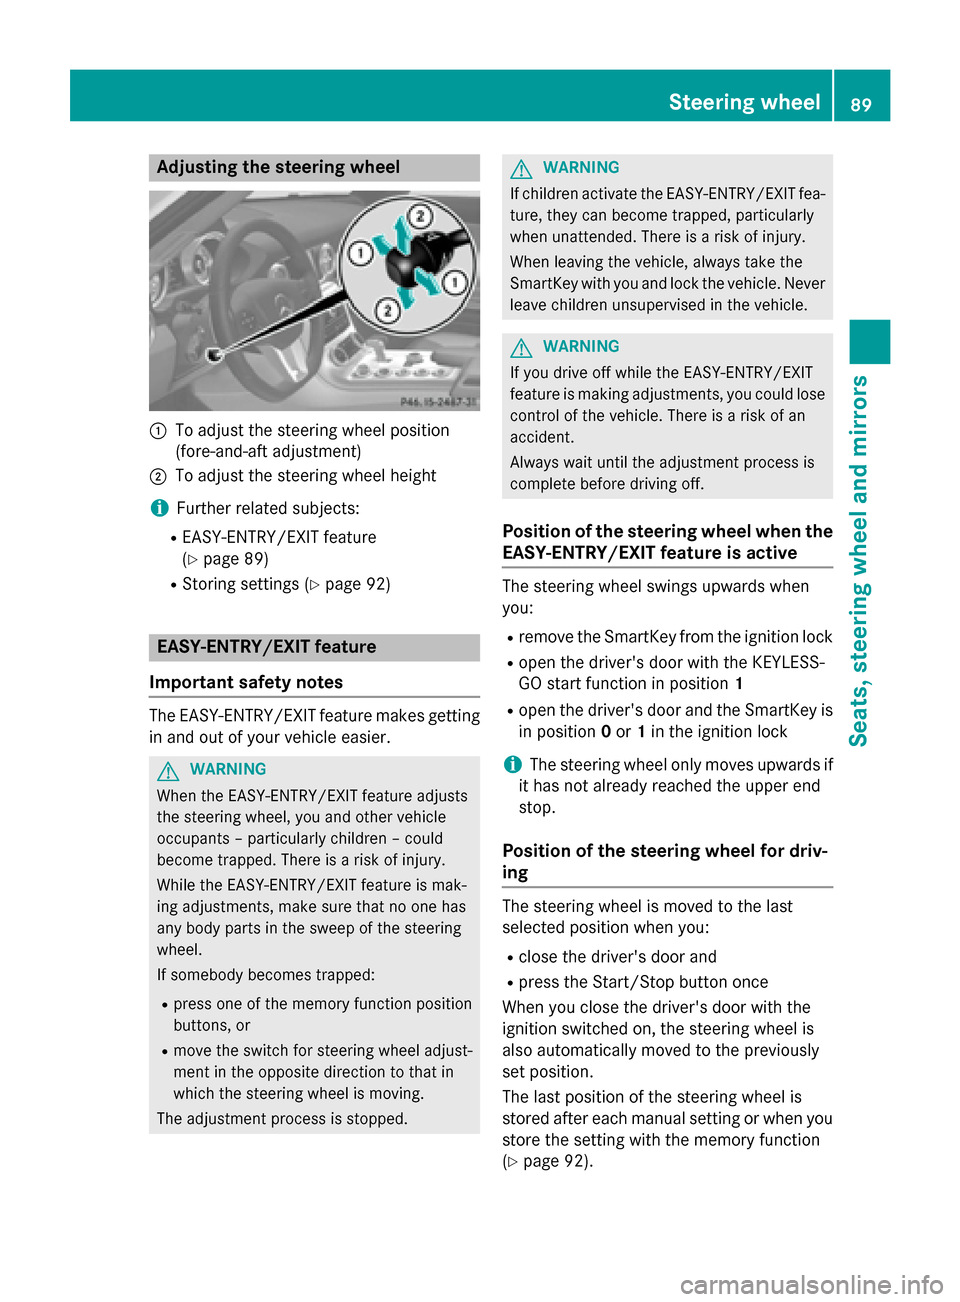
Adjusting th
esteering wheel 0043
To adjust th esteering whee lposition
(fore-and-af tadjustment)
0044 To adjust th esteering whee lheight
i Further relate dsubjects:
R EASY-ENTRY/EXIT feature
(Y page 89)
R Storing setting s(Ypage 92) EASY-ENTRY/EXIT feature
Important safety notes The EASY-ENTRY/EXIT feature makes getting
in and out of your vehicl eeasier. G
WARNING
When th eEASY-ENTRY/EXIT feature adjusts
th es teering wheel, you and other vehicle
occupant s–particularly children –could
become trapped .There is ariskofi njury.
Whil ethe EASY-ENTRY/EXIT feature is mak-
ing adjustments ,makes uret hatnoo nehas
any body part sintheswee poft hesteering
wheel.
If somebod ybecome strapped:
R press on eofthememory function position
buttons ,or
R mov ethe switch for steering whee ladjust-
men tint heopposit edirection to that in
whic hthe steering whee lismoving.
The adjustmen tprocess is stopped. G
WARNING
If children activat ethe EASY-ENTRY/EXIT fea-
ture, they can become trapped ,particularly
when unattended. There is ariskofi njury.
When leaving th evehicle, always tak ethe
SmartKey wit hyou and loc kthe vehicle. Never
leav echildren unsupervised in th evehicle. G
WARNING
If you drive off while th eEASY-ENTRY/EXIT
feature is making adjustments ,you could lose
control of th evehicle. There is ariskofan
accident.
Always wait until th eadjustmen tprocess is
complete before drivin goff.
Position of th esteering wheel when the
EASY-ENTRY/EXIT feature is active The steering whee
lswings upward swhen
you:
R remove th eSma rtKey from th eignition lock
R open th edriver' sdoor wit hthe KEYLESS-
GO start function in position 1
R open th edriver' sdoor and th eSmartKey is
in position 0or 1in th eignition lock
i The steering whee
lonlym oves upward sif
it has no talready reached th eupper end
stop.
Position of th esteering wheel for driv-
ing The steering whee
lismoved to th elast
selected position when you:
R close th edriver' sdoor and
R press th eStart/Sto pbutto nonce
When you close th edriver' sdoor wit hthe
ignition switched on ,the steering whee lis
also automatically moved to th epreviously
set position.
The last position of th esteering whee lis
store dafter eac hmanual setting or when you
store th esetting wit hthe memory function
(Y page 92). Steering wheel
89Seats,steering wheel and mirrors Z
Page 94 of 290
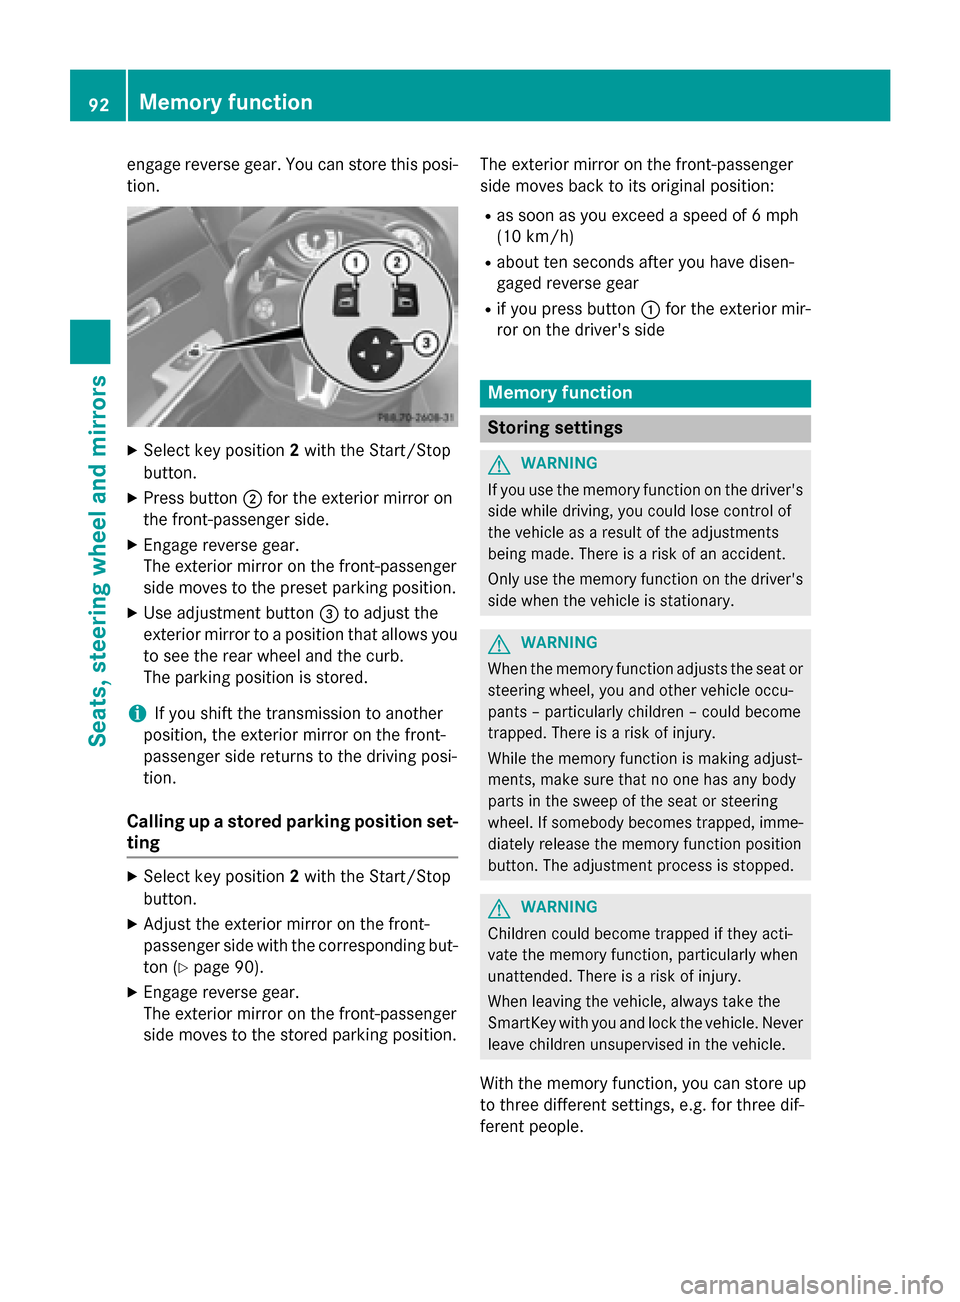
engage revers
egear. You can stor ethis posi-
tion. X
Select key position 2with the Start/Stop
button.
X Press button 0044for the exterior mirror on
the front-passenger side.
X Engage revers egear.
The exterior mirror on the front-passenger
side moves to the preset parkin gposition.
X Use adjustment button 0087to adjust the
exterior mirror to aposition that allows you
to see the rear wheel and the curb.
The parkin gposition is stored.
i If you shift the transmission to another
position ,the exterior mirror on the front-
passenger side return stothe driving posi-
tion.
Calling up astored parking position set-
ting X
Select key position 2with the Start/Stop
button.
X Adjust the exterior mirror on the front-
passenger side with the correspondin gbut-
ton (Y page 90).
X Engage revers egear.
The exterior mirror on the front-passenger
side moves to the stored parkin gposition. The exterior mirror on the front-passenger
side moves back to its original position:
R as soon as you exceed aspeed of 6mph
(10 km/h)
R about ten seconds after you have disen-
gaged revers egear
R if you press button 0043for the exterior mir-
ror on the driver's side Memor
yfunction Storing settings
G
WARNING
If you use the memory function on the driver's side while driving, you could lose control of
the vehicle as aresult of the adjustments
being made. There is arisk of an accident.
Only use the memory function on the driver's
side when the vehicle is stationary. G
WARNING
When the memory function adjusts the seat or steering wheel, you and other vehicle occu-
pants –particularly children –could become
trapped. There is arisk of injury.
While the memory function is makin gadjust-
ments, make sure that no one has any body
parts in the sweep of the seat or steering
wheel. If somebody becomes trapped, imme-
diately release the memory function position
button .The adjustment process is stopped. G
WARNING
Children could become trapped if they acti-
vate the memory function ,particularly when
unattended. There is arisk of injury.
When leaving the vehicle, alway stake the
SmartKey with you and lock the vehicle. Never leave children unsupervised in the vehicle.
With the memory function ,you can stor eup
to three differen tsettings, e.g. for three dif-
feren tpeople. 92
Memor
yfunctionSeats, steering wheel and mirrors
Page 161 of 290
the exterior lighting goes ou
tafter
60 second s.
If you activate the Locator
Locator Lighting:
Lighting: func-
tion, the following lightu p:
R the parking lamps
R the low-beam headlamps
R the license plate lamp
R the surround lighting in the exterior mirrors
X Press the 0059or0065 button on the steer-
ing wheeltos elect theSettings
Settings menu.
X Press the 0064or0063 button to select the
LIGHTS
LIGHTS submenu.
X Press 0076to confirm.
X Press the 0064or0063 button to select the
Locator Lighting:
Locator Lighting: function.
You wills ee the selected setting: Enabled
Enabled
or Disabled
Disabled.
X Press the 0076button to save the setting.
Deactivating the delayed switch-off tempora-
rily:
X Select key position 0with the Start/Stop
button before leaving the vehicle.
X Select key position 2and then key position
0 again with the Start/Stop button
The delayed shut-off is deactivated.
The delayed shut-off is reactivated the next
time you start the engine.
Activating/deactivating the interio rlight-
ing delayed switch-off
If you select key position 0with the Start/
Stop button when the Light. delay
Light. delay func-
tion is activated, the interior lighting lights up
for approximately 20 seconds if it is dark.
X Press the 0059or0065 button on the steer-
ing wheeltos elect theSettings Settings menu.
X Press the 0064or0063 button to select the
Light
Light submenu.
X Press 0076to confirm.
X Press the 0064or0063 button to select the
Light. delay
Light. delay function.
You wills ee the selected setting: on
onoroff
off.
X Press the 0076button to save the setting. Vehicle Activating/deactivating the automatic
door locking mechanism
If you select the
Automatic Door Lock: Automatic Door Lock:
function, the vehicle is centrally locked above
as peed of around 9mph(15 km/h).
i For further information on the automatic
locking feature, see (Y page 70).
X Press the 0059or0065 button on the steer-
ing wheeltos elect theSettings
Settings menu.
X Press the 0064or0063 button to select the
Vehicle
Vehicle submenu.
X Press the 0076button to confirm.
X Press the 0064or0063 button to select the
Automatic door locks
Automatic door locks function.
You wills ee the selected setting: Enabled
Enabled
or Disabled Disabled.
X Press the 0076button to save the setting.
Convenience Activating/deactivating the EASY-
ENTRY/EXIT feature
G
WARNING
When the EASY-ENTRY/EXIT feature adjusts
the steering wheel, you and other vehicle
occupants –particularly childre n–could
become trapped .There is arisk of injury.
Whilet he EASY-ENTRY/EXIT feature is mak-
ing adjustments, make sure that no one has
any body parts in the sweep of the steering
wheel.
If somebod ybecomes trapped:
R press one of the memory function position
buttons, or
R move the switch for steering wheela djust-
ment in the opposite direction to that in
which the steering wheelism oving.
The adjustment process is stopped.
You can use the Easy
Easy Entry/Exit: Entry/Exit: function
to activate or deactivate the EASY-ENTRY/
EXIT feature (Y page 89). Menus and submenus
159On-board computer and displays Z